Category Archives: Coder

C Language: How to Search in Header File (Two Methods)

angle bracket pattern

Header files enclosed by angle brackets, for example #include <file>, are searched from standard system directories by default, and the exact search path depends on the target system, how GCC is configured, and where GCC is installed. cpp -vThe default search path can be viewed through the directive.

quote pattern

Header files enclosed in quotes, for example #include "file", are searched first from the current file’s directory, and then from the standard system directories.

Specify the search directory

With -Idircommand line options, you can specify a custom search directory.

For quote mode, after the current directory is searched, the directory specified by dir will be searched, and finally the standard system directory will be searched.

For angle bracket mode, the directory specified by dir is searched first, followed by the standard system directories.

More granular control over search directories

If you want to specify only the search path for quote patterns, you can use -iquotethis option. This option only applies to quote patterns. -I,-isystem,-idirafterApplies to both.

WPF: How to Customize High-perfor Forms with WindowChrome

background:

But when we customize the form, the default form cannot meet our functional requirements, then we need to customize the form.

Core code:

<WindowChrome.WindowChrome> 
        < WindowChrome 
            CaptionHeight = " 30 " 
            CornerRadius = " 10 " 
            GlassFrameThickness = " 1 " 
            NonClientFrameEdges = " None " 
            UseAeroCaptionButtons = " False " /> 
    </WindowChrome.WindowChrome>

Paste it directly under the WIndow root node

uni-app: How to Get the Androoid Device Mac Address

/**
* Get Androoid device mac address
* */
function getMacAddress(){
  var net = plus.android.importClass("java.net.NetworkInterface")
  console.log('mac', net)
  var wl0 = net.getByName('wlan0')
  var macByte = wl0.getHardwareAddress()
  var str = ''
  for (var i = 0; i < macByte.length; i++) {
    var tmp = "";
    var num = macByte[i];
    if (num < 0) {
      tmp =(255+num+1).toString(16);
    } else {
      tmp = num.toString(16);
    }
    if (tmp.length == 1) {
      tmp = "0" + tmp;
    }
    if(i == macByte.length-1){
      str += tmp;
    }else{
      str = str + tmp + "-";
    }
  }
  console.log('mac', str.toUpperCase())
  return str.toUpperCase()
}

Python: How to Batch Read the Form Information in Word and output them to Excel file

1. Read all the files in the folder and filter out the .doc files (because the python dependency package docx can only open .docx files, you need to filter out the .doc files first and convert them to .docx)

import os

def list_files_doc(path):
    files_doc = []
     for i, j, k in os.walk(path):
         for file in k:
            suffix = file.split( ' . ' )
             if suffix[1] == ' doc ' :
                 print (file)
                files_doc.append(os.path.join(path, file))

    print ( ' List of files in doc format: {} ' .format(files_doc))
     return files_doc


if  __name__ == ' __main__ ' :
    list_files_doc( ' E:\\python_myfile\\read_excel ' )


2. Convert .doc files to .docx files

from win32com import client as wc   #Import module

def doc2docx(doc_files):
    word = wc.Dispatch( " Word.Application " )   #Open the word application for doc_file in doc_files:
    
        doc = word.Documents.Open(doc_file) #Open   word file 
        doc.SaveAs( " {}x " .format(doc_file), 12) #Save   as a file with the suffix ".docx", where parameter 12 refers to the docx file 
        doc .Close()   #Close the original word file 
    word.Quit()
     print ( "The doc file is converted to docx completed " )

if  __name__ == ' __main__ ' :
    doc2docx([ ' E:\\python_myfile\\read_excel\\user1 information.doc ' ,])


3. Read table information from .docx file

copy code
from docx import Document
 import os

def get_data_from_docx_files(path):
     print (path)
    data = []
     for i, j, k in os.walk(path):
         for file in k:
            suffix = file.split( ' . ' )
             if suffix[1] == ' docx ' :
                document = Document(file)   #Read in the file 
                tables = document.tables #Get   the table set in the file 

                table = tables[0]
                name = table.cell(0, 1 ).text
                sex = table.cell(0, 3 ).text
                info = { " name " : name, " sex " : sex}
                 print (info)
                data.append(info)
    return data

if  __name__ == ' __main__ ' :
    get_data_from_docx_files( ' E:\\python_myfile\\read_excel ' )


4. Export the information to an excel sheet

import xlwt

def output_excel(header, data, result_excel):
     #Read the text file 
    book = xlwt.Workbook(encoding= ' utf-8 ' , style_compression=0) #Create   a Workbook object, which is equivalent to creating an Excel file 
    sheet = book.add_sheet( ' test ' , cell_overwrite_ok=True)   # # where test is the name of the sheet, cell_overwrite_ok, indicating whether the cell can be overwritten, it is actually a parameter of Worksheet instantiation, the default value is False

    #Write header 
    i = 0
     for k in header:
        sheet.write(0, i, k)
        i = i + 1

    # write content
    row = 1
    for val in data:
         print (val)
        sheet.write(row, 0, val[ ' name ' ])   #the second row and the first column 
        sheet.write(row, 1, val[ ' sex ' ])   #the second row and the second column 
        row = row + 1

    book.save(result_excel)

if  __name__ == ' __main__ ' :
    output_excel([ ' name ' , ' gender ' ], [{ ' name ' : ' Danny ' , ' sex ' : ' female ' }, { ' name ' : ' Merry ' , ' sex ' : ' male ' }], ' results.xls ' )

How to Replace log4j with shell Script in Bulk

Here is a script example to replace log4j in bulk.


How to Replace log4j with shell Script in Bulk

#!/bin/ bash
#

#java 6 log4j file directory
lpath6 =/opt/test/ repl6 #java 7 log4j file directory 
lpath7 =/opt/test/ repl7 
jarname = ' log4j*.jar '
#status value
stat = 0
#The production environment can modify the following line to $(ps -ef |grep java |grep -v grep) |while read pro Extract the current java process.
cat grepfile.txt | while read pro
 do 
propath =$( echo ${pro} | awk -F "  "  ' {print $9} ' | awk -F " = "  ' {print $2} ' | awk -F " tomcat "  ' {print $1} ' )
 if [ -d ${propath} ]; then 
    echo  " ----update path: ${propath} starting------ " 
    echo ${pro} | awk -F " " ' {print $8} ' | grep  1.6 
    if [ $? -eq 0 ]; then 
        echo  " -----jdk 1.6------- " 
        for  file  in $( find ${propath} -name ${ jarname} - print)
         do 
            echo ${ file }
             mv -f ${ file } ${ file }_$( date +%y%m%d%H%M%S) && echo  " ${file} back complete! " 
        done 
        \ cp ${lpath6} /*${propath} && echo "cp ${lpath6}/* /${propath} complete"
        stat=1
    else
        echo "-----Discontent-----"
    fi

    if [ ${stat} -eq 0 ];then
    echo ${pro} |awk -F" " '{print $8}' |grep 1.7
    if [ $? -eq 0 ];then
        echo "-----jdk 1.7-------"
        for file in $(find ${propath} -name ${jarname} -print)
        do
            echo ${file}
            mv -f ${file} ${file}_$(date +%y%m%d%H%M%S) && echo "${file} back complete!"
        done
        \cp ${lpath7}/* ${propath} && echo "cp ${lpath7}/* /${propath} complete"
    else
        echo "-----Discontent-----"
    fi
    else
        stat=0
    fi
else
    echo "----update path: ${propath} no exist------"
fi
done

How to Close the iframe Window opened by layui

(1) Close the specific iframe

//When closing itself in the iframe page, the following js script is executed in the iframe page

var index = parent.layer.getFrameIndex(window.name); //get the index of the current iframe layer first

parent.layer.close(index); //then execute close

(2) The parent page passes a reference to the iframe pop-up layer

var collectionId = parent.$(“#hideCollectionId”).val();//you can define the hidden field in the parent page, the id is hideCollectionId, you need to refer to jquery

(3) close all pop-up layers

If there is no complex logic such as pop-up layer stacking, you can close all pop-up layers as needed

layer.closeAll(); //mad mode, close all layers

layer.closeAll(‘dialog’); //close the message box

layer.closeAll(‘page’); //close all page layers

layer.closeAll(‘iframe’); //close all iframe layers

layer.closeAll(‘loading’); //close the loading layer

layer.closeAll(‘tips’); //close all tips layers

How to Add a Upload Files Function with Cypress

1. Download the plugin for the cypress action file

Download the plugin:
--save-dev: save during development; no -dev means any environment can be used
npm install --save-dev cypress-file-upload


2. Write the html file of the locally uploaded file and start the service

<!DOCTYPE html>
<html lang="en">
<!-- Go to the html path and use the npx http-server command to temporarily start a service and access it through http://127.0.0.1:8080/-- >
<head>
    <meta charset="UTF-8">
    <meta name="Viewport" content="width=device-width, initial-scale=1.0">
    <title>Document</title>
    
</head>

<body>
    <input type="file" name="mfile" id="mfile">
</body>

</html>


3. cypress operation upload file

// import "cypress-file-upload" can put the import operation in the commands.js file in the support folder, and it can be used globally. 
describe("Drop-down selection box", () => {
    it( 'Single selection and multiple selection', () => {
        cy.visit( "http://127.0.0.1:8080/" )
         // The uploaded file will be saved in the fixtures folder by default, select 
        cy.get('#mfile').attachFile('example according to the file name .json' )
    })
})

How to Copy Echarts Map Examples to Local vueCLI Project (Commissioning Operation)

(4) Copy the Echarts map case to the local vueCLI project to debug and run


Note: ① Use $.get to get related local variables, you need to use self instead of this. And you need to download and import JQuery dependencies.


② Baidu map download and ak introduction.


//under main.js file


1. import BaiduMap from ‘vue-baidu-map’

2. Vue.use(BaiduMap, {

ak:’your ak’

});


3. import * as echarts from “echarts” // The introduction method of echarts5.

4. Vue.prototype.$echarts = echorts


************************************************


//Specific case under .vue file


1. import ‘echarts/extension/bmap/bmap’ //Introduce Baidu Map

2. import { loadBMap } from ‘../map.js’ //Import map.js file

3. var $ = require(‘jquery’); //jquery import


************************************************

//Create a new map.js file in the same folder as the main.js file.


export function loadBMap(ak) {

return new Promise(function(resolve, reject) {

if (typeof BMap !== ‘undefined’) {

resolve(BMap)

return true

}

window.onBMapCallback = function() {

resolve(BMap)

}

let script = document.createElement(‘script’)

script.type = ‘text/javascript’

script.src =

‘http://api.map.baidu.com/api?v=2.0&ak=’+ ak +’&__ec_v__=20190126&callback=onBMapCallback’

script.onerror = reject

document.head.appendC

Cmake: How to Connect boost Library

Here is a simple guide on how to connect to boost library in Cmake.


How to Connect boost Library to Cmake

Situation 1: Not installed in the default path use:

set(BOOST_ROOT /usr/include/boost)////Set your own path
set(Boost_NO_SYSTEM_PATHS NO)////////Here is the system path for instructions. Generally, the default installation is in /usr/include/boost
find_package (Boost COMPONENTS regex system REQUIRED)

if(Boost_FOUND)
include_directories(${Boost_INCLUDE_DIRS})
MESSAGE( STATUS "Boost_INCLUDE_DIRS = ${Boost_INCLUDE_DIRS}.")
MESSAGE( STATUS "Boost_LIBRARIES = ${Boost_LIBRARIES}.")
MESSAGE( STATUS "Boost_LIB_VERSION = ${Boost_LIB_VERSION}.")
add_executable(main main.cpp)
target_link_libraries (main ${Boost_LIBRARIES})
endif()


Situation 2: Install it in the default path and use it directly


find_package(Boost COMPONENTS regex system REQUIRED)
if(Boost_FOUND)
include_directories(${Boost_INCLUDE_DIRS})
MESSAGE( STATUS "Boost_INCLUDE_DIRS = ${Boost_INCLUDE_DIRS}.")
MESSAGE( STATUS "Boost_LIBRARIES = ${Boost_LIBRARIES}.")
MESSAGE( STATUS "Boost_LIB_VERSION = ${Boost_LIB_VERSION}.")
add_executable(main main.cpp)
target_link_libraries (main ${Boost_LIBRARIES})
endif()

C#: How to Add Ink Annotation in PDF

Ink Annotation in PDF is a freehand graffiti-like shape; this type of annotation can arbitrarily specify the position and number of vertices of the shape, and through the specified vertices, the program will connect the points to draw a smooth curve. Below, we will introduce how to add this annotation in PDF through C# program code.

1. dll reference

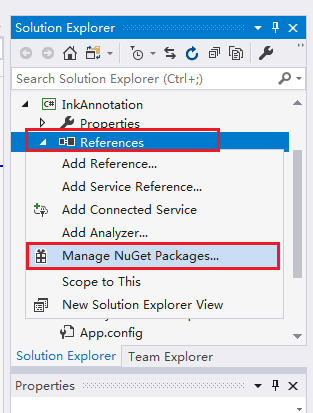
Step 1 : Open “Solution Explorer” in Visual Studio – right mouse click “References” – “Manage NuGet Packages”.

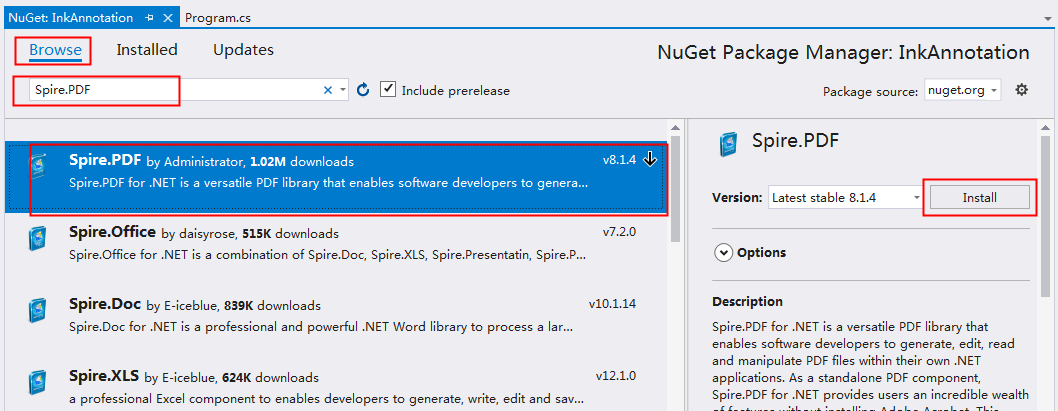
Step 2 : Select “Browse” – enter the search content in the search box, select the search result, and click “Install”.

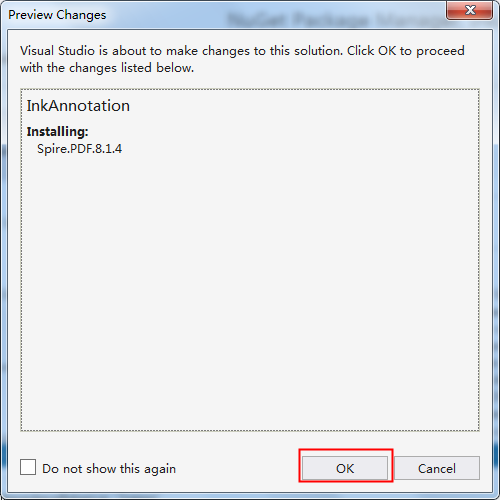
Step 3: Click “OK” – “Accept” in sequence, and then wait for the program to complete the installation.

Or, through official channels, download the package  Spire.PDF for .NET  to the local. After decompression, reference the Spire.Pdf.dll file in the BIN folder to the VS program.


2. Code example

When adding annotations, in addition to customizing the position and number of each point, you can also set ink color, line width, transparency, annotation content, name, etc. Here are the steps of the code implementation:

  • Create an object of the PdfDocument class and load the PDF document through the PdfDocument.LoadFromFile(String fileName) method.
  • Get the specified page of the PDF through the PdfDocument.Pages[int Index] property.
  • Creates a collection of objects of type int, where the elements of the collection are the ink vertices.
  • Create an instance of the PdfInkAnnotation class. And set the ink color, width, annotation content and other formats through the properties provided by this class.
  • Call the PdfAnnotationCollection.Add(PdfAnnotation annotation) method provided by the PdfPageBase.AnnotationsWidget property to add annotations to the PDF.
  • Finally, save the PDF document to the specified path through the PdfDocument.SaveToFile(string filename, FileFormat fileFormat) method.

C#

using Spire.Pdf;
 using Spire.Pdf.Annotations;
 using System.Collections.Generic;
 using System.Drawing;

namespace InkAnnotation
{
    class Program
    {
        static  void Main( string [] args)
        {
            // Load PDF document 
            PdfDocument pdf = new PdfDocument();
            pdf.LoadFromFile( " test.pdf " );

            // Get the first page 
            PdfPageBase pdfPage = pdf.Pages[ 0 ];

            // Set the ink coordinate point position 
            List< int []> inkList = new List< int []> ();           
             int [] intPoints = new  int []
            {
                370 , 700 ,
                 120 , 720 ,
                 110 , 760 ,
                 220 , 800 ,
                 270 , 790 ,
                 350 , 770 ,
                 350 , 670
            };
            inkList.Add(intPoints);
            // Add ink annotation to PDF page 
            PdfInkAnnotation inkannotation = new PdfInkAnnotation(inkList);
            inkannotation.Color = Color.MediumVioletRed;
            inkannotation.Border.Width = 6 ;
            inkannotation.Opacity = 0.5f ;
            inkannotation.Text = " This is an ink annotation. " ;
            inkannotation.Name = " Manager " ;     
            pdfPage.AnnotationsWidget.Add(inkannotation);

            // Save the document 
            Pdf.SaveToFile( " AddInkAnnotation.pdf " ,FileFormat.PDF);
            System.Diagnostics.Process.Start( " AddInkAnnotation.pdf " );
        }
    }
}

vb.net

Imports Spire.Pdf
 Imports Spire.Pdf.Annotations
 Imports System.Collections.Generic
 Imports System.Drawing

Namespace InkAnnotation
     Class Program
         Private  Shared  Sub Main(args As  String ())
             ' Load PDF document 
            Dim pdf As  New PdfDocument()
            pdf.LoadFromFile( " test.pdf " )

            ' Get the first page 
            Dim pdfPage As PdfPageBase = pdf.Pages( 0 )

            ' Set the ink coordinate point position 
            Dim inkList As  New List( Of  Integer ())()
             Dim intPoints As  Integer () = New  Integer () { 370 , 700 , 120 , 720 , 110 , 760 , _
                 220 , 800 , 270 , 790 , 350 , 770 , _
                 350 , 670 }
            inkList.Add(intPoints)
            ' Add ink annotation to PDF page 
            Dim inkannotation As  New PdfInkAnnotation(inkList)
            inkannotation.Color = Color.MediumVioletRed
            inkannotation.Border.Width = 6 
            inkannotation.Opacity = 0.5F _
            inkannotation.Text = " This is an ink annotation. " 
            inkannotation.Name = " Manager "
            pdfPage.AnnotationsWidget.Add(inkannotation)

            ' Save the document 
            pdf.SaveToFile( " AddInkAnnotation.pdf " , FileFormat.PDF)
         End Sub 
    End Class 
End Namespace

Annotation effect: