Authentication failed for error resolution
After using git in pychar, an error is reported after modifying the login password, and the interface of re login git address in pychar cannot be found. There are two methods
Authentication failed for error resolution
After using git in pychar, an error is reported after modifying the login password, and the interface of re login git address in pychar cannot be found.
There are two methods
First, find the control panel – user account – voucher manager, and go to the voucher to modify the password saved by git address voucher
Solve the problem of HTTP 000 connection failed for URL in Anaconda
1. Problem Description: CONDA is unable to create a virtual environment and install other third-party packages. The error is as follows:
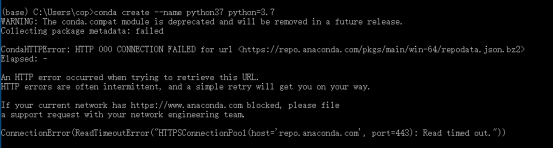
2. Error reason: the access speed of the default image source is too slow, which will lead to timeout, resulting in update and download failure.
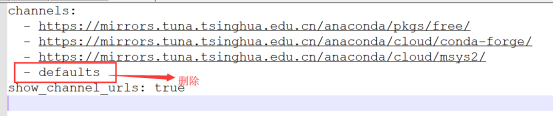
3. Solution: change the image source to Tsinghua image source, and delete the default image source.
3.1. First, execute the following commands to replace the image source
conda config –add channels https://mirrors.tuna.tsinghua.edu.cn/anaconda/cloud/msys2/
conda config –add channels https://mirrors.tuna.tsinghua.edu.cn/anaconda/cloud/conda-forge/
conda config –add channels https://mirrors.tuna.tsinghua.edu.cn/anaconda/pkgs/free/
conda config –set show_ channel_ urls yes
3.2. Change the image source profile
Find the. Condarc file in the user’s root directory (C:// users \ \ user name), open and edit it, and delete the default configuration line.

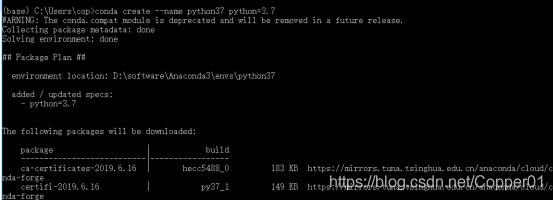
4. Re create the virtual environment, success!
Reference link: https://blog.csdn.net/ada0915/article/details/78529877
Initialization failed for” https://start.spring.io Welcome
1. Open setting
2. Output HTTP search as follows:
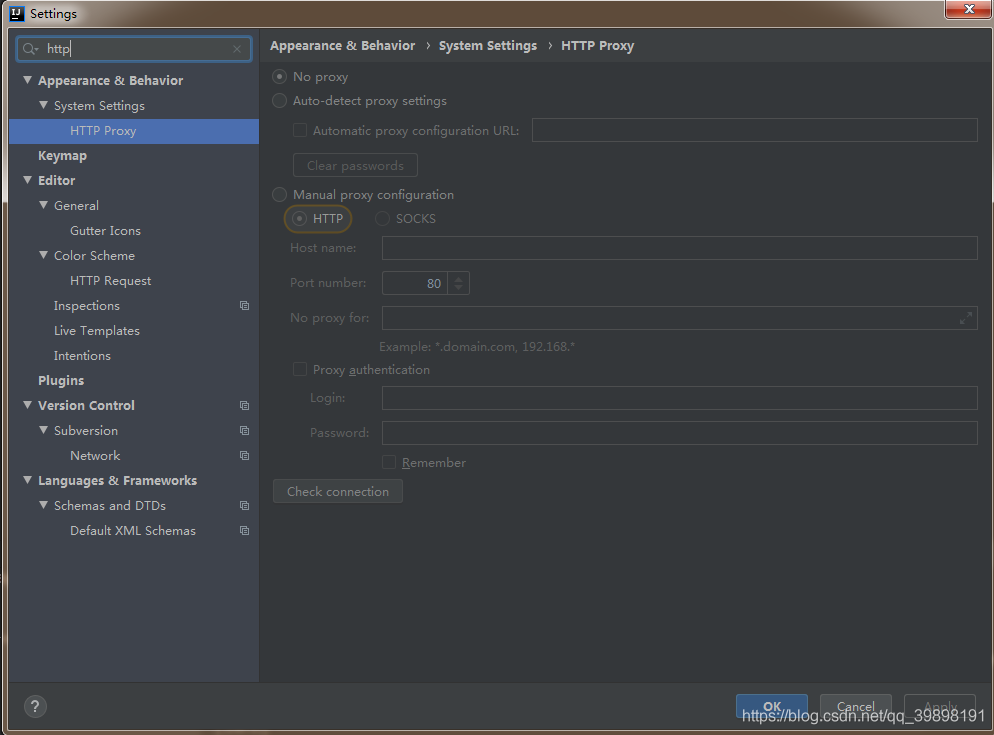
3. Check auto detect
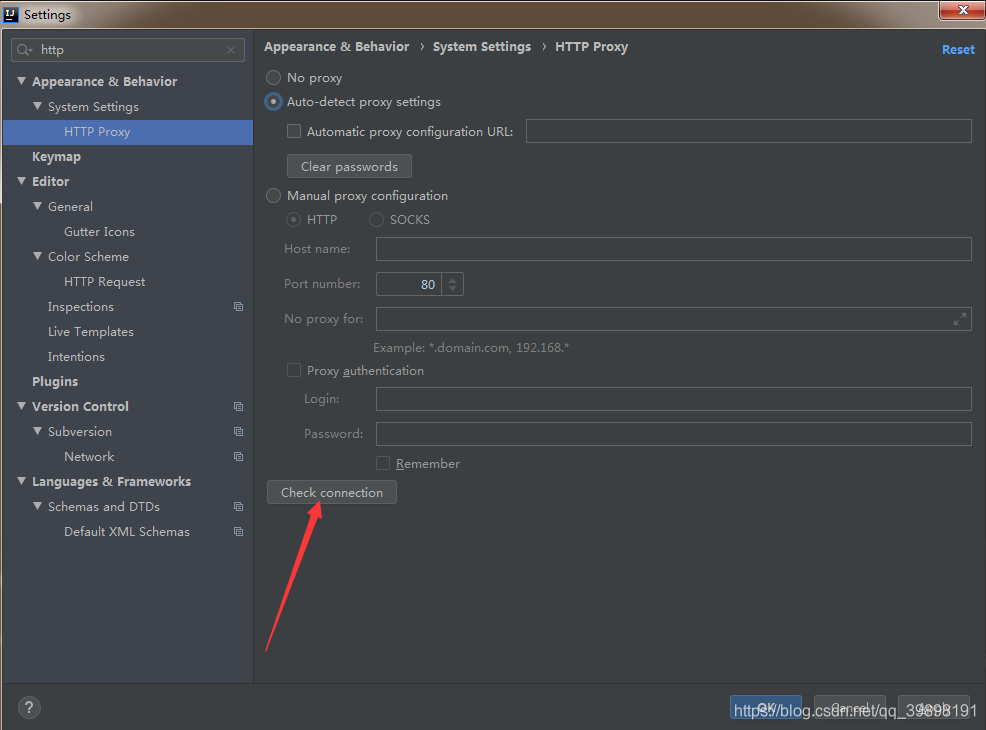
4. Click Check and enter https://start.spring.io , click OK to display successful
Reconstruction project
5. If it still can't work, change the network and connect the mobile hot spots
PytorchStreamReader failed reading zip archive: failed finding central directory
The 1.6 release of PyTorch switched ``torch.save`` to use a new
zipfile-based file format. ``torch.load`` still retains the ability to
load files in the old format. If for any reason you want ``torch.save``
to use the old format, pass the kwarg ``_use_new_zipfile_serialization=False``.
2018-05-11 Centos7 Failed to start xxx.service : unit not found. Systemctl cannot be used after the service is installed
First of all, let’s see if there is this service in the service list
systemctl list-unit-files --type=service
If any:
systemctl daemon-reload
That’s it
If not, please confirm whether the system is centos7, install systemctl and try again
Solve chrome no access to the browser problem, error code: err_ FAILED
The page may be temporarily disconnected, or it may have moved permanently to the new URL
Error code: err_ FAILED
Press Win + R to open the running dialog box, enter “CMD”, enter to open the command line program, and confirm that the command line program is running in administrator mode (the title has the word “Administrator”). Enter Netsh Winsock reset in the command line program, and then restart the computer.
Shortcut to exit scale mode in VirtualBox [closed]
Question:
What is the shortcut to exit zoom mode in Oracle VirtualBox, Windows 7 host
Solution:
reference 1:https://stackoom.com/question/ixxD/ Shortcut to exit zoom mode in VirtualBox – close
Reference 2:
https://oldbug.net/q/ixxD/Shortcut-to-exit-scale-mode-in-VirtualBox-closed
VirtualBox: boots only into UEFI Interactive Shell
1.Problem
Problem with VirtualBox 5.x running on GNU/Linux Debian 9.x host:
EFI-enabled guest suddenly boots only into UEFI Interactive Shell.
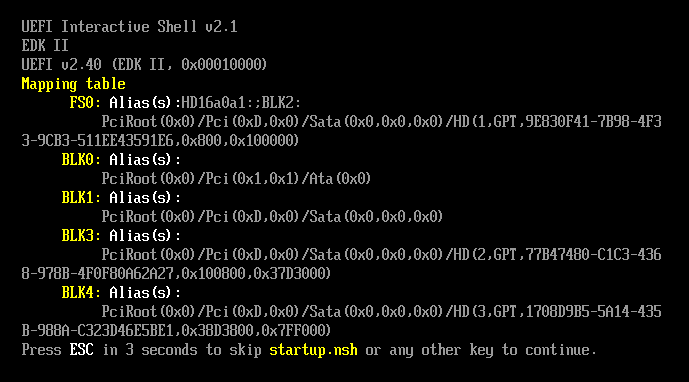
It waits for 5 seconds and then it drops to Shell&>.
I don’t remember any modifications, which I would have done, neither to the host, nor guest, or VirtualBox itself.
2.Plausible fix:
In UEFI Interactive Shell, enter the file system:
fs0:
Following up with creating this file:
echo '\EFI\ubuntu\grubx64.efi' &> startup.nsh
: <8195plough959595; Press CTRL+S to save the file.
: <8195arrange;: <819595; Press ENTER to confirm the file name.
: <8195019595; Press CTRL+Q to exit the editor.
: <8195containment;
reset
Important notes
For some reason you have only a few seconds to edit and save the file. If it takes you longer, then the guest may react with a significant delay. Or it may even freeze.
Replace debian with your system’s id, e.g. ubuntu. You may verify this by simply going into the \EFI\ directory and running ls.
Another way
If you don’t succeed, and supposing your guest is Linux type, I myself had to do it:
Boot from live USB with any Linux.
Mount the root file system.
Create this file on the mounted file system, adjust the path to wherever you have mounted it:
/boot/efi/startup.nsh
Enter the above explained line to it.
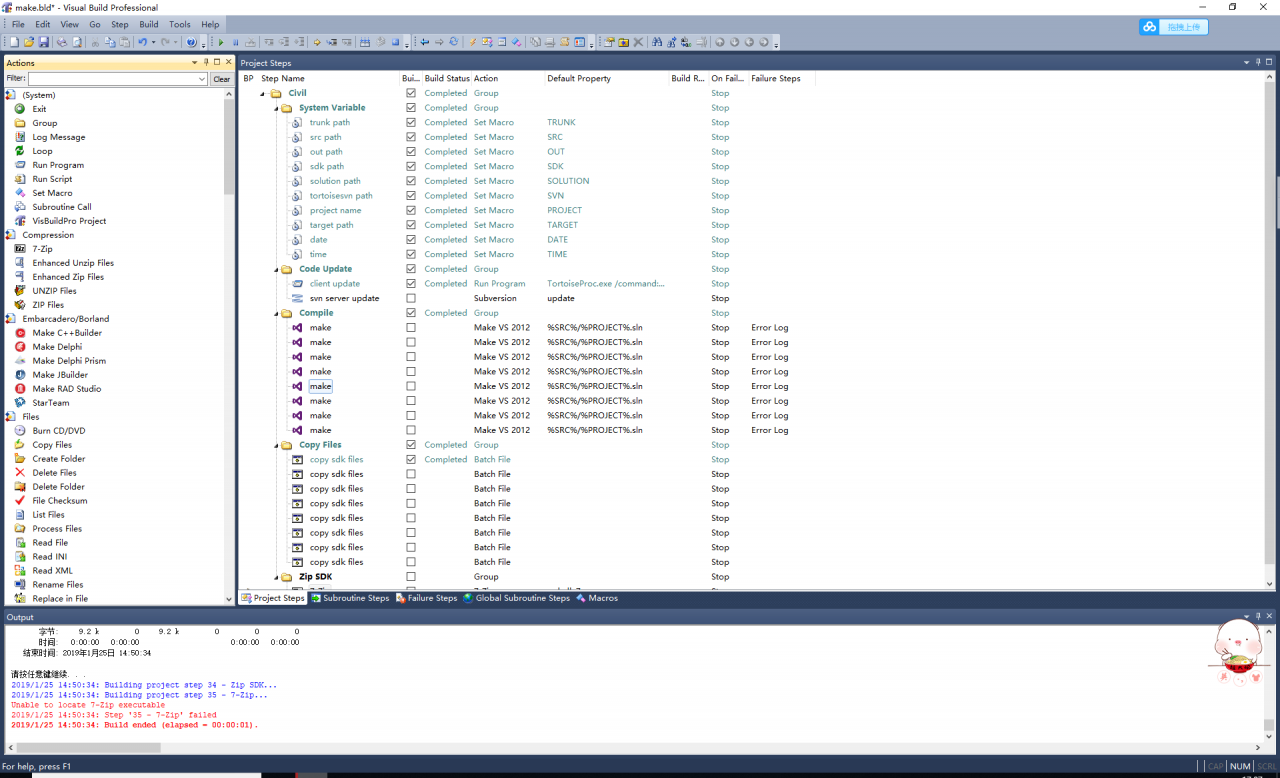
Automatic compilation of visual build professional
Visual build Pro can help software developers automatically produce reusable projects for their software development. The software has powerful automatic compiling function, visual build Pro supports automatic creation of installation program, FTP, HTTP, LAN sharing and other file transfer modes, and has powerful log recording system and automatic running unit test cases; in addition, it also supports automatic sending mail and database operation. Visual build supports the creation of projects. Each project contains several step groups, and each group contains several steps. For example, a simple daily build can be divided into resource update, code update, automatic compilation, automatic creation of installation package, automatic running of test cases, and notification of results to relevant personnel. You can subdivide the above steps into small steps, and the subdivision is completed by visual build. Visual build defines a template for various steps. You only need to fill in different parameters according to your own project. Specific use can see the help file, the operation inside are very detailed, but some places still need to pay attention to.
Usage reference: https://wenku.baidu.com/view/f8074042a8956bec0975e3fa.html?from=rec
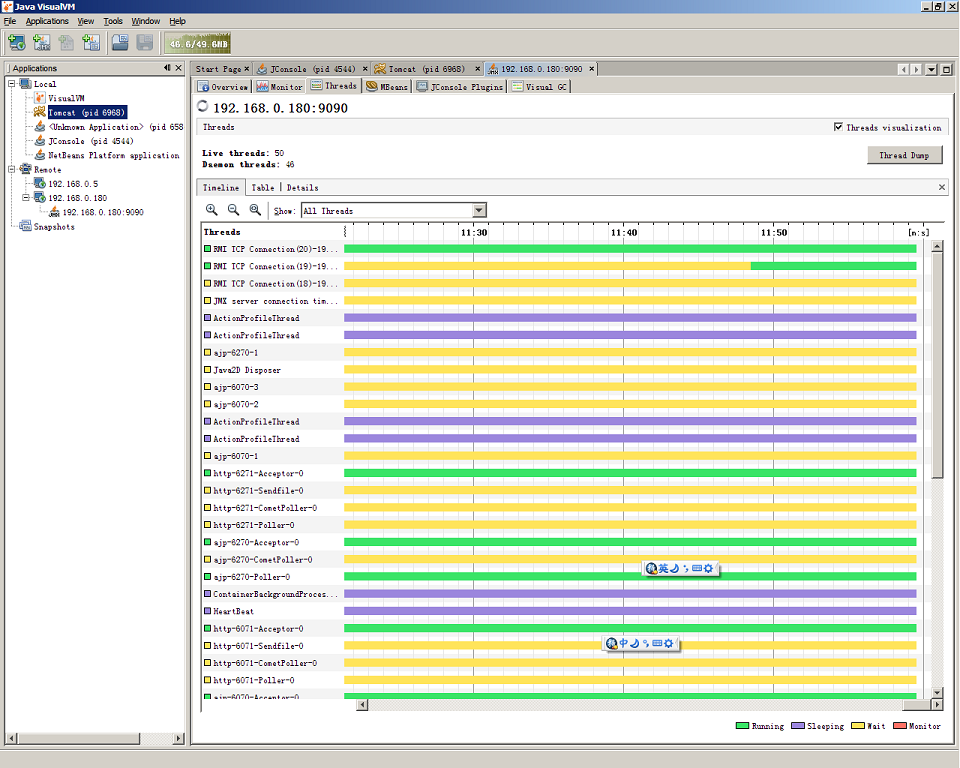
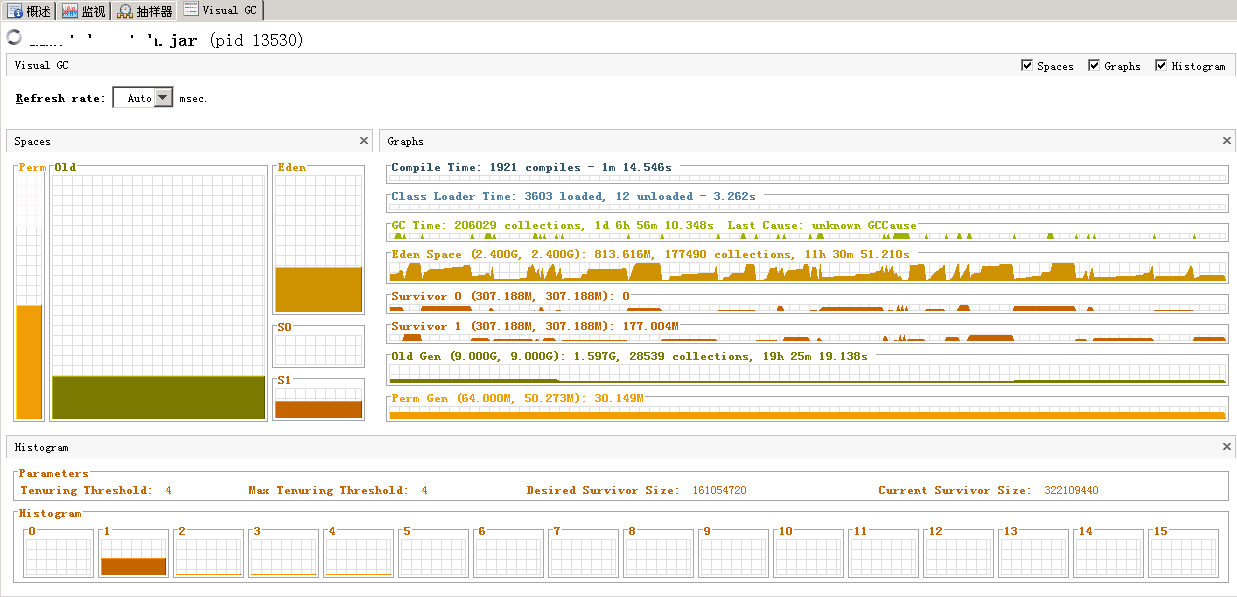
GC plug in of jvasualvm + error “not supported for this JVM” + command jstatd
Plugin install
tools->plugin->Available Plugin There will be plug-ins worth installing, such as VisualGC
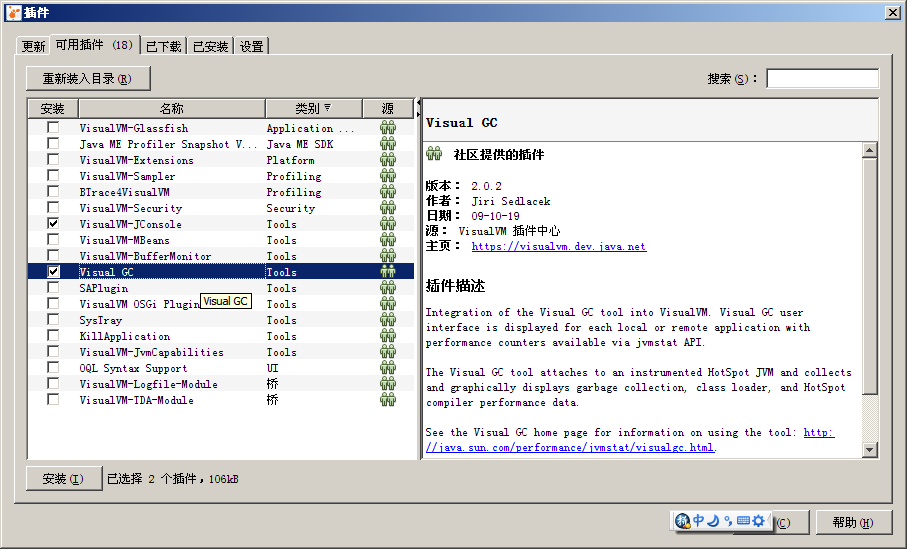
Plugin Lists: https://visualvm.dev.java.net/plugins.html
Note: The port configuration provided above is a bit cumbersome, so why not just do it like this.
To use VisualGC you must start the jstatd agent on the remote machine, otherwise it will show “not supported for this jvm” error.
And there is a permission problem when starting jstatd, you need to make the following changes.
[root@xxx-01 ~]# java -version
java version “1.7.0_55”
Java(TM) SE Runtime Environment (build 1.7.0_55-b13)
Java HotSpot(TM) 64-Bit Server VM (build 24.55-b03, mixed mode)
[root@xxx-01 ~]# jstatd
Could not create remote object
access denied (“java.util.PropertyPermission” “java.rmi.server.ignoreSubClasses” “write”)
java.security.AccessControlException: access denied (“java.util.PropertyPermission” “java.rmi.server.ignoreSubClasses” “write”)
at java.security.AccessControlContext.checkPermission(AccessControlContext.java:372)
at java.security.AccessController.checkPermission(AccessController.java:559)
at java.lang.SecurityManager.checkPermission(SecurityManager.java:549)
at java.lang.System.setProperty(System.java:783)
at sun.tools.jstatd.Jstatd.main(Jstatd.java:139)
[root@xxx-01 ~]# cd /usr/java/jdk1.7.0_55
[root@xxx-01 ~]# vi /usr/java/jdk1.7.0_55/jstatd.all.policy
grant codebase “file:${JAVA_HOME}/lib/tools.jar” {
permission java.security.AllPermission;
};
[root@xxx-01 jdk1.7.0_55]# jstatd -J-Djava.security.policy=/usr/java/jdk1.7.0_55/jstatd.all.policy &
Then start the jstatd command in background mode
e.g:
Threads