Tag Archives: mac os

Mount NFS error in Mac OS [How to Solve]

Data and Layout Files

NFS service

Ubuntu

Install apt install nfs-kernel-server

Server-side Layout File
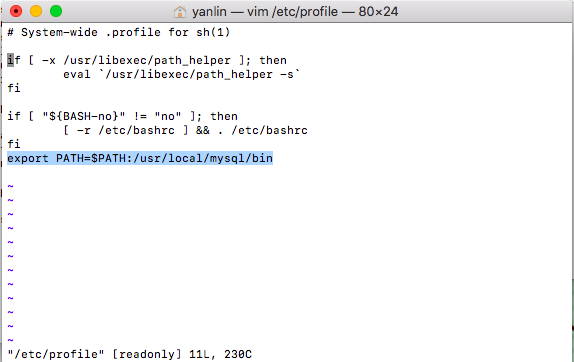
cat /etc/exports

/nfsdata  192.168.22.1/26(rw,sync,insecure,no_root_squash)

CentOS try to load

yum install nfs-utils -y

mount -t nfs -o rw 192.168.22.8:/nfsdata /tmp/test

Ubuntu Try to load

apt install nfs-common -y

mount -t nfs -o rw 192.168.22.8:/nfsdata /tmp/test

Mac OS Hang Characters

used banned commands

mount -t nfs -o rw 192.168.22.8:/nfsdata /tmp/test

Use finder

finder -> before — Link service…”. Enter the window you open.” nfs://192.168.22.8/nfsdata ”

Question weight 1

(/etc/exports) This layout file needs 39035;, to add an insecure parameter, if Mac OS has been rewarded without service error

/nfsdata 192.168.22.1/26(rw,sync,insecure,no_root_squash)

Problem point 2

there is a problem in setting permissions due to the inconsistency between the Mac OS user ID and the server ID. you cannot write.

solution

you can directly Chmod 777/nfsdata. This method is very violent

create a user with the same uid as the one in the MAC on the server, and then set additional permissions.

view your uid on the MAC ID

id

uid=501(makeit) gid=20(staff) groups=20(staff),12(everyone),61(localaccounts),79(_appserverusr),80(admin),81(_appserveradm),98(_lpadmin),33(_appstore

NFS server

#Specify the uid when creating a new user
useradd -u 501 makeit
#Configure additional permissions for shared directories
#chfacl may not be available in ubuntu, you need to install it yourself `apt install acl -y`
chfacl -m makeit:rwx -R /nfsdata
# If you already have the user, you can use usermod to change the user information
usermod -u 501 makeit

Find failed events in lookup.

enjoy 😯


When installing MySQL database on Mac OS, the system prompts MySQL: command not found

Geeks, please accept the hero post of 2021 Microsoft x Intel hacking contest>>>

After we install mysql, we enter the MySQL command in the terminal and find that we can’t see the database we installed. This is because you don’t configure the environment variables

Install MySQL database in OS system and save it in/usr/local/MySQL by default

So how do we configure environment variables

1. Open terminal, enter: sudo Su enter to enter the system administrator management directory (of course, you need to enter your user password to enter)

2. Enter the command: VIM/etc/profile, and then enter the VIM editing interface

3. In the VIM editing interface, press I to enter the editing state. Then, you can add the path name and enter the command: export path = $path/usr/local/MySQL/bin

4. Press the ESC key to exit the editing state

5. Enter the command: WQ( Indicates save and force exit)

6. Then I’ll call back to my previous terminal interface

7. Then enter the command: source/etc/profile in this interface to indicate that the settings will take effect immediately. Of course, it’s the same for you to restart after closing

At this time, you can enter: MySQL carriage return to test

What if the system still prompts MySQL: command not found

1. Apple – > System Preferences – > At the bottom, click Mysql to close the MySQL service in the pop-up page

2. Enter the terminal input: CD/usr/local/MySQL/bin

3. After entering, log in the administrator permission sudo Su (enter your computer password)

4. Enter the following command to disable the MySQL verification function./mysqld_ safe –skip-grant-tables & ( Note that mysqld

5. After entering, MySQL will restart automatically (you can see in the preferences that the state of MySQL will change to running)

6. Then enter the command./MySQL

7. After entering, you can see the following effect:

The comfortable MySQL > Prompt

8. Here’s how to change the password

Then enter: flush priorities

After entering, enter: set password for ‘root’ @’localhost ‘= password (‘123’)

9. Re open a terminal and enter: MySQL – uroot – P123 to enter MySQL data:

Reference: https://blog.csdn.net/adley_ app/article/details/54694230

MAC OS Install opencv ModuleNotFoundError: No module named ‘cv2’

Opencv installed on Mac OS has installed Python 3.6

run the command brew install opencv3 after installation, an error was reported. But there is also a hint in pychar import CV2

Import CV2 runs with an error of “modulenotfoundererror: no module named ‘CV2′”. If the package of CV2 cannot be found, the installation of the expansion package can be executed: PIP3 install Python opencv PIP3

import cv2 print(cv2.__ version__) output opencv version number

installation complete