Error reporting prompt
gnutls_handshake() failed: Error in the pull function
Causes and Solutions
It may be a problem with the libssl library, which can be solved by installing libssl dev
sudo apt-get install libssl-dev
Error reporting prompt
gnutls_handshake() failed: Error in the pull function
Causes and Solutions
It may be a problem with the libssl library, which can be solved by installing libssl dev
sudo apt-get install libssl-dev
After chopping hands, the fraud call came before the express delivery was received. How to improve the privacy and security of e-commerce>>> ![]()
On the first day after the festival, the virtual machine was updated. After restarting, SSH could not be accessed. I quickly logged in to the manufacturer’s control panel to have a look. I could only use the provided online shell to enter the system to find problems. First, I manually restarted the SSH service
Failed to start OpenBSD Secure Shell server 
Hurry to Baidu, use systemctl status ssh.service to check, refer to two articles, and carefully check/etc/SSH/sshd_ Finally, it runs
sshd -T
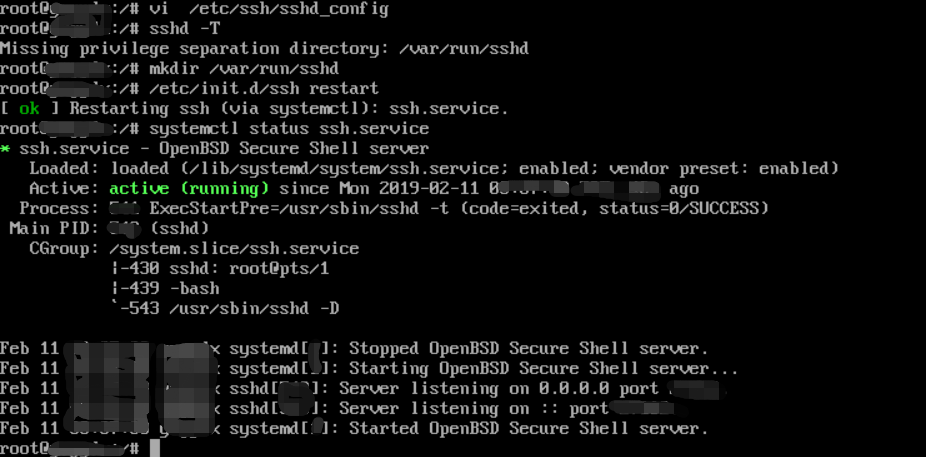
Create directory MKDIR/var/run/sshd
Finally, restart the SSH service and check the status. You can also log in locally
Ubuntu 16.04 solves the problem of displaying rhombus Chinese garbled code in virtual terminal (Ctrl + Alt + F1)
Reference article:
(1) Ubuntu 16.04 solves the problem of displaying rhombus Chinese garbled code in virtual terminal (Ctrl + Alt + F1)
(2) https://www.cnblogs.com/EasonJim/p/7123304.html
Let’s make a note.
Start with Dell’s xps13, the pre installed win10 operating system. Considering that this model has the developer version of Ubuntu 16.04 pre installed, but it is not available in China, we asked Dell customer service if we can provide system image or corresponding driver. In this regard, Dell said that it did not provide any drivers officially. The system has an adapter by default. You can install Ubuntu directly
I searched the Internet. It seems that someone has tried. For example, you can install win10 and Ubuntu dual systems in Dell XPS 13, so you start.
The default mode of XPS 13 is raid mode, which is changed to achi mode.
Press the power key to start. When the Dell icon appears, press F2 to enter the BIOS setting
Select Settings - &> system configuration - &> SATA operation in the left list box, and select AHCI in SATA operation on the right`
Click apply to confirm
Ubuntu 16.04 already supports secure boot, so there is no need to turn off secure boot.
Install the system with the prepared boot disk. The win10 system was not reserved, so it was formatted and repartitioned.
There is a prompt during the installation that the operating system is installed on the hard disk now. Repartition may cause the previous system to fail to start. You can choose whether to continue or not. Here, click continue to get stuck, but press the power button to force the shutdown. The second time, there is no problem. The normal installation.
XPS 13 has no RJ-45 cable interface, and there is no adapter on hand, so it can only connect to the network through wireless network card. The newly installed Ubuntu system can’t use wireless, it should be a driver problem. After searching, it is found that installing a firmware can solve the problem.
Download installation package http://launchpadlibrarian.net/292156147/linux-firmware_ 1.157.5_ all.deb
Copy to XPS 13 with U disk
sudo dpkg -i linux-firmware_ 1.157.5_ all.deb
Restart the machine
The newly installed Ubuntu will feign death once the computer is turned on and dormant. It can only be forced to shut down by pressing the power button. It seems that the new version has fixed this problem. As long as you update all the packages, it will work.
Execute sudo apt update & amp; sudo apt upgrade on the terminal
So far, the installation is complete, and it can be used normally.
The default touch pad of Ubuntu has the following operations: single finger click, double finger up and down, double finger up and down, double finger left and right, double finger left and right, double finger right, three finger double-click (click has no effect) switch window, four finger click is equivalent to super
If you want more gestures, you need programs like xswape
Enter Gnome session properties on the terminal to start the setting of boot items
Client installation method of graphical interface: the command line client can be installed through PIP install shadowlocks
Chrome plug-in proxy switchomomega can manage socks proxy settings. However, chrome plug-ins need to be installed through a proxy. Here you can start chrome from the command line.
Enter Google Chrome -- proxy server = "Socks5:// (monitoring IP of Socks5): (monitoring port)" in the terminal to start chrome. After installing the plug-in, exit, and then you can control the proxy settings through proxy switchyomega.