Tag Archives: Ubuntu18.04

[Solved] Ubuntu 18.04 installation vscode configuration and error reporting

Installation

Sinicization

1. CTRL + Shift + P to start command mode

2. Search

Configure display language

3、install add language packs

4. Select the Chinese language pack installation, prompt the user to update the language in the lower right corner, and select OK to restart vscode

Error reporting processing

Unable to install extension 'ms-ceintl.vscode-language-pack-zh-hans' as it is not compatible with VS Code '1.37.1'.

Just change the language pack version

Unable to install extension 'ms-ceintl.vscode-language-pack-zh-hans' as it is not compatible with VS Code '1.37.1'.

In this case, the extension does not have permission. Just change the directory permission to link to the original blogger

sudo chown -R Your Username ~/.vscode/extensions


Unable to enter the interface after startup of Ubuntu 18.04 [failed command: read DMA]

With multi-dimensional model as the core, let the factory digital transformation and upgrading “within reach”>>>

Machine configuration: Lenovo think_ D20 workstation, default configuration, hard disk manually wired to raid mode

For the same machine, similar problems have occurred before running openSUSE. However, due to the total ticket skipping of openSUSE update links and the need of some tools, Ubuntu 18.04 has been replaced recently. This problem has not been thoroughly solved before

Solution process:

1.
https://ubuntuforums.org/showthread.php?t=2332373
https://askubuntu.com/questions/321277/how-do-i-recover-from-a-read-dma-bootup-error

#Blkid
view the problem information,
echo the basically same boot problem information: failed command: read DMA
combined with the content of/etc/fstab, It is roughly estimated that it is the “/ disk” in fstab as sdc5 in raid hard disk_ It should be that the hard disk mounted as/dev/sdc5 is faulty or even damaged
using # dmesg | grep ATA2
can also see the corresponding error information

leave the idea of commenting out the corresponding line in fstab for the time being, and look at other solutions first

2.
https://ubuntu-mate.community/t/getting-emergency-mode-screen-on-boot-up-every-time/2626/8

Use fsck to scan and repair the hard disk (note umount first)

?Fsck/dev/sdc5
and then prompt e2fsck – B XXX & lt; dev>, The corresponding operation
# e2fsck – B 8193/dev/sdc5
can’t end the cycle, instead use
# e2fsck – B 32768/dev/sdc5
to prompt for confirmation in the middle, select y (yes) to repair, after several times of Y, a (all) will be prompted to default to all

this method is currently being used, and the effect will be reported again

—————————Feedback of the following results:

The use of e2fsck makes the sound of the hard disk become louder in the process of rotation, which seems to be more thorough. Finally, the first method is still used, that is, to comment out the corresponding hard mount line in fstab

In the end, the problem hard disk was removed

ubuntu18.04 Start Android StudioKVM is required to run this AVD ./dev/kvm device: permission denied.

Install Android studio under Ubuntu 18.04, and report an error after installing the simulator

KVM is required to run this AVD. /dev/kvm device: permission denied.

That is, the current user has no permission to/dev/KVM, so the/dev/KVM file needs to configure the permission group to the current login account. The terminal configures the following commands

sudo chown g -R /dev/kvm

In order to configure the command automatically, we need to follow the way of configuring Java environment variables. Configure it in the. Bashrc file so that it can be started automatically

( the following operations should not be needed. After using the sudo chown command to restart, you do not need to change the permission of this file again, because it has been set)

if you want to know how to add sudo (root permission) command when starting up, please see : start sudo command when Linux starts up

Configuration method:

sudo vim ~/.bashrc

On the last line of the file, add the following code. Add the file/dev/KVM to the permission group of redkey (my account)

sudo chown redkey -R /dev/kvm

In this way, after restarting the computer , the configuration information will be automatically executed

Error 1046 (3d000): no database selected) error in importing MySQL datagram from Ubuntu 18.04

Geeks, please accept the hero post of 2021 Microsoft x Intel hacking contest>>>

The error message is as follows:

ERROR 1046 (3D000): No database selected

There are two reasons for the error

1. Before importing the database, there is no such database in the database

Solution: create a new database with the name of the database you want to import, select the database, and then import it

The input command and running results are as follows:


mysql> use mydb
mysql> source /root/mydb.sql

2. The location of the SQL to be imported is not correct 2

Solution: check the path of your SQL file to modify it


Error in configuring static IP in Ubuntu 18.04

Geeks, please accept the hero post of 2021 Microsoft x Intel hacking contest>>>

Note:

Because many test environments are installed on this Ubuntu system, but due to the restart and power failure of the virtual server, every time IP changes, the environment has to be updated, so the IP of the environment needs to be configured as static, once and for all

According to the previous experience of configuring Ubuntu static IP, VI/etc/network/interfaces directly configures the static IP under this file. After resetting the network, it is found that it does not take effect

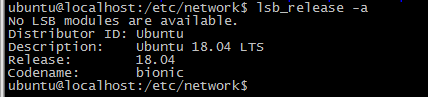
So I checked the version of Ubuntu, which is 18.04. Then Baidu found that “since 17.10, Ubuntu has given up the configuration of fixed IP in/etc/network/interfaces. Even if the configuration does not take effect, it will be changed to the netplan mode, and the configuration is written in/etc/netplan/01-netcfg.yaml or similar yaml file”. So I configured according to the found method, As a result, I encountered a lot of errors and almost vomited blood. Here I write down the errors I encountered

1. The initial configuration is as follows: invalid yaml at// etc/netplan/01-netcfg.yaml line 11 column 11: mapping values are not allowed in this context

Solution: yaml is a hierarchical structure, which needs to be indented. Colon (:) represents dictionary, hyphen (-) represents list, and there must be a space after colon

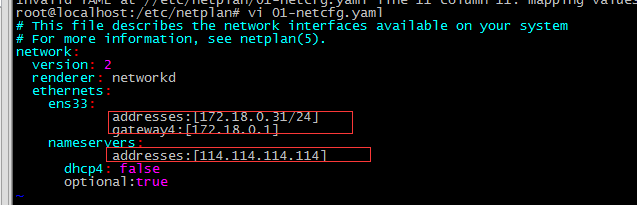
2. After adding a space after the colon (as shown in the figure below), execute netplan apply and report an error again: invalid yaml at// etc/netplan/01-netcfg.yaml line 11 column 6: did not find expected key

Solution: nameservers should be the fourth layer like gateway 4, and addresses after nameservers should be the fifth layer

The correct number of layers is as follows:

First floor –

network:

Layer 2 – Ethernet:

The third layer – ens33:

The fourth layer addresses: [172.18.0.31/24]

The fourth layer gateway4: 172.18.0.1
0

The fourth layer – nameservers:

The fifth floor

addresses: [114.114.114.114, 8.8.8.8]

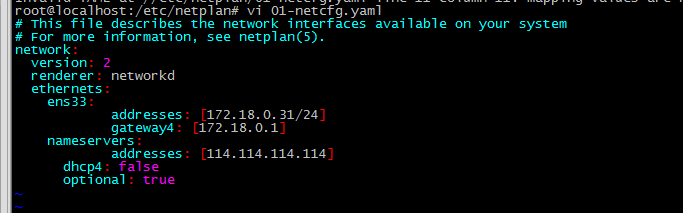
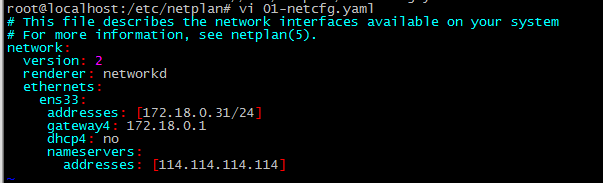
3. After solving the problem according to the above method, execute netplan apply as shown in the figure below, and report an error again: error in network definition// etc/netplan/01-netcfg.yaml line 8 column 16: expected scalar

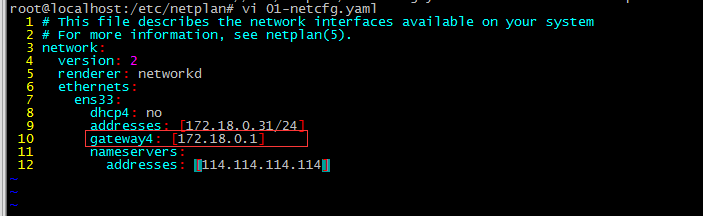
Solution: the address of gateway4 has no brackets. After modification, restart the network service and it will be normal (netplan apply)

So the correct configuration format should be as follows: in this way, the static IP is successfully configured

I didn’t get the wrong report:

A similar error appears: Line8 column 6: cloud not find expected ‘:’ # the prompt is colon: there is no space after it

Similar error occurred:

Netplan found character that cannot start any token, the prompt is that the configuration document is not written according to five levels, and the next level must be one or more spaces than the previous level.

In short: here restart the network times wrong, mostly the level is wrong, wrong format, no space