Tag Archives: unity

Unity uses UMP to play RTSP stream, and displays blank after packaging exe

If the operation reports an error, if the error is that the libvlc.dll file cannot be found, it is that there is no VLC library on your computer. Download and install one. After the installation is completed, the error disappears immediately.

Download address: http://get.videolan.org/vlc/3.0.6/win64/vlc-3.0.6-win64.exe

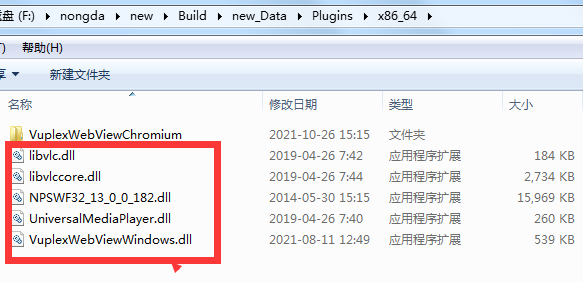
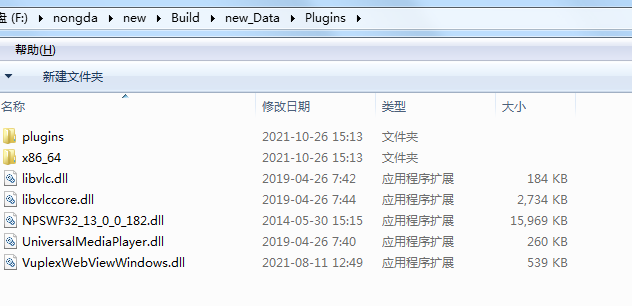
If the EXE is still blank after packaging, enter new after packaging_ Data/Plugins/x86_ 64 folder, copy and paste the DLL file in the directory to the parent directory, that is, the same as x86_ 64 keep the folder level and solve the problem.


Copy and paste a copy of these DLLs to the superior, as shown in the following figure:


[Solved] Unity Xcode Error: A build only device cannot be used to run this target

The unity code prompts on Xcode: A build only device cannot be used to run this target.

If the phone is not connected, you will have the above prompt, you can use the emulator to fix it first.


Solution:

In Unity, you must click on Build Settings > Player Settings And in Inspector, choose settings for iOS > Other Settings > SDK Version and make sure “Simulator SDK” is selected.

Now in Xcode, it can be viewed in the iPhone Simulator.


Unit delay methods: invoke and invokerepeating

Why can’t you stop buying 618?From the technical dimension to explore>>>

monobehavior has two built-in delay methods

Invoke

one

two

three

Invoke(methodName:

string

, time:

float

):

void

;

methodname: method name

time: how many seconds to execute in

InvokeRepeating

one

two

three

four

InvokeRepeating(methodName:

string

, time:

float

, repeatRate:

float

):

void

;

methodname: method name

time: how many seconds to execute in

repeatrate: repeat interval

There are also two important ways:

Isinvoking: used to determine whether a method has been delayed and is about to be executed

Cancel invoke: cancel all delay methods on the script (note that GameObject. Setactive (false) does not work, which is different from coroutine)

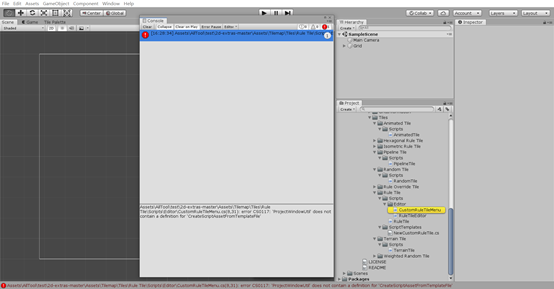
[unity] to solve the problem of error reporting in the custom rule tile menu script of 2D extras

2D extras is a very useful plug-in for tilemap officially made by unity. You can download it from GitHub

Like me, you may encounter an error in the custom rule tile menu script in the downloaded 2D extras package

According to the error prompt, the non-existent function is called. After searching, the corresponding function is indeed missing

Solution 1:

Just open the script and replace it with the following code

 1 namespace UnityEditor
 2 {
 3     static class CustomRuleTileMenu
 4     {
 5         [MenuItem("Assets/Create/Custom Rule Tile Script", false, 89)]
 6         static void CreateCustomRuleTile()
 7         {
 8             CreateScriptAsset("Assets/Tilemap/Rule Tiles/Scripts/ScriptTemplates/NewCustomRuleTile.cs.txt", "NewCustomRuleTile.cs");
 9         }
10 
11         static void CreateScriptAsset(string templatePath, string destName)
12         {
13             typeof(ProjectWindowUtil)
14                 .GetMethod("CreateScriptAsset", System.Reflection.BindingFlags.Static | System.Reflection.BindingFlags.NonPublic)
15                 .Invoke(null, new object[] { templatePath, destName });
16         }
17     }
18 }

Solution 2:

Or, use the 2D techdemos version, which is officially provided for you to learn. In addition to the complete 2D extras, there are also some examples. According to my personal test, there is no problem with this version. It is just that there are too many sample materials and palettes, which will be a bit of an eyesore when you don’t need them

In fact, the code in solution 1 is the code of the custom rule tile menu script file in the 2D techdemo version

If you are interested, comparing the content of the custom rule tile menu scripts of 2D extras and 2D techdemos, it is not difficult to see that they realize the same function, but there are some differences in the implementation methods. What I do is equivalent to replacing parts

Unity realizes lookat in 2D

Since transform. Lookat makes z-axis look at the target, 2D is basically composed of x-axis and y-axis. So in 2D games, it’s not easy to use

So use code to implement a 2D lookat function

Example:

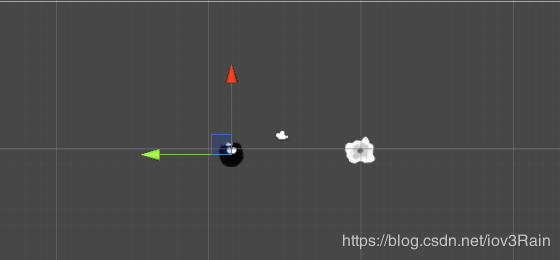
We keep the monster’s eyes on the cloud

The orientation of the monster’s eyes is the same as that of the localx axis, so make the monster look at the cloud and point the localx to the cloud

Script the monster

Scripting

Writing method 1:

	void Update () {
        Vector2 direction = target.transform.position - transform.position;
        float angle = Mathf.Atan2(direction.y, direction.x) * Mathf.Rad2Deg;
        transform.rotation = Quaternion.AngleAxis(angle, Vector3.forward);
	}

Writing method 2:

void Update () 
    {
        Vector3 v = (target.position - transform.position).normalized;
        transform.right = v;
	}

Then move the cloud and the monster will follow

Unity awesome plug-in Final IK

What’s the use of this plug-in

animations in general games are performed by loading a skeletal animation. The action is adjusted by the animator in the 3D software to adjust the skeleton of the character at different time postures, to generate continuous animations, or to capture actions, record human actions, and finally import.

into the game engine.

Although the production process of these two methods is different, there is no big difference for the game engine in the end – the actions of the two methods are fixed and can not be changed. but in the game, this type of bone animation often can not meet the needs, such as an animation of picking up props on the ground. In the game, props are not necessarily on the ground, but on the table, At this time, we need a new method to drive the bones of the whole body to complete the “picking up” action. and this will use the final IK plug-in. this plug-in

In addition, for the combination of objects without bones, such as the mechanical arm, it can also achieve very natural action.

Why use this plug-in:

compared with unity’s own IK system, final IK is more convenient and widely used. There are many situational applications, such as action system for interacting with objects

with this plug-in, you can use a small amount of fixed animation, and on this basis, fuse IK actions to make a variety of interactive actions

FPS game is very useful for making RPG.

VR game is also a very interesting application direction: today’s first person VR game basically has no body, only one hand. If the positioning information of VR handle and VR glasses is used to drive the whole body skeleton of the players in the game, it can almost synchronize the actions of the players in reality. Once it is realized, it will greatly improve the sense of substitution

Final IK details:

1. Aim IK: set a goal, and the end of the joint always faces the goal. It is generally used to face the head

Steps:

a. Add an aim empty object at the model head node and reset it

b. Add aim IK component to the model, and fill in aim transform and 4 joints from root spine to head (weight can be set)

c. Create a target directly in front of your face

d. Add an empty object pin to the model, and the position is consistent with the target

e. Add aim boxing script to target with model object and pin as parameters

f. Moving the target after running, the face of the model drives the upper body and always faces the target

2. Biped IK: one more head IK control than unity’s own IK

3. Full body biped IK: the enhanced version above controls more parts (elbow, shoulder, waist, knee, crotch, etc.)

Steps:

a. Add the component script to the model

b. Fill in root node

c. If you want to control an IK, you need to increase the weight. At run time, a cubic controller appears, through which you can control the corresponding IK

d. Script control:

public FullBodyBipedIK ik;

public FullBodyBipedEffector effector;// Enumerate variables, choose by yourself

ik.solver.leftHandEffector.position = leftHandTarget.position;

//Assign a position to the right hand IK control point, that is, let the right hand move to the specified point

ik.solver.GetEffector(effector).position = target.position;

//Assign a target to a given location

4. Limb IK: three points, connecting three bones, the end point driving two bones, pay attention to add bend goal to control the direction of contraction

5. Ccdik: the enhanced version of limb IK, which can connect multiple bones, and can be used to make tail, rope, mechanical arm, etc

Fabrik: similar to ccdik, but more flexible. It can be used to make steel bars, tree trunks, etc

7. Ground fbbik: IK effect of humanoid model moving on various terrain

Steps:

a. Add the component to the model

b. Parameter filling model object

c. Add rigid body and Collider to the model

d. After running, the mesh of the foot of the model will fit the terrain (the sole of the foot will remain flat, but it will tilt differently according to the terrain)

e. Only need walking animation, you can present the animation effect of walking on various terrain (stairs, slopes)

8. Ground IK: the effect is the same as above, the model with unknown number of feet can be used, and the number of feet can be customized

Steps:

a. Add limb IK to each leg of the model, and fill in the bone parameters from the root of the leg to the foot

b. Add grounderik components to the model and fill in all legs, model mesh objects, and character controller objects

c. User defined walking controller can walk on any terrain after running

9. Interaction system: interaction system, which can obtain the specified IK and control it, showing the effect of opposite movement

Steps:

a. Create an empty object box and add an interaction object script

b. Capture the palm bone, add the induction target script, set the parameters and rotate the palm angle, which is the placement angle when touching the object plane

c. Add the palm under the box

d. Add interaction system to model

e. Add control script:

interactionSystem.StartInteraction(FullBodyBipedEffector.RightHand, box, bool);

//Execution events

10. Lookatik: make the model face a certain point, which is better than aim IK as the head orientation, and it is easy to use with biped IK

Steps:

a. Add lookatik component to model

b. Add head

c. Add spine from root to neck

d. Operation

11. Analysis of various examples:

a. Boxing: there is a special fbik boxing script control, the weight of the hand changes with the curve, the bottom is at the time of closing the fist, and the peak is at the time of hitting the target

b. Handshake, push-pull, pick: use interaction system

c. Driving: special fbik driving rig script control

d. Robot feet: apply angle and joint limits

e. Hit and fly effect: holding a long stick and waving the target, you can hit and fly the target; Two scripts applied to motion antibody

f. Kissing: there is a special kissing rig script

g. Push wall: special touch walls script

this article shares WeChat’s official account – Unity3D game development essence course dry cargo (u3dnotes).
Limit the range of axial movement in unity mathf.clamp

Mathf.Clamp

in the game, in order to limit the movement of a certain axis of the player within a certain range, mathf.clamp can be used to solve the problem

Mathf.Clamp(float value,float min,float max)

Pass in three parameters in mathf. Clamp: value, min, max

Limit the value between min and max. if value is greater than max, Max is returned. If value is less than min, min is returned. Otherwise, value is returned

For example:

_ rig.transform.position = new Vector3(transform.position.x, transform.position.y,
Mathf.Clamp(_ rig.transform.position.z, -20.0f, 28.0f));

Here, the movement of the rigid body in the z-axis direction is limited, and the rigid body moves in the range of – 20.0 to 28.0

A brief summary of hash calculation in resource packaging of unity

1. Generally, when calculating resource hash, we need to consider: resource + resource meta, dependency + dependency meta

2. Generally, when computing resource hash, the calculation results need to be encrypted, which can be directly encrypted with MD5 of C #

Specific implementation, the code is as follows (learning to use, structure is not perfect):

 1 using System;
 2 using System.IO;
 3 using System.Collections.Generic;
 4 using UnityEditor;
 5 using UnityEngine;
 6 using System.Security.Cryptography;
 7 using System.Text;
 8 
 9 public class Test
10 {
11     [MenuItem("BuildTool/Lugs")]
12     static void LugsTest()
13     {
14         Debug.Log(ComputeAssetHash("Assets/UI/Prefab/ui_login/ui_login.prefab"));
15     }
16 
17     static string ComputeAssetHash(string assetPath)
18     {
19         if (!File.Exists(assetPath))
20             return null;
21 
22         List<byte> list = new List<byte>();
23 
24         //Read the resource and its meta file as an array of bytes
25 list.AddRange(GetAssetBytes(assetPath));
26 
27         // Read the resource's dependencies and its meta file as an array of bytes (dependencies are essentially paths to the resource as well)
28         string[] dependencies = AssetDatabase.GetDependencies(assetPath);
29         for (int i = 0, iMax = dependencies.Length; i < iMax; ++i)
30             list.AddRange(GetAssetBytes(dependencies[i]));
31 
32         //If the resource has other dependencies, the corresponding byte array should also be read into the list, and then the hash code should be calculated
33 
34         //return the resource hash
35         return ComputeHash(list.ToArray());
36     }
37 
38     static byte[] GetAssetBytes(string assetPath)
39     {
40         if (!File.Exists(assetPath))
41             return null;
42 
43         List<byte> list = new List<byte>();
44 
45         var assetBytes = File.ReadAllBytes(assetPath);
46         list.AddRange(assetBytes);
47 
48         string metaPath = assetPath + ".meta";
49         var metaBytes = File.ReadAllBytes(metaPath);
50         list.AddRange(metaBytes);
51 
52         return list.ToArray();
53     }
54 
55     static MD5 md5 = null;
56     static MD5 MD5
57     {
58         get
59         {
60             if (null == md5)
61                 md5 = MD5.Create();
62             return md5;
63         }
64     }
65 
66     static string ComputeHash(byte[] buffer)
67     {
68         if (null == buffer || buffer.Length < 1)
69             return "";
70 
71         byte[] hash = MD5.ComputeHash(buffer);
72         StringBuilder sb = new StringBuilder();
73 
74         foreach (var b in hash)
75             sb.Append(b.ToString("x2"));
76 
77         return sb.ToString();
78     }
79 
80    
81 }

The following results are:

Small function: dynamic change of scripting define symbols (macro definition) by unity

Objective:

Add a new macro definition to an existing macro definition

//Get which platform you are currently on
BuildTargetGroup buildTargetGroup = EditorUserBuildSettings.selectedBuildTargetGroup;

//Get macro definitions that are already available for the current platform
var symbols = PlayerSettings.GetScriptingDefineSymbolsForGroup(buildTargetGroup);
            
//Add the macro definition you want
if (!symbols.Contains("SARF"))
{
    string str = "";
    str = symbols + ";SARF";

    PlayerSettings.SetScriptingDefineSymbolsForGroup(buildTargetGroup, str);
}