Tag Archives: v-im

VIM edit prompt swap file already exists solution

When editing an .ini file on a linux server, it gets stuck and when you close the connection tool and re-enter to work on the .ini file, you are prompted.

E325: ATTENTION
Found a swap file by the name “.xxx.ini.swp”

(1) Another program may be editing the same file. If this is the case,

be careful not to end up with two different instances of the same

file when making changes. Quit, or continue with caution.

(2) An edit session for this file crashed.

If this is the case, use “:recover” or “vim -r other.conf”

to recover the changes (see “:help recovery”).

If you did this already, delete the swap file “.other.conf.swp”

to avoid this message.

Swap file “.xxx.ini.swp” already exists!
[O]pen Read-Only, (E)dit anyway, (R)ecover, (Q)uit, (A)bort:


Solution.

Execute the following command in the directory where the file is located.

ls -a

Check the hidden files in the current directory and find the .xxx.ini.swap file

Delete the file by executing the delete command

rm -rf .xxx.ini.swap

Execute vim xxx.ini again and you will not be prompted.
How to Solve Warning: Permanently added ‘ 192.168.1.230′(RSA) to the list of known hosts.

Premise

When I was running SSH 192.168.1.230 remote on the newly installed red hat linux 5. X system, the following error occurred:

Warning: Permanently added ' 192.168.1.230'(RSA) to the list of known hosts.

Of course, I set the fixed IP first

1. Switch root and use: Su-

2. Delete all the lines in the/etc/hosts file that begin with #

3. Modify ifcfg-eth0 file. Change the bootproto item to bootproto = static

[root@localhost ~]# vi /etc/sysconfig/network-scripts/ifcfg-eth0

Add directly at the end of the file:

IPADDR=192.168.1.230
NETMASK=255.255.255.0
GATEWAY=192.168.1.1
DNS1=192.168.1.1
PREFIX=24

4. Save and restart


Solutions

After the restart of the system is completed, the first remote connection with SSH 192.168.1.230 in the Red Hat Linux 5. X system appears the above error.

Solution:

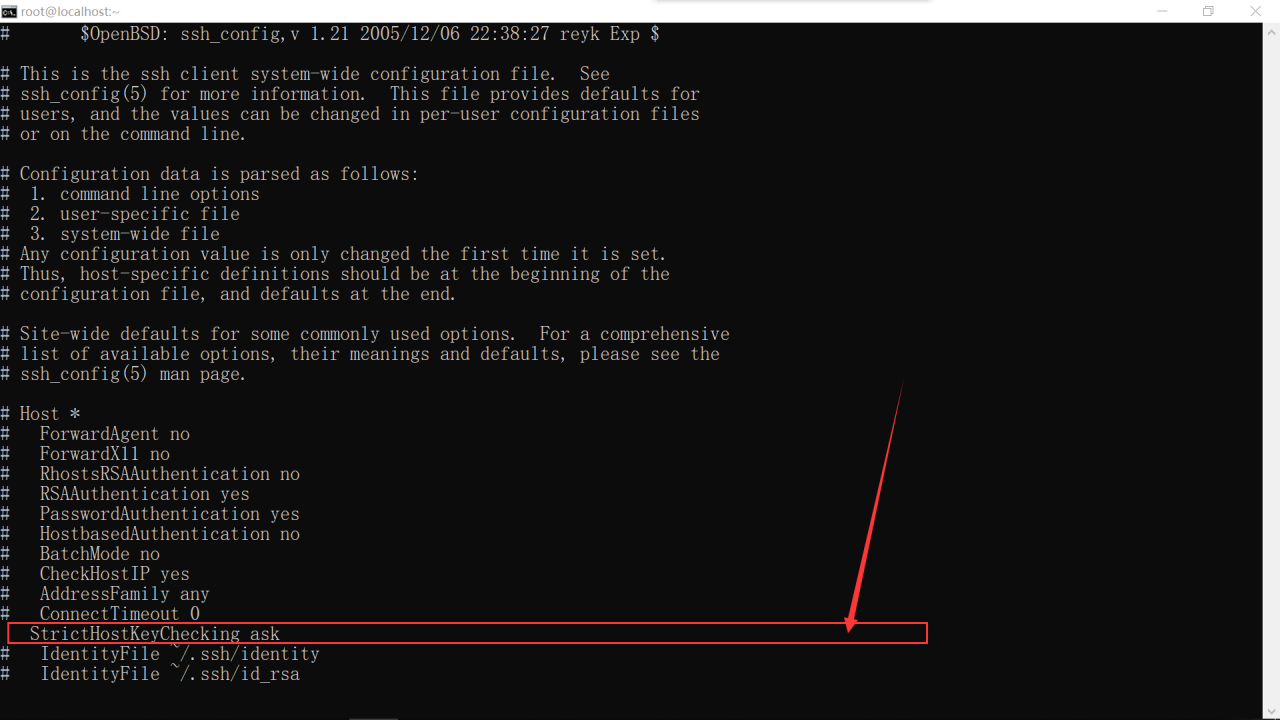
1. Switch to root and use: Su -. It is necessary to switch the root user here, because the/etc/SSH/SSH of ordinary users_ Under config, there may be no # stricthostkeychecking ask item.

2. vim /etc/ssh/ssh_ config。 Find # stricthostkeychecking ask and remove the comment directly. If not, suggest to change the ask to No

Here’s what I changed directly:

3. Save and exit.

Solution of welcome to emergency mode! When CentOS 7 starts up

Centos7.3 was used well yesterday, but the boot prompt today is as follows (as shown in the figure):
welcome to emergency mode! after logging in ,type “journalctl -xb” to view system logs,“systemctl reboot” to reboot ,“systemctl default” to try again to boot into default mode。
give root password for maintenance
(?? Control-D???) :

After checking, it is because I wrote the CD in/etc/fstab to mount automatically, but the boot is not successful.

Solution: there is a problem with the fstab file that is automatically mounted, you can directly enter the password in this interface, and then delete the one you added, and restart OK
1: log in to the root garbled code, and also enter the password
2: VIM/etc/fstab, check the disk mounting information
3: comment out the content you added, and delete it if you are sure you are not using it
4: restart OK.

This error is mostly due to the error in the/etc/fstab file. Pay attention to whether the external hard disk, memory or network commons are loaded and not loaded during restart.

GVIM configuration file (_ User defined configuration (no plug-in) record of vimrc

_ The personal configuration of vimrc file (without plug-in) is as follows

......
(_vimrc original configuration, no changes)
......

" ============================= ↓ custom ↓ ===============================

" ------------------------ Basic settings
" Turn off compatibility with vi
set nocompatible

" reload files when changed on disk, i.e. via `git checkout`
" set autoread

" Turn off ringing when there is an error message
" set noerrorbells
"
" Customize the backup file location
set backupdir=D:/softwares/GVim/Vim/backupFiles

" Turn off automatic backups
" set nobackup

" disable automatic generation of .un~ files
" set noundofile

" set ------------------------ encoding
" set the character encoding used internally by Vim, which is applied to the characters used in buffers, registers, and expressions
" set encoding=utf-8

" sets a list of character encodings that represent the list of alternative character encodings used by Vim to automatically detect file encodings
set fileencodings=ucs-bom,utf-8,cp936,gb18030,big5,euc-jp,euc-kr,latin1,gbk

" Set the list of alternatives that participate in the automatic detection of the newline () format type
set fileformats=unix,dos,mac  

" Set the encoding method used by the terminal
set termencoding=utf-8

"set langmenu=zh_cn.utf-8
"language messages zh_CN.UTF-8

" indicates the way auto-formatting is done. = can be used to auto-format code in Vim's visual mode. m means to branch on any multibyte character with a value higher than 255; B means not to insert a space between two multibyte characters when joining lines
"set formatoptions+=m
"set formatoptions+=B

" ------------------------ Display settings
" set font
set guifont=Ubuntu\ Mono:h12

" set colorscheme
colorscheme evening

" turn on syntax highlighting
" syntax enable
syntax on

" Turn on file type detection
filetype indent on

" Show line numbers
set number

" Show the row and column numbers of the current cursor position
set ruler

" shows the current mode
set showmode

" Briefly jump to the corresponding matching bracket when inserting brackets
set showmatch

" the time to jump to the matching bracket when inserting a bracket
set matchtime=2

" always show status bar
set laststatus=2

" highlight the current line
set cursorline

" Highlight the current column
" set cursorcolumn

" Disable line breaks
" set nowrap

" ------------------------ search settings
" set search content highlighting
set hlsearch

" turn on pre-matching (match as you type the search)
" set incsearch

" Ignore case in search
set ignorecase

" smart search (when both ignorecase and smartcase options are on, Vim assumes that the current lookup (search) is case-sensitive if the search pattern contains uppercase letters. If the search pattern does not contain any uppercase letters, Vim assumes that the search should be case-insensitive)
set smartcase

" ------------------------ indent setting
" set tab = 4 spaces
set tabstop=4

" set the number of columns to indent when performing indent operations in Vim normal mode ( << and &>&> commands )
set shiftwidth=4

" Set the newly added line to have the same indent as the previous line
" set autoindent

" ------------------------ Other settings
" set Vim's default registers to be shared with the system clipboard
set clipboard+=unnamed

" set alt key not to map to menu bar
set winaltkeys=no

" Map F2 as a shortcut to show line numbers or not
nnoremap <F2&> :set nu! nu?<CR&>

" Make vimrc configuration changes take effect immediately
" if has("autocmd")
	autocmd BufWritePost _vimrc source D:/softwares/GVim/Vim
" endif


Ubuntu Resolution Change xrandr Failed to get size of gamma for output default

1.Questions

Version information description: Ubuntu 16.04 lts

After installing Ubuntu, resolution and display do not match . The xrandr command cannot give relevant information. So we tried different methods.

2.Xrandr — addnewmode

This is the most frequently answered method on stackoverflow

gtf 1920 1080 60

1920×1080 resolution, 60Hz refresh rate

So you get a modeline:

"1920x1080_60.00"  172.80  1920 2040 2248 2576  1080 1081 1084 1118  -HSync +Vsync

Copy this line and run it

xrandr --newmode "1920x1080_60.00" 172.80 1920 2040 2248 2576 1080 1081 1084 1118 -HSync +Vsync

Add one more:

xrandr --addmode VGA1 "1920x1080_60.00"

Here, vga1 can be HDM and others (have no idea about this)

Finally:

xrandr --output VGA1 --mode "1920x1080_60.00"

But their own is to run xrandr can not give a response, there are errors. So it doesn’t work.

3.xorg.conf

1 sudo vim /etc/xorg.conf

Copy the following:

Section "Monitor"
        Identifier   "Monitor0"
        VendorName   "Monitor Vendor"
        ModelName    "Monitor Model"
        HorizSync   28.0 - 70.0
        VertRefresh     56.0 - 75.0
EndSection


Section "Device"
        Identifier  "VMware SVGA"
        Driver      "vesa"
EndSection


Section "Screen"
        Identifier "Screen0"
        Device     "Card0"
        Monitor    "Monitor0"
        SubSection "Display"
                Viewport   0 0
                Depth     24
                Modes     "1920x1080_60.00"
        EndSubSection
EndSection

: WQ! (save)

Restart and it’s successful.

4.Postscript

You also see a way to change the grub startup file. But it didn’t work for me.