Category Archives: Linux

How to Use awk to Analyze Nginx Log

nginx log field description

127.0.0.1 – – [31/Aug/2018:16:11:16 +0800] “GET /50x.html HTTP/1.1” 200 537 “-” “curl/7.29.0”

Access ip, access time, request method, request url, response status code, response body size, ua


Statistics based on access ip

cat access.log | awk ‘{count[$1]++}END{for(ip in count){print ip,count[ip]}}’

cat access.log | awk ‘{count[$1]++}END{for(ip in count){print ip”\t”count[ip]}}’|sort -rnk 2


Count the response status codes of nginx

cat access.log|awk ‘{count[$9]++}END{for(ip in count){print ip,count[ip]}}’ #Number of status codes

cat access.log|awk ‘{count[$9]++}END{for(status in count){print status,count[status]/NR*100″%”}}’ #Proportion statistics

cat access.log|awk ‘{count[$9]++}END{for(status in count){print status”\t”int(count[status]/NR*100)”%”}}’ #proportion statistics reserved integer


According to ua statistics

cat access.log|awk -F'”‘ ‘{print $(NF-1)}’

cat access.log|awk -F'”‘ ‘{count[$(NF-1)]++}END{for(ua in count){print ua,count[ua]}}’


According to time statistics, count the number of visits per minute and the number of visits per second

cat access.log |awk ‘{print $4}’|awk -F’:’ ‘{print $1″:”$2″:”$3}’|awk ‘{count[$1]++}END{for(time in count){print time,count[time]}}’ #Count the number of requests per minute

cat access.log|awk ‘{count[$4]++}END{ for(time in count){print time,count[time]} }’ #Request per second, concurrent


nginx log filtering

cat access.log|awk ‘$9~/^2/’ #Status code, normal request

cat access.log|awk ‘$9~/^5/’ #Status code, handle exception

cat access.log |awk -F'”‘ ‘$(NF-1) ~ /iPhone/’ #Filter ua containing iphone
[Solved] Shell Error: syntax error: invalid arithmetic operator (error token is “

When processing windows format text, use \r\n as the newline character, if the data involved in the operation is at the end of the line

syntax error: invalid arithmetic operator (error token is “

https://stackoverflow.com/questions/43309793/remove-rn-in-awk

awk -v RS= ' \r\n ' ...


awk  ' { sub("\r$", ""); ...}
awk  ' {sub(/\r/,"",$NF); ...} '
awk  ' BEGIN { RS=ORS="\r\n"; ...


foo=$ ' 5\r ' ; echo $(( 5 + foo))

" )syntax error: invalid arithmetic operator (error token is "


foo=$ ' 5\r ' ; echo $(( 5 +${foo // $'\r'}))


foo=$ ' 5\r ' ; echo $(( 5 +$( tr -d ' \r ' <<< " $foo " )))


or remove \r

foo=$ ' 5\r ' ; foo=${foo // $'\r'}

[Solved] passwd: Authentication token manipulation error

problem background

The following error is displayed when the root password is changed in the online environment:

[root]# passwd root
Changing password for user root.
passwd: Authentication token manipulation error

Solution

View /etc/passwd, /etc/shadow file properties

[root]# lsattr /etc/shadow
----i----------- /etc/shadow
[root]# lsattr /etc/passwd
----i----------- /etc/passwd

Notes:

  • A: Atime, which tells the system not to modify the last access time to this file.
  • S: Sync, once the application performs a write operation on the file, the system immediately writes the modified result to the disk.
  • a: Append Only, the system only allows appending data after this file, and does not allow any process to overwrite or truncate this file. If a directory has this attribute, the system will only allow files to be created and modified in this directory, not to delete any files.
  • b: Do not update the last access time of the file or directory.
  • c: Compress the file or directory and store it.
  • d: When the dump program is executed, the file or directory will not be backed up by dump.
  • D: Check for errors in the compressed file.
  • i: Immutable, the system does not allow any modification to this file. If the directory has this attribute, any process can only modify the files under the directory, and is not allowed to create and delete files.
  • s: The file is completely deleted and cannot be recovered, because it is deleted from the disk, and then fills the area where the file is located with 0.
  • u: When an application requests to delete the file, the system reserves its data blocks so that the file can be undeleted later to prevent accidental deletion of the file or directory.
  • t: The file system supports tail-merging.
  • X: The contents of the compressed file can be directly accessed.


Revoke the i file attributes of /etc/passwd and /etc/shadow

[root]# chattr -i /etc/shadow
[root]# chattr -i /etc/passwd


Check the /etc/passwd, /etc/shadow file properties again

[root]# lsattr /etc/shadow
---------------- /etc/shadow
[root]# lsattr /etc/passwd
---------------- /etc/passwd

Then, re-update the user password.

[Solved] pip Install Error: is not a supported wheel on this platform

Possible reason 1: The installed library is not the corresponding python version. In the downloaded library name, cp27 represents python2.7, and the same is true for others.

Possible reason 2: This is the situation I encountered (downloaded the corresponding version of the library, and then still prompted that the current platform is not supported)

The filename of the numpy library I downloaded:

Install with pip (on the command line):

Error: *** is not a supported wheel on this platform, the problem was successfully solved by a post on stackoverflow.

Method: Enter import pip in the shell; print(pip.pep425tags.get_supported()) can get the file name and version supported by pip, here I am as follows:

>>import pip; print(pip.pep425tags.get_supported())[('cp27', 'none', 'win32'), ('py2', 'none', 'win32'), ('cp27', 'none', 'any'), ('cp2', 'none', 'any'), ('cp26', 'none', 'any'), ('cp25', 'none', 'any'), ('cp24', 'none', 'any'), ('cp23', 'none', 'any'), ('cp22', 'none', 'any'), ('cp21', 'none', 'any'), ('cp20', 'none', 'any'), ('py27', 'none', 'any'), ('py2', 'none', 'any'), ('py26', 'none', 'any'), ('py25', 'none', 'any'), ('py24', 'none', 'any'), ('py23', 'none', 'any'), ('py22', 'none', 'any'), ('py21', 'none', 'any'), ('py20', 'none', 'any')]

It can be found here that the file name format downloaded above is not supported, and it can be successfully installed by modifying it to: numpy-1.10.4+mkl-cp27-none-win32.whl.

Other libraries can also be successfully installed in the same way, but please also pay attention to the dependencies of the library.

Reference: http://stackoverflow.com/questions/28107123/cannot-install-numpy-from-wheel-format?rq=1

[Solved] ERROR: ***-cp37-cp37m-linux_x86_64.whl is not a supported wheel on this platform.

pip install ***-cp37-cp37m-linux_x86_64.whl

ERROR:***-cp37-cp37m-linux_x86_64.whl is not a supported wheel on this platform.


Cause of error:

The mismatch between the downloaded installation package and the local Python version or system architecture causes.

For example, ***-cp37-cp37m-linux_x86_64.whl corresponds to python version 3.7, and the system version is x86_64 linux system.

[Solved] Centos7 Execute Script Error: syntax error near unexpected token `fi’

When the script written on the window computer is executed on Linux and always reports an error, as shown below

syntax error near unexpected token `fi'

Solution:

Open the file with vim and enter it in command line mode

:set ff

If it shows fileformat=dos
Now set our code mode with the command: set ff=unix
Execute: wq!
Check again to see that the code is programmed for unix


Via cat – V * * SH check that the code is normal.

In this way, there will be no errors when executing the code again.

[Solved] Ubuntu ccsm Error: Could not connect: Connection refused Traceback (most recent call last): File “/usr/bin/ccsm”, line 99, in

premise

Environment: Windows 10 LTSC Enterprise Edition 2021
had MSDN mirroring before, and the system was upgraded from 2019 to 2021. The purpose is to install WSL2
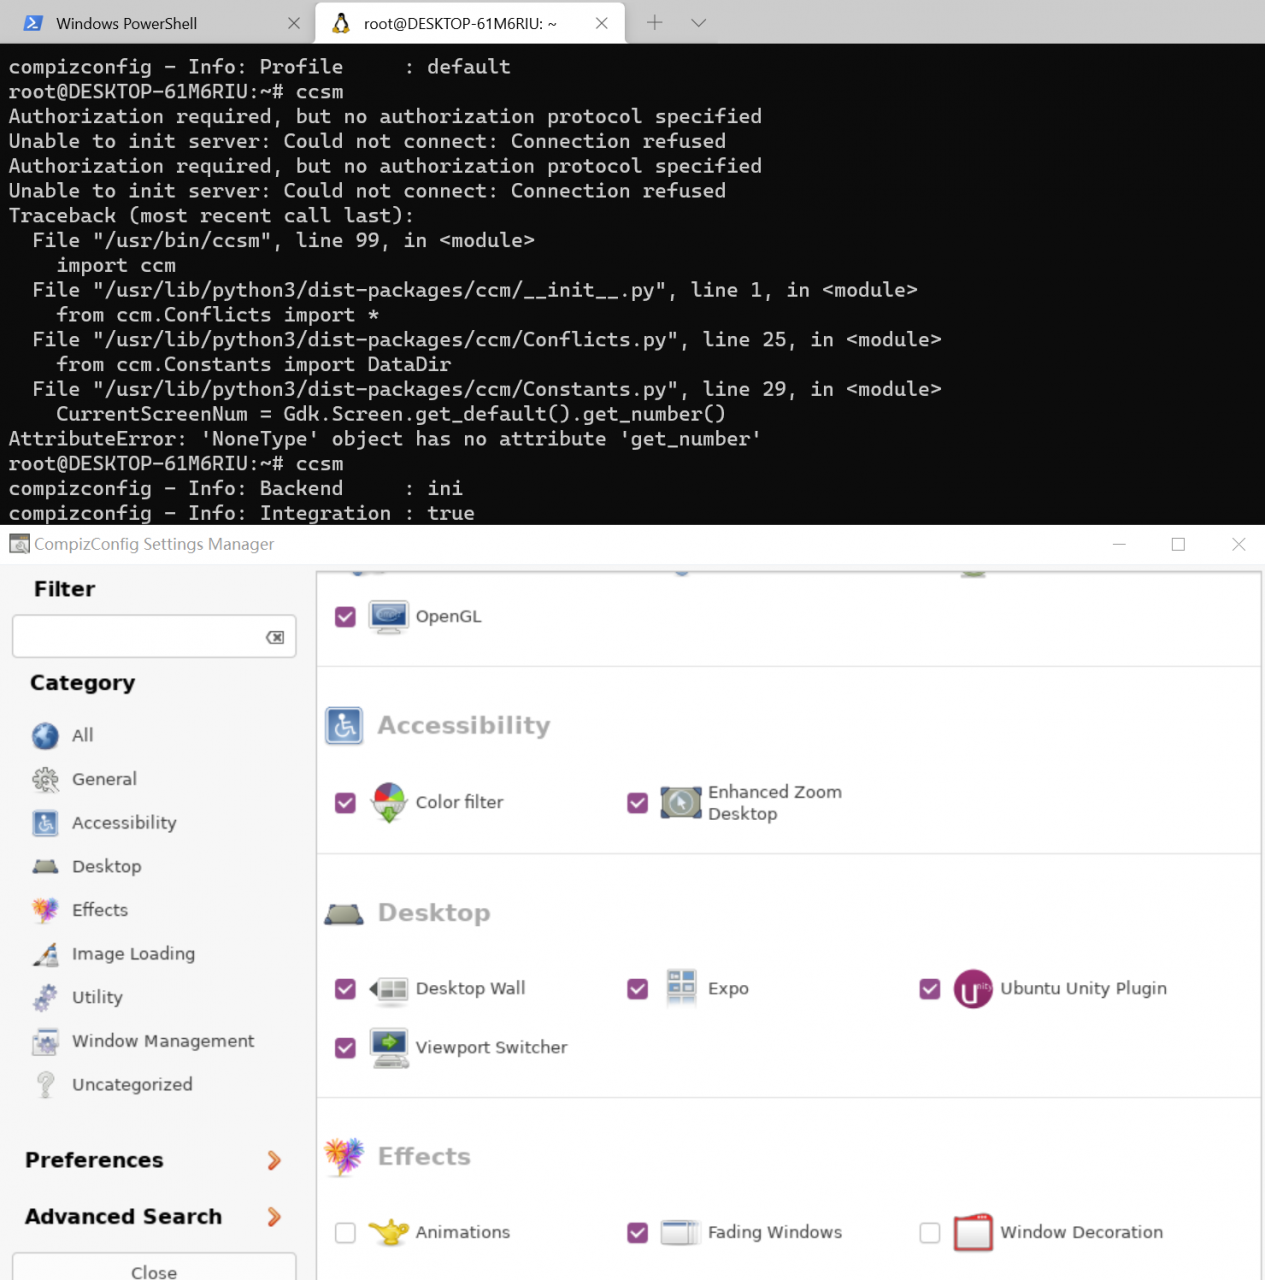
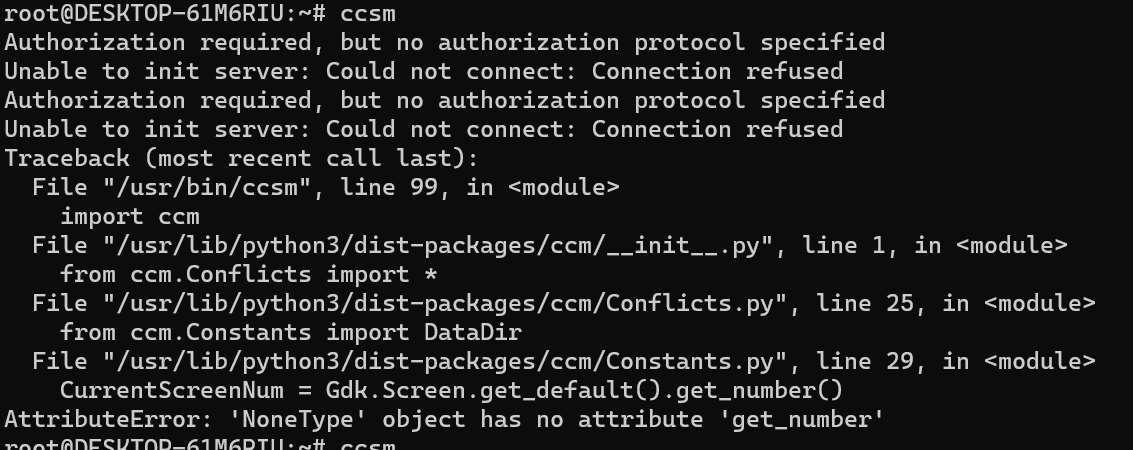
Microsoft Store after installation, open the store to install Ubuntu, start the system and run the graphical X-server, the result is an error, an error is reported As shown below:

ccsm error

solution:

export DISPLAY=x.x.x.x=:0

The ip address is the local address, enter cat /etc/resolv.conf to view the ip address

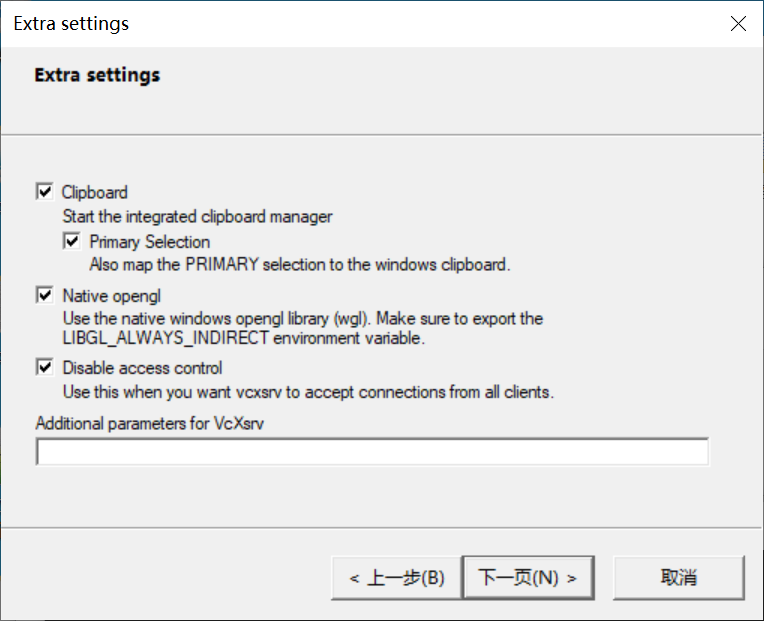
X-server can be set at will, the following Display nunber does not need to be set, the default -1, Extra settings need to check the third

Then enter ccsm to enter

Linux Script Example: iptables-nat.sh

#!/bin/bash
# 2022.2.28 by dewan
# DNAT configuration.

iptables -t nat -F

PUB_IFACE="enp125s0f0"
INT_IFACE="enp125s0f1"

LAN="10.0.0.0/8 172.16.0.0/12 192.168.0.0/16"
SERVER_IP=

for ips in $LAN
do
  iptables -t nat -A POSTROUTING -o $PUB_IFACE -s $ips -j MASQUERADE
done

# 20000 ~ 23999
iptables -t nat -A PREROUTING -p tcp -i $PUB_IFACE --dport 20000:23999 -j DNAT --to-destination $SERVER_IP
iptables -t nat -A PREROUTING -p tcp -i $INT_IFACE -d x.x.x.x --dport 20000:23999 -j DNAT --to-destination $SERVER_IP

# 24000 ~ 32000
# reserved

# 32001 ~ 32768
# sshd

for c in {1..15}
do
        for s in {1..12}
        do
                id=$((c*12-12+s))
                dport=$((32000+id))
                chassis=$((130+c))
                ip="172.168.$chassis.$s"
                echo "$ip:22 --> $dport" >> ip_port.info

                iptables -t nat -A PREROUTING -p tcp -i $PUB_IFACE --dport $dport -j DNAT --to-destination $ip:22
                [ $? -eq 0 ] || echo "$ip failed!"
        done
done

# net.ipv4.ip_local_port_range = 32769  48999

# 48999 ~ 60999
# reserved

# 61000 ~ 64999
# 20 range ports for every hosts

rm -f ip_port.info
for c in {1..15}
do
        for s in {1..12}
        do
                id=$((c*12-12+s))
                dport=$((60980+$id*20)):$((60999+$id*20))
                chassis=$((130+c))
                ip="172.168.$chassis.$s"
                echo "$ip --> $dport" >> ip_port.info

                if [ $c -eq 3 -a $s -eq 4 ] ;then
                        ip="172.168.130.2"
                fi

                iptables -t nat -A PREROUTING -p tcp -i $PUB_IFACE --dport $dport -j DNAT --to-destination $ip
                [ $? -eq 0 ] || echo "$ip failed!"
        done
done

# 65000 ~ 65536
# reserved

Centos7: How to Install GPU v100 Driver

The installation of the graphics card driver is not difficult, but the choice of the driver version is more troublesome, and if it is an offline environment, there will be many dependent packages, which are not included in the default installation of the system. This article does not discuss extreme environments, and now introduces the general driver installation method.
1. Check the graphics card version of the server
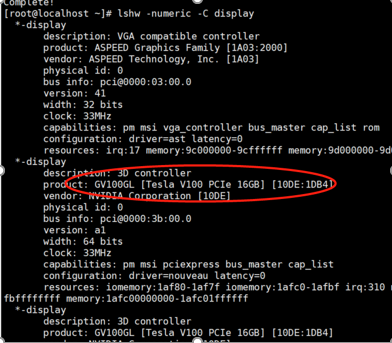
lshw -numeric -C display

Then the server graphics card version I tested is Tesla V100

2. Select the appropriate driver to download from the official website

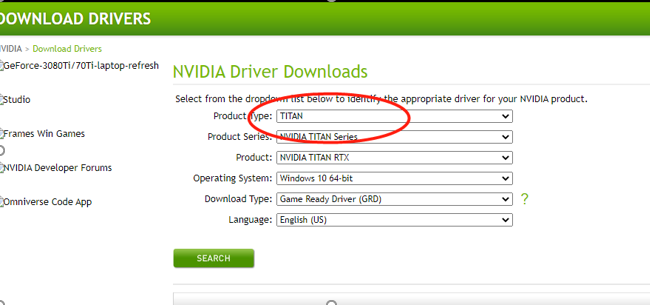
As shown in the figure: Tesla is selected as the Priduce Type, and linux 64 is selected as the Operating system. The response of the multi-select box is a bit slow, and it takes a few seconds after the selection is completed.
After the selection is complete, click search to download the given driver version, or you can copy the download address and wget directly on the server

3. Prepare the installation environment

3.1 Installation dependencies
yum install install -y tar bzip2 make automake gcc gcc-c++ pciutils elfutils-libelf-devel libglvnd-devel iptables firewalld vim bind-utils wget

3.2 Edit the configuration file
vim /lib/modprobe.d/dist-blacklist.conf
Comment out nvidiafb:
#blacklist nvidiafb
add the following statement:

blacklist nouveau
options nouveau modeset=0

3.3 Rebuild the initramfs image file

cp /boot/initramfs-$(uname -r).img /boot/initramfs-$(uname -r).img.bak
dracut /boot/initramfs-$(uname -r).img $(uname -r)

After the rebuild is complete, restart the server to take effect , and restart this step must be done.

3.4 After restarting, verify whether nouveau has been disabled
lsmod | grep nouveau. If there is no output, the disablement is successful.

4. Install the driver
chmod +x NVIDIA-Linux-x86_64-440.118.02.run
./NVIDIA-Linux-x86_64-470.103.01.run
Next step, pay attention to the error.

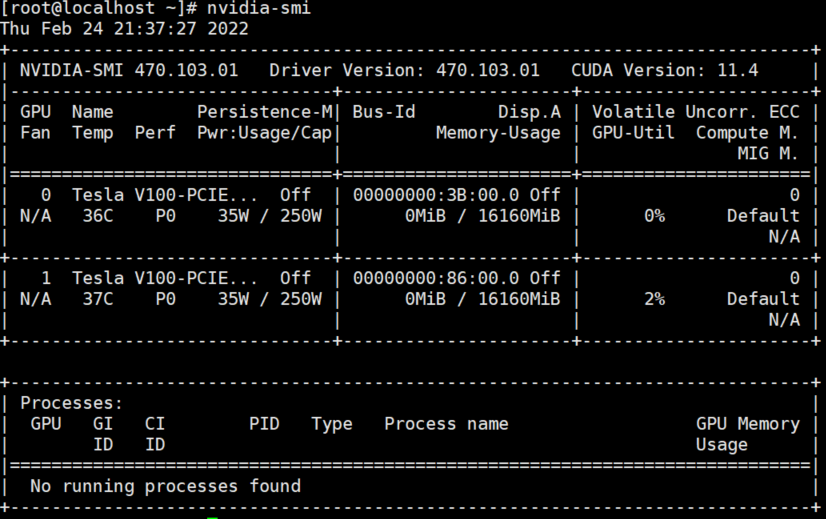
5. Verify
nvidia-smi

Centos7 Install datax Error: [/usr/local/datax/plugin/reader/._drdsreader/plugin.json] do not exist. Please check your configuration file.

Install datax and execute the self-test script: python /usr/local/datax/bin/datax.py /usr/local/datax/job/job.json, the error is as follows:

solution

Need to delete hidden files (important)
rm -rf /usr/local/datax/plugin/*/._*

cd /usr/local/datax/bin
python datax.py ../job/job.json

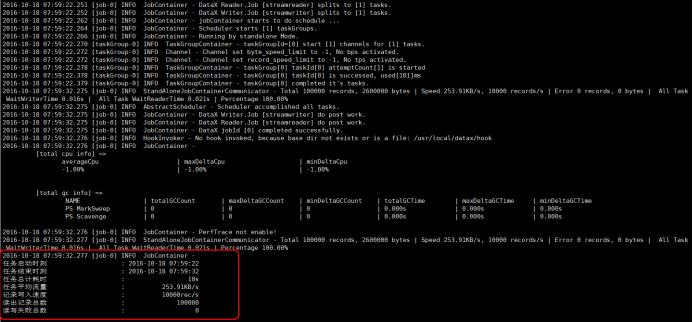
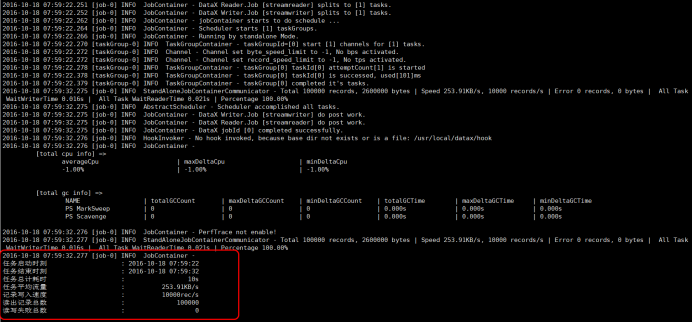
Successfully started as follows