Tag Archives: Windows

podman wsl2 Report Error After Windows is Restarted: ERRO[0000] error joining network namespace for container

1. error joining network namespace for container

If you restart windows without stopping the container first, there is a great probability that this problem will occur


Solution:

Stop the stopped container before starting the exited container You will be prompted that you cannot start, but now you can podman PS or continue to execute podman start to start the container. It’s amazing, isn’t it

podman stop $(podman ps 2>&1 | grep -oE 'for container [a-f0-9]+' | awk '$0=$NF')
podman start $(podman ps --format '{{.Names}}' --filter status=exited)

2. Error refreshing volume

Something like this

$ podman ps -a
ERRO[0000] Error refreshing volume 20115fd77826acd6308a6dceb6318062fcdae8e3626c7b3367de25d328e93a2f: error acquiring lock 1 for volume 20115fd77826acd6308a6dceb6318062fcdae8e3626c7b3367de25d328e93a2f: file exists
ERRO[0000] Error refreshing volume 74d3b3f07e31ce9baabd307ebfea62c0860aa2454babff744c04e828eb571b89: error acquiring lock 2 for volume 74d3b3f07e31ce9baabd307ebfea62c0860aa2454babff744c04e828eb571b89: file exists
ERRO[0000] Error refreshing volume fbbb149df2df1ed1ac1092976de6216e604ea773958ee812e3e24e0d1e635850: error acquiring lock 1 for volume fbbb149df2df1ed1ac1092976de6216e604ea773958ee812e3e24e0d1e635850: file exists
ERRO[0000] Error refreshing volume spec: error acquiring lock 1 for volume spec: file exists
CONTAINER ID  IMAGE   COMMAND  CREATED  STATUS  PORTS   NAMES

Solution

podman system renumber

[Solved] Windows Install Docker Error: “docker engine failed to start…”

1. Problem Description
Referring to the installation of Docker client in linux environment, after completion, it reports "docker engine failed to start...".
2. Refer to the solution
Open Powershell as administrator and execute the following command:
& 'C:\Program Files\Docker\Docker\DockerCli.exe' -SwitchDaemon

[Solved] ElasticSearch Error: FORBIDDEN/12/index read-only/allow delete (api) ,read_only_allow_delete Set windows

Elasticsearch reports an error. For bind/12/index read only/allow delete (API)
this error is because the indexes in elasticsearch are read-only and cannot be added or modified. Query the official website. The reason for this problem may be that the storage disk where es is located does not have enough space, which causes es to automatically turn on data protection and limit it to read-only
just execute the following command. If curl is not installed in the window, please install curl first

Note: when executing the following commands in Windows system, because the single quotation mark “‘” cannot be recognized, please modify it to double quotation mark and or escape the double quotation mark

The windows system executes the following commands:

curl -XPUT -H "Content-Type: application/json" http://127.0.0.1:9200/_all/_settings -d "{\"index.blocks.read_only_allow_delete\": null}"

the Linux system executes the following command:

curl -XPUT -H "Content-Type: application/json" http://127.0.0.1:9200/_all/_settings -d '{"index.blocks.read_only_allo

Golan project Error: CreateProcess error = 216. This version of% 1 is incompatible with the version of windows you are running. Check your computer’s system information, and then contact the software publisher.

Error display

according to Mr.Li Wenzhou's teaching video, he was knocking on the project. After knocking, he clicked run and reported such an error. It showed that the Windows version was incompatible, and he was immediately confused

Solution:

the reason for the error is the package name of the main file package. Just modify it to main

Windows: How to Solve Git Pull Error

Error content:

Unable to negotiate with x.x.x.x port 22: no matching host key type found. Their offer: ssh-rsa
fatal: Could not read from remote repository.

Please make sure you have the correct access rights
and the repository exists.

The public key of Windows computer has been added to the server. At first, it can be used normally, but suddenly, the code cannot be updated on windows.

Solution:

C:\users\administrator\.SSH (this is the path on my computer. Your computer path may be different. Find it according to the specific situation)

Add a new file config in this directory. The file content is:

Host x.x.x.x
    HostkeyAlgorithms +ssh-rsa
    PubkeyAcceptedAlgorithms +ssh-rsa

Note that x.x.x.x here represents the IP address of your git server.

Pull the code again and restore it.

Windows Install Node.js Error: 2503, 2502 [How to Solve]

1. In order to obtain the highest permission through the command prompt, we cut the downloaded node installation package to the root directory of disk C. first, we right-click and click [cut]

2. Open the root directory of Disk C and right-click [paste] in the blank space

3. Click continue in the pop-up reminder to cut the node installation package

4. Right-click start on the taskbar at the bottom of the desktop, and then click command prompt (administrator). This means opening the command prompt with the highest privileges

5. Enter the command CD\, and then press enter

6. using commands MSIEXEC/package node-v8.7.0-64.msi to install

Solving fastdfs in Windows Environment_ Client installation error, error: Microsoft Visual C + + 14.0 is required

Problem recurrence:

building ‘fdfs_ client.sendfile’ extension
error: Microsoft Visual C++ 14.0 is required. Get it with “Microsoft Visual C++ Build Tools”: http://landinghub.visualstudio.com/visual-cpp-build-tools

Cause analysis:

You cannot PIP install FDFS directly under windows_ client_ py-1.2.6-py3.8.egg

resolvent:

1. First set FDFS_ client_ Py-1.2.6-py3.8.egg decompression

2. Then find FDFS_ Setup.py in the client py master directory

Comment out lines 34 and 35, as shown in the figure below:

3. Find FDFS again_ Storage under client directory_ client.py

Line 12 of note is shown in the figure:

4. Finally, find the directory where setup.py is located and execute

python setup.py install

You can find the installed FDFS in the interpreter in pycharm’s settings_ client_ py

5. Install the dependent packages mutagen and requests

pip install   mutagen

pip install   requests

Troubleshooting of nginx error under Windows: createfile() “XXX / logs / nginx. PID” failed


phenomenon

Under windows, when we execute nginx -s stop or Nginx -s quit  or Nginx -s reload   You may receive the following error messages:

nginx: [error] CreateFile() "D:/software/nginx/logs/nginx.pid" failed (2: The system cannot find the file specified)

analysis

When we use start Nginx   To start Nginx xxx/logs/   Generated under the directory named   Nginx.PID   The content of the file has only one number, that is, the PID corresponding to the nginx.exe process. Whether stop, quit or reload, you need to use the PID of nginx.exe to operate it. However, in some special cases (we will create a special case artificially below), Nginx.PID will be lost, so the above three commands will report an error because Nginx.PID cannot be found. Obviously, it is impossible to stop, quit or reload successfully at this time, because nginx doesn’t even know which process it corresponds to.

Solution:

Simple and rough: 1) pass tasklist | findstr “nginx.exe”   Find out the PID corresponding to nginx.exe; 2) In xxx/logs/   New text file under Nginx.pid  , Write the PID of the previous step through the text editor (of course, this step can also be carried out through command line, script, hands-on programming and other methods that can achieve the purpose); 3) Execute Nginx -s stop or Nginx -s quit   Or Nginx -s reload.

verification

[required]

In this verification, the nginx installation path is   D:/software/nginx  , The listening port is 5000.

The rendering method is a command-line screenshot. The commands used will be given in the form of text in the back, which is convenient for readers to copy and paste.

This paper only focuses on the problem of “unable to find nginx. PID”. For other problems derived from the verification process, this paper only gives the link of the answer and does not guarantee the right remedy (it does not mean that the document content is wrong, but does not guarantee that the corresponding problem can be solved). I also urge readers who know the answer to give me advice.

The commands in the verification process must be executed under the nginx installation directory, otherwise an error will occur. If you have to execute in any directory, please refer to another blog under. At the same time, remember to make corresponding changes to the relevant path.

The verification process is shown in the figure below:

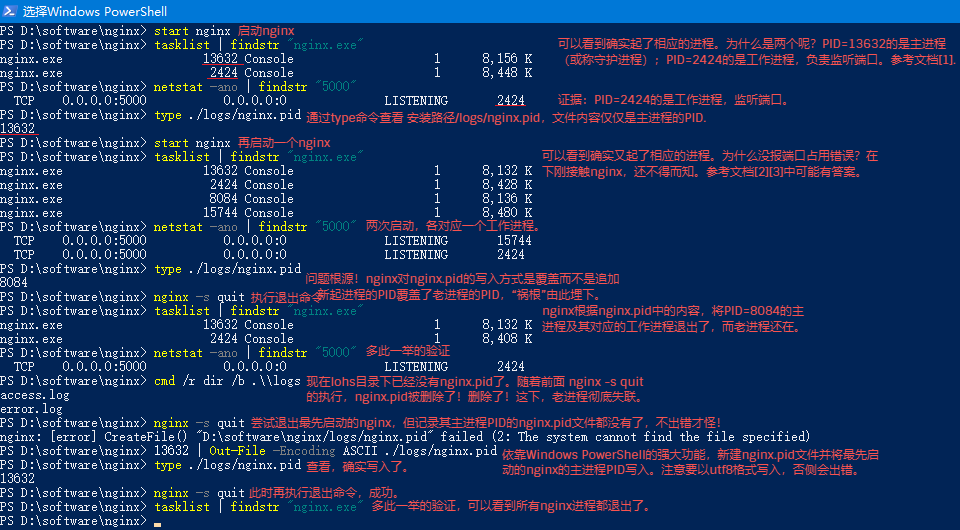
Verification process

The commands used are sorted as follows:

1 start nginx
2 tasklist | findstr "nginx.exe"
3 netstat -ano | findstr "5000"   
4 type ./logs/nginx.pid
5 nginx -s quit
6 cmd /r dir /b .\\logs
7 13632 | Out-File -Encoding ASCII ./logs/nginx.pid


How to Share Files Between Linux and windows

1. Create users, directories and installation packages
yum install samba smbfs
useradd -s /sbin/nologin yunwei
smbpasswd -a yunwei
mkdir -p /date/yunwei
chmod 777 /data/yunwei
2. Configuration file
cp /etc/samba/smb.conf /etc/samba/smb.confbak
vi /etc/samba/smb.conf
[homes]
comment = Home Directories
valid users = %S
browseable = No
writable = yes
create mode = 0664
directory mode = 0775

[yunwei]
comment = yunwei
path = /data/yunwei
public = no
valid users = @yunwei
write list = yunwei
printable = no

3. Start the service
Red Hat Enterprise Linux Server release 6.4 (Santiago)
/etc/init.d/smb start
service smb reload
linux 7
systemctl start smb
systemctl status smb
4. Test the use of
windows => run =>
\\ip\yunwei