Tag Archives: github

[Solved] GitHub Warning: Commit failed – exit code 1 received


1. Show hidden file: open terminal, execute code

defaults write com.apple.finder AppleShowAllFiles -boolean true;killall Finder

Shortcut key: [shift] + [command] + [.]

2. Delete the [. Git] folder, that is, delete the [. Git] folder contained in the folder

3. Cancel the display of hidden files: open the terminal and execute the code

defaults write com.apple.finder AppleShowAllFiles -boolean false;killall Finder

Shortcut key:[Shift] + [Command] + [.]

[Solved] Permission denied (public key) appears during GitHub access

I. Found the problem:

Permission denied (public key) when using the git clone command.

II. Solve the problem:

1. First, try to re-add the previously generated key, and add it several times, but it still does not work.

2. Use the command ssh -v [email protected]测试, the last few lines result in the following.

debug1: Authentications that can continue: publickey
debug1: Next authentication method: publickey
debug1: Trying private key: /home/gr/.ssh/id_rsa
debug1: Trying private key: /home/gr/.ssh/id_dsa
debug1: Trying private key: /home/gr/.ssh/id_ecdsa
debug1: No more authentication methods to try.
Permission denied (publickey).

3. Analysis: Tried 3 private keys, but none of them worked, and finally it led to Permission denied.

4, check my key, ls ~/.ssh/ :

bajie bajie.pub known_hosts

5. I found that my id_rsa file I commanded as bajie, so it is not used at all. Also you can check the key list with the following command.

ssh-add -l

6. The key list of the above command is empty, so to add my key, use the command

gr@grpc:~/workspace/git/home$ ssh-add ~/.ssh/bajie

Enter passphrase for /home/gr/.ssh/bajie:
Identity added: /home/gr/.ssh/bajie (/home/gr/.ssh/bajie)

7. Check again, as follows, the addition was successful.

gr@grpc:~/workspace/git/home$ ssh-add -l

2048 63:c5:d8:6c:a0:0c:a8:9c:26:d8:f8:95:de:29:04:eb /home/gr/.ssh/bajie (RSA)

8. Use ssh -v [email protected]测试连接 again and you can see that the authentication is passed.

debug1: Authentications that can continue: publickey
debug1: Next authentication method: publickey
debug1: Offering RSA public key: /home/gr/.ssh/bajie
debug1: Server accepts key: pkalg ssh-rsa blen 279
debug1: Authentication succeeded (publickey).
Authenticated to github.com ([192.30.252.129]:22).

9. Finally, git clone project succeeded.

[Solved] Updates were rejected because the tip of your current branch is behind

Problem Description.

Updates were rejected because the tip of your current branch is behind

Scenario.

Create a project on github or coding, then git init locally

and then no git pull -f –all

The readme file in the github version conflicts with the local version, and the reason for the conflict is given below.

[master][~/Downloads/ios] git push -u origin master

Username for ‘https://github.com’: shiren1118
Password for ‘https://[email protected]’:
To https://github.com/shiren1118/iOS_code_agile.git
! [rejected] master -> master (non-fast-forward)
error: failed to push some refs to ‘https://github.com/shiren1118/iOS_code_agile.git’
hint: Updates were rejected because the tip of your current branch is behind
hint: its remote counterpart. Merge the remote changes (e.g. ‘git pull’)
hint: before pushing again.
hint: See the ‘Note about fast-forwards’ in ‘git push –help’ for details.


Workaround:

Check the box to force overwrite existing branches (changes may be lost), then click upload, and the upload succeeds.

[master][~/Downloads/ios] git push -u origin master -f

Translated with www.DeepL.com/Translator (free version)


GitHub prompts permission denied (public key). How can I solve this problem?

Why are there a series of technical challenges behind “OMG buy it”>>>

$ git clone [email protected]:gogo/protobuf.git
Cloning into 'protobuf'...
The authenticity of host 'github.com (13.229.188.59)' can't be established.
RSA key fingerprint is SHA256:nThbg6kXUpJWGl7E1IGOCspRomTxdCARLviKw6E5SY8.
Are you sure you want to continue connecting (yes/no)?yes
Warning: Permanently added 'github.com,13.229.188.59' (RSA) to the list of known hosts.
[email protected]: Permission denied (publickey).
fatal: Could not read from remote repository.

Please make sure you have the correct access rights
and the repository exists.

The settings SSH and GPG keys new SSH key in GitHub are shown in the figure below

Go back to the machine terminal where you need to download the source code

Type in the command and return all the way

#ssh-keygen -t rsa

Then go to the/root /. SSH/directory

Take out the public key, copy and paste it into the key in GitHub, and then save it

#cat id_ rsa.pub

Test, success

#ssh -T [email protected]
Hi kylePan! You’ve successfully authenticated, but GitHub does not provide shell access.

My command is as follows

[root@VM_171_105_centos src]# ssh-keygen -t rsa
Generating public/private rsa key pair.
Enter file in which to save the key (/root/.ssh/id_rsa): 
Enter passphrase (empty for no passphrase): 
Enter same passphrase again: 
Your identification has been saved in /root/.ssh/id_rsa.
Your public key has been saved in /root/.ssh/id_rsa.pub.
The key fingerprint is:
c8:b9:17:bf:e7:9b:8b:ba:9f:e1:23:0d:1c:6a:64:45 root@VM_171_105_centos
The key's randomart image is:
+--[ RSA 2048]----+
|       .E        |
|        .        |
|       .         |
|     .oo.        |
|     o+oS.       |
|      o.oo       |
|     .. .oo      |
|       ...o=..   |
|        o=*+=o   |
+-----------------+
[root@VM_171_105_centos src]# ssh -T [email protected]
Permission denied (publickey).
[root@VM_171_105_centos src]# cd /root/.ssh/
[root@VM_171_105_centos .ssh]# ls
authorized_keys  id_rsa  id_rsa.pub  known_hosts
[root@VM_171_105_centos .ssh]# cat id_rsa.pub 
ssh-rsa AAAAB3AAABIwAAAQEAzVPno/Cm5ApGGMP8YjituJGegOCq7TVKVECehWog9hTfC0Z5PMsf5OWkWvUZ85nFJBuwhMszxkjFSd7e6INYJ42WfGKxPXm7ZoOQxkBZAetUUaNvDhCKZCdLNHWGde8gaX84i39JKWgwYrzX9Y1T+bDI1cJiUuNN6Xr8x4ZkMm4e+LugYtVSKGZKz7zLcp1mXQszh9mWM08/yyRq/CdTEly1ghojUDUNFTzyk6VQz/rzMFoiVuwbYlQasqdR4xIzvnIjfBrtSP4z+qdD+wZFvSABnFClXH0nJEaaKX9EdJpi2ezvLvAblDg371J
[root@VM_171_105_centos .ssh]# ssh -T [email protected]
Hi kylePan! You've successfully authenticated, but GitHub does not provide shell access.

Git Push Github ERROR: Permission to xxx.git denied to user

Before, my computer’s local git has logged into a GitHub account. Today, I want to change another new GitHub account to submit the project, which is equivalent to using two GitHub accounts on the same computer

So I changed my user name and email first

1 git config --global user.name "Your_username"
2 git config --global user.email "Your_email"

Then create a new warehouse on GitHub, connect with the local warehouse, and finally use git push – U origin master to push to the remote warehouse

User linliquan does not have access to user monkeylucky’s repository javainterview

Finally, a solution is found by searching for information on the Internet

My computer is win7, but the setting method should be almost the same

1. Open the control panel and search the credential manager on the right. You will find that there are in GitHub account

2. Change your user name and password to your new login GitHub account and password 2

re submit: git push – U origin master

It’s done

GitHub common operations and common errors! Error prompt: fatal: remote origin already exists

If you enter $git remote add origin [email protected] : djqiang (GitHub account name)/gitdemo (project name). Git

Prompt error message: fatal: remote origin already exists

The solution is as follows:

1. Enter $git remote RM origin first

2. Then enter $git remote add origin [email protected] : djqiang/gitdemo.git will not report error

3. Error: could not remove config section ‘remote. Origin’. We need to modify the content of gitconfig file

4. Find the installation path of your GitHub, and mine is C:: (users) ﹣ ASUS ﹣ appdata ﹣ local ﹣ GitHub ﹣ portablegit_ ca477551eeb4aea0e4ae9fcd3358bd96720bb5c8\etc

5. Find a file named gitconfig, open it, and delete the line [remote “origin”]

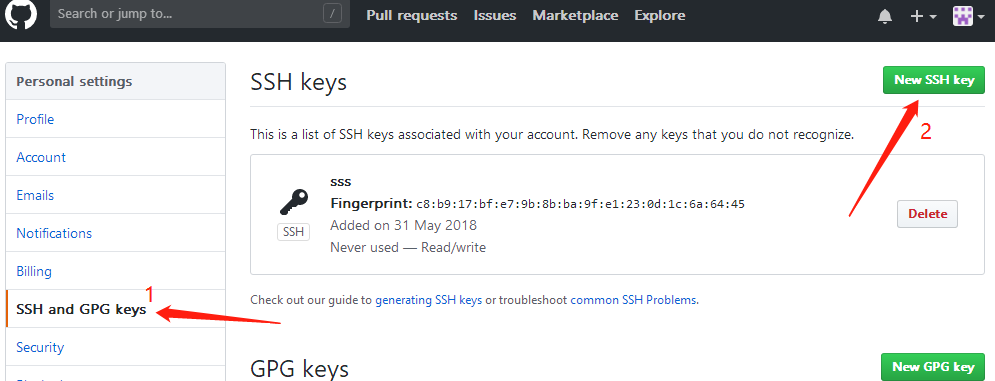
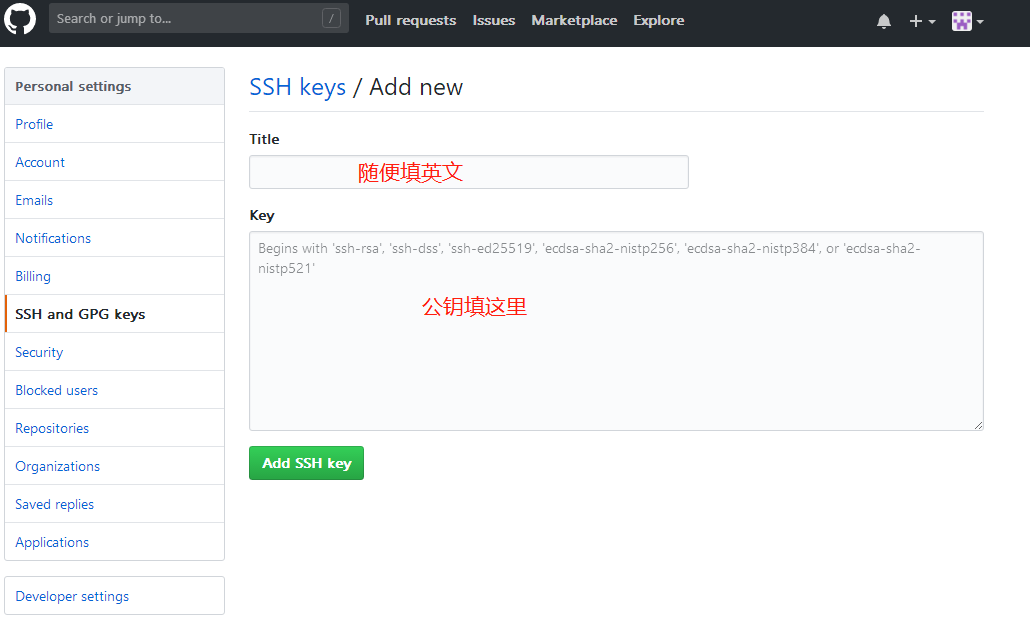
If you enter $SSH – t [email protected]
There is an error prompt: permission denied (public key). Because the newly generated key cannot be added to SSH, the connection to GitHub cannot be made

The solution is as follows:

1. Enter $SSH agent first, and then $SSH add ~ /. SSH/ID_ Key, that’s it

2. If not, enter SSH add ~ /. SSH/ID_ Can not open a connection to your authentication agent. The solution is to use git GUI’s SSH tool to generate the key. In this way, the key will be directly saved in SSH when it is generated. There is no need to add the SSH add command. Other user, token and other configurations will be done with the command line

3. It’s better to check the ID in your copy_ If there are any extra spaces or empty lines in the content of the rsa.pub file, some editors will help you add these

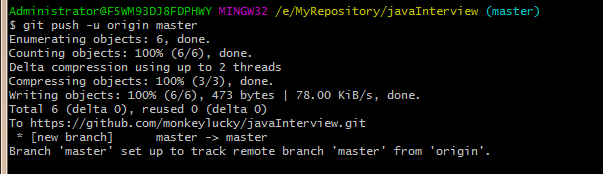
If you enter $git push origin master

Error message: error:failed to push som refs to …….

The solution is as follows:

1. Enter $git pull origin master// first pull down the files on the remote server GitHub

2. Enter $git push origin master

3. If an error is reported, fatal: couldn’t find remote ref master or fatal: ‘origin’ does not appear to be a git repository and fatal: could not read from remote repository

4. You need to re-enter $git remote add origin [email protected] :djqiang/gitdemo.git

The process of creating a project locally using Git

$makdir ~/Hello World// create a project Hello World
$Cd ~/Hello World// open the project
$git init// initialize
$touch readme
$git add readme// update the readme file
$git commit – M ‘first commit’// submit the update, And annotate the information “first commit”
$git remote add origin [email protected] : defnngj/hello-world.git// connect to remote GitHub project
$git push – U origin master// update local project to GitHub project

Gitconfig configuration file

Git has a tool called git config, which allows you to get and set configuration variables; These variables control all aspects of GIT’s appearance and operation. These variables can be stored in three different locations:
1./etc/gitconfig file: contains values applicable to all users and all libraries of the system. If you pass the parameter option ‘– system’ to git config, it will explicitly read and write the file
2. ~ /. Gitconfig file: specific to your users. You can make git read or write this particular file by passing the — global option in windows, GIT looks up the. Gitconfig file in the $home directory (for most people, it’s under C:// documents and settings \ $user). It also looks for/etc/gitconfig, although it is relative to the msys root. This could be anywhere you decide to install git when you run setup on windows

Configuration information:

2.1 When you install git, the first thing to do is to set your user name and e-mail address. This is very important because this information is used every git submission. It’s embedded in your submission forever:

  $ git config –global user.name “John Doe”

  $ git config –global user.email [email protected]

2.2 your editor

Now that your logo has been set, you can configure your default text editor, which git will use when you need to enter some messages. By default, GIT uses your system’s default editor, which is usually VI or vim. If you want to use a different text editor, such as Emacs, you can do the following:

  $ git config –global core.editor emacs

2.3 checking your settings

If you want to check your settings, you can use git config — list to list all the settings git can find there

  $ git config –list

You can also check the current value of a specific keyword that git thinks. Use the following command git config {key}:

  $ git config user.name

2.4 getting help

If you need help when using git, there are three ways to get the man page help information of any git command:

  $ git help < verb>

  $ git < verb> — help

  $ man git-< verb>

For example, you can run the following command to get man page help for the config command:

$git help config
— –
Author: dengjianqiang2011
source: CSDN
original text: https://blog.csdn.net/dengjianqiang2011/article/details/9260435?utm_ Source = copy
copyright notice: This article is the original article of the blogger, please attach the blog link if you want to reprint it

Clone code from GitHub website — unable to find remote helper

https://github.com/ARM-software/arm-trusted-firmware.git

Error

fatal: Unable to find remote helper for ‘https’

Method 1:

(1) git clone –recursive git://github.com/ceph/ceph.git
(2) Then run the following command (replacing https, with git).

git clonegit://github.com/ARM-software/arm-trusted-firmware.git

Method 2 (Recommended):

It looks like not having (lib)curl-devel installed when you install git can cause this.

Solution:

$ yum installcurl-devel
$ # cd to wherever the source for git is
$ cd /home/lion/git-source-code
$ ./configure
$ make
$ make install

git schnnel failed to receive handshake, SSLTLS connection failed

Error in Git push:

Error message:

C:\Code\git> git p
fatal: unable to access ‘ https://github.com/i042416/KnowlegeRepository.git/ ’: schnnel: failed to receive handshake, SSL/TLS connection failed

Solution

Add a line to git configuration file:

[http] sslbackend = openssl

For more original articles on Jerry, please pay attention to the official account of “Wang Zixi”:

AS Pycharm Git push Error: Invocation failed Server returned invalid Response, Authentication failed

Contents of articles

Android studio git error reporting and Solutions

Pcharm git push error and solution push failed: unable to access’ https://github.com/BierOne/bottom-up-attention-vqa.git/ ‘: Could not resolve host: github.comPush failed Invocation failed Server returned invalid Response. Authentication failed for

Reference link

Android studio git error reporting and Solutions

after all, Android studio and pychar are the same family. However, there are many solutions to as found on the Internet. Here is a brief introduction</ mark>

Invocation failed Unexpected Response from Server: Unauthorized

resolvent:

AndroidStudio -> Preferences -> Git -> SSH Executable and changed from Native to Built-in and it started working.

Reason: SSH key pair protects the password. If you select native SSH executable, the as will not prompt you to enter the password, so the final authentication will fail. However, if build in is set, you will be prompted to enter the password, so the authentication is successful.

Pychar git push error report and solution

Push failed: Unable to access ‘ https://github.com/BierOne/bottom-up-attention-vqa.git/ ’: Could not resolve host: github.com

Solutions and reasons:

This error is obviously caused by network problems. It is recommended to connect to the network again. Generally, the avatar can be displayed normally at this position, that is, there is no problem with the network

Push failed Invocation failed Server returned invalid Response. Authentication failed for

Solution and reason: because there is no build in option in my pychar, the as method is not applicable. My solution is to check “use confidential helper” in the GIT column, which is the authentication assistant:

in this way, you will be prompted to enter your password during authentication, and you can pass the authentication normally. There are other solutions, but they are similar.

In addition, you can also try to use token when adding GitHub account. It should be done once and for all

In the settings page of the GitHub official website account, select create new token, and then copy it

Rust’s introduction to Hello world | webassembly

As wechat does not support external links, you can read the original at the end of the article for more resources

In the previous article, we introduced

Learn the frequently asked questions of webassembly

.

Now let’s start with rust.

Rust is the best language to write webassembly applications today.

For the source code repo used in this article, please click:

https://github.com/second-state/wasm-learning/tree/master/rust

Although webassembly supports many programming languages, rust has the best tools so far.

In the past four years, rust has been selected as the most popular programming language by stackoverflow users, and is one of the fastest growing programming languages.

Rust is as versatile and efficient as C, but because of its compiler design, rust is much safer than C.

Like C, rust has a learning curve.

In this tutorial, I’ll help you get started with the rust programming language.

You can use online resources, such as

This book

Learn more about the rust language.

Install rust

In a typical Linux system, run the following instructions, install the rust compiler and the cargo tool to create a management system.


$ sudo apt-get update
$ sudo apt-get -y upgrade

$ curl --proto '=https' --tlsv1.2 -sSf https://sh.rustup.rs | sh
$ source $HOME/.cargo/env

Hello World

The source code of this demo application can be downloaded as follows:

https://github.com/second-state/wasm-learning/blob/master/rust/hello.md

First, let’s use

cargo

Create a new project.


$ cargo new hello
Created binary (application) `hello` package
$ cd hello

stay

src/ main.rs

In

main ()

Function, which is the entry point to execute the rust application.

Src/main. Rs

The contents of the document are as follows.

The code just prints a string “Hello world” to standard output.


fn main() {
println!(“Hello, world!”);
}

Next, create a binary executable for your machine.


$ cargo build --release
Compiling hello v0.1.0 (/home/ubuntu/wasm-learning/rust/hello)
Finished release [optimized] target(s) in 0.22s

You can now run your first rust program and see “Hello world” on the console

You can now run your first rust program and see “Hello world” on the console


$ target/release/hello
Hello, world!

Interaction

The source code for this demo can be found here

https://github.com/second-state/wasm-learning/blob/master/rust/cli.md .

Again, let’s use cargo to create a new project.


$ cargo new cli
Created binary (application) `cli` package
$ cd cli

Src/ main.Rs

The contents of the document are as follows.

env::args()

Will save the string value that we pass from the command line when we execute the program.

Also note here that we first create a rust string and then attach more string references to it.

Why do we have to join string references instead of string values?That’s why rust makes programs safe. click

here

Learn more.


use std::env;

fn main() {
let args: Vec<String&> = env::args().collect();
println!("{}", String::from("Hello ") + &args[1]);
}

Next, create a QR code executable for your machine.


$ cargo build --release

You can run the program and pass in a piece of command line code


$ target/release/cli Rust
Hello Rust

What about webassembly?

Now we’ve learned how to create a local executable program from the rust source code.

Executable programs can only run on the build computer and may not be safe.

In the next tutorial, we will show you:

How to build webassembly bytecode program from rust source code instead of local executable file.

How to interact with webassembly program through web browser instead of tedious command line.

Related reading

String in webassembly

It only takes 5 minutes to teach you how to write and execute a rust + webassembly program

Wechat does not support external links. Click to read the original text to view the article resources

this article is from WeChat official account – WebAssembly Chinese community (webassemblywasm).
In case of infringement, please contact [email protected] Delete.
This article participates in the “OSC source creation program”. You are welcome to join and share.