Category Archives: Linux

Solutions to nginx upstream timed out (Two Situations)

This can happen in either of the following two scenarios.

1. nginx proxy

The proxy_read_timeout value needs to be adjusted appropriately.

location/{

proxy_read_timeout 300;


location/{ …}


2. nginx as other upstream services such as php-fpm

In this case, adjust the fastcgi_read_timeout option value appropriately.

location ~ .+\.php($|/) {

fastcgi_pass unix:/var/run/php5-fpm.sock;
fastcgi_read_timeout 300;

}


The relevant configurations for the server section are.

large_client_header_buffers 4 16k;
client_max_body_size 30m;
client_body_buffer_size 128k;
#proxy_connect_timeout 300;
#proxy_read_timeout 300;
#proxy_send_timeout 300;
#proxy_buffer_size 64k;
#proxy_buffers 4 32k;
#proxy_busy_buffers_size 64k;
#proxy_temp_file_write_size 64k;

fastcgi_connect_timeout 75;
fastcgi_read_timeout 300;
fastcgi_send_timeout 300;
fastcgi_buffer_size 64k;
fastcgi_buffers 4 32k;
fastcgi_busy_buffers_size 64k;
fastcgi_temp_file_write_size 64k;

Choose the above configuration depending on the proxy or fastcgi used by your server.

How to Solve Nginx Error 13: Permission denied) while connecting to upstream

When using nginx for load balancing, there is a problem

1 connect() to 10.51.2.237:8084 failed (13: Permission denied) while connecting to upstream, client: 10.51.2.237, server:

It has been confirmed that the local firewall has been shut down. After some inquiry, it is because of SELinux

SELinux is a mandatory access control (MAC) system provided in Linux kernel version 2.6. It’s a built-in security system, and firewalls should be external

So: there are two solutions

1. Close SELinux

1. Temporary shutdown (no need to restart the machine)

Setenforce 0 # set SELinux to permission mode

##Setenforce 1 sets SELinux to enforcing mode

2. To modify the configuration file, restart the machine

Modify/etc/SELinux/config file

Change SELinux = enforcing to SELinux = disabled

Just restart the machine

2. Execute the following command

setsebool -P httpd_ can_ network_ connect 1

[Solved] Nginx can’t listen to the problem of virtual VIP: 99: cannot assign requested address

99: Cannot assign requested address

#Without the IP 10.0.0.3 on the local NIC Nginx will report the following error.

[root@lb01 conf]# /application/nginx/sbin/nginx -t

nginx: the configuration file /application/nginx-1.10.2/conf/nginx.conf syntax is ok

nginx: [emerg] bind() to 10.0.0.3:80 failed (99: Cannot assign requested address)

nginx: configuration file /application/nginx-1.10.2/conf/nginx.conf test failed

[root@lb01 conf]# ip a s eth0

2: eth0: <BROADCAST,MULTICAST,UP,LOWER_UP> mtu 1500 qdisc pfifo_fast state UP qlen 1000

    link/ether 00:0c:29:27:4e:e9 brd ff:ff:ff:ff:ff:ff

    inet 10.0.0.5/24 brd 10.0.0.255 scope global eth0

    inet6 fe80::20c:29ff:fe27:4ee9/64 scope link

       valid_lft forever preferred_lft forever

#Note: There is no way for nginx to listen to ip addresses that do not exist locally. 

solution to nginx monitoring virtual VIP: 

The above problem is that there is no IP corresponding to the IP monitored by the configuration file on the physical network card. The solution is to add the following kernel parameter configuration in/etc/sysctl.conf

echo 'net.ipv4.ip_nonlocal_bind = 1' >>/etc/sysctl.conf

sysctl -p# Effective 

#You can also make Nginx start up by ignoring the presence of VIPs listening in the configuration with the following method, also suitable for haproxy

echo "1" >/proc/sys/net/ipv4/ip_nonlocal_bind

MySql Host is blocked because of many connection errors; unblock with ‘mysqladmin flush-hosts’ [How to Solve]


It’s the end of the year, it’s the middle of the night on Friday, and the disaster is not alone. After repairing redis, MySQL doesn’t stop

Error: host is blocked because of many connection errors; unblock with ‘mysqladmin flush-hosts’

Reason:

The same IP generates too much in a short time (more than MySQL database)_ connection_ The maximum value of errors) caused by the interrupted database connection

Solution:

1. Increase allowed Max_ connection_ Number of errors

Enter MySQL database to view Max_ connection_ errors: show variables like ‘%max_ connection_ errors%’;

Modify Max_ connection_ The number of errors is 1000: set global max_ connect_ errors = 1000;

Check whether the modification is successful: Show variables like% max_ connection_ errors%’;

2. Use the command mysqladmin flush hosts to clean up the hosts file (I don’t know which directory mysqladmin is in, I can use the command to find: where is mysqladmin)

In the found directory, use the command to modify/usr/bin/mysqladmin flush hosts – h192.168.1.1 – p3308 – uroot – prootpwd

Remarks:

Port number, user name and password can be added and modified as needed

If the master/slave database is configured, it is necessary to modify both the master and slave databases (I just suffered from some very easy commands, and it took me a long time)

The second step can also be done in the database. The command is as follows: flush hosts

[Solved] Ubuntu mariadb root access denied after mysql_secure_installation

ubuntu mariadb mysql root access denied after mysql_secure_installation

mariadb-cannot-login-as-root

https://stackoverflow.com/questions/43379892/mariadb-cannot-login-as-root

exec command (need no password) :sudo mysql

Unlike native MariaDB packages (those provided by MariaDB itself), packages generated by Ubuntu by default haveunix_socketauthentication for the local root. To check, run

SELECT user, host, plugin FROM mysql.user;

If you seeunix_socketin theplugincolumn, that’s the reason.

To return to the usual password authentication, run

UPDATE mysql.user SET plugin = ” WHERE plugin = ‘unix_socket’; FLUSH PRIVILEGES;

(choose theWHEREclause which fits your purposes, the one above is just an example)

Solve yum install mysql-server exception under CentOS7: No package mysql-server available.

Solution to the problem that yum installs mysql-server has no available package:

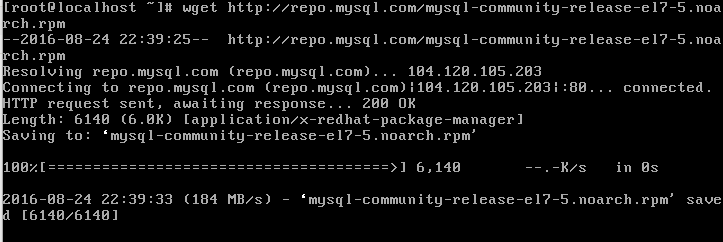
step 1: wget http://repo.mysql.com/mysql-community-release-el7-5.noarch.rpm

step 2: rpm -ivh mysql-community-release-el7-5.noarch.rpm

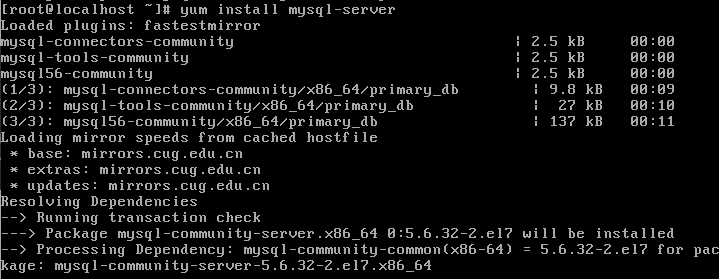
After the above two steps, execute again: yum install mysql-server command can be successfully installed.


CenterOS7: How to Solve error: No package mysql-server available.

No package MySQL server available

1. Using Yum install – y MySQL server, the error is as follows:

[root@heyong_jd ~]# yum install -y mysql-server
Loaded plugins: fastestmirror, langpacks
Loading mirror speeds from cached hostfile
No package mysql-server available.
Error: Nothing to do

2. The solution is as follows:

1: wget http://repo.mysql.com/mysql-community-release-el7-5.noarch.rpm

2: rpm -ivh mysql-community-release-el7-5.noarch.rpm

3. Then perform the installation

[root@heyong_jd ~]# yum install mysql-server
Loaded plugins: fastestmirror, langpacks
Repository base is listed more than once in the configuration
Repository updates is listed more than once in the configuration
Repository extras is listed more than once in the configuration
Repository centosplus is listed more than once in the configuration
Repository contrib is listed more than once in the configuration
Loading mirror speeds from cached hostfile
mysql-connectors-community                                                                                                                          | 2.5 kB  00:00:00     
mysql-tools-community                                                                                                                               | 2.5 kB  00:00:00     
mysql56-community                                                                                                                                   | 2.5 kB  00:00:00     
(1/3): mysql-connectors-community/x86_64/primary_db                                                                                                 |  41 kB  00:00:00     
(2/3): mysql-tools-community/x86_64/primary_db                                                                                                      |  58 kB  00:00:00     
(3/3): mysql56-community/x86_64/primary_db                                                                                                          | 226 kB  00:00:01  
...
...
...
Installed:
  mysql-community-libs.x86_64 0:5.6.44-2.el7                                          mysql-community-server.x86_64 0:5.6.44-2.el7                                         

Dependency Installed:
  mysql-community-client.x86_64 0:5.6.44-2.el7            mysql-community-common.x86_64 0:5.6.44-2.el7            perl-Compress-Raw-Bzip2.x86_64 0:2.061-3.el7           
  perl-Compress-Raw-Zlib.x86_64 1:2.061-4.el7             perl-DBI.x86_64 0:1.627-4.el7                           perl-Data-Dumper.x86_64 0:2.145-3.el7                  
  perl-IO-Compress.noarch 0:2.061-2.el7                   perl-Net-Daemon.noarch 0:0.48-5.el7                     perl-PlRPC.noarch 0:0.2020-14.el7                      

Replaced:
  mariadb-libs.x86_64 1:5.5.60-1.el7_5                                                                                                                                     

Complete!

Successfully installed

How to Solve Centos Yum Error: No module named yum

centos reports an error when executing yum

[root@localhost ~]# yum
There was a problem importing one of the Python modules
required to run yum. The error leading to this problem was:

No module named yum

Please install a package which provides this module, or
verify that the module is installed correctly.

It’s possible that the above module doesn’t match the
current version of Python, which is:
2.7.8 (default, Nov 24 2015, 15:31:38)
[GCC 4.4.7 20120313 (Red Hat 4.4.7-16)]

If you cannot solve this problem yourself, please go to
the yum faq at:
http://yum.baseurl.org/wiki/Faq

Most of them are caused by python upgrade

Check python version

[root@localhost ~]# ls /usr/bin/|grep python
abrt-action-analyze-python
python
python2
python2.6.6
python-config

Modify the python interpreter address

vim /usr/bin/yum Change the first line #! /usr/bin/python to #! /usr/bin/python2.6.6

If you still get an error, you need to check if python 2.6.6 is working properly

Enter the following command in the python interactive terminal.

>>> import yum
Traceback (most recent call last):
File “<stdin>”, line 1, in <module>
ImportError: No module named yum

To see if there are yum modules

ls /usr/lib/python2.6/site-packages/yum to see if there is anything under this directory, if there is nothing, then there is nothing under it

If this directory exists, check if python 2.6.6 can import other modules properly

For example: import os

If it doesn’t work, the directory /usr/lib64/python2.6 is corrupt or unusable.

If it is gone, you can only copy one from another server, so that it works

[Solved] Centos6: Python 2.6 upgrade to 3.7, error handling [no module named ‘_ctypes’]

Centos6 upgrade from Python 2.6 to 3.7, error handling [no module named ‘_ctypes’]

Because of the need of development, we upgrade Python 2 to Python 3 on CentOS 6 server. Due to the limitation of Intranet, manual installation is used here

1. View the current Python version

[python@VM000001564 ~]$ python -V
Python 2.6.6

2. Download Python stable version (current 3.7.2) from the official website for installation

Here, download software using Python User, install using root user

[python@VM000001564 ~]$ wget https://www.python.org/ftp/python/3.7.2/Python-3.7.2.tgz
[python@VM000001564 ~]$ tar -xzvf Python-3.7.2.tgz
[python@VM000001564 ~]$ cd Python-3.7.2


[root@VM000001564 Python-3.7.2]# ./configure
[root@VM000001564 Python-3.7.2]# make && make install

3. Post verification version after installation

[python@VM000001564 Python-3.7.2]$ python3 -V
Python 3.7.2

4. Set 3.7.2 as the default version

The default version is 2.6.6, and 3.7.2 needs to be set

[root@VM000001564 Python-3.7.2]# ls -al /usr/bin | grep python
-rwxr-xr-x.  1 root root      11232 Oct 16  2014 abrt-action-analyze-python
-rwxr-xr-x.  2 root root       9032 Jan 22  2014 python
lrwxrwxrwx.  1 root root          6 Oct 27  2014 python2 -> python
-rwxr-xr-x.  2 root root       9032 Jan 22  2014 python2.6

Back up the original Python soft link:

# mv /usr/bin/python /usr/bin/python.bak

links python to python3:

# ln -s /usr/local/bin/python3 /usr/bin/python

5. Problems encountered in installation

ModuleNotFoundError: No module named ‘_ ctypes’

Because version 3.7 uses external modules_ Ctypes, you need a new package libffi devel. After installing this package, you can install it again

yum install libffi-devel -y
make install

If you remove the file link dependency of Python under/usr/bin before the installation, then Yum can’t be used normally. You need to download the relevant software package to install. To save readers’ time, put the link

Download this version from CentOS 7

wget http://mirror.centos.org/centos/7/os/x86_64/Packages/libffi-devel-3.0.13-18.el7.x86_64.rpm
rpm -ivh libffi-devel-3.0.13-18.el7.x86_64.rpm

Download this version from CentOS 6

wget http://mirror.centos.org/centos/6/os/x86_64/Packages/libffi-devel-3.0.5-3.2.el6.x86_64.rpm
rpm -ivh  libffi-devel-3.0.5-3.2.el6.x86_64.rpm

after installing this package, recompile it again. Just follow the installation steps, and remember