Category Archives: Linux

There are offline or missing virtual drivers with preserved cache

Error given during linux system startup.

There are offline or missing virtual drives with preserved cache. Please check the cables and ensure that all drives are present.
Press any key to enter the configuration utility.

Unable to enter the system.

The solution is as follows:

Go to raid management, F2, edit profile –> Managing Preserved Cache –> discard the cache, then save, Ctrl+Alt+Del and reboot. The problem is solved.

Attachment: DELL official instructions for this problem.

Error Message:There are offline or missing virtual drives with preserved cache.Please check the cables and ensure that all drives are present.Press any key to enter the configuration utility.

Probable Cause:The controller preserves the dirty cache from a virtual disk if the disk becomes offline or is deleted because of missing physical disks.

This preserved dirty cache is called pinned cache, and is preserved until you import the virtual disk, or discard the cache.

Corrective Action:Use the<Ctrl><R>utility to import the virtual disk or discard the preserved cache. For the steps used to manage preserved cache, seeManaging Preserved Cache.
 

Deploying multiple jbosserror: transport error 202: bind failed in Linux

[chenshuo@localhost bin]$ ./run.sh 
=========================================================================

  JBoss Bootstrap Environment

  JBOSS_HOME: /usr/local/jboss

  JAVA: /usr/local/jdk1.6.0_45/bin/java

  JAVA_OPTS: -Dprogram.name=run.sh -server -Xms256m -Xmx2048m -Dsun.rmi.dgc.client.gcInterval=3600000 -Dsun.rmi.dgc.server.gcInterval=3600000 -XX:PermSize=128m -XX:MaxPermSize=512m -XX:MaxNewSize=256m -XX:+UseParallelGC -XX:+UseParallelOldGC -Xrunjdwp:transport=dt_socket,address=8787,server=y,suspend=n -Djava.net.preferIPv4Stack=true

  CLASSPATH: /usr/local/jboss/bin/run.jar:/usr/local/jdk1.6.0_45/lib/tools.jar

=========================================================================

ERROR: transport error 202: bind failed: Address already in use
ERROR: JDWP Transport dt_socket failed to initialize, TRANSPORT_INIT(510)
JDWP exit error AGENT_ERROR_TRANSPORT_INIT(197): No transports initialized [../../../src/share/back/debugInit.c:690]
FATAL ERROR in native method: JDWP No transports initialized, jvmtiError=AGENT_ERROR_TRANSPORT_INIT(197)
./run.sh: line 255: 24689 give up              "$JAVA" $JAVA_OPTS -Djava.endorsed.dirs="$JBOSS_ENDORSED_DIRS" -classpath "$JBOSS_CLASSPATH" org.jboss.Main "$@"


Resolve debug port occupancy Modify the configured 8787 JAVA_OPTS=”$JAVA_OPTS -Xrunjdwp:transport=dt_socket,address=8787,server=y,suspend=n”

#JAVA_OPTS="$JAVA_OPTS -Xrunjdwp:transport=dt_shmem,server=y,suspend=n,address=jboss"
[chenshuo@localhost bin]$ less run.conf 
## -*- shell-script -*- ######################################################
##                                                                          ##
##  JBoss Bootstrap Script Configuration                                    ##
##                                                                          ##
##############################################################################

### $Id: run.conf 62747 2007-05-02 17:43:36Z [email protected] $

#
# This file is optional; it may be removed if not needed.
#

#
# Specify the maximum file descriptor limit, use "max" or "maximum" to use
# the default, as queried by the system.
#
# Defaults to "maximum"
#
#MAX_FD="maximum"

#
# Specify the profiler configuration file to load.
#
# Default is to not load profiler configuration file.
#
#PROFILER=""

#
# Specify the location of the Java home directory.  If set then $JAVA will
# be defined to $JAVA_HOME/bin/java, else $JAVA will be "java".
#
#JAVA_HOME="/opt/java/jdk"

#
# Specify the exact Java VM executable to use.
#
#JAVA=""

#
# Specify options to pass to the Java VM.
#
if [ "x$JAVA_OPTS" = "x" ]; then
   JAVA_OPTS="-Xms256m -Xmx2048m -Dsun.rmi.dgc.client.gcInterval=3600000 -Dsun.rmi.dgc.server.gcInterval=3600000 -XX:PermSize=128m -XX:MaxPermSize=512m -XX:MaxNewSize=256m -XX:+UseParallelGC -XX:+UseParallelOldGC"
fi

# Sample JPDA settings for remote socket debuging
JAVA_OPTS="$JAVA_OPTS -Xrunjdwp:transport=dt_socket,address=8787,server=y,suspend=n"

# Sample JPDA settings for shared memory debugging 
...skipping...
##                                                                          ##
##  JBoss Bootstrap Script Configuration                                    ##
##                                                                          ##
##############################################################################

### $Id: run.conf 62747 2007-05-02 17:43:36Z [email protected] $

#
# This file is optional; it may be removed if not needed.
#

#
# Specify the maximum file descriptor limit, use "max" or "maximum" to use
# the default, as queried by the system.
#
# Defaults to "maximum"
#
#MAX_FD="maximum"

#
# Specify the profiler configuration file to load.
#
# Default is to not load profiler configuration file.
#
#PROFILER=""

#
# Specify the location of the Java home directory.  If set then $JAVA will
# be defined to $JAVA_HOME/bin/java, else $JAVA will be "java".
#
#JAVA_HOME="/opt/java/jdk"

#
# Specify the exact Java VM executable to use.
#
#JAVA=""

#
# Specify options to pass to the Java VM.
#
if [ "x$JAVA_OPTS" = "x" ]; then
   JAVA_OPTS="-Xms256m -Xmx2048m -Dsun.rmi.dgc.client.gcInterval=3600000 -Dsun.rmi.dgc.server.gcInterval=3600000 -XX:PermSize=128m -XX:MaxPermSize=512m -XX:MaxNewSize=256m -XX:+UseParallelGC -XX:+UseParallelOldGC"
fi

# Sample JPDA settings for remote socket debuging
JAVA_OPTS="$JAVA_OPTS -Xrunjdwp:transport=dt_socket,address=**8787**,server=y,suspend=n"

# Sample JPDA settings for shared memory debugging 
#JAVA_OPTS="$JAVA_OPTS -Xrunjdwp:transport=dt_shmem,server=y,suspend=n,address=jboss"

How to Solve Error: use a kernel appropriate for your CPU

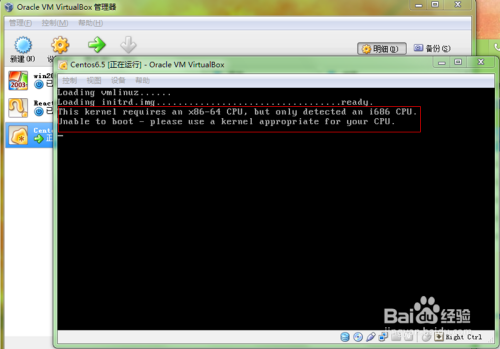
Oracle VM virturalbox is a free and open source powerful virtual machine software. The main products of Oracle (Oracle database, Oracle convergence middleware, Oracle business products and Oracle RAC) have passed the certification of Oracle VM, which is also the only virtualization software with Oracle application certification in the industry. There will always be problems in the process of using the product. The author recently re installed the machine, and the following problems occurred when installing the virtual machine on the new machine: as shown in Figure 1

This kernel requires an x86-64 CPU,but only detected an i686 CPU.

Unable to boot – please use a kernel appropriate for your CPU.

After reading a lot of materials, I successfully solved the problem. Now I will share the process of solving the problem with you, so as to help more people

Tools/raw materials

​Oracle VM VirturalBox

your computer BIOS Setup help book

Method/step

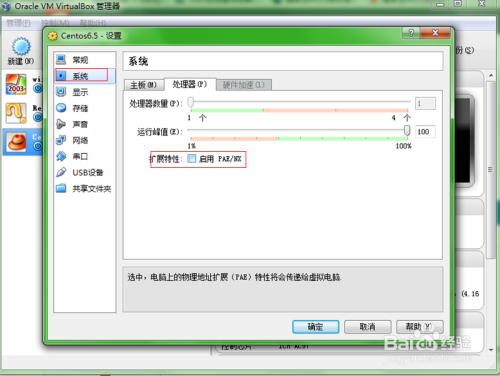
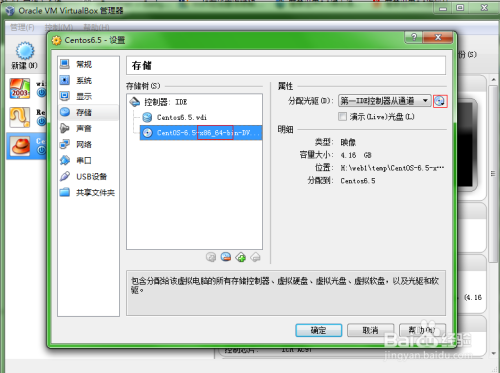
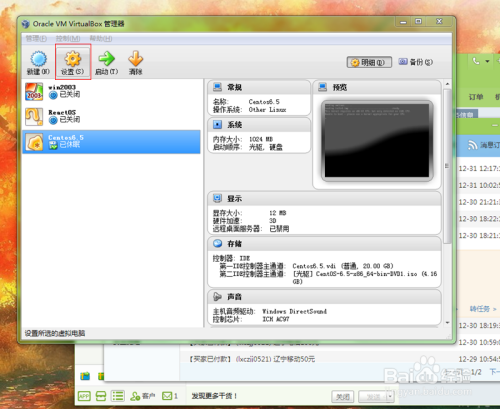
first, shut down the virtual machine and check whether there is a problem with the virtual machine settings, as shown in Figure 2

switch to the system tag processor, check the enable PAE/NX option, as shown in Figure 3, confirm

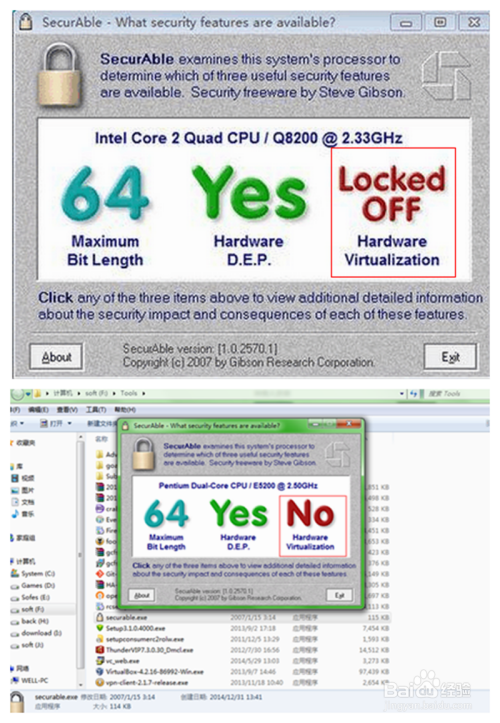
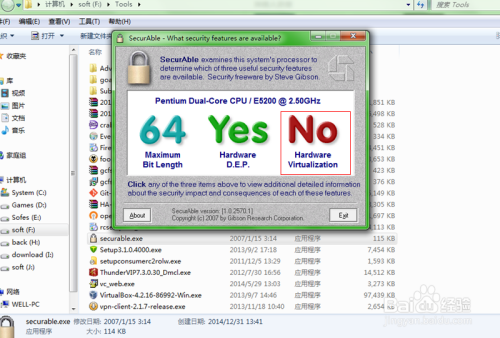
if the problem remains, we should start to check the problems of our computer. Download the software secure,

shared connection (Pan. Baidu. COM/S/1ddiu3up), and the check results are shown in Figure 4; In the first case, we will continue to look. In the second case, we will jump to step 5 directly

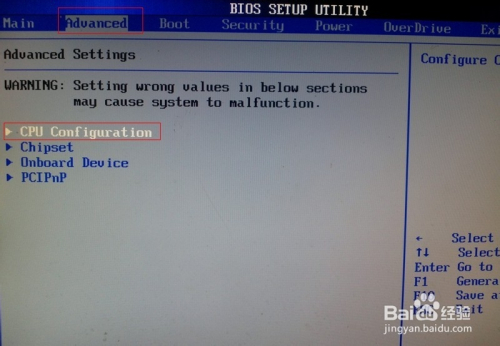
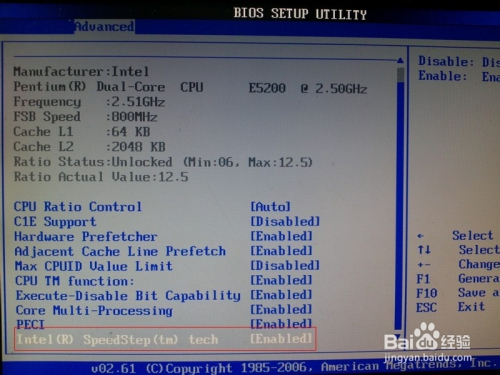
lockoff option, which is not supported by the motherboard; Please restart the machine and enter the BIOS settings (the settings of each motherboard manufacturer are slightly different, but they are basically the same. Please pay attention to the power on self-test items and motherboard manufacturer’s help). As shown in Figure 5, advanced – CPU settings; Intel XXX selects enable. F10 save restart. If you restart the machine, it will be like the second case in Figure 4, red “no”

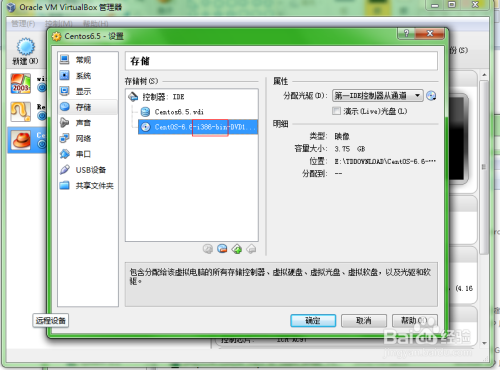
in Figure 4, the red “no” option is not supported by CPU, as shown in Figure 6. There is no way but to switch to 32-bit system; Open virtual machine settings – storage – change 64 bit CD to 32-bit CD, as shown in Figure 7 and figure 8. Confirm; Start the installation again and find that everything is normal, as shown in Figure 9

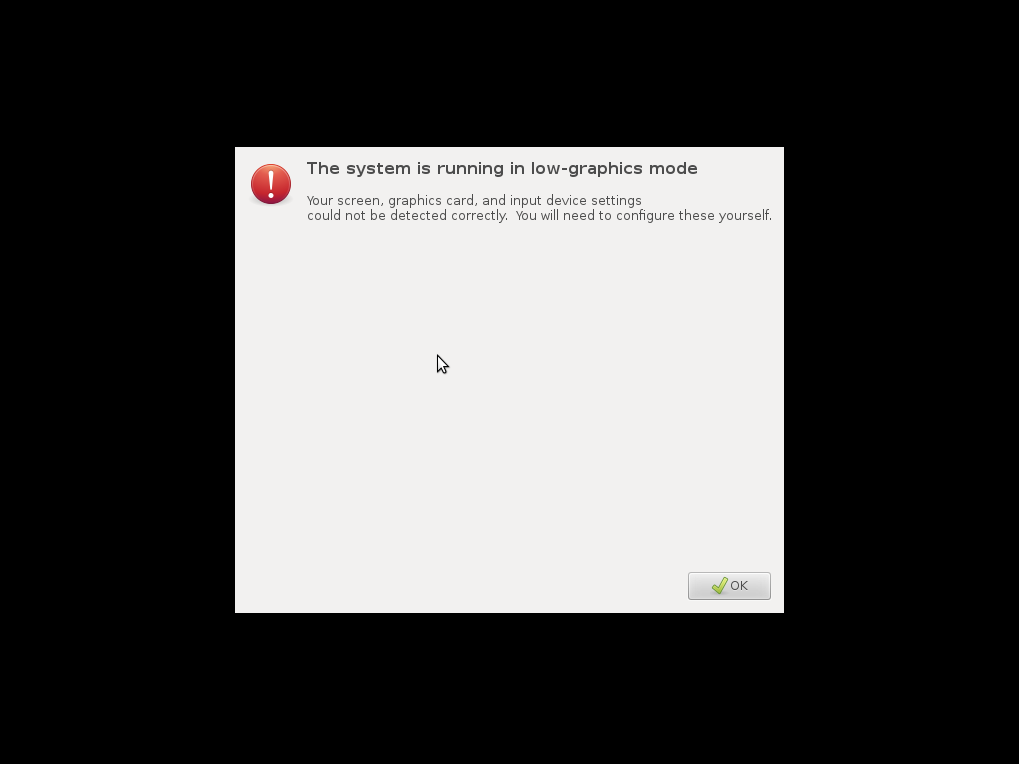
[Solved] Ubuntu Warning: The system is running in low-graphics mode

After checking the Internet for a number of solutions, I finally found one that fits my problem here, cited below.

I have recently received a similar issue with myPangolin Performance laptop. The folks at System 76 told me to do the following:

Click Okay and then select the option to get a terminal. (alternatively you can press ctr+alt+f1 to bring up another tty)

sudo chown lightdm:lightdm -R /var/lib/lightdm
sudo chown avahi-autoipd:avahi-autoipd -R /var/lib/avahi-autoipd
sudo chown colord:colord -R /var/lib/colord
sudo reboot

—————————————————————————-

Attachment: there is another way to install network card driver on the Internet

# For the latest Nvidia binary drivers.

sudo add-apt-repository ppa:ubuntu-x-swat/x-updates
sudo apt-get update
sudo apt-get install nvidia-current nvidia-current-modaliases nvidia-settings

# For the latest ATI/AMD binary drivers.

sudo add-apt-repository ppa:ubuntu-x-swat/x-updates
sudo apt-get update
sudo apt-get install fglrx 

I installed the NVIDIA driver. After restarting, I entered the login interface. After entering the user name and password, I still couldn’t enter the desktop. I kept circulating in the login interface. The solution is as follows:

alternatively you can press ctr+alt+f1 to bring up another tty

To uninstall NVIDIA driver:

sudo apt-get remove --purge nvidia-*
sudo apt-get install ubuntu-desktop
sudo rm /etc/X11/xorg.conf
echo 'nouveau' | sudo tee -a /etc/modules
#restart
sudo reboot

After restart

Reason search:

When there is a circular login problem, you can enter the shell according to the above method and find the. Xsession errors file in the home directory

# cd home check.xsession-errors
cd ~
ls -a
vi .xsession-errors

Then you can see the information in the log, according to the information in the log to Baidu, maybe you can solve the problem of driver installation

[How to Solve] putty server refused our key

/etc/ssh/sshd_ Config 1. Find “strictmodes yes” and change it to “strictmodes no” (change it to no after removing the comment). 2. Find “pubkeyauthentication yes” and change it to “pubkeyauthentication yes” (remove the comment). 3. Find “authorized keysfile. SSH/authorized”_ Change keys to authorized keysfile. SSH/authorized_ Keys 4. Save 5. Reload/etc/rc.d/init.d/sshd reload

Setting root password after installation of Ubuntu 20.04 LTS

Environment:

ubuntu 20.04 LTS version

Questions:

How to set root password after installation of ubuntu 20.04 LTS

How: Method.

Use the command line sudo passwd to set the root password

The command line is as follows.

www@ubuntu:~$ sudo passwd
[sudo] password for www:
New password:
Retype new password:
passwd: password updated successfully
www@ubuntu:~$ su root
Password:
root@ubuntu:/home/www#

Description.
[sudo] password for www: enter the password for the current user
New password: Enter the password for root
Retype new password: Confirm the password for root
www@ubuntu:~$ su root Switch to the root user
Password: Enter the password you just set for root
root@ubuntu:/home/www# Successfully switched to the root user

done!

Ubuntu Update Error: Failed to download repository information

ubuntu update,

sudo apt-get clean
sudo apt-get update
sudo apt-get upgrade

If it does not work, follow the following to operate, the author is the following operation to successfully solve the problem.

If you still have issues, then change your repo mirror: OpenUpdate ManagerorSoftware Updater, then clickSettings > Ubuntu Softwaretab, then selectOtherfrom theDownload Frommenu and click theSelect Best Serverbutton. Now try updating/upgrading again.

https://askubuntu.com/questions/141512/how-to-resolve-failed-to-download-repository-information

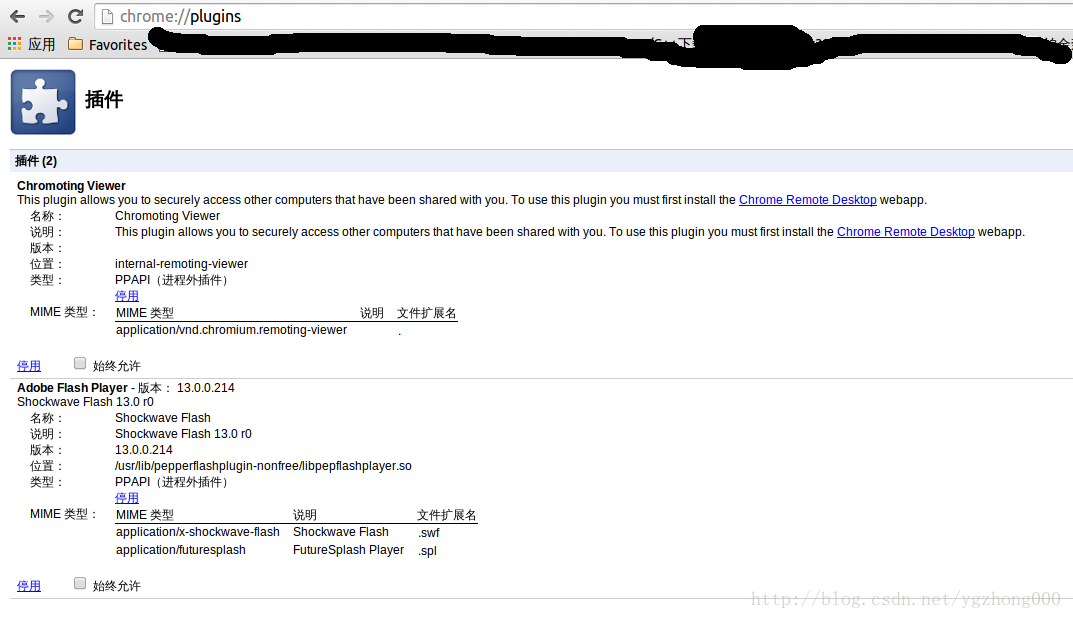
Ubuntu 14.04 UNK : How to Install Pepper Flash Player For Chromiu

An installer for pepper flash player for chromium has been included in the official source of Ubuntu 14.04

Flash player for Linux has stopped updating since 11.2. At present, flash player under Linux platform can only be updated by Google Chrome’s ppapi (peer flash player) (Adobe only maintains this version). Other browsers, including chrome, can only use flash player 11.2

However, because chromium announced that it would abandon the old standard (npapi), the original flash player would not be able to run in chromium, so it decided to use pepper flash player in chromium. This pepper flash player is extracted by downloading Google Chrome and then used by chromium

At present, this installer has been included in the official source of Ubuntu 14.04 (imported from Debian source)

Ubuntu 14.04 users can install pepper flash player for chromium through the following command:

sudo apt-get install pepperflashplugin-nonfree
sudo update-pepperflashplugin-nonfree –install

If you want to use the pepper flash player in the beta version of Google Chrome, you can change the second command to:

sudo update-pepperflashplugin-nonfree –install –beta –unverified

If you want to use the pepper flash player in the unstable version of Google Chrome, you can change the second command to:

sudo update-pepperflashplugin-nonfree –install –unstable –unverified

If you want to uninstall the flash player, execute the following command:

sudo update-pepperflashplugin-nonfree –uninstall