Tag Archives: centos7

After installing mysql, centos7 can’t start the service, and prompts unit not found

Phenomenon:

Start MySQL database prompt:

Failed to start mysqld.service: Unit not found

MySQL is no longer supported in centos7. Even if you have installed it, centos7 still says it’s disgusting


Solutions

Maria dB, an open source version of MySQL

(Maria DB is like the shadow version of MySQL. Maria DB is a branch version of MySQL, not a folk version. The functions provided by Maria dB are fully compatible with MySQL.)

1. Installation:

yum install -y mariadb-server

2.start maria DB serves:

systemctl start mariadb.service

(Note: since CentOS 7. X, CentOS has started to use SYSTEMd service instead of daemon, and the original commands related to the start-up and management of system services are all replaced by systemctl commands.)

3. Add to boot auto start:

systemctl enable mariadb.service

Initialize database configuration

mysql_secure_installation

The first step is to set the password. You will be prompted to enter the password first

Set password

Enter current password for root (enter for none):<– Direct return

Set root password?[ Y/n] <– Whether to set the root password, enter y and press enter or press enter directly
new password: & lt; — Set the password of the root user
re enter new password: & lt; — Enter the password you set again
for other configurations

Remove anonymous users?[ Y/n] <– Do you want to delete anonymous users?Y enter

Disallow root login remotely?[ Y/n] <– Do you want to disable root remote login?N enter

Remove test database and access to it?[ Y/n] <– Delete test database, y enter

Reload privilege tables now?[ Y/n] <– Do you want to reload the permission table?Y enter

Complete the initialization of MariaDB, and then test the local login

Location of configuration file: VIM/etc/my.cnf.d/mysql-clients.cnf

Turn on remote access

Log in to the database locally and execute the following command:

First of all, configure the users who are allowed to access, and give the users permission in the way of authorization

GRANTALLPRIVILEGESON*.*TO'root'@'%'IDENTIFIEDBY'123456'WITHGRANTOPTION;

Finally, after configuring the permissions, you should not forget to refresh them to make them take effect. Note: root is the user who logs in to the database, 123456 is the password for logging in to the database, * means that any host from any source has great permissions anyway

flushprivileges;
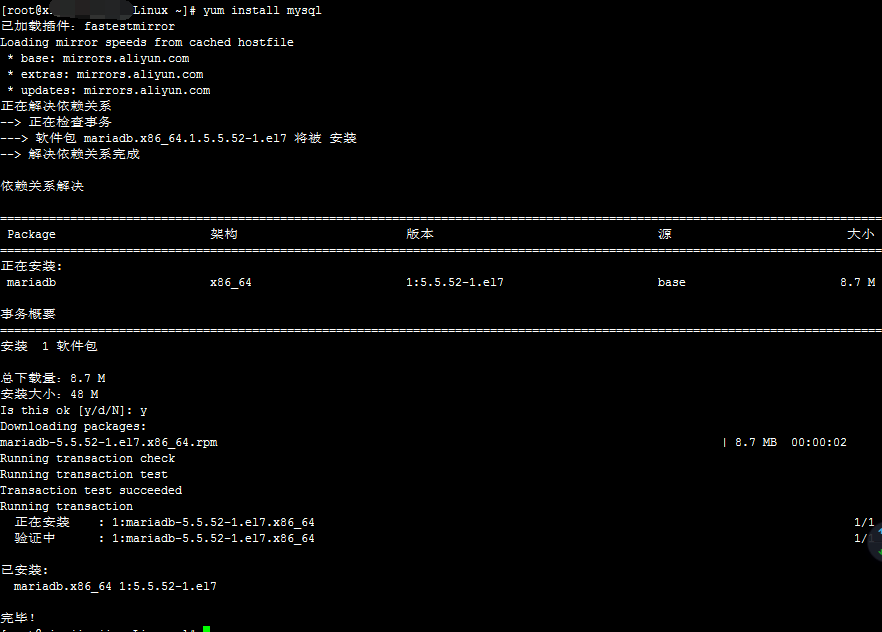
[Solved] Centos7 Install MYSQL Error: Failed to start mariadb.service: Unit not found.

Solution:

First, you need to install MariaDB server

yum install -y mariadb-server

Start the service

systemctlstartmariadb.service

Add to boot

systemctlenablemariadb.service

Make some security settings, and modify the database administrator password

Failed to get D-Bus connection: Operation not permitted [docker Install centos7]

When using docker to install centos:7 Mirror or centos:latest After that, if you execute systemctl, the following problems will occur

[root@68903c5fbdeb /]# systemctl stop firewalld.service
Failed to get D-Bus connection: Operation not permitted

This is a bug of centos7 in docker, which is also mentioned on the official website. The official CentOS image of docker does not provide SYSTEMd service, and gives a solution. Although it is a little complicated, it can still be handled

1. Create the base image of SYSTEMd 2

Create a new file dockerfile, which is the default file name when building docker image. You can also use other file names, and then use – F to specify the file name when building

vi Dockerfile

Enter the following

FROM centos:latest
ENV container docker
RUN (cd /lib/systemd/system/sysinit.target.wants/; for i in *; do [ $i == \
systemd-tmpfiles-setup.service ] || rm -f $i; done); \
rm -f /lib/systemd/system/multi-user.target.wants/*;\
rm -f /etc/systemd/system/*.wants/*;\
rm -f /lib/systemd/system/local-fs.target.wants/*; \
rm -f /lib/systemd/system/sockets.target.wants/*udev*; \
rm -f /lib/systemd/system/sockets.target.wants/*initctl*; \
rm -f /lib/systemd/system/basic.target.wants/*;\
rm -f /lib/systemd/system/anaconda.target.wants/*;
VOLUME [ "/sys/fs/cgroup" ]
CMD ["/usr/sbin/init"]

Execute the create image command (Note: remember to add a space and a dot at the end of the command, otherwise an error will be reported)

docker build --rm -t centos:c7-systemd .

2. Create an HTTP service image based on the image 2

Re edit dockerfile file

vi Dockerfile

Delete the original content and enter the following

FROM centos:c7-systemd
RUN yum -y install httpd; yum clean all; systemctl enable httpd.service
EXPOSE 80
CMD ["/usr/sbin/init"]

Build docker image (Note: remember to add a space and a dot at the end of the command, otherwise an error will be reported)

docker build --rm -t centos:c7-systemd-httpd .

3. Create centos7 container with new image

Remember to add — privileged. The official example does not have this parameter. An error will be reported during execution. After adding it, it will not

docker run --privileged -it --name mycentos -d -v /sys/fs/cgroup:/sys/fs/cgroup:ro -p 80:80 centos:c7-systemd-httpd

4. Enter the docker container to execute systemctl 2

docker exec -it mycentos bin/bash

Implementation

systemctl start sshd.service

Although there is no prompt for failed to get D-Bus connection: operation not permitted, it does

[root@21481fb2cefc /]# systemctl start sshd.service
Failed to get D-Bus connection: No such file or directory

The service path of systemctl is checked

ls /usr/lib/systemd/system | grep sshd.service

There is sshd.service service, but when you execute systemctl, you can’t find the file, which is very strange

You can’t execute systemctl enable sshd.service

[root@21481fb2cefc /]# systemctl enable sshd.service
Failed to get D-Bus connection: No such file or directory

There is no solution to this problem for the time being. We will continue to study it later

When centos7 uses yum, file contains no section headers

After chopping hands, the fraud call came before the express delivery was received. How to improve the privacy and security of e-commerce>>>

this article is reproduced in https://blog.csdn.net/trokey/article/details/84908838

After installing celos7, the built-in Yum can’t be used directly. The following problems will occur when using it:

The reason is that no Yum source is configured. Modify the file/etc/yum.repos.d/cenos-base.repo as follows:

# CentOS-Base.repo
#
# The mirror system uses the connecting IP address of the client and the
# update status of each mirror to pick mirrors that are updated to and
# geographically close to the client.  You should use this for CentOS updates
# unless you are manually picking other mirrors.
#
# If the mirrorlist= does not work for you, as a fall back you can try the 
# remarked out baseurl= line instead.
#
#

[base]
name=CentOS-$releasever - Base
mirrorlist=http://mirrorlist.centos.org/?release=$releasever&arch=$basearch&repo=os&infra=$infra
#baseurl=http://mirror.centos.org/centos/$releasever/os/$basearch/
gpgcheck=1
gpgkey=file:///etc/pki/rpm-gpg/RPM-GPG-KEY-CentOS-7

#released updates 
[updates]
name=CentOS-$releasever - Updates
mirrorlist=http://mirrorlist.centos.org/?release=$releasever&arch=$basearch&repo=updates&infra=$infra
#baseurl=http://mirror.centos.org/centos/$releasever/updates/$basearch/
gpgcheck=1
gpgkey=file:///etc/pki/rpm-gpg/RPM-GPG-KEY-CentOS-7

#additional packages that may be useful
[extras]
name=CentOS-$releasever - Extras
mirrorlist=http://mirrorlist.centos.org/?release=$releasever&arch=$basearch&repo=extras&infra=$infra
#baseurl=http://mirror.centos.org/centos/$releasever/extras/$basearch/
gpgcheck=1
gpgkey=file:///etc/pki/rpm-gpg/RPM-GPG-KEY-CentOS-7

#additional packages that extend functionality of existing packages
[centosplus]
name=CentOS-$releasever - Plus
mirrorlist=http://mirrorlist.centos.org/?release=$releasever&arch=$basearch&repo=centosplus&infra=$infra
#baseurl=http://mirror.centos.org/centos/$releasever/centosplus/$basearch/
gpgcheck=1
enabled=0
gpgkey=file:///etc/pki/rpm-gpg/RPM-GPG-KEY-CentOS-7

The edit command is as follows:

vi /etc/yum.repos.d/CentOS-Base.repo

Save command

Press ESC to jump to command mode, and then:

: W save the file without quitting VI

: W file save the modification to the file and do not exit VI

:w! Force save, do not push VI

: WQ save the file and exit VI

:wq! Force save file and exit VI

Q: quit VI without saving the file

:q! Do not save the file, forced to exit VI

:e! Discard all changes and edit from the last time you saved the file

Or delete the original file first

rm -f  /etc/yum.repos.d/CentOS-Base.repo

Then download Alibaba’s

wget -O /etc/yum.repos.d/CentOS-Base.repo http://mirrors.aliyun.com/repo/Centos-7.repo

Clean up cache

yum clean all

PS: if the above method is not solved, try the following:

Delete all files in the yum. Repos. D directory

rm -f /etc/yum.repos.d/*

Then download Alibaba’s

wget -O /etc/yum.repos.d/CentOS-Base.repo http://mirrors.aliyun.com/repo/Centos-7.repo

Clean up cache

yum clean all

Test download install

yum install gcc

The following results are:

When deploying Django project on centos7, there will be an error of importerror: cannot import name middlewaremin

Deployment on embedded devices has been fine, but this problem occurs on Linux Centos7, usually due to versioning issues.
Solution Install pip3 install Django==1.11.1
However, the following ImportError: cannot import name patterns
vim touch/extra_apps/DjangoUeditor/urls.py

# coding:utf-8
from django import VERSION

if VERSION[0:2] > (1, 3):
from django.conf.urls import patterns, url
else:
from django.conf.urls.defaults import patterns, url

from .views import get_ueditor_controller

urlpatterns = [
url(r’^controller/$’, get_ueditor_controller)
]

to:

# coding:utf-8
from django import VERSION

if VERSION[0:2] > (1, 3):
from django.conf.urls import url
else:
from django.conf.urls.defaults import url

from .views import get_ueditor_controller

urlpatterns = [
url(r’^controller/$’, get_ueditor_controller)
]

Due to version issues, this may cause the following problems

render_to_string() got an unexpected keyword argument ‘context_instance’

Solution:

context must be a dict rather than RequestContext.

is when the context becomes
{
“context”:context
}

Due to the version upgrade, the previous code

return render_to_response(‘info_count.html’, {}, context_instance=RequestContext(request))

should be rewritten to something like this.

from django.shortcuts import render

return render(request, “info_main.html”, {‘time_refresh’: time_refresh,
‘time_refresh_long’: time_refresh_long,
‘time_refresh_net’: time_refresh_net,
‘version’: version})

CentOS7 Install MYSQL8.0.13 error while loading shared libraries: libaio.so.1

Install the database of mysql8.0.13 on centos7, using the installation package compiled on the official website. After downloading and decompressing, you can use it and need to install it

However, an error occurred during database initialization after decompression

/usr/local/mysql/bin/mysqld –initailize –user=mysql –basedir=/usr/local/mysql –datadir=/www/mysql/data

The error after running the command is as follows:

error while loading shared libraries: libaio.so.1: cannot open shared object file: No such file or directory

in case of this problem, first check whether the link library file is installed and use the command to check

rpm -qa|grep libaio

After running the command, it is found that there is no link library file in the system

Using the command, yum install libaio-devel.x86_ 64

After the installation is successful, continue to run the initialization command of the database, indicating success

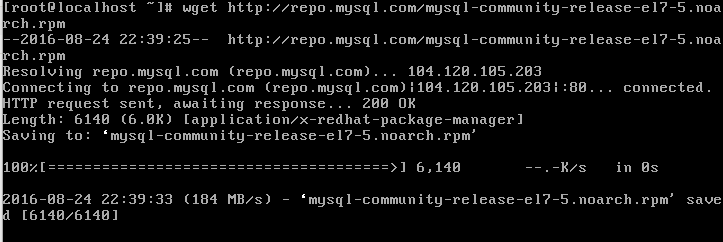
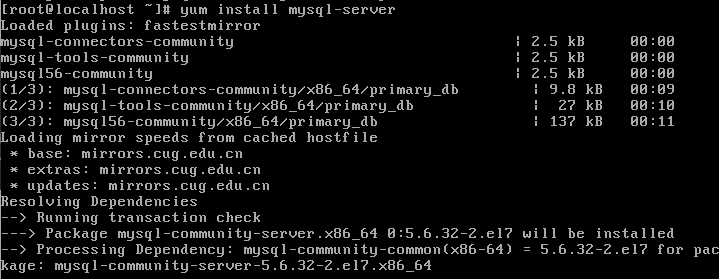
Solve yum install mysql-server exception under CentOS7: No package mysql-server available.

Solution to the problem that yum installs mysql-server has no available package:

step 1: wget http://repo.mysql.com/mysql-community-release-el7-5.noarch.rpm

step 2: rpm -ivh mysql-community-release-el7-5.noarch.rpm

After the above two steps, execute again: yum install mysql-server command can be successfully installed.


Centos7 is unable to enter the graphical interface when it is powered on, so a solution of SDA estimating drive cache write through appears

A super detailed tutorial: springboot integrates mybatis plus>>>

centos7 is unable to enter the graphical interface when it is powered on, so there is a solution of SDA assessing drive cache write through

Reference article:

(1) Centos7 is unable to enter the graphical interface when it is powered on, so a solution of SDA estimating drive cache write through appears

(2) https://www.cnblogs.com/shujudamayi/p/7077310.html

Let’s make a note.

How to Solve centos7 selenium–unknown error: DevToolsActivePort file doesn’t exist

Unknown error: devtoolsactivport file doesn’t exist

In the morning, there was a problem when starting Chrome with selenium under Linux: error:

Traceback (most recent call last):
  File "get2.py", line 62, in <module>
    browser = webdriver.Chrome()
  File "/root/.pyenv/versions/anaconda3-5.1.0/lib/python3.6/site-packages/selenium/webdriver/chrome/webdriver.py", line 75, in __init__
    desired_capabilities=desired_capabilities)
  File "/root/.pyenv/versions/anaconda3-5.1.0/lib/python3.6/site-packages/selenium/webdriver/remote/webdriver.py", line 154, in __init__
    self.start_session(desired_capabilities, browser_profile)
  File "/root/.pyenv/versions/anaconda3-5.1.0/lib/python3.6/site-packages/selenium/webdriver/remote/webdriver.py", line 243, in start_session
    response = self.execute(Command.NEW_SESSION, parameters)
  File "/root/.pyenv/versions/anaconda3-5.1.0/lib/python3.6/site-packages/selenium/webdriver/remote/webdriver.py", line 311, in execute
    self.error_handler.check_response(response)
  File "/root/.pyenv/versions/anaconda3-5.1.0/lib/python3.6/site-packages/selenium/webdriver/remote/errorhandler.py", line 237, in check_response
    raise exception_class(message, screen, stacktrace)
selenium.common.exceptions.WebDriverException: Message: unknown error: Chrome failed to start: exited abnormally
  (unknown error: DevToolsActivePort file doesn't exist)
  (The process started from chrome location /usr/bin/google-chrome is no longer running, so ChromeDriver is assuming that Chrome has crashed.)
  (Driver info: chromedriver=2.43.600233 (523efee95e3d68b8719b3a1c83051aa63aa6b10d),platform=Linux 4.9.0-6-amd64 x86_64)

Solution: add code:

from selenium.webdriver.chrome.options import Options
chrome_options = Options()
chrome_options.add_argument('--no-sandbox')
chrome_options.add_argument('--disable-dev-shm-usage')
chrome_options.add_argument('--headless')
browser = webdriver.Chrome(chrome_options=chrome_options)

The “– no sandbox” parameter allows chrome to run under the root permission, and the “– headless” parameter allows chrome to have a better experience without opening the graphical interface

The “– no sandbox” parameter allows chrome to run under the root permission, and the “– headless” parameter allows chrome to have a better experience without opening the graphical interface

chrome_options.add_argument('blink-settings=imagesEnabled=false')
chrome_options.add_argument('--disable-gpu')