Tag Archives: DebugAH

324. Wiggle Sort II

Link to original question

Given an unsorted array nums, reorder it such that nums[0] < nums[1] &> nums[2] < nums[3]…. Follow Up: Can you do it in O(n) time and/or in-place with O(1) extra space?

The most intuitive way to solve this problem is to arrange the array in order first, and then do the exchange. I didn’t study the specific exchange method, but in theory, it must be arranged in O (n) time and O (1) space. However, the bottleneck is that the fastest sorting method can’t do o (n), so this method doesn’t work. So I relaxed the restrictions. Even if I didn’t sort the array, if I could try to divide the values of the array into two groups, and any value in one group was not less than any value in the other group, I would put the larger group in odd digits and the smaller group in even digits, which would also meet the requirements of the topic. Obviously, the cut-off value of the two groups can use the median (not the average), so the bottleneck is the complexity of finding the median. It happens that C + + provides nth_ The element method can find the nth largest value in the array , which has o (n) time complexity and O (1) space complexity.

After finding the median, the array is divided into three categories: greater than median (L), less than median (s), and equal to median (m). Obviously, when traversing an array, s should be placed in even digits, l in odd digits, and m in the rest. If the even and odd digits are filled in the order from front to back, then for the array composed of two s, two L and two m, SLMM arrangement may be formed, that is, the median is stacked at the end. Therefore, even and odd bits should be filled in the opposite order. For example, my method is that odd bits are filled from front to back, and even bits are filled from back to front, so that they can be arranged into smslml.

class Solution {
public:
    void wiggleSort(vector<int&>& nums) {
        int n = nums.size();
        if(n<2) return;
        // Find a median
        auto midptr = nums.begin() + n/2;
        nth_element(nums.begin(), midptr, nums.end());// O(n) time, O(1) space
        int mid = *midptr;
        
        int j=1;// first odd
        int k=(n%2==0)?n-2:n-1;// last even
        int i=1;// start from first odd
        for(int count=0; count<n; count++) {
            if(nums[i]<mid) {
                swap(nums[i], nums[k]);
                k=k-2;
            }
            else if(nums[i]&>mid) {
                swap(nums[i], nums[j]);
                j=j+2;
                i=i+2;
                if(i&>n-1) i=0;// back to first even;
            }
            else {
                i=i+2;
                if(i&>n-1) i=0;
            }
        }
    }
};

The exchange value method of O (1): starting from the first odd digit (marked with I), the goal is to change all odd digits into values not less than the median. mark the location where the first s should be stored with K, and mark the location where the first l should be stored with J .

1. If the value of the current odd digit is less than the median, it is swapped to K. As mentioned above, K is moved from the last even bit to the front, so K-2 after swapping. Because I don’t know what the value is, I don’t need to move.

2. If the value of the current odd digit is equal to the median, do not move it, I move backward.

3. If the value of the current odd digit is larger than the median, it is swapped to J. Because I &> = J, the value I accessed by J must also be accessed. According to the operation of 1 and 2, the value accessed by I must not be smaller than the median value, so the value returned by the current bit exchange must not be smaller than the median value. After the exchange, I and j move backward. In fact, the purpose of this operation is to move the median to the last odd digit.

Finally, llllsmsm may appear after traversing odd digits, so even digits need to be traversed once. Note that even bits should be traversed from front to back, opposite to the change direction of K. This is to avoid revisiting the position visited by K (which will cause the correct value to be removed).
Windows Azure Developer Guidance Map

Introduction

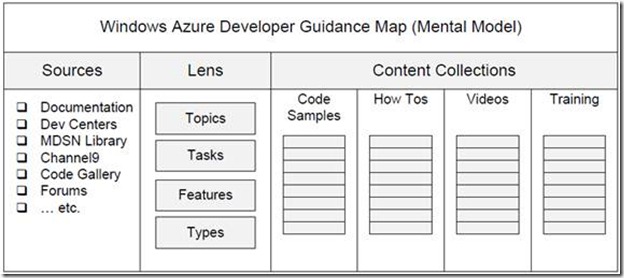
Welcome to the Windows Azure Developer Guidance Map! This map is a consolidated index of Windows Azure content collections for developers. The primary content collections included in this map are: Code Samples, How Tos, Videos, and Training. Within the content collections, the resources are organized by Windows Azure features, common tasks, and common categories for Windows Azure development.

Usage Scenarios

• Use the map to discover the various sources of developer content at Microsoft

• Use the map to find some of the most useful content for helping you solve your problems with Silverlight

• Use the map as an example to help you create your own map of content resources

Mental Model

Sources of Windows Azure Developer Guidance

You can think of this as a “topology map” of some of the main sources of Windows Azure developer guidance from Microsoft. Simply by knowing what types of resources are available (code, forums, documentation, training, etc.), and by knowing where to look, you improve your success at finding the resources you need to get your job done, whether that’s figuring out how to code for a particular scenario, ramping up on the technology, or finding the latest news. Here is a summary of the various channels and some of what they have to offer:

Category Items
Home • Windows Azure – http://www.microsoft.com/windowsazure/windowsazure/
MSDN Hub • MSDN Cloud Hub – http://msdn.microsoft.com/en-us/ff380142.aspx
MSDN Dev Center • Windows Azure Dev Center – http://msdn.microsoft.com/en-us/windowsazure/default.aspx
MSDN Library • Windows Azure Platform – http://msdn.microsoft.com/en-us/library/dd163896.aspx

• Windows Azure API Reference – http://msdn.microsoft.com/en-us/library/ff800682.aspx

Channel 9 • Windows Azure Platform Training Course – http://msdn.microsoft.com/en-us/wazplatformtrainingcourse.aspx

Tags

• AppFabric – http://channel9.msdn.com/Tags/AppFabric

• Azure – http://channel9.msdn.com/Tags/Azure

• AzurePlatform – http://channel9.msdn.com/Tags/azure+platform

• Cloud – http://channel9.msdn.com/Tags/Cloud

• SQL + Azure – http://channel9.msdn.com/Tags/sql+azure

• Windows+Azure – http://channel9.msdn.com/Tags/windows+azure

Code Samples All-in-One Code Framework

• Windows Azure Code Samples – http://1code.codeplex.com/wikipage?title=All-In-One%20Code%20Framework%20Sample%20Catalog&referringTitle=Home

Code Gallery

• Windows Azure Code Samples – http://code.msdn.microsoft.com/windowsazuresamples

Forums • Windows Azure App Platform – http://social.msdn.microsoft.com/Forums/en-US/category/windowsazureplatform

• Windows Azure Marketplace – http://social.msdn.microsoft.com/Forums/en-US/category/azuremarketplace

About window.history.back() backward problem

Under Windows window.history.back() the state of the previous page is returned instead of the previous page. If I modify a page three times, I have to go back three times to go back to the previous page. And the deleted data in the database is still displayed on it, which is very impractical.

Solution: history.back () and then add a reload () so that you can go back to the refreshed page

Namely: history.back (); location.reload (); if there is a frame, just add the name of the frame before it

****************************Notes******************************************

1: history.go (- 1);// return to the previous page. Return without data

2: window.**** ==*****;

3:window.**** ==document.***

4: Use document.location.href After switching, you can return to the original page. And use it document.location.replace After switching, you cannot go back to the original page by “back”.


<inputtype=buttonvalue=Refresh onclick="window.location.reload()">
<inputtype=buttonvalue=Forward onclick="window.history.go(1)">
<inputtype=buttonvalue=Backward onclick="window.history.go(-1)">
<inputtype=buttonvalue=Forward onclick="window.history.forward()">
<inputtype=buttonvalue=Backward onclick="window.history.back()">Backward+Fresh<inputtype=buttonvalue=Backward onclick="window.history.go(-1);window.location.reload()"&>In C# Web application, such as writing back to the previous page code for the page button


window.external Using the complete book

AddFavorite, a script that adds websites to the viewer’s favorites, should be seen often, but do you know some other uses of window.external? Since it is a command for system file manipulation, some scripts may have errors due to security settings.

1.external.AddDesktopComponent Make the site the user’s Active desktop

Syntax:external.AddDesktopComponent(address, type [image/website], left distance, top distance, width, length)

function j_adc(){ //example

window.external.AddDesktopComponent(“http://…”,”website”,0,0,800,600);

}

2.external.AddFavorite Add the site to the user’s favorites

Syntax:external.AddFavorite(url, title);

function j_af(){

window.external.AddFavorite(location.href, document.title);

}

3.external.NavigateAndFind Search for a field in a given site

Syntax:external.NavigateAndFind(file address, keyword_Target)

function j_an(){

window.external.NavigateAndFind(“http://…”,gosearch.value,””);

}

4.external.ShowBrowserUI Calling the language selection window and the favorites management window

Syntax:external.ShowBrowserUI(type[LanguageDialog/OrganizeFavorites], null)

<input type=”button” name=”Button” value=”setting language” onclick=”window.external.ShowBrowserUI(‘LanguageDialog’, null)”&>

<input type=”button” name=”Submit2″ value=”Organize Favorites” onclick=”window.external.ShowBrowserUI(‘OrganizeFavorites’, null)”&>

5.external.ImportExportFavorites Importing and exporting user favorites

Syntax:external.ImportExportFavorites(import/true export/false, file path)

<input type=”button” name=”Button” value=”Import Favorites”

onClick=window.external.ImportExportFavorites(true,”http://…”);&>

<input type=”button” name=”Button3″ value=”export Favorites”

onClick=window.external.ImportExportFavorites(false,”http://…”);&>

6.external.addChanne add to your channel

Syntax:external.addChannel(page path)

7. Here is the list of all methods of the external object

Method Description
AddChannel Obsolete. Presents a dialog box that enables the user to add the specified channel, or to change the channel URL, if it is already installed.
AddDesktopComponent Adds a Web site or image to the Microsoft Active Desktop.
AddFavorite Prompts the user with a dialog box to add the specified URL to the Favorites list.
AddSearchProvider Adds a search provider to the registry.
AddService User initiated action to add a service.
AddToFavoritesBar Adds a URL to the Favorites Bar.
AutoCompleteSaveForm Saves the specified form in the AutoComplete data store.
AutoScan No longer available as of Internet Explorer 7. Attempts to connect to a Web server by passing the specified query through completion templates.
BrandImageUri Not supported. Retrieves the Uniform Resource Identifier (URI) of an alternate product image.
bubbleEvent Propagates an event up its containment hierarchy.
ContentDiscoveryReset Resets the list of feeds, search providers, and Web Slices associated with the page.
CustomizeClearType Not supported. Sets a registry value to turn ClearType on or off.
CustomizeSettings Not supported. Saves the user settings from a “first run” page.
DefaultSearchProvider Not supported. Retrieves the name of the user’s default search provider.
DiagnoseConnection Not supported. Attempts to diagnose problems with the network connection.
ImportExportFavorites Deprecated. Handles the import and export of Internet Explorer favorites.
InPrivateFilteringEnabled Detects whether the user has enabled InPrivate Filtering.
IsSearchMigrated Not supported. Determines whether autosearch settings were migrated from a previous version of Internet Explorer.
IsSearchProviderInstalled Determines if a search provider has been installed for the current user and whether it is set as default.
IsServiceInstalled Check if a service is already installed.
IsSubscribed Obsolete. Retrieves a value indicating whether the client subscribes to the given channel.
NavigateAndFind Navigates to the specified URL and selects the specified text.
PhishingEnabled Not supported. Determines whether Microsoft Phishing Filter is enabled.
raiseEvent Triggers an event, as specified.
RunOnceHasShown Not supported. Determines whether the “first run” page has been shown.
RunOnceRequiredSettingsComplete Not supported. Sets a registry value to indicate whether the “first run” page completed successfully.
RunOnceShown Not supported. Sets a registry value to indicate that the “first run” page has been shown.
SearchGuideUrl Not supported. Retrieves the URL of a page that can be used to install additional search providers.
setContextMenu Constructs a context menu, as specified.
ShowBrowserUI Opens the specified browser dialog box.
SkipRunOnce Not supported. Enables the user to select “first run” settings at a later time.
SkipTabsWelcome Not supported. Disables the welcome screen that appears when opening a new tab in Internet Explorer 7.
SqmEnabled Not supported. Determines whether Software Quality Monitoring (SQM) is enabled.

How to Solve Win32 Disk Imager Error 5: Access is Denied

Problem encountered: an error occurred when attempting to write data to handle. Error 5 access is denied

Solution: use SD memory card formatter to format the SD card, and then write the image file to it through the Win32 tool

Specific steps:

1、 Download SD memory card formatter software
official download website: https://www.sdcard.org/downloads/formatter_ 4/
pay attention to choose the software suitable for your operating system

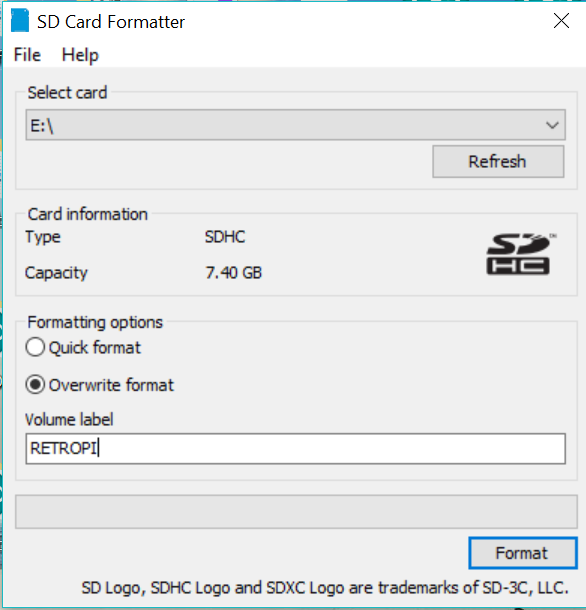
2、 Install the SD memory card formatter software and open the configuration
select the disk where your SD card is located (usually you will take the initiative to select when you plug in the card)
select rewrite format (this is very important!)
Volume label can be named freely

click “format” to start formatting, which usually takes 10 minutes
after formatting, you will find that your disk is completely empty , and there are no files

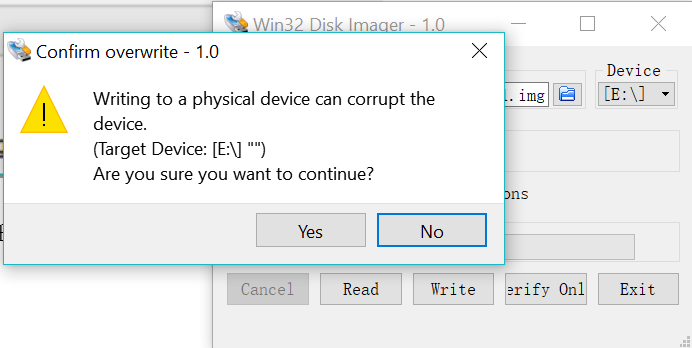
3、 If you open the Win32 software again and write the image file to the disk where the SD card is located, there will be no error (click Yes to continue writing)

Warning: will be initialized after [- writer]

Today, I found a warning when I was writing a C + + program. After thinking about it, I found the answer on the Internet. Well, there is something wrong with the order

class A
{
public:
    A(int a, int b);

private:
    int two;
    int one;
};

A::A(int a, int b):one(a),two(b)
{

};

In the G + + compiler, there will be warnings when compiling:

warning: 'A::one' will be initialized after [-Wreorder]

The main problem is the order (pay attention to the order of one and two), that is, the order of members in the initialization list and the order of members in the class must be consistent, so that there will be no warning again. Change the above code:

class A
{
public:
    A(int a, int b);

private:
    int one;
    int two;
};

A::A(int a, int b):one(a),two(b)
{

};

Debugging using Windbg : Symbols loading

This post explains how to use program symbol files to debug applications or kernel drivers on Windows operating system. On Windows platform, the program symbols are stored in a separate file. These files are referred aspdbfiles and has the extension .pdb. When debugging a program in windbg, we need these symbol files otherwise what we see in the stack trace is just numerical addresses instead of function names and variable names. We won’t be able to make out anything from these numerical addresses. The symbols stored in pdb files are function names, local variable names, global variable names etc.

Setting symbol path

To use the symbols for debugging, we need to tell windbg which directories it should look into, to find the symbols. To do this, click onFilemenu and thenSymbol File Path. You can enter the path as shown in the below image.

The symbol path in this example is srv*c:\symbols*http://msdl.microsoft.com/download/symbols.
The first path is a local directory and the second path is the Microsoft’s symbol server path. This path is required to get the symbols for Windows libraries like shell32.dll, gdi32.dll, advapi32.dll, kernel32.dll, ntdll.dll and many more libraries. The application we need to debug might be using these libraries.

We can specify the symbol search path in windbg prompt also. The command for this is.sympath
For example to set the above search path we need to run the below command.

.sympath srv*c:\symbols*http://msdl.microsoft.com/download/symbols

To print the current symbol search path just run .sympath command.

.sympath

Loading symbols after setting the path

After setting the symbol search path we need to load the symbols for all the loaded modules in memory. For this runthe below command.

.reload /f

To load symbols for a particular binary we can specify the binary file name in the .reload command. For example to load symbols for myapplication.exe you can run the below command.

.reload /f myapplication.exe

In this command you need to provide the full name of the binary name along with the extension. Otherwise you might see the message like below.

“Myapplication” was not found in the image list.
Debugger will attempt to load “Myapplication” at given base 00000000`00000000.

Please provide the full image name, including the extension (i.e. kernel32.dll)
for more reliable results.

Issues with symbols loading

If none of the symbol files match with the binary file then .reload command fails with the below error message.

0:041&> .reload /f MyApplication.exe
*** ERROR: Module load completed but symbols could not be loaded for MyApplication.exe

When you get this do the following. Enable verbose mode for symbols loading by running the command!sym noisy. And run the .reload command again. Check for the error messages it prints.

0:041&> !sym noisy
noisy mode – symbol prompts on
0:041&> .reload /f myapplication.exe
SYMSRV: c:\symbols\myapplication.pdb\38266E74B06B4EF3BCC16713A4A1E5E82\myapplication.pdb not found
SYMSRV: http://msdl.microsoft.com/download/symbols/myapplication.pdb/38266E74B06B4EF3BCC16713A4A1E5E82/myapplication.pdb not found
*** WARNING: Unable to verify checksum for myapplication.exe
*** ERROR: Module load completed but symbols could not be loaded for myapplication.exe
DBGHELP: myapplication – no symbols loaded

As you can see none of the symbol search paths have theMyapplication.pdbfile. Before looking at how to fix this issue, let’s understand how windbg interpretes the symbol server path.

Understanding ‘SRV’ in symbol server path

Another thing you can notice in the above error is that, Windbg looks for the symbols files in a sub directory with the namemyapplication.pdb/38266E74B06B4EF3BCC16713A4A1E5E82.This is because we used the keyword SRV in the symbol search path which indicates that this path need to be used as a symbol server path. For symbol servers, to identify the files path easily, Windbg uses the formatbinaryname.pdb/GUID. Each binary is given a unique GUID when the application is built and this GUID can be printed by the command!lmi binaryname. For example, to print GUID information for MyApplication.exe I need to run the command!lmi myapplication.

Now back to the symbol loading issue forMyapplication.exe. As the existing paths does not have this file, we need to add the path where the file is present. Let’s say the file is located atC:\localsymbls. Then we can add this path to the symbols search using.sympath+command. In our example, we need to run.symapth+ C:\localsymbols. This is a normal directory which directly stores pdb files, it’s not a server path. So we don’t prefix the path with SRV.

0:041&> .sympath+ c:\localsymbols
DBGHELP: Symbol Search Path: srv*c:\symbols*http://msdl.microsoft.com/download/symbols;c:\localsymbols
Symbol search path is: srv*c:\symbols*http://msdl.microsoft.com/download/symbols;c:\localsymbols
Expanded Symbol search path is: srv*c:\symbols*http://msdl.microsoft.com/download/symbols;c:\localsymbols
0:041&> .reload /f myapplication.exe
SYMSRV: c:\symbols\myapplication.pdb\38266E74B06B4EF3BCC16713A4A1E5E82\myapplication.pdb not found
SYMSRV: http://msdl.microsoft.com/download/symbols/myapplication.pdb/38266E74B06B4EF3BCC16713A4A1E5E82/myapplication.pdb not found
DBGHELP: c:\localsymbols\myapplication.pdb – mismatched pdb
DBGHELP: c:\localsymbols\exe\myapplication.pdb – file not found
DBGHELP: c:\localsymbols\symbols\exe\myapplication.pdb – file not found

DBGHELP: Couldn’t load mismatched pdb for myapplication.exe

*** ERROR: Module load completed but symbols could not be loaded for myapplication.exeDBGHELP: myapplication – no symbols loaded

Now we are into another problem. Windbg detected the symbol file but it says that the symbol file is not matching with the exe file. Let’s see how to fix this in the next section.

Symbol file not matching

If you see this issue, you need to crosscheck with your build numbers and pick up the right pdb file. If you are sure that the pdb file you are using is the right one, but still seeing this message, then you can use /i switch to load the symbols even if there is no match.

0:041&> .reload /i myapplication.exe
SYMSRV: c:\symbols\myapplication.pdb\38266E74B06B4EF3BCC16713A4A1E5E82\myapplication.pdb not found
SYMSRV: http://msdl.microsoft.com/download/symbols/myapplication.pdb/38266E74B06B4EF3BCC16713A4A1E5E82/myapplication.pdb not found
DBGHELP: c:\localsymbols\myapplication.pdb – mismatched pdb
DBGHELP: c:\localsymbols\exe\myapplication.pdb – file not found
DBGHELP: c:\localsymbols\symbols\exe\myapplication.pdb – file not found

DBGHELP: Loaded mismatched pdb for myapplication.exe

DBGENG: myapplication.exe has mismatched symbols – type “.hh dbgerr003″ for details
DBGHELP: myapplication – private symbols & lines
c:\localsymbols\myapplication.pdb – unmatched

As you can see it looks for a matching pdb in all the search paths. As it does not find any, it loads the mismatched pdb in the end.

I hope this post has helped you in understanding how symbols loading works in Windbg. If something is not clear to you, or if you have any other questions, please share it in the comments below.

window.location.href/replace/reload()

window.location.href/replace/reload () — page Jump + replace + refresh

1. window.location.href= “URL”: change the URL address

2. window.location.replace (“URL”); replace the address with URL. This method replaces the items currently cached in the history (client) by specifying the URL, for example: three pages a, B, C. when the user visits page a, it jumps to page B. If you jump to the B page, how to trigger it to jump to the C page window.location.replace (“URL”); at the beginning of & lt; script & gt.

3. window.location.reload (): force refresh page, request again from server!

window.location And window.open The difference between

window.open By default, it opens in a new window

and adds the target attribute (_ By default, the browser opens in the new tab

after “blank” window.open (url,”_ blank”);

1. window.location Is a property of the window object, and window.open Is the method of window object

window.location Is your reference to the URL address object of the current browser window!
window.open Is used to open a new window function!

2. window.open It’s not necessary to open a new window!!!
as long as there is a window’s name and name window.open This window will be replaced by the second parameter in. If you use this feature, you can replace it in iframe and frame location.href .
For example & lt; iframe name = “AA” &> & lt; & iframe &>
& lt; input type = button onclick=“ window.open (‘1. HTM ‘,’aa’, ‘) “&> and
& lt; input type = button

onclick=” self.frames [‘aa’]. location.href= ‘1. HTM’ “&> has the same effect

3.
when making links to buttons, tables, cells, drop-down lists and div, we usually use JavaScript to complete them. Just like making ordinary links, we may need to open the link page in the current window or in a new window. At this time, we can use one of the following two items to complete them:
2 window.open It is used to open a new window window.location It is used to replace the current page, that is, to relocate the current page
you can test it with the following example.
& lt; input type = “button” value = “new window open” onclick=“ window.open (‘ http://www.google.com ‘”&>
& lt; input type =” button “value =” current page opens “onclick =” window.location= ‘ http://www.google.com/ ‘”&>

4.
window.location or window.open How to specify the target?
this is a common problem, especially when using the frame framework.
solution:
window.location Change to top.location You can link to the specified page
or
at the top window.open (“your website”, “_ top”);

5.

window.open It is used to open a new window window.location It is used to replace the current page, that is, to relocate the current page

users cannot change it document.location (because this is where the document is currently displayed).
window.location It is also an object.

however, you can use window.location Change the current document (replace the current document with another document), and document.location It’s not an object.
Server redirection may cause document.url Change, but window.location.href It always refers to the URL used to access the web page.
in most cases, document.location and location.href Is the same, but when there is a server redirection, document.location Contains the URL that has been loaded, and location.href It contains the URL of the original requested document.

7.
2 window.open () is the address where you can open another website on one website and window.location () is a web page that can only be opened in one web site
0 window.open () detailed explanation

& lt; script type = “text/JavaScript” &>
& lt;! — window.open (‘ page.html ‘; — &>
& lt; & Script &>

because it is a piece of JavaScript code, they should be placed in & lt; script language = “JavaScript” &> Between tag and & lt; & Script & gt. ≪! — and — &> work for some older browsers, where the code in the tag is not displayed as text.
We should form this good habit.
window.open (‘ page.html ‘) to control the pop-up of new windows page.html , if page.html If it is not in the same path as the main window, the path should be written in the front, either absolute path (http://) or relative path (/ /). Single quotation marks and double quotation marks are OK, but don’t mix them up. This code can be added to any position of HTML, between & lt; Head &> and & lt; Head &>, & lt; body &>, or between & lt; body &>, the earlier it is executed, especially when the page code is long and you want to make the page pop up earlier.

after setting the pop-up window

let’s talk about the setting of pop-up window. Just add a little more to the code above. Let’s customize the appearance, size and location of the pop-up window to suit the specific situation of the page.
  
  <SCRIPT LANGUAGE=”javascript”&>
  <!–
   window.open (‘ page.html ‘,’newwindow’,’height = 100, width = 400, top = 0, left = 0, toolbar = no, menubar = no, scrollbars = no, sizable = no, location = n o, status = no ‘)// this sentence should be written in a line
— &>
& lt; & Script &>

parameter explanation:

window.open Command to pop up a new window;
‘ page.html ‘the file name of the pop-up window;
‘newwindow ‘the name of the pop-up window (not the file name), which is optional and can be replaced by an empty’;
height = 100 window height;
width = 400 window width;
Top = 0

the value of “scroll” in the menu bar on the left side of the screen is “scroll = 0” and “scroll = 0”.
Re sizable = no whether the window size is allowed to be changed, yes is allowed;
location = no whether the address bar is displayed, yes is allowed;
status = no whether the information in the status bar is displayed (usually the file has been opened), yes is allowed;
& lt; script &>

control the pop-up window with functions:

the following is a complete code.
  <html&>
  <head&>
  <script LANGUAGE=”JavaScript”&>
  <!–
  function openwin() {
   window.open (” page.html “,” newwindow “,” height = 100, width = 400, toolbar = no, menubar = no, scrollbars = no, reusable = no, location = no, status = no “)// write in a line
}
// — &>
& lt; script &>
& lt; Head &>
& lt; body onload = “openwin()” &>
any page content…
& lt; & Body &>
& lt; ml &>

here, we define a function openwin(), whose content is to open a window. There is no use until it is called. How to call it?

method 1: & lt; body onload = “openwin()” &> the browser will pop up when reading the page;
method 2: & lt; body onload = “openwin()” &> the browser will pop up when leaving the page;
method 3: call with a connection:
& lt; a (?) “onclick =” openwin() “&> open a window & lt;/A &>
Note: the “#” used is a virtual connection.
Method 4: call with one button:

two windows will pop up at the same time:

slightly change the source code:

& lt; script language = “JavaScript” &>
& lt; !–
  function openwin() {
   window.open (” page.html “,” newwindow “,” height = 100, width = 100, top = 0, left = 0, toolbar = no, menubar = no, scrollbars = no, sizable = no, location = n o, status = no “)// write a line
in Chinese window.open (“page2.html”, “newwindow2”, “height=100, width=100, top=1 00, left=100,toolbar=no, menubar=no, scrollbars=no, Re sizable = no, location = no, status = no “)// write it in a line
}
// — &>
& lt; & Script &>
to avoid covering the two pop-up windows, use top and left to control the pop-up position, and do not cover each other. Finally, use the four methods mentioned above to call.
Note: the names of the two windows (newwindows and newwindows2) should not be the same, or they should all be empty.

[open the file 1.htm in the main window and pop up a small window at the same time page.html 】

add the following code to the & lt; Head &> section of the main window:
& lt; script language = “JavaScript” &>
& lt;! —
function openwin() {
0 window.open (” page.html “,””,”width=200,height=200″)
  }
  //–&>
  < /Script &>
to join the & lt; body &> section:
& lt; a (<1. HTM) onclick = "openwin()" &> open & lt;/A & gt.

[timing closing control of pop-up windows]

next, we will control the pop-up windows, and the effect will be better. If we add a small piece of code to the pop-up page (Note: add) page.html In HTML, it’s not in the main page, otherwise…), is it cooler to let it close automatically after 10 seconds?
First, add the following code page.html The & lt; Head &> section of the file:
& lt; script language = “JavaScript” &>
function closeit()
{
setTimeout(“ self.close () “, 10000)// MS
}
& lt; & Script &>
and then & lt; body onload =” closeit() “&> This sentence replaces page.html The original & lt; body &> sentence is OK. Don’t forget to write this sentence! The function of this sentence is to call the code to close the window and close the window after 10 seconds. )
[add a close button in the pop-up window]

& lt; form &>
& lt; input type =’button ‘value =’close’) {
openwin()
open window document.cookie= “Popped = yes”
}
}