We already saw the default approach toconfiguredatasource, in this article I am going to explain you how to configuredatasourcesusingJNDIlookup in spring boot applications. Before you read this article, I highly recommend to readHow to Deploy Spring Boot Applications on External Tomcat Server.
Spring Boot : Steps to Configure JNDI DataSource with External Tomcat
Add a dependency topom.xmlto give support to our Spring Boot application to run on external servers and also add packaging war (I will explain this later 🙂 )
Extend main class withSpringBootServletInitializerand override itsconfiguremethod
Add a propertyspring.datasource.jndi-nameinapplication.properties
Create new folderwebapp/META-INFunder main and addcontext.xml(will see this later)
Generate aWARand deploy into the external Tomcat Server, that’s it you are good to go 😉
Before all these, make sure you have datasource information in your external server’sserver.xml🙂 this is very very important. Add the below line in between <GlobalNamingResources/> tag.
<Resource auth="Container" driverClassName="com.mysql.jdbc.Driver"
                           maxActive="20"
                           maxIdle="0"
                           maxWait="10000"
                           name="jdbc/j4s"
                           password="java4s"
                           username="java4s"
                           type="javax.sql.DataSource"
                           url="jdbc:mysql://localhost/test"/>
I have given my local details, just change accordingly, mainly you need to changeusername,passwordandurl.
pom.xml
<project xmlns="http://maven.apache.org/POM/4.0.0" xmlns:xsi="http://www.w3.org/2001/XMLSchema-instance" xsi:schemaLocation="http://maven.apache.org/POM/4.0.0 http://maven.apache.org/xsd/maven-4.0.0.xsd">
  <modelVersion>4.0.0</modelVersion>
  <groupId>com.java4s</groupId>
  <version>0.0.1-SNAPSHOT</version>
  <packaging>war</packaging>
  <artifactId>SpringBootDataSourceConfigJNDILookUp</artifactId>

  	<parent>
	    <groupId>org.springframework.boot</groupId>
	    <artifactId>spring-boot-starter-parent</artifactId>
	    <version>1.5.6.RELEASE</version>
	</parent>

	<dependencies>
		<dependency>
	        <groupId>org.springframework.boot</groupId>
	        <artifactId>spring-boot-starter-web</artifactId>
	    </dependency>
        <dependency>
            <groupId>org.springframework.boot</groupId>
            <artifactId>spring-boot-starter-jdbc</artifactId>
        </dependency>
		<dependency>
		    <groupId>mysql</groupId>
		    <artifactId>mysql-connector-java</artifactId>
		</dependency>
		<dependency>
		   <groupId>org.springframework.boot</groupId>
		   <artifactId>spring-boot-starter-tomcat</artifactId>
		   <scope>provided</scope>
		</dependency>
	</dependencies>

	<properties>
	 	<java.version>1.8</java.version>
	</properties>

</project>
SpringBootApp.java
package com.java4s.app;

import org.springframework.boot.SpringApplication;
import org.springframework.boot.autoconfigure.SpringBootApplication;
import org.springframework.boot.builder.SpringApplicationBuilder;
import org.springframework.boot.web.support.SpringBootServletInitializer;

@SpringBootApplication
public class SpringBootApp extends SpringBootServletInitializer {

	public static void main(String[] args) {
		SpringApplication.run(SpringBootApp.class, args);
	}

	@Override
	protected SpringApplicationBuilder configure(SpringApplicationBuilder application) {
		return application.sources(SpringBootApp.class);
	}
}
application.properties
spring.datasource.jndi-name=java:comp/env/jdbc/j4s
context.xml
<?xml version="1.0" encoding="UTF-8"?>
<context>
	<ResourceLink auth="Container" name="jdbc/j4s" global="jdbc/j4s" type="javax.sql.DataSource" />
</context>
Make sure value in global attribute should match with the name attribute’s value in server.xml’s Resource tag (read again if you didn’t understand 🙂 ), I hope you know the basic JNDI concept.
lets see other supporting files that I have used in this example.
SpringJava4sController.java
package com.java4s.app.controller;

import java.util.List;

import org.springframework.beans.factory.annotation.Autowired;
import org.springframework.web.bind.annotation.RequestMapping;
import org.springframework.web.bind.annotation.RestController;

import com.java4s.app.repository.SpringJava4sDAO;
import com.java4s.model.Customer;

@RestController
public class SpringJava4sController {

	@Autowired
	public SpringJava4sDAO dao;

	@RequestMapping("/get-cust-info")
	public List<Customer> customerInformation() {

		List<Customer> customers = dao.isData();

		return customers;
	}
}
SpringJava4sDAO.java
package com.java4s.app.repository;

import java.util.ArrayList;
import java.util.List;
import java.util.Map;

import org.springframework.beans.factory.annotation.Autowired;
import org.springframework.jdbc.core.JdbcTemplate;
import org.springframework.stereotype.Repository;

import com.java4s.model.Customer;

@Repository
public class SpringJava4sDAO {

	@Autowired
	private JdbcTemplate jdbcTemplate;

	private static final String SQL = "select * from customers";

	public List<Customer> isData() {

		List<Customer> customers = new ArrayList<Customer>();

		List<Map<String, Object>> rows = jdbcTemplate.queryForList(SQL);

		for (Map<String, Object> row : rows) {
			Customer customer = new Customer();

			customer.setCustNo((int)row.get("Cust_id"));
			customer.setCustName((String)row.get("Cust_name"));
			customer.setCountry((String)row.get("Country"));

			customers.add(customer);
		}

		return customers;

	}
}
Customer.java
package com.java4s.model;

public class Customer {

	private int custNo;
	private String custName;
	private String country;

	public Customer() {
	}

	public Customer(int custNumber, String custName, String country) {
		this.custNo = custNumber;
		this.custName = custName;
		this.country = country;
	}

	public int getCustNo() {
		return custNo;
	}

	public void setCustNo(int custNo) {
		this.custNo = custNo;
	}

	public String getCustName() {
		return custName;
	}

	public void setCustName(String custName) {
		this.custName = custName;
	}

	public String getCountry() {
		return country;
	}

	public void setCountry(String country) {
		this.country = country;
	}
}
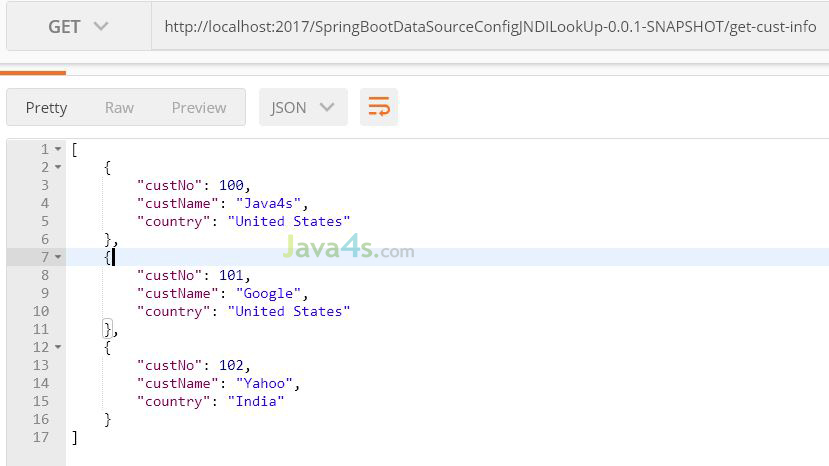
Now just right click on the application >Run As>Maven install::.this will generate aWARfile in your applications target folder. Now you can import that WAR and verify the changes.
Output

Spring Boot : Steps to Configure JNDI DataSource with Embedded Tomcat
Lets compare the steps we have followed for the configuration done above for external tomcat server, for Embedded tomcat…
No need to add anyexternaldependency
No need to extend main class withSpringBootServletInitializer
No need to addspring.datasource.jndi-nameinapplication.properties
No need to createwebapp/META-INFandcontext.xml
No need to generateWAR
Rather just add one more javaclasswhich takes care of datasource and JNDI configuration 🙂 that’s it. Very easy with embedded tomcat.
TomcatConfigs.java
package com.java4s.app.configs;

import javax.naming.NamingException;
import javax.sql.DataSource;

import org.apache.catalina.Context;
import org.apache.catalina.startup.Tomcat;
import org.apache.tomcat.util.descriptor.web.ContextResource;
import org.springframework.boot.context.embedded.tomcat.TomcatEmbeddedServletContainer;
import org.springframework.boot.context.embedded.tomcat.TomcatEmbeddedServletContainerFactory;
import org.springframework.context.annotation.Bean;
import org.springframework.context.annotation.Configuration;
import org.springframework.jndi.JndiObjectFactoryBean;

@Configuration
public class TomcatConfigs {

	 @Bean
	 public TomcatEmbeddedServletContainerFactory tomcatFactory() {

		 return new TomcatEmbeddedServletContainerFactory() {

	           @Override
	           protected TomcatEmbeddedServletContainer getTomcatEmbeddedServletContainer(Tomcat tomcat)
	           {
	                tomcat.enableNaming();
	                return super.getTomcatEmbeddedServletContainer(tomcat);
	            }

	            @Override
	            protected void postProcessContext(Context context)
	            {
	                ContextResource resource = new ContextResource();

	                resource.setType(DataSource.class.getName());
	                resource.setName("j4s");
	                resource.setProperty("factory", "org.apache.tomcat.jdbc.pool.DataSourceFactory");
	                resource.setProperty("driverClassName", "com.mysql.jdbc.Driver");
	                resource.setProperty("url", "jdbc:mysql://localhost/test");
	                resource.setProperty("username", "java4s");
	                resource.setProperty("password", "java4s");

	                context.getNamingResources().addResource(resource);
	            }
	        };
	    }

	    @Bean
	    public DataSource jndiDataSource() throws IllegalArgumentException, NamingException
	    {
	        JndiObjectFactoryBean bean = new JndiObjectFactoryBean();
	        bean.setJndiName("java:/comp/env/j4s");
	        bean.setProxyInterface(DataSource.class);
	        bean.setLookupOnStartup(false);
	        bean.afterPropertiesSet();

	        return (DataSource) bean.getObject();
	    }
}
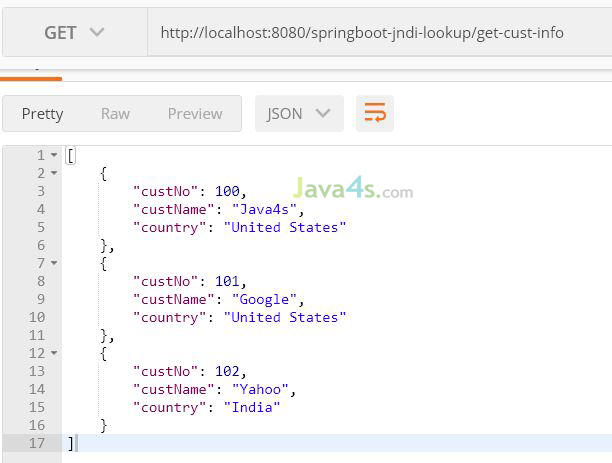
Output

Hope you enjoy the article and considersharingthis with your friends 🙂 BTWdownloadthe code and play with it