Category Archives: Coder

Android system/app/ VS system/priv-app/

The system/priv app directory is mainly used to store system level applications customized by mobile phone manufacturers, such as phone app, settings app, systemui app, etc. these applications need system and permissions, but cannot be unloaded by users. This directory is a new partition in Android KitKat. Before KitKat, all apks in the system partition can use system permissions. This change enables mobile phone manufacturers to better control the access of bundled software to sensitive permissions. When mobile phone manufacturers customize some system software, the software also needs to add SELinux policy to priv app. Of course, there are other ways for applications to obtain system permissions. Add them to the Android manifest. XML file android:sharedUserId= “Android. Uid. Sysytem” and add a system signature to the APK. For example, Xiaomi mobile phone needs to add Xiaomi’s system permissions to the APK

In fact, from the perspective of security, Google doesn’t want the system/APP/applications that use WebView controls to have system permissions, such as chrome, which has always been a favorite attack point for hackers, so Google will check whether the applications that use WebView controls have system permissions in code power. Paste a code:

194    static WebViewFactoryProvider getProvider() {
195        synchronized (sProviderLock) {
196            // For now the main purpose of this function (and the factory abstraction) is to keep
197            // us honest and minimize usage of WebView internals when binding the proxy.
198            if (sProviderInstance != null) return sProviderInstance;
199
200            final int uid = android.os.Process.myUid();
201            if (uid == android.os.Process.ROOT_UID || uid == android.os.Process.SYSTEM_UID
202                    || uid == android.os.Process.PHONE_UID || uid == android.os.Process.NFC_UID
203                    || uid == android.os.Process.BLUETOOTH_UID) {
204                throw new UnsupportedOperationException(
205                        "For security reasons, WebView is not allowed in privileged processes");
206            }

Note that the processes marked in yellow have system privileges.
These are the special features of the system/priv-app/ partition.

The C compiler identification is unknown No CMAKE_C_COMPILER could be found

Current system environment.

1.Windows 7 Chinese flagship version

2.Visual studio 2017、Visual studio 2019

3.Cmake 3.8.1


Error Message:

The C compiler identification is unknown

The CXX compiler identification is unknown

CMake Error at CMakeLists.txt:3 (project):

No CMAKE_C_COMPILER could be found.

CMake Error at CMakeLists.txt:3 (project):

No CMAKE_CXX_COMPILER could be found.


Solution.

1, ensure that when installing VS, the compiler for C++ is installed (you can test it by directly creating a new project with VS and checking whether the compilation passes).

2. Check the installation options for Windows 8.1 SDK and UCRT SDK (the default is unchecked)

3. Make sure that the correct compilation version is selected when coexisting with multiple versions of VS.

Links to related issues.

https://stackoverflow.com/questions/32801638/cmake-error-at-cmakelists-txt30-project-no-cmake-c-compiler-could-be-found

tf.nn.top_k(input, k, name=None) & tf.nn.in_top_k(predictions, targets, k, name=None)

tf.nn.top_ k(input, k, name=None)

This function returns the maximum number of K input rows and the index of their location

Input: a tensor. The data type must be one of the following: float32, float64, int32, Int64, uint8, int16, int8. The data dimension is batch_ Multiply size by X categories
k: an integer must be & gt= 1。 In each row, find the largest K values
Name: give this operation a name<

output: a tuple tensor, and the data element is (values, indexes), as follows:
values: a tensor, and the data type is the same as input. The data dimension is batch_ Size multiplied by K maximum
indicators: a tensor whose data type is int32. The index position of each maximum value in input

tf.nn.in_ top_ k(predictions, targets, k, name=None)

It is to compare whether predictions and targets are the same, return true if they are the same, and return false if they are different. Next, tf.cast (correct, TF. Floatxx) can be used to calculate the accuracy
predictions: the prediction result, and the prediction matrix size is the number of samples × Two dimensional matrix of the number of labeled label classes
targets: the actual tag size is the number of samples
k: whether the first k largest numbers of the prediction results of each sample contain the tags in the targets prediction is generally taken as 1, that is, the index of the maximum probability of prediction is taken to compare with the tags
Name: name

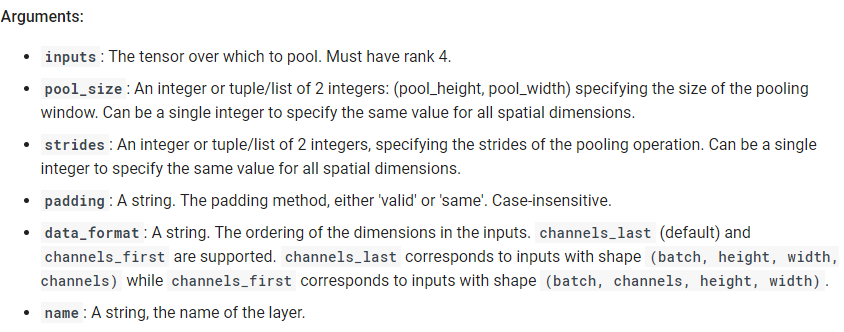
TensorFlow_CNN: tf.nn.max_pool VS tf.layers.max_pooling2d Parameters

1 tf.nn.max_pool(
2     value,
3     ksize,
4     strides,
5     padding,
6     data_format='NHWC',
7     name=None
8 )

Pooling is similar to convolution, The reason is that pooling is similar to subsampling

1 tf.layers.max_pooling2d(
2     inputs,
3     pool_size,
4     strides,
5     padding='valid',
6     data_format='channels_last',
7     name=None
8 )

tf.data.Dataset.from_tensor_slices: How to Use shuffle(), repeat(), batch()

1.code

Reference library file

from __future__ import absolute_import, division, print_function, unicode_literals
import numpy as np
import pandas as pd
import tensorflow as tf
from tensorflow import feature_column
from tensorflow.keras import layers
from sklearn.model_selection import train_test_split

Load data set and generate data frame resource handle

# Download and load the heart.csv dataset into a data frame
path_data = "E:/pre_data/heart.csv"
dataframe = pd.read_csv(path_data)

The data format of panda dataframe is transformed into the data set format of TF. Data

# Copy the data frame, id(dataframe)! =id(dataframe_new)
 dataframe_new = dataframe.copy()
 # Get the target property from the dataframe_new data
labels = dataframe_new.pop('target')
# To build the data in the Dataset memory
dataset = tf.data.Dataset.from_tensor_slices((dict(dataframe_new), labels))
# The degree of confusion that will break up the data
dataset = dataset.shuffle(buffer_size=len(dataframe_new))
# Number of datasets to remove from the dataset
dstaset = dataset.batch(100)
# Specify the number of times the dataset should be duplicated
dataset = dataset.repeat(2)

2.suffle, batch and repeat

2.1 shuffle method/function

2.1.1 implementation process of shuffle function

Shuffle is a function used to scramble the data set, that is, shuffle the data. This method is very useful in training data

dataset = dataset.shuffle(buffer_size)

Parameter buffer_ The larger the size value is, the more chaotic the data is. The specific principle is as follows

Suppose buffer_ Size = 9, that is to say, first take out 9 data from the dataset and “drag” them to the buffer area, and each sample of subsequent training data will be obtained from the buffer area
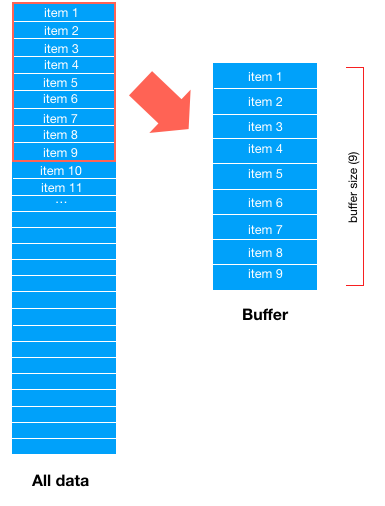
For example, take a data item 7 from the buffer area. Now there are only 8 data in the buffer area
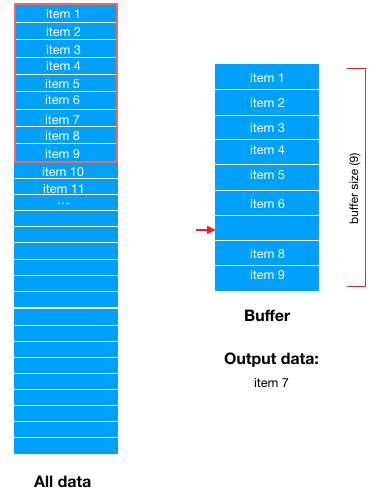
Then take out a piece of data (item10) from the dataset in order and “drag” it to the buffer area again to fill the gap
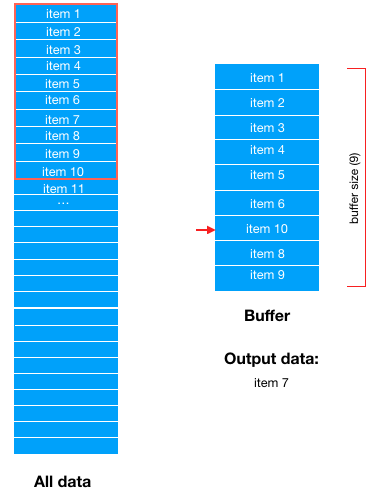
Then, when training data, one data is randomly selected from the buffer area; The buffer area forms a data vacancy

It should be noted that a data item here is just an abstract description, which is actually a Bach_ The size of the data

In fact, we can find that buffer actually defines the size of a data pool, buffer size. When the data is taken from the buffer, samples will be extracted from the source data set to fill the gaps in the buffer

2.1.2 parameters of shuffle method

buffer_ The size = 1 dataset will not be scrambled

buffer_ Size = the number of samples in the data set, randomly scrambling the whole data set

buffer_ size > The number of samples in the data set is randomly scrambled

Shuffle is an important means to prevent data from over fitting. However, improper buffer size will lead to meaningless shuffle. Please refer to the importance of buffer for details_ size in shuffle()

2.2 repeat method/function

The repeat method restarts the dataset when the data after the group is read. To limit the number of epochs, you can set the count parameter

In order to match the output times, the default repeat() is empty

The repeat function is similar to epoch

The current optimizer SGD is the abbreviation of stochastic gradient descent, but it does not mean that it is based on a sample or mini batch

What does batch epoch iteration stand for

(1) Batch size: batch size. In deep learning, SGD training is generally used, that is, each training takes batch size samples in the training set

(2) Iteration: one iteration is equal to one training with batchsize samples

(3) Epoch: one epoch is equal to using all the samples in the training set to train once. Generally speaking, the value of epoch is the number of rounds of the whole data set

For example, if the training set has 500 samples and batchsize = 10, then the training set has a complete sample set: iteration = 50, epoch = 1.
– – –
Author: bboysky45
source: CSDN
original text: https://blog.csdn.net/qq_ 18668137/article/details/80883350
copyright notice: This is the original article of the blogger, please attach the blog link if you want to reprint it

2.3 batch method/function

The batch size of the data fed into the neural network at one time

3. The relationship among shuffle, repeat and batch

On the official website, it is explained that the use of repeat before shuffle can effectively improve the performance, but it blurs the epoch of data samples

In fact, you can understand that shuffle has reset the source dataset before fetching

That is, repeat before shuffle. TF will multiply the data set by the number of repeats, and then scramble it as a data set

dataset = dataset.shuffle(buffer_size=10000)
dataset = dataset.batch(32) 
dataset = dataset.repeat(num_epochs)

 

maven web web.xmlThe markup in the document following the root element must be well-formed.

This is the beginning constraint of web. XML in Maven project

<?xml version="1.0" encoding="UTF-8"?>
<web-app xmlns:xsi="http://www.w3.org/2001/XMLSchema-instance"
    xmlns="http://java.sun.com/xml/ns/javaee"
    xsi:schemaLocation="http://java.sun.com/xml/ns/javaee http://java.sun.com/xml/ns/javaee/web-app_2_5.xsd"
    id="WebApp_ID" version="2.5" />

When you add something after it, you will report an error:

The markup in the document following the root element must be well-formed.

Translation error: the markup in the document after the root element must be well formed

Solution:

<?xml version="1.0" encoding="UTF-8"?>
<web-app xmlns:xsi="http://www.w3.org/2001/XMLSchema-instance"
    xmlns="http://java.sun.com/xml/ns/javaee"
    xsi:schemaLocation="http://java.sun.com/xml/ns/javaee http://java.sun.com/xml/ns/javaee/web-app_2_5.xsd"
    id="WebApp_ID" version="2.5" >
</web-app>

Keras.utils.to in keras_ Categorical method


to_categorical(y, num_classes=None, dtype=’float32′)

Convert integer category labels to onehot encoding. y is an int array, num_classes is the total number of label categories, greater than max(y) (labels starting from 0).

Returns: len(y) * [max(y)+1] (dimension, m*n means m rows and n columns matrix, same below) if num_classes=None, otherwise len(y) * num_classes.

import keras

ohl=keras.utils.to_categorical([
1,3])

# ohl=keras.utils.to_categorical([[1],[3]])

print(ohl)

“””

[[0. 1. 0. 0.]

[0. 0. 0. 1.]]

“””

ohl=keras.utils.to_categorical([
1,3],num_classes=5)

print(ohl)

“””

[[0. 1. 0. 0. 0.]

[0. 0. 0. 1. 0.]]

“””

The source code for this part of keras is as follows.

def to_categorical(y, num_classes=None, dtype=’float32′):

“””Converts a class vector (integers) to binary class matrix.

E.g. for use with categorical_crossentropy.

# Arguments

y: class vector to be converted into a matrix

(integers from 0 to num_classes).

num_classes: total number of classes.

dtype: The data type expected by the input, as a string

(`float32`, `float64`, `int32`…)

# Returns

A binary matrix representation of the input. The classes axis

is placed last.

“””

y = np.array(y, dtype=
‘int’)

input_shape = y.shape

if input_shape and input_shape[-1] == 1 and len(input_shape) > 1:

input_shape = tuple(input_shape[:
-1])

y = y.ravel()

if not num_classes:

num_classes = np.max(y) +
1

n = y.shape[
0]

categorical = np.zeros((n, num_classes), dtype=dtype)

categorical[np.arange(n), y] =
1

output_shape = input_shape + (num_classes,)

categorical = np.reshape(categorical, output_shape)

return categorical

In short: **keras.utils.to_categorical function: is to convert the category label to onehot encoding (categorical means category label, which indicates the various categories you categorize in the real world), and onehot encoding is a binary encoding that is convenient for computer processing. **

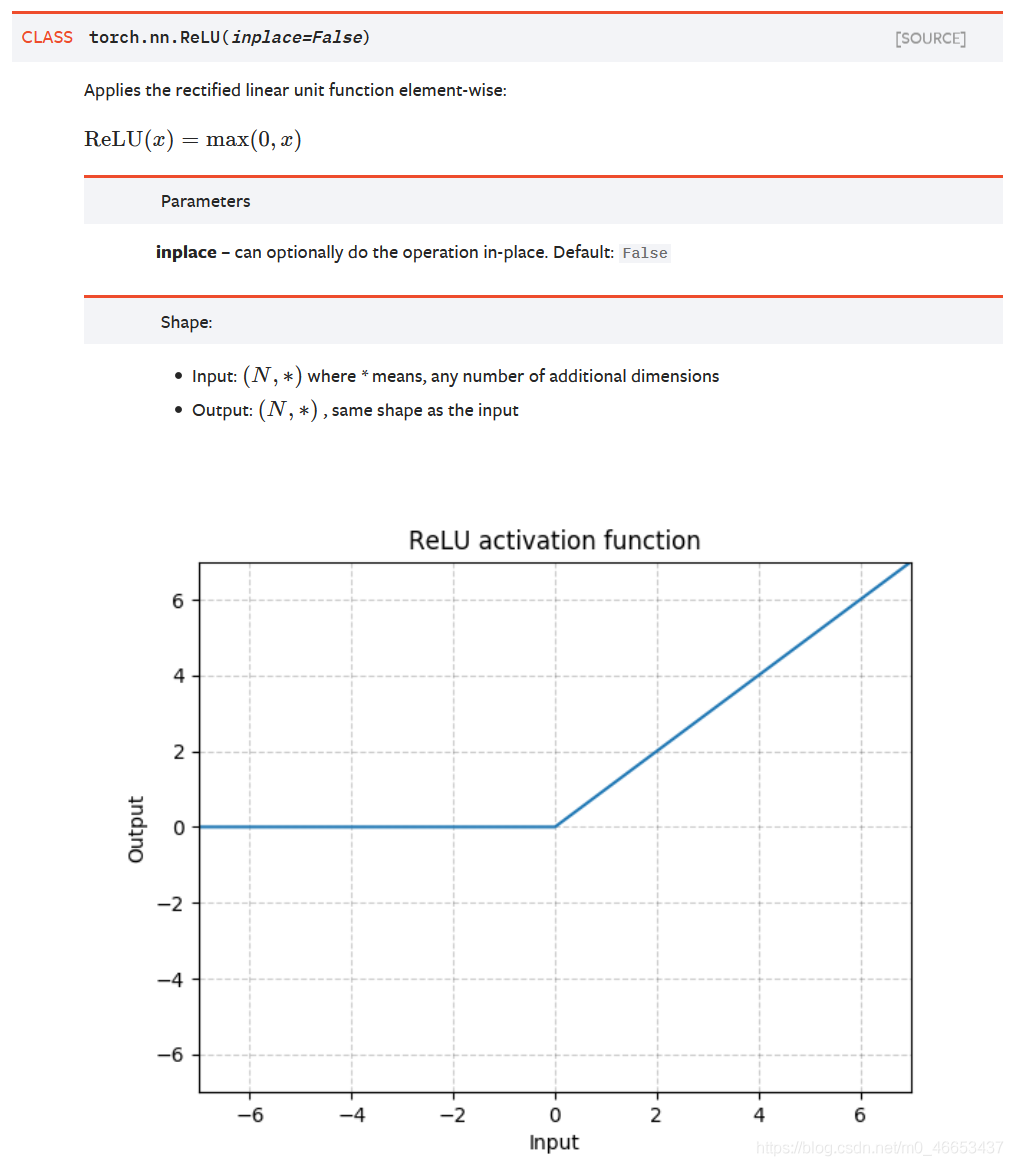
Examples of torch.NN.Functional.Relu() and torch.NN.Relu()


Code:

Microsoft Windows [V 10.0.18363.1256]
(c) 2019 Microsoft Corporation。

C:\Users\chenxuqi>conda activate ssd4pytorch1_2_0

(ssd4pytorch1_2_0) C:\Users\chenxuqi>python
Python 3.7.7 (default, May  6 2020, 11:45:54) [MSC v.1916 64 bit (AMD64)] :: Anaconda, Inc. on win32
Type "help", "copyright", "credits" or "license" for more information.
>>> import torch
>>> torch.manual_seed(seed=20200910)
<torch._C.Generator object at 0x000001CD8F73D330>
>>>
>>> input = torch.randn(3, 5)
>>> input
tensor([[ 0.2824, -0.3715,  0.9088, -1.7601, -0.1806],
        [ 2.0937,  1.0406, -1.7651,  1.1216,  0.8440],
        [ 0.1783,  0.6859, -1.5942, -0.2006, -0.4050]])
>>>
>>>
>>> output1 = torch.nn.ReLU()(input)
>>> output1
tensor([[0.2824, 0.0000, 0.9088, 0.0000, 0.0000],
        [2.0937, 1.0406, 0.0000, 1.1216, 0.8440],
        [0.1783, 0.6859, 0.0000, 0.0000, 0.0000]])
>>>
>>> input
tensor([[ 0.2824, -0.3715,  0.9088, -1.7601, -0.1806],
        [ 2.0937,  1.0406, -1.7651,  1.1216,  0.8440],
        [ 0.1783,  0.6859, -1.5942, -0.2006, -0.4050]])
>>> output2 = torch.nn.functional.relu(input)
>>> output2
tensor([[0.2824, 0.0000, 0.9088, 0.0000, 0.0000],
        [2.0937, 1.0406, 0.0000, 1.1216, 0.8440],
        [0.1783, 0.6859, 0.0000, 0.0000, 0.0000]])
>>>
>>>
>>>

C++: The usage of spanactor in [UE4]

create a level in C + + and add it to the runtime

Level.Add(GetWorld()->SpawnActor<ABuildingModLevel>());

Spawn a blueprint-based Actor in C++

https://answers.unrealengine.com/questions/60897/spawn-actorobject-from-code.htm

Here is how I spawn a blueprint via C++. Note that the blueprint I spawn has a base class that was created in C++ also.

.h

TSubclassOf<YourClass> BlueprintVar; // YourClass is the base class that your blueprint uses 

. CPP (note that this code must be placed in the constructor. Other types of UE4 blueprints, such as widget blueprints , can be loaded in the following way.)

ClassThatWillSpawnTheBlueprint::ClassThatWillSpawnTheBlueprint(const class FPostConstructInitializeProperties& PCIP)  
    : Super(PCIP)  
{  
    static ConstructorHelpers::FObjectFinder<UBlueprint> PutNameHere(TEXT("Blueprint'/Path/To/Your/Blueprint/BP.BP'"));  
    if (PutNameHere.Object)   
    {  
        BlueprintVar = (UClass*)PutNameHere.Object->GeneratedClass;  
    }  
}  

PutNameHereis just an arbitrary name you give to the constructor helper. The path to your blueprint is found by finding your blueprint in the content browser, right clicking it, and choosingCopy Reference. Then, just paste that in between the quotes.

Now, you’re ready to spawn the blueprint. You can do it in BeginPlay() or wherever, just not in the constructor.(This code must be placed in a non-constructor, such as BeginPlay())

UWorld* const World = GetWorld(); // get a reference to the world  
if (World)   
{  
    // if world exists  
    YourClass* YC = World->SpawnActor<YourClass>(BlueprintVar, SpawnLocation, SpawnRotation);  
}  

If you don’t know your SpawnLocation or SpawnRotation you can just throw in FVector(0,0,0) and FRotator(0,0,0) instead.

So, since your blueprint base class was also created in C++ this makes it easy to interact with your blueprint from code. It’s as simple asYC->SomeVariable = SomeValue. Hope that helps.

APuzzleBlock* NewBlock = GetWorld()->SpawnActor<APuzzleBlock>(BlockLocation, FRotator(0,0,0));

Datatable is a component of Excel which is provided by UE4 engine

Udatatable is a component provided by UE4 to read and write files. The advantage is that you don’t need to write the logic related to C + + STL API, such as fopen and Fclose, to avoid the differences between different platforms; The disadvantage is that the DataTable function you want is not implemented, so you have to use fopen to play it yourself

Reading and writing excel needs to be exported as a CSV file. At present, *. XLS format is not supported

In the following official documents, there is no specific description about the usage of defining line structure with C + + Code:

If a DataTable is created from a blueprint, then the row structure structure can also use the structure component provided by UE4. The creation method is: add new blueprints structure, and then set the row structure in this structure

If you create a DataTable with C + + code, you can directly create a new C + + class and choose to inherit the DataTable. In addition, ftablerowbase can be directly defined in the header file of the custom datatable, for example:

#pragma once

#include "Engine/DataTable.h"
#include "CharactersDT.generated.h"

USTRUCT(BlueprintType)
struct FLevelUpData : public FTableRowBase
{
	GENERATED_USTRUCT_BODY()

public:

	FLevelUpData()
		: XPtoLvl(0)
		, AdditionalHP(0)
	{}

	/** The 'Name' column is the same as the XP Level */

	/** XP to get to the given level from the previous level */
	UPROPERTY(EditAnywhere, BlueprintReadWrite, Category = LevelUp)
		int32 XPtoLvl;

	/** Extra HitPoints gained at this level */
	UPROPERTY(EditAnywhere, BlueprintReadWrite, Category = LevelUp)
		int32 AdditionalHP;

	/** Icon to use for Achivement */
	UPROPERTY(EditAnywhere, BlueprintReadWrite, Category = LevelUp)
		TAssetPtr<UTexture> AchievementIcon;
};

Using excel to store gameplay data – DataTables

https://wiki.unrealengine.com/Using_excel_to_store_gameplay_data_-_DataTables

Data Driven Gameplay Elements

https://docs.unrealengine.com/latest/INT/Gameplay/DataDriven/index.html

Driving Gameplay with Data from Excel

https://forums.unrealengine.com/showthread.php?12572-Driving-Gameplay-with-Data-from-Excel

Methods for manipulating DataTable with blueprints.
Unreal Engine, Datatables for Blueprints (build & Use)

Excel to Unreal

https://www.youtube.com/watch?v=WLv67ddnzN0

How to load *.CSV dynamically with C++ code

If you have few tables you can use this self-contained DataTable, if you have many tables and will change them frequently, then you have to manually operate one by one in the UE editor after each change, so it is recommended to load *.csv dynamically in C++:.

FString csvFile = FPaths::GameContentDir() + "Downloads\\DownloadedFile.csv";
if (FPaths::FileExists(csvFile ))
{
	FString FileContent;
	//Read the csv file
	FFileHelper::LoadFileToString(FileContent, *csvFile );
	TArray<FString> problems = YourDataTable->CreateTableFromCSVString(FileContent);

	if (problems.Num() > 0)
	{
		for (int32 ProbIdx = 0; ProbIdx < problems.Num(); ProbIdx++)
		{        
			//Log the errors
		}
	}
	else
	{
		//Updated Successfully
	}
}