Category Archives: Linux

Linux: Environment Variables C_INCLUDE_PATH, CPLUS_INCLUDE_PATH, CPATH Common Error [How to Solve]

C_ INCLUDE_ PATHCPLUS_ INCLUDE_ Path and cpath are often used to globally add the include directory when preprocessing C/C + +, where C + + is used as the include directory_ INCLUDE_ Path is only effective for pretreatment C, cplus_ INCLUDE_ Path is only valid for preprocessing C + +, while cpath is valid for all languages. Next, we only use C_ INCLUDE_ Path as an example

The common error prone setting method is to simply use recursive assignment in ~ /. Bashrc and other files

export C_INCLUDE_PATH=$C_INCLUDE_PATH:/somewhere/include

The command of this statement will change C_ INCLUDE_ Path is assigned to its original value, followed by the value of :/somewhere/include

For example, if the original $C_ INCLUDE_ The value of path is /previous/include , then after executing this shell statement, $C_ INCLUDE_ The value of path will change to /previous/include/somewhere/include , and if the environment variable C has not been defined before_ INCLUDE_ Path or defined but empty, then $C_ INCLUDE_ The value of path will change to :/somewhere/include .

But why is it easy to make mistakes

We know that colon : is used to separate two directories in Linux (semicolon is commonly used in Windows)</The expected effect of using this statement should be to add /somewhere/include to the included directory when preprocessing C

There is a sentence in the official document of GCC about the influence of environment variables on GCC

In all these variables, an empty element instructs the compiler to search its current working directory. Empty elements can appear at the beginning or end of a path. For instance, if the value of CPATH is :/special/include, that has the same effect as -I. -I/special/include.

In all of these variables, an empty element instructs the compiler to search the current working directory empty elements can appear at the beginning or end of a path . For example, if the value of cpath is :/special/include , this would be equivalent to - I. - I/special/include

Therefore, in the previous example, we just want to add a /somewhere/include , the expected C, to the preprocessed search path_ INCLUDE_ The value of path is /somewhere/include , but actually C_ INCLUDE_ Path is assigned as :/somewhere/include . Although the colon at the beginning is empty, the current working directory will be added to the preprocessing search path, that is, , in Linux, and the priority is the highest in all directories

This is often not the result we want, which will lead to the change of the included directory of preprocessing with the change of the current working directory. If there is a file with the same name as the file contained in the source code in the current working directory, it will lead to unexpected errors

Unfortunately, tasks. Options. CWD happens to be /usr/bin in the tasks. JSON automatically generated by vscode for us, so once C is set incorrectly_ INCLUDE_ Path , and there is a file with the same name in /usr/bin (you should know that most of the files here are executable programs). When compiling C programs, you will mistakenly include the file with the same name as the source code file, and then you can appreciate a large number of compilation errors. For example, manjaro, the most popular Linux distribution at present, will have an executable program named array in /usr/bin after installation, which is similar to & lt; array> duplicate name

Correct method:

First of all, to be clear, these environment variables that contain the directory are not part of the Linux operating system, so in general, Linux will not set these environment variables

Therefore, when setting an environment variable for the first time, it should be directly assigned to the required directory, and then the recursive assignment should be used in the subsequent settings; Or all directories can be separated by : at one time and assigned values together; Or simply do not use these environment variables, but use the - I parameter to add the included directory at compile time

Others:

To view the search directory of GCC preprocessing C:

echo | gcc -x c -v -E -

To view the search directory of GCC preprocessing C + +

echo | gcc -x c++ -v -E -

To view the search directory of C + + preprocessed by clang:

echo | clang -x c++ -v -E -

cwd : current working directory
Centos7 vmware Install Error: C header files matching your running kernel were not found.

C header files matching your running kernel were not found when installing VMware in centos7

02 OCT 2015 06:48:45jcxch number of readings: 3812

When installing VMware 11.0 in CentOS 7

1. Install gcc compiler first, because some files need to be compiled when installing VMware. If the system does not install GCC, you will be prompted to install GCC. Just use Yum install GCC

2. C header files matching your running kernel were not found. Refer to your distribution’s documentation for installation instruction. The general meaning is that there are no C header files and other files found in the current kernel. If there is such a problem that the development package of the corresponding kernel is not installed, you need to solve it by Yum install kernel devel or download the corresponding RPM package for installation

How to Solve Disk blk_update_request: I/O error

When booting Linux on the hardware with the floppy drive controller turned on, the following prompt will appear:
blk_update_request: I/O error, dev fd0, sector 0

Solve the error message by closing the floppy drive module:

#
# /etc/modprobe.d/modprobe.conf
#
blacklist floppy

Attempt 2:

<strong>When dmesg, the following message appears indicating a problem with the disk</strong><br><br>Info fld=0x139066d0
end_request: I/O error, dev sda, sector 328230608
Buffer I/O error  on  device sda, logical block 41028826
sd 0:0:0:0: SCSI error:  return  code = 0x08000002
sda: Current: sense key: Medium Error
     Add. Sense: Unrecovered read error
Info fld=0x139066d0
end_request: I/O error, dev sda, sector 328230608
Buffer I/O error  on  device sda, logical block 41028826
sd 0:0:0:0: SCSI error:  return  code = 0x08000002
sda: Current: sense key: Medium Error
     Add. Sense: Unrecovered read error
Info fld=0x139066d0
end_request: I/O error, dev sda, sector 328230608
Buffer I/O error  on  device sda, logical block 41028826
sd 0:0:0:0: SCSI error:  return  code = 0x08000002
sda: Current: sense key: Medium Error
     Add. Sense: Unrecovered read error
Info fld=0x139066d0
end_request: I/O error, dev sda, sector 328230608
Buffer I/O error  on  device sda, logical block 41028826
sd 0:0:0:0: SCSI error:  return  code = 0x08000002
sda: Current: sense key: Medium Error
     Add. Sense: Unrecovered read error

1. First detect the failure

badblocks -s -v -o /root/bb.log /dev/sda save the result to bb.log

[root@logging ~]# badblocks -s -v -o /root/badblocks.log /dev/sda
Checking blocks 0 to 586061784
Checking for bad blocks (read-only test): done                                
Pass completed, 173 bad blocks found.


smartctl -a /dev/sda3 (Quickly detect bad sectors on the hard disk, see if there are errors behind read and write)

2. Logic bad sectors repair method

①, badblocks -s -w /dev/sda END START (END represents the end of the sector that needs to be repaired, START represents the beginning of the sector that needs to be repaired)
②, fsck -a /dev/sda

After repairing, use badblocks -s -v -o /root/bb.log /dev/sda to monitor whether there are any bad sectors. If the bad sectors still exist, it means that the bad sectors are hard disk bad sectors. The hard disk bad sectors should be isolated. Firstly, record the detected bad sectors of the hard disk and then divide the sectors where the hard disk bad sectors are located in a partition (the size is generally larger than the size of the bad sector), and the divided bad sector partitions are not used. Can achieve the purpose of isolation

3. 0 bad track and hard drive (ready to change hard drive)

The repair method for bad tracks of track 0 is to isolate track 0, and when using fdsk to divide the area, start dividing the area from track 1.

If it is a bad sector of the hard disk, it can only be isolated but not repaired

Linux Programmer Error: /bin/bash: No such file or directory [How to Solve]

As an example, take the following script.

#!/bin/bash


conn=’mysql -upitt -p123456 -hhostname –default-character-set=UTF8 database’


`$conn -e “select Name from Product1 where Type=’Live'” > a.txt`

`$conn -e “select Name from Product2 where Type=’Live'” >> a.txt`

echo “query end”

echo “start check”


`cd /home/user/NameCheck`

`grep ‘@’ a.txt | wc -l > result.txt`


Using Notepad++ editor.

1. In the Edit menu bar, select EOL Conversion sidebar and choose UNIX Format

2. In the Encoding menu bar, select Encode in UTF-8 without BOM

This way, you will not get the error /bin/bash: No such file or directory when running under Linux.

[Solved] “/bin/bash^M: bad interpreter: No such file or directory”

Reason: when executing a shell script, this error is mainly caused by that the shell script file is in DOS format, that is, the end of each line is marked with a line, while the end of a UNIX file is marked with a line

Solution:

(1) Use the Linux command dos2unix file name to convert the file to UNIX format directly
(2) use the SED command sed – I “s/\ R//” or sed – I “s/^ m//” to directly replace the terminator in UNIX format
(3) VI filename open the file, execute: set FF = UNIX, set the file to UNIX, and then execute: WQ, save it to UNIX format

Several ways to check whether the script file is DOS format or UNIX format
(1) cat – a file name can judge from the display results that the end of the file line in DOS format is ^ m $, and the end of the file line in UNIX format is $
(2) od – t X1 file name if you see 0d 0A characters in the output content, the file is in DOS format, if only 0A, it is in UNIX format
(3) VI filename open the file and execute: set FF. If the file is in DOS format, it will be displayed as fileformat = DOS, if it is uxi, it will be displayed as fileformat = UNIX

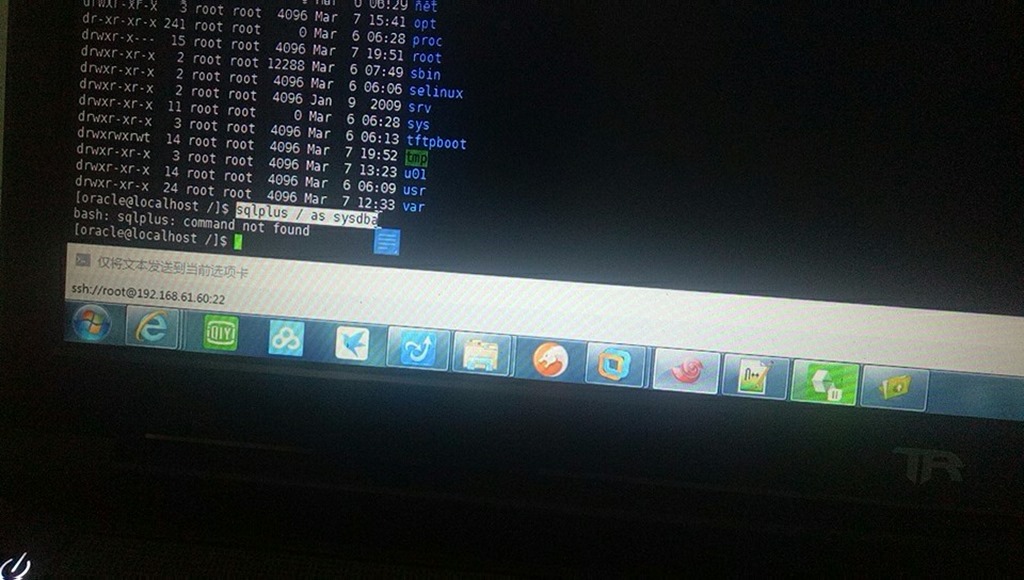
[Solved] Linux Oracle bash: “sqlplus / as sysdba”: command not found


bash: sqlplus: command not found solution

1: Problem situation:


2: How to Solve


1: polio variable is good, but still errors:

  1 [oracle@dg1 ~]$ vi .bash_profile
  2 
  3 # .bash_profile
  4 
  5 # Get the aliases and functions
  6 if [ -f ~/.bashrc ]; then
  7         . ~/.bashrc
  8 fi
  9 
 10 # User specific environment and startup programs
 11 
 12 PATH=$PATH:$HOME/bin
 13 
 14 export PATH
 15 unset USERNAME
 16 
 17 export EDITOR=vi
 18 export ORACLE_SID=dg1
 19 export ORACLE_BASE=/u01/app/oracle
 20 export ORACLE_HOME=$ORACLE_BASE/product/10.2.0/db_1
 21 export LD_LIBRARY_PATH=$ORACLE_HOME/lib:/usr/lib
 22 export PATH=/u01/app/oracle/product/10.2.0/db_1/bin:/bin:/usr/bin:/usr/sbin:/usr/local/bin:/usr/X11R6/bin
 23 export PATH=$ORACLE_HOME/bin:$PATH
 24


2. Solution:

  1 [oracle@dg1 ~]$ sqlplus /nolog
  2 bash: sqlplus: command not found
  3 [oracle@dg1 ~]$ ln -s $ORACLE_HOME/bin/sqlplus /usr/bin
  4 ln: creating symbolic link `/usr/bin/sqlplus' to `/bin/sqlplus': Permission deni ed
  5 [oracle@dg1 ~]$ su - root
  6 Password:
  7 [root@dg1 ~]# ln -s $ORACLE_HOME/bin/sqlplus /usr/bin
  8 [root@dg1 ~]# su - oracle
  9 [oracle@dg1 ~]$ sqlplus /nolog
 10 
 11 SQL*Plus: Release 10.2.0.1.0 - Production on Mon May 11 12:51:24 2009
 12 
 13 Copyright (c) 1982, 2005, Oracle.  All rights reserved.
 14 
 15 SQL> conn/as sysdba
 16 Connected to an idle instance.
 17 SQL> startup
 18 ORACLE instance started.
 19 
 20 Total System Global Area  167772160 bytes
 21 Fixed Size                  1218316 bytes
 22 Variable Size              79694068 bytes
 23 Database Buffers           83886080 bytes
 24 Redo Buffers                2973696 bytes
 25 Database mounted.
 26 Database opened.
 27 SQL>
 28 
 29

[Solved] JSCH cannot run JAVA bash:java:Command not found.

/etc/profile, /etc/bashrc, ~/.bash_profile, ~/.bashrc are easy to confuse, what is the difference between them? What is their role?
/etc/profile: Used to set system environment parameters, such as $PATH. The environment variables inside are effective for all users in the system.
/etc/bashrc: This file sets the system bash shell-related things and is effective for all users in the system. As long as the user runs the bash command, then the things in it will work.
~/.bash_profile: Used to set some environment variables, the function is similar to /etc/profile, but this is set for users, that is, you set environment variables in /home/user1/.bash_profile, Then this environment variable only takes effect for the user user1.
~/.bashrc: The function is similar to /etc/bashrc, but it is only for the user himself and does not take effect for other users.
In addition, the variables (global) set in /etc/profile can act on any user, and the variables (local) set in ~/.bashrc etc. can only inherit the variables in /etc/profile, they are “father and child” Relationship.
~/.bash_profile is interactive and login mode to enter bash operation, which means that it will take effect only when the user logs in.
~/.bashrc is an interactive non-login way to enter bash to run, the user does not necessarily log in, as long as the command line is run as the user, the file will be read.


Here we can see that /etc/profile and ~./bashrc_profile are equivalent, and /etc/bashrc and ~/.bashrc are equivalent. The difference is that the scope of users is different. The former is for all users, and the latter is for all users. The person is for a single user. Here is one sentence: “/etc/bashrc: This file sets the system bash shell-related things and is effective for all users in the system. As long as the user runs the bash command, then the things inside are in effect.” We just prompted The problem is that the bash command cannot be found. Now we reconfigure the environment variables of the required command in /etc/bashrc, source /etc/bashrc to make the configuration effective, and execute the above program again to see the correct return of the corresponding command It turned out.

Basic Xlib functionality test failed [How to Solve]

This complete error message is in the ./configure phase

Basic XLib functionality test failed!
You might need to modify the include and library search paths by editing
QMAKE_INCDIR_X11 and QMAKE_LIBDIR_X11 in /home/zhu/Qt/qt-x11-opensource-src-4.5.2/mkspecs/linux-g++


As usual, I’ll do it the same way. Go to config.test/x11/xlib and run the make command to see the error message


g++ -Wl,-O1 -o xlib xlib.o -L/usr/X11R6/lib -lXext -lX11 -lm
/usr/bin/ld: cannot find -lXext

See, g++ can’t find libXext.so under /usr/X11R6/lib.


The reason for this is that you need to install the libX11 development package, which is called libX11-dev in ubuntu/debian.
According to past experience, the package name is libX11-dev in . /configure, you can install the following 3 packages and everything will be fine

sudo apt-get install libX11-dev libXext-dev libXtst-dev

[Solved] su: warning: cannot change directory to : Permission denied ;-bash: bash_profile: Permission denied

A. Check if the home directory permissions are right

1: Problem description
[root@ser6-52 ~]# su – mongodb
su: warning: cannot change directory to /home/mongodb: Permission denied
-bash: /home/mongodb/.bash_profile: Permission denied

2: Cause of error
The home directory has the wrong owner and insufficient permissions
[root@ser6-51 ~]# ls -ld /home/mongodb/
drwx—— 2 504 504 4096 Jul 15 13:50 /home/mongodb/

3: Solution
Modify the owner,modify the permissions
[root@ser6-51 ~]# chown -R mongodb:mongodb /home/mongodb/
[root@ser6-51 ~]# chmod -R 755 /home/mongodb/
[root@ser6-51 ~]# su – mongodb
[mongodb@ser6-51 ~]$
Now you can switch. ls-ld/home/mongodb/


II. View

In fact, it is to use root to modify /etc/sysconfig/selinux, SELINUX=targeted modified to SELINUX=permissive

Third, modify the permissions of the etc directory

chmod -R 755 /etc

-bash: ls: command not found [How to Solve]

reason: when setting environment variables, the edit profile file is not written correctly, resulting in LS and other commands not being recognized on the command line. Maybe we are writing Java_ Path
was modified when home and other environment paths were created

solution:
export path =/usr/local/SBIN/usr/local/bin/SBIN/bin/usr/SBIN/usr/bin/root/bin