Category Archives: Linux

How to Solve Error: failed dependencies error resolution

# rpm -ivh php-mbstring-5.3.3-3.el6_2.8.x86_64.rpm

warning: php-mbstring-5.3.3-3.el6_2.8.x86_64.rpm: Header V3 RSA/SHA1 Signature, key ID c105b9de: NOKEY

error: Failed dependencies:

php-common = 5.3.3-3.el6_2.8 is needed by php-mbstring-5.3.3-3.el6_2.8.x86_64

When installing rpm, the error is error: Failed dependencies:.
This error is due to the problem of function dependencies, no dependencies, the installation failed
You can add the following parameter –nodeps –force

# rpm -ivh php-mbstring-5.3.3-3.el6_2.8.x86_64.rpm  –nodeps –force
warning: php-bcmath-5.2.17-1.el6.art.x86_64.rpm: Header V3 DSA/SHA1 Signature, key ID 5ebd2744: NOKEY
Preparing…                ########################################### [100%]
1:php-bcmath             ########################################### [100%]

Install Success

Driver failed programming external connectivity on endpoint query_allen

docker port mapping or error when starting container  Error response from daemon: driver failed programming external connectivity on endpoint quirky_allen:
[root@localhost ~]# docker run -d -p 9000:80 centos:httpd /bin/sh -c /usr/local/bin/start.sh
d5b2bd5a7bc4895a973fe61efd051847047d26385f65c278aaa09e4fa31c4d76
docker: Error response from daemon: driver failed programming external connectivity on endpoint quirky_allen (6bda693d1143657e46bee0300276aa05820da2b21a3d89441e820d1a274c48b6): (iptables failed: iptables –wait -t nat -A DOCKER -p tcp -d 0/0 –dport 9000 -j DNAT –to-destination 172.17.0.2:80 ! -i docker0: iptables: No chain/target/match by that name.
(exit status 1)).
[root@localhost ~]# docker start d5b2bd5a7bc4
Error response from daemon: driver failed programming external connectivity on endpoint quirky_allen (4127da7466709fd45695a1fbe98e13c2ac30c2a554e18fb902ef5a03ba308438): (iptables failed: iptables –wait -t nat -A DOCKER -p tcp -d 0/0 –dport 9000 -j DNAT –to-destination 172.17.0.2:80 ! -i docker0: iptables: No chain/target/match by that name.
(exit status 1))
Error: failed to start containers: d5b2bd5a7bc4Reason:
The custom chain DOCKER defined at docker service startup was cleared due to centos7 firewall
The underlying firewall is using iptables for data filtering, built on top of iptables, which may conflict with Docker.
When firewalld starts or restarts, it will remove the DOCKER rules from iptables, which affects Docker’s ability to work properly.
When you are using Systemd, firewalld will start before Docker, but if you start or restart firewalld after Docker starts, you will need to restart the Docker process.
Restarting the docker service and regenerating the custom chain DOCKER

Chain PREROUTING (policy ACCEPT)
target     prot opt source               destination        
DOCKER     all  --  0.0.0.0/0            0.0.0.0/0            ADDRTYPE match dst-type LOCAL

Chain INPUT (policy ACCEPT)
target     prot opt source               destination        

Chain OUTPUT (policy ACCEPT)
target     prot opt source               destination        
DOCKER     all  --  0.0.0.0/0           !127.0.0.0/8          ADDRTYPE match dst-type LOCAL

Chain POSTROUTING (policy ACCEPT)
target     prot opt source               destination        
MASQUERADE  all  --  172.17.0.0/16        0.0.0.0/0          
MASQUERADE  tcp  --  172.17.0.2           172.17.0.2           tcp dpt:8080

Chain DOCKER (2 references)
target     prot opt source               destination        
RETURN     all  --  0.0.0.0/0            0.0.0.0/0          
DNAT       tcp  --  0.0.0.0/0            0.0.0.0/0            tcp dpt:8888 to:172.17.0.2:8080
root@router:playbook#iptables -t nat -nL
Chain PREROUTING (policy ACCEPT)
target     prot opt source               destination        
DOCKER     all  --  0.0.0.0/0            0.0.0.0/0            ADDRTYPE match dst-type LOCAL

Chain INPUT (policy ACCEPT)
target     prot opt source               destination        

Chain OUTPUT (policy ACCEPT)
target     prot opt source               destination        
DOCKER     all  --  0.0.0.0/0           !127.0.0.0/8          ADDRTYPE match dst-type LOCAL

Chain POSTROUTING (policy ACCEPT)
target     prot opt source               destination        
MASQUERADE  all  --  172.17.0.0/16        0.0.0.0/0          
MASQUERADE  tcp  --  172.17.0.2           172.17.0.2           tcp dpt:8080

Chain DOCKER (2 references)
target     prot opt source               destination        
RETURN     all  --  0.0.0.0/0            0.0.0.0/0          
DNAT       tcp  --  0.0.0.0/0            0.0.0.0/0            tcp dpt:8888 to:172.17.0.2:8080

Solution:
restart the docker service and then start the container
systemctl restart docker
docker start foo

[Solved] Failed to reboot system via logind: Interactive authentication required.

Failed to reboot system via logind: Interactive authentication required.
1. reboot failed

deepnorth@deepnorth-amax:~$ reboot
Failed to set wall message, ignoring: Interactive authentication required.
Failed to reboot system via logind: Interactive authentication required.
Failed to start reboot.target: Interactive authentication required.
See system logs and 'systemctl status reboot.target' for details.
Failed to open /dev/initctl: Permission denied
Failed to talk to init daemon.
deepnorth@deepnorth-amax:~$
deepnorth@deepnorth-amax:~$ sudo reboot

2. sudo reboot

daemon [ˈdiːmən]:n. Guardian processes, background programs

Failed to start docker.service: Unit not found(Docker service does not start)

Linux deployment docker appears: failed to start docker.service : unit not found
linux has deployed k8s and other projects before, Some of the remaining dockers are damaged
after re installation, the service always fails: failed to start docker.service : unit not found
warning: if applicable to my situation, it needs to be reinstalled

solution:
Direct Yum update
be sure to restart Linux
Yum install docker
systemctl start docker.service

Failed to restart network.service: Unit network.service not found

This problem occurs when you restart after configuring the network settings. The reason for this problem is due to the connection with the network manager   The solution is to shut down NetworkManager and restart the network service

service NetworkManager stop //关闭NetworkManager
service network restart //启动network服务 (vm 下安装 centos 可用 nmcli c reload 命令启动)

The difference between network and NetworkManager
Network: after the configuration information of network card and network control network interface is changed, the network service must be restarted to activate the new configuration of the network and make the configuration effective. This part of the operation is the same as starting the system again. Control (control) is the file/etc/init.d/network. You can use this file with the following parameters to operate network services

Network manager: it is a program to detect the network and automatically connect to the network. Whether it’s wireless or wired, it’s easy to manage. For wireless network, network manager can automatically switch to the most reliable wireless network. The program of network manager can switch between online mode and offline mode freely. Network manager can give priority to wired network and support VPN. The network manager was originally developed by RedHat and is now managed by gnome

Some commands about network manager are arranged as follows:

service NetworkManager stop //close NetworkManager
service NetworkManager status //check NetworkManager status
chkconfig NetworkManager off //Disable boot-up
chkconfig NetworkManager on //boot-up
service NetworkManager start //Temporarily start
chkconfig NetworkManager off // Permanently disable the NetworkManager hosting tool

Centos7 Install virtualenv Error bash: virtualenv: command not found…

After installing python3

1. Install virtualenv with PIP3

pip3 install -i https://pypi.tuna.tsinghua.edu.cn/simple virtualenv

The above image has been installed successfully

2. Virtualenv: command not found

3. Add environment variable to solve the problem

(1) Using find/- name ‘ virtualenv.py ‘does it exist

It can be found in the figure below

(2) Add environment variable

Steps:

vim /etc/profile
# Add the following to the bottom of the file
PATH=$PATH:/usr/local/python3/bin

# is the command added to take effect
source /etc/profile

# Finally, check if the file was added successfully
echo $PATH

Example card:

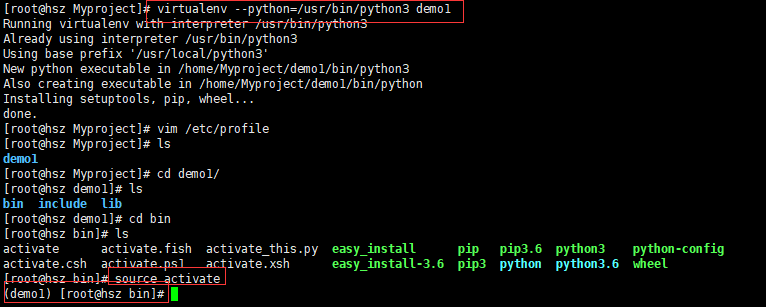
(3)Reuse virtual env

# Use virtualenv to create a python3 environment with the command demo1
virtualenv --python=/usr/bin/python3 demo1
# Go to /demo1/bin under the virtual slow directory and start the virtual environment with the command
source activate

LMDE: VirtualBox kernel service is not running

Operating system lmde

Linux y430p 3.16.0-4-amd64 #1 SMP Debian 3.16.7-ckt7-1 (2015-03-01) x86_64 GNU/Linux

VirtualBox is not installed. It seems that the system comes with something about it. It used to be nothing. A few months ago, every time I turned on the computer, I had a warning message:

VBoxClient: the VirtualBox kernel service is not running. Exiting.

Although it doesn’t affect the use, it’s annoying to see</ p>

After searching for a long time, it seems that this related post is similar to me</ p>

So I also unloaded the bags:

sudo aptitude remove virtualbox-guest-utils virtualbox-guest-x11 virtualbox-guest-dkms

However, the restart is successful, or report that warning.

Then clear the relevant configuration to try – also deleted a lot of old packages, do not know will hang. I’m a little afraid now. After all, the system has hung up many times, and now I dare not upgrade without brain.

is mainly afraid of the kernel.

# Clear all residual configuration files of deleted packages
dpkg -l |grep ^rc|awk '{print $2}' |sudo xargs dpkg -P

I’ll restart it.

Well, it’s rebooted. It’s alive. 🙂

The bad information didn’t come out at last. :weary:

VIM edit prompt swap file already exists solution

When editing an .ini file on a linux server, it gets stuck and when you close the connection tool and re-enter to work on the .ini file, you are prompted.

E325: ATTENTION
Found a swap file by the name “.xxx.ini.swp”

(1) Another program may be editing the same file. If this is the case,

be careful not to end up with two different instances of the same

file when making changes. Quit, or continue with caution.

(2) An edit session for this file crashed.

If this is the case, use “:recover” or “vim -r other.conf”

to recover the changes (see “:help recovery”).

If you did this already, delete the swap file “.other.conf.swp”

to avoid this message.

Swap file “.xxx.ini.swp” already exists!
[O]pen Read-Only, (E)dit anyway, (R)ecover, (Q)uit, (A)bort:


Solution.

Execute the following command in the directory where the file is located.

ls -a

Check the hidden files in the current directory and find the .xxx.ini.swap file

Delete the file by executing the delete command

rm -rf .xxx.ini.swap

Execute vim xxx.ini again and you will not be prompted.

Ubuntu Ubuntu 14.04.5 vmware-tool Installation

[BEGIN] 2017/9/28 17:09:03
Last login: Thu Sep 21 14:54:32 2017 from 10.2.202.39

########    ###    ########  ########  #### ##     ##
     ##    ## ##   ##     ## ##     ##  ##   ##   ##
    ##    ##   ##  ##     ## ##     ##  ##    ## ##
   ##    ##     ## ########  ########   ##     ###
  ##     ######### ##     ## ##     ##  ##    ## ##
 ##      ##     ## ##     ## ##     ##  ##   ##   ##
######## ##     ## ########  ########  #### ##     ##
root@zabbix:~# cat /etc/os-release
NAME="Ubuntu"
VERSION="14.04.5 LTS, Trusty Tahr"
ID=ubuntu
ID_LIKE=debian
PRETTY_NAME="Ubuntu 14.04.5 LTS"
VERSION_ID="14.04"
HOME_URL="http://www.ubuntu.com/"
SUPPORT_URL="http://help.ubuntu.com/"
BUG_REPORT_URL="http://bugs.launchpad.net/ubuntu/"
root@zabbix:~# 
root@zabbix:~# yum install -y gcc gcc-c++ automake make
-bash: yum: command not found
root@zabbix:~# mkdir /mnt/cdrom/
root@zabbix:~# mount /dev/cdrom /mnt/cdrom/
mount: block device /dev/sr0 is write-protected, mounting read-only
root@zabbix:~# cd /mnt/cdrom/
root@zabbix:/mnt/cdrom# ll
total 71816
dr-xr-xr-x 2 root root     2048 May 23  2016 ./
drwxr-xr-x 3 root root     4096 Sep 28 17:13 ../
-r-xr-xr-x 1 root root     2012 May 23  2016 manifest.txt*
-r-xr-xr-x 1 root root     1850 May 23  2016 run_upgrader.sh*
-r--r--r-- 1 root root 72083159 May 23  2016 VMwareTools-10.0.9-3917699.tar.gz
-r-xr-xr-x 1 root root   687524 May 23  2016 vmware-tools-upgrader-32*
-r-xr-xr-x 1 root root   757944 May 23  2016 vmware-tools-upgrader-64*
root@zabbix:/mnt/cdrom# cp VMwareTools-10.0.9-3917699.tar.gz /tmp/
root@zabbix:/mnt/cdrom# cd /tmp/
root@zabbix:/tmp# ll
total 70420
drwxrwxrwt  3 root   root       4096 Sep 28 17:14 ./
drwxr-xr-x 22 root   root       4096 Jul 25 09:45 ../
drwxr-xr-x  2 zabbix zabbix     4096 Sep 26 11:16 hsperfdata_zabbix/
-r--r--r--  1 root   root   72083159 Sep 28 17:14 VMwareTools-10.0.9-3917699.tar.gz
-rw-rw-r--  1 zabbix zabbix       23 Sep 28 17:14 zabbix_server_1169.pinger
-rw-rw-r--  1 zabbix zabbix       24 Sep 28 17:14 zabbix_server_1173.pinger
-rw-rw-r--  1 zabbix zabbix       23 Sep 28 17:14 zabbix_server_1178.pinger
root@zabbix:/tmp# umount /dev/cdrom
root@zabbix:/tmp# tar -zxvf VMwareTools-10.0.9-3917699.tar.gz 
root@zabbix:/tmp# ll
total 70420
drwxrwxrwt  4 root   root       4096 Sep 28 17:14 ./
drwxr-xr-x 22 root   root       4096 Jul 25 09:45 ../
drwxr-xr-x  2 zabbix zabbix     4096 Sep 26 11:16 hsperfdata_zabbix/
-r--r--r--  1 root   root   72083159 Sep 28 17:14 VMwareTools-10.0.9-3917699.tar.gz
drwxr-xr-x  9 root   root       4096 May 23  2016 vmware-tools-distrib/
-rw-rw-r--  1 zabbix zabbix       13 Sep 28 17:14 zabbix_server_1172.pinger
-rw-rw-r--  1 zabbix zabbix       13 Sep 28 17:14 zabbix_server_1178.pinger
root@zabbix:/tmp# cd vmware-tools-distrib/
root@zabbix:/tmp/vmware-tools-distrib# ll
total 524
drwxr-xr-x  9 root root   4096 May 23  2016 ./
drwxrwxrwt  4 root root   4096 Sep 28 17:15 ../
drwxr-xr-x  2 root root   4096 May 23  2016 bin/
drwxr-xr-x  5 root root   4096 May 23  2016 caf/
drwxr-xr-x  2 root root   4096 May 23  2016 doc/
drwxr-xr-x  5 root root   4096 May 23  2016 etc/
-rw-r--r--  1 root root 282475 May 23  2016 FILES
-rw-r--r--  1 root root   2538 May 23  2016 INSTALL
drwxr-xr-x  2 root root   4096 May 23  2016 installer/
drwxr-xr-x 14 root root   4096 May 23  2016 lib/
drwxr-xr-x  3 root root   4096 May 23  2016 vgauth/
-rwxr-xr-x  1 root root    243 May 23  2016 vmware-install.pl*
-rwxr-xr-x  1 root root 205571 May 23  2016 vmware-install.real.pl*
root@zabbix:/tmp/vmware-tools-distrib# ./vmware-install.pl
open-vm-tools are available from the OS vendor and VMware recommends using 
open-vm-tools. See http://kb.vmware.com/kb/2073803 for more information.
Do you still want to proceed with this legacy installer?[no] ^C
root@zabbix:/tmp/vmware-tools-distrib# apt-get install open-vm-tools

root@zabbix:/tmp/vmware-tools-distrib# ./vmware-install.pl
The installer has detected an existing installation of open-vm-tools on this 
system and will not attempt to remove and replace these user-space 
applications. It is recommended to use the open-vm-tools packages provided by 
the operating system. If you do not want to use the existing installation of 
open-vm-tools and attempt to install VMware Tools, you must uninstall the 
open-vm-tools packages and re-run this installer.
The packages that need to be removed are:
open-vm-tools
The installer will next check if there are any missing kernel drivers. Type yes
if you want to do this, otherwise type no [yes] 

Creating a new VMware Tools installer database using the tar4 format.

Installing VMware Tools.

In which directory do you want to install the binary files?
[/usr/bin] 

What is the directory that contains the init directories (rc0.d/ to rc6.d/)?
[/etc] 

What is the directory that contains the init scripts?
[/etc/init.d] 

In which directory do you want to install the daemon files?
[/usr/sbin] 

In which directory do you want to install the library files?
[/usr/lib/vmware-tools] 

The path "/usr/lib/vmware-tools" does not exist currently. This program is 
going to create it, including needed parent directories. Is this what you want?
[yes] 

In which directory do you want to install the documentation files?
[/usr/share/doc/vmware-tools] 

The path "/usr/share/doc/vmware-tools" does not exist currently. This program 
is going to create it, including needed parent directories. Is this what you 
want?[yes] 

The installation of VMware Tools 10.0.9 build-3917699 for Linux completed 
successfully. You can decide to remove this software from your system at any 
time by invoking the following command: "/usr/bin/vmware-uninstall-tools.pl".

Before running VMware Tools for the first time, you need to configure it by 
invoking the following command: "/usr/bin/vmware-config-tools.pl". Do you want 
this program to invoke the command for you now?[yes] 

The file /usr/bin/vmware-hgfsclient that this program was about to install 
already exists.  Overwrite?[no] 

The file /sbin/mount.vmhgfs that this program was about to install already 
exists.  Overwrite?[no] 

Initializing...


Making sure services for VMware Tools are stopped.


The module vmci has already been installed on this system by another installer 
or package and will not be modified by this installer.

The module vsock has already been installed on this system by another installer
or package and will not be modified by this installer.

The module vmxnet3 has already been installed on this system by another 
installer or package and will not be modified by this installer.

The module pvscsi has already been installed on this system by another 
installer or package and will not be modified by this installer.

The module vmmemctl has already been installed on this system by another 
installer or package and will not be modified by this installer.

The VMware Host-Guest Filesystem allows for shared folders between the host OS 
and the guest OS in a Fusion or Workstation virtual environment.  Do you wish 
to enable this feature?[no] 

The vmxnet driver is no longer supported on kernels 3.3 and greater. Please 
upgrade to a newer virtual NIC. (e.g., vmxnet3 or e1000e)

VMware automatic kernel modules enables automatic building and installation of
VMware kernel modules at boot that are not already present. This feature can
be enabled/disabled by re-running vmware-config-tools.pl.

Would you like to enable VMware automatic kernel modules?
[no] 

Creating a new initrd boot image for the kernel.
update-initramfs: Generating /boot/initrd.img-3.19.0-80-generic
vmware-tools start/running
The configuration of VMware Tools 10.0.9 build-3917699 for Linux for this 
running kernel completed successfully.

Enjoy,

--the VMware team

root@zabbix:/tmp/vmware-tools-distrib# reboot


Broadcast message from root@zabbix

	(/dev/pts/0) at 17:16 ...


The system is going down for reboot NOW!

root@zabbix:/tmp/vmware-tools-distrib# 

wampserver 3.0.4 Same LAN Error: You don’t have permission to access /index.php on this server

It’s very normal for me to visit my host and my resources when I found that I was debugging with my colleagues today. I changed it

C:\Windows\System32\drivers\etc\hosts

xx.xx.xx.xx newjin1.com // xx.xx.xx.xx My LAN IP newjin1.com my configured domain name

But it does suggest that:

Youdon’thavepermissiontoaccess/ index.phponthisserver.
Apache/2.4.18(Win32)PHP/5.6.19Serverat newjin1.comPort80

According to the online search, it should be changed httpd.conf File, but my this is a virtual directory, multi domain ah, most of the Internet can not follow, to understand why change, change where

original virtual host configuration :

<VirtualHost *:80&>
ServerName newjin1.com
DocumentRoot D:\wamp\www\guanjin1\yiqifei\php
<Directory “D:\wamp\www\guanjin1\yiqifei\php”&>
Options +Indexes +FollowSymLinks +MultiViews
AllowOverride All
Require local
</Directory&>
</VirtualHost&>

to change the virtual host configuration, the red words below are the places to change

<VirtualHost *:80&>
ServerName newjin1.com
DocumentRoot D:\wamp\www\guanjin1\yiqifei\php
<Directory “D:\wamp\www\guanjin1\yiqifei\php”&>
Options +Indexes +FollowSymLinks +MultiViews
AllowOverride All
Require all granted
allow from all
</Directory&>
</VirtualHost&>

It’s OK after I change it. If it’s not OK after I change it, I can see other changes, such as httpd.conf Learn to draw inferences from one instance.