Download address of texlive in the latest version of ctan
https://www.tug.org/texlive/acquire-iso.html
There is a link to download the latest version of ISO seed problem of texlive under this page.
#2018
https://www.tug.org/texlive/files/texlive2018-20180414.iso.torrent
There are many download sources for texlive in China, and now only Tsinghua University and Alibaba cloud are taken as examples.
https://mirrors.tuna.tsinghua.edu.cn/#
https://mirrors.aliyun.com/CTAN/systems/texlive/
Find the commonly used ISO distribution and application tools installation package to download directly. Click the application software. The download link of Tsinghua University texlive2018 is as follows
#2018 version
https://mirrors.tuna.tsinghua.edu.cn/CTAN/systems/texlive/Images/texlive2018-20180414.iso
#2020 version
https://mirrors.tuna.tsinghua.edu.cn/CTAN/systems/texlive/Images/texlive2020-20200406.iso
Alicloud download link:
http://mirrors.aliyun.com/CTAN/systems/texlive/Images/
Select the corresponding version to download.
Download can use WGet to download, or copy ISO file to system directory on windows.
After downloading, you can mount the ISO image.
The official ctan ISO website is as follows.
mount -t iso9660 -o ro,loop,noauto /ISOFileDictory/texlive2018-20180414.iso /mnt
The mount record of this machine is as follows:
dell@DELL-Server:~$ sudo mount -o loop texlive2018-20180414.iso /mnt/
mount: /home/dell/texlive2016.iso is already mounted
dell@DELL-Server:~$ ls /mnt/
archive      install-tl               LICENSE.CTAN  readme-html.dir    release-texlive.txt  tlpkg
autorun.inf  install-tl-advanced.bat  LICENSE.TL    readme-txt.dir     source               tl-tray-menu.exe
index.html   install-tl-windows.bat   README        README.usergroups  texlive-doc
dell@DELL-Server:~$
Installation command
dell@DELL-Server:~$ cd /mnt/
dell@DELL-Server:/mnt$ sudo ./install-tl --gui
The command can be installed in graphical interface.
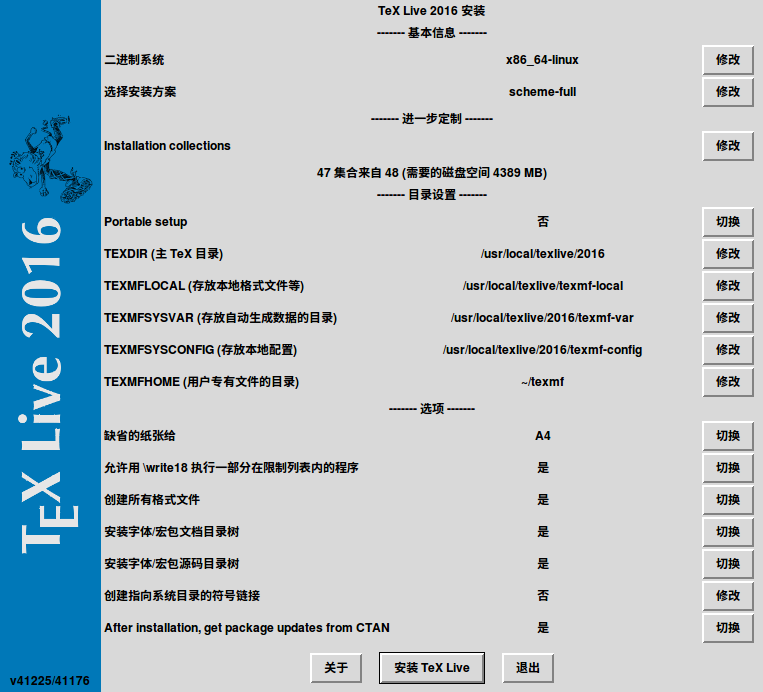
The installation process and complete screenshot are as follows.
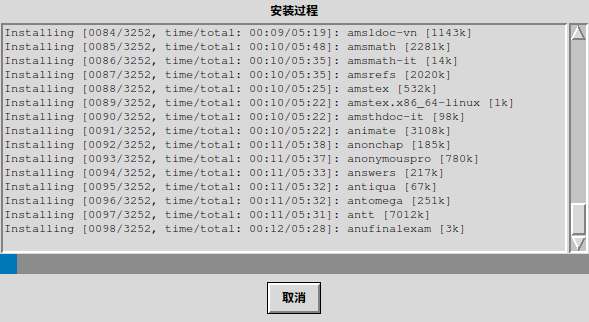
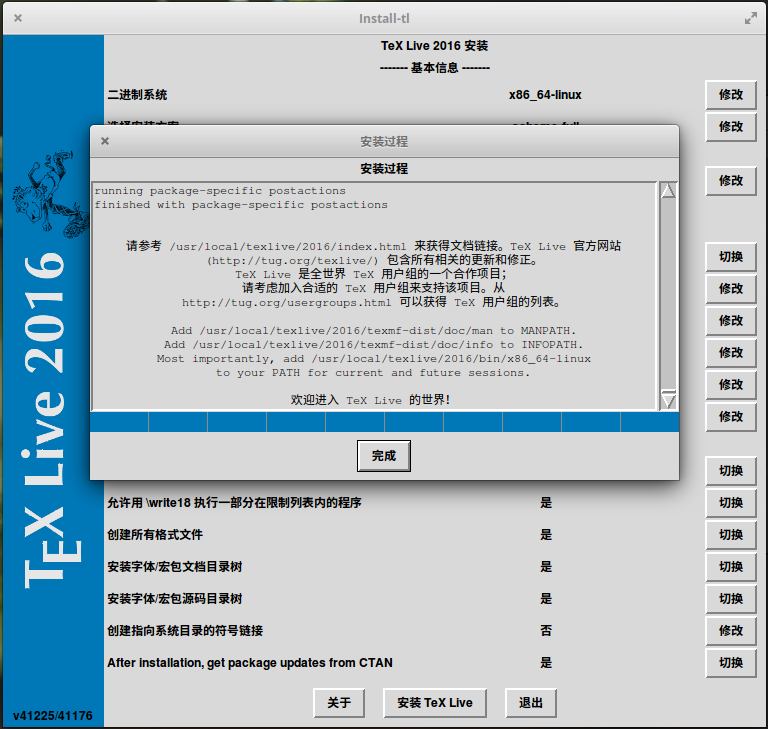
There are many installation options in the installation interface. Click Install textlive directly without special requirements to wait for the installation process to complete.
When the installation is complete, uninstall the image.
sudo umount /mnt
You can also extract ISO and copy it to Linux system. The method of copying files will not be repeated here.
Add environment variables.
# TeX Live 2016
#Commands can be copied and run directly, one command at a time
export TeXLiveMANPATH=/urs/local/texlive/2018/texmf-dist/doc/man
export TeXLiveINFOPATH=/usr/local/texlive/2018/texmf-dist/doc/info
# X64
export TeXLivePATH=/usr/local/texlive/2018/bin/x86_64-linux
The specific installation path is subject to the directory selected during installation.
The running results are as follows:
dell@DELL-Server:~$ export TeXLiveMANPATH=/urs/local/texlive/2018/texmf-dist/doc/man
dell@DELL-Server:~$ export TeXLiveINFOPATH=/usr/local/texlive/2018/texmf-dist/doc/info
dell@DELL-Server:~$ export TeXLivePATH=/usr/local/texlive/2018/bin/x86_64-linux
dell@DELL-Server:~$ echo $TeXLiveMANPATH
/urs/local/texlive/2018/texmf-dist/doc/man
dell@DELL-Server:~$ echo $TeXLiveINFOPATH
/usr/local/texlive/2018/texmf-dist/doc/info
dell@DELL-Server:~$ echo $TeXLivePATH
/usr/local/texlive/2018/bin/x86_64-linux
dell@DELL-Server:~$
It is recommended to copy windows fonts to Linux before installation. The method of copying Fonts is the same as that of copying ISO decompressed files. Wait for font installation to complete before installing texlive.
Create the winfonts folder under the font directory of Linux system (optional), provided that the font has been copied to the Linux host.
#Create a Windows font file directory with a customizable name
dell@DELL-Server:~$ sudo mkdir /usr/share/fonts/WindowsFonts
# View the directory
dell@DELL-Server:~$ ls /usr/share/fonts/
cmap  opentype  truetype  type1  WindowsFonts  X11
Copy the font to the winfonts folder.
dell@DELL-Server:~$ sudo cp /home/dell/Fonts/* /usr/share/fonts/WindowsFonts/
#View font copy
dell@DELL-Server:~$ ls /usr/share/fonts/WindowsFonts/
Install the font command.
dell@DELL-Server:mkfontscale
dell@DELL-Server:mkfontdir
dell@DELL-Server:sudo fc-cache -fv
dell@DELL-Server:~$ sudo fc-cache -fsv
/usr/share/fonts: caching, new cache contents: 0 fonts, 6 dirs
/usr/share/fonts/WindowsFonts: caching, new cache contents: 1188 fonts, 0 dirs
/usr/share/fonts/X11: caching, new cache contents: 0 fonts, 4 dirs
/usr/share/fonts/X11/Type1: caching, new cache contents: 8 fonts, 0 dirs
/usr/share/fonts/X11/encodings: caching, new cache contents: 0 fonts, 1 dirs
/usr/share/fonts/X11/encodings/large: caching, new cache contents: 0 fonts, 0 dirs
/usr/share/fonts/X11/misc: caching, new cache contents: 59 fonts, 0 dirs
/usr/share/fonts/X11/util: caching, new cache contents: 0 fonts, 0 dirs
/usr/share/fonts/cmap: caching, new cache contents: 0 fonts, 5 dirs
/usr/share/fonts/cmap/adobe-cns1: caching, new cache contents: 0 fonts, 0 dirs
/usr/share/fonts/cmap/adobe-gb1: caching, new cache contents: 0 fonts, 0 dirs
/usr/share/fonts/cmap/adobe-japan1: caching, new cache contents: 0 fonts, 0 dirs
/usr/share/fonts/cmap/adobe-japan2: caching, new cache contents: 0 fonts, 0 dirs
/usr/share/fonts/cmap/adobe-korea1: caching, new cache contents: 0 fonts, 0 dirs
/usr/share/fonts/opentype: caching, new cache contents: 0 fonts, 5 dirs
/usr/share/fonts/opentype/mondulkiri: caching, new cache contents: 8 fonts, 0 dirs
/usr/share/fonts/opentype/noto: caching, new cache contents: 36 fonts, 0 dirs
/usr/share/fonts/opentype/opendyslexic: caching, new cache contents: 9 fonts, 0 dirs
/usr/share/fonts/opentype/stix: caching, new cache contents: 29 fonts, 0 dirs
/usr/share/fonts/opentype/stix-word: caching, new cache contents: 5 fonts, 0 dirs
/usr/share/fonts/truetype: caching, new cache contents: 2 fonts, 38 dirs
/usr/share/fonts/truetype/abyssinica: caching, new cache contents: 1 fonts, 0 dirs
/usr/share/fonts/truetype/ancient-scripts: caching, new cache contents: 1 fonts, 0 dirs
/usr/share/fonts/truetype/arphic: caching, new cache contents: 8 fonts, 0 dirs
/usr/share/fonts/truetype/capture-it-elementary: caching, new cache contents: 2 fonts, 0 dirs
/usr/share/fonts/truetype/croscore: caching, new cache contents: 12 fonts, 0 dirs
/usr/share/fonts/truetype/daniel-elementary: caching, new cache contents: 3 fonts, 0 dirs
/usr/share/fonts/truetype/dejavu: caching, new cache contents: 21 fonts, 0 dirs
/usr/share/fonts/truetype/fonts-guru-extra: caching, new cache contents: 1 fonts, 0 dirs
/usr/share/fonts/truetype/freefont: caching, new cache contents: 12 fonts, 0 dirs
/usr/share/fonts/truetype/hvd-bodedo-elementary: caching, new cache contents: 1 fonts, 0 dirs
/usr/share/fonts/truetype/jenna-sue-elementary: caching, new cache contents: 1 fonts, 0 dirs
/usr/share/fonts/truetype/kacst: caching, new cache contents: 15 fonts, 0 dirs
/usr/share/fonts/truetype/kacst-one: caching, new cache contents: 2 fonts, 0 dirs
/usr/share/fonts/truetype/lao: caching, new cache contents: 1 fonts, 0 dirs
/usr/share/fonts/truetype/lato: caching, new cache contents: 18 fonts, 0 dirs
/usr/share/fonts/truetype/liberation: caching, new cache contents: 16 fonts, 0 dirs
/usr/share/fonts/truetype/limelight-elementary: caching, new cache contents: 1 fonts, 0 dirs
/usr/share/fonts/truetype/lobster-elementary: caching, new cache contents: 1 fonts, 0 dirs
/usr/share/fonts/truetype/lohit-punjabi: caching, new cache contents: 1 fonts, 0 dirs
/usr/share/fonts/truetype/nanum: caching, new cache contents: 8 fonts, 0 dirs
/usr/share/fonts/truetype/noto: caching, new cache contents: 175 fonts, 0 dirs
/usr/share/fonts/truetype/open-sans-elementary: caching, new cache contents: 10 fonts, 0 dirs
/usr/share/fonts/truetype/openoffice: caching, new cache contents: 1 fonts, 0 dirs
/usr/share/fonts/truetype/operating-instructions-elementary: caching, new cache contents: 1 fonts, 0 dirs
/usr/share/fonts/truetype/padauk: caching, new cache contents: 4 fonts, 0 dirs
/usr/share/fonts/truetype/plainblack-elementary: caching, new cache contents: 6 fonts, 0 dirs
/usr/share/fonts/truetype/raleway-elementary: caching, new cache contents: 9 fonts, 0 dirs
/usr/share/fonts/truetype/redacted-elementary: caching, new cache contents: 3 fonts, 0 dirs
/usr/share/fonts/truetype/roboto: caching, new cache contents: 0 fonts, 1 dirs
/usr/share/fonts/truetype/roboto/hinted: caching, new cache contents: 18 fonts, 0 dirs
/usr/share/fonts/truetype/roboto-mono-elementary: caching, new cache contents: 10 fonts, 0 dirs
/usr/share/fonts/truetype/sinhala: caching, new cache contents: 1 fonts, 0 dirs
/usr/share/fonts/truetype/takao-gothic: caching, new cache contents: 3 fonts, 0 dirs
/usr/share/fonts/truetype/takao-mincho: caching, new cache contents: 3 fonts, 0 dirs
/usr/share/fonts/truetype/tibetan-machine: caching, new cache contents: 1 fonts, 0 dirs
/usr/share/fonts/truetype/tlwg: caching, new cache contents: 58 fonts, 0 dirs
/usr/share/fonts/truetype/ttf-khmeros-core: caching, new cache contents: 2 fonts, 0 dirs
/usr/share/fonts/truetype/ubuntu-font-family: caching, new cache contents: 13 fonts, 0 dirs
/usr/share/fonts/truetype/unfonts-core: caching, new cache contents: 12 fonts, 0 dirs
/usr/share/fonts/type1: caching, new cache contents: 0 fonts, 1 dirs
/usr/share/fonts/type1/gsfonts: caching, new cache contents: 35 fonts, 0 dirs
/usr/local/share/fonts: caching, new cache contents: 0 fonts, 0 dirs
Re-scanning /usr/share/fonts: caching, new cache contents: 0 fonts, 6 dirs
Re-scanning /usr/share/fonts/X11: caching, new cache contents: 0 fonts, 4 dirs
Re-scanning /usr/share/fonts/X11/encodings: caching, new cache contents: 0 fonts, 1 dirs
Re-scanning /usr/share/fonts/cmap: caching, new cache contents: 0 fonts, 5 dirs
Re-scanning /usr/share/fonts/opentype: caching, new cache contents: 0 fonts, 5 dirs
Re-scanning /usr/share/fonts/truetype: caching, new cache contents: 2 fonts, 38 dirs
Re-scanning /usr/share/fonts/truetype/roboto: caching, new cache contents: 0 fonts, 1 dirs
Re-scanning /usr/share/fonts/type1: caching, new cache contents: 0 fonts, 1 dirs
/var/cache/fontconfig: cleaning cache directory
fc-cache: succeeded
dell@DELL-Server:~$
Installing texlive on the Ubuntu network is relatively simple. You only need to execute a command and wait for the installation to complete.
First, install the underlying dependency software.
sudo apt-get install libdigest-perl-md5-perl perl-tk
sudo apt install texlive-full
However, there is a drawback in this method, that is, the macro package (including all Debian and Ubuntu distributions) cannot be updated.
When we execute orders
tlmgr update -all
We can use it
There will be errors from time to time. The error information is as follows:
jiangjuan@OptiPlex-390:~$ tlmgr update --all
(running on Debian, switching to user mode!)
cannot setup TLPDB in /home/jiangjuan/texmf at /usr/bin/tlmgr line 5604.
Other tlmgr commands are also invalid. So we need another way to install texlive. This is described below.
All macro packages in the installation image are packaged versions, and some packages will be updated after the release of the Ubuntu installation source. This method can solve the problem that the version of the installation source software cannot be updated in real time. Some Debian distributions have problems executing tlmgr commands. A solution is given below.
First, execute the command:
#must install perl-tk
sudo apt install git perl-tk
Install git client, GIT client can clone GitHub code to local. After Git is completed, see the figure below. 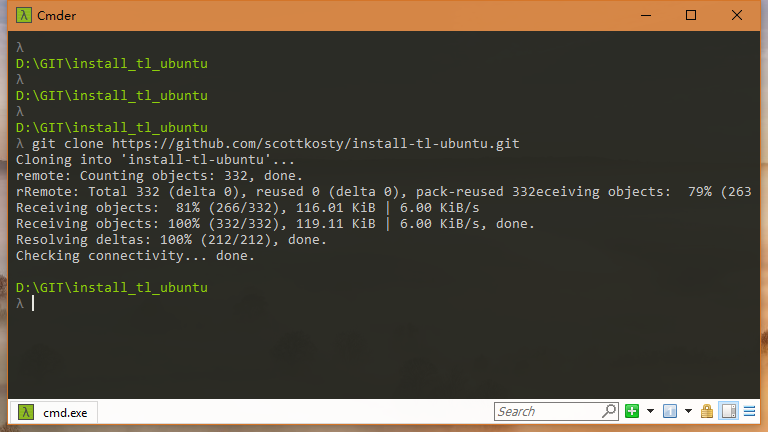

Install TL Ubuntu GitHub address.
https://github.com/scottkosty/install-tl-ubuntu .
The following is an important part. First, GIT synchronizes the install TL Ubuntu code to the local machine and installs it. The code is as follows:
#Clone the code
git clone https://github.com/scottkosty/install-tl-ubuntu.git
# switch to the installation directory
cd cd install-tl-ubuntu
#Give the installer executable permissions
chmod +x . /install-tl-ubuntu
#Start the installation
sudo . /install-tl-ubuntu
# Check the installation help documentation, here is part of it
jiangjuan@jiangjuan-machine:~/install-tl-ubuntu$ ./install-tl-ubuntu --help | more

  USAGE
  sudo ./install-tl-ubuntu [OPTIONS]

  DESCRIPTION
  This script uses the TeX Live 2016 installer to install TeX Live so that LaTeX
  packages can be updated through CTAN with tlmgr. To do this, the official TeX
  Live 2016 installer is downloaded and used and apt is informed that TeX
  dependencies are satisfied. Thus, when you want to install a program with
  apt-get that depends on TeX Live, apt will not try to install the TeX Live
  packages from the Ubuntu repositories.

  If this script detects a previous TeX Live installation installed to the same
  place (/opt/texbin), the link will be updated to the new installation but the
  old installation (the place /opt/texbin points to) will not be removed and
  should be removed manually by the user if desired.

  This script must be run with sudo. Many recommend not installing TeX Live with
  sudo, in which case this script must be altered (please send a patch or post
  an enhancement request).

--More-
Wait for the program to automatically select the installation source and complete the installation without manual intervention.
Tip: it should be noted that this method needs a stable network environment, otherwise repeated re installation may occur.
After the program is installed, an option texlive package manager will be added to the start menu, through which macro package update and management can be completed.
Tip: software function bugs may be fixed as the author updates the software.
After the installation, check the software installation and execute the command.
xelatex -version
The sample code of latex is as follows. Windows copies the code directly to the text editor (Notepad + + and so on) and saves it as the English name. Tex (Linux has no such limitation). You can open it again in the text editor or compile it directly by command.
\documentclass{book}
\usepackage{amsmath}
\usepackage{ctex}
%\usepackage{ctex}%(PDF)For the LaTeX compilation method, select this line and comment out the previous line of code
\begin{document}
Hello, China.

Pythagorean law
$$a^2+b^2=c^2$$

Happy TeXing.
\end{document}
Linux system can save the code to/home/Dell/document/tex/Hello directory, which is the author’s computer directory. You can choose to save the directory or put it to any other directory according to the actual situation.
/home/dell/file/tex/Hello/hello.tex
The operation steps of compiling Linux files are as follows:
#Switch to the tex source file directory
cd /home/dell/documentation/Hello/
#xelatex command to compile the file, with other options
xelatex hello.tex
Wait for the compilation process to complete.
Here is a compilation process.
jiangjuan@jiangjuan-machine:~/test$ xelatex test.tex
This is XeTeX, Version 3.14159265-2.6-0.99992 (TeX Live 2015/Debian) (preloaded format=xelatex)
 restricted \write18 enabled.
entering extended mode
(./test.tex
LaTeX2e <2016/02/01&>
Babel <3.9q&> and hyphenation patterns for 81 language(s) loaded.
(/usr/share/texlive/texmf-dist/tex/latex/base/book.cls
Document Class: book 2014/09/29 v1.4h Standard LaTeX document class
(/usr/share/texlive/texmf-dist/tex/latex/base/bk10.clo))
(/usr/share/texlive/texmf-dist/tex/latex/amsmath/amsmath.sty
For additional information on amsmath, use the `?' option.
(/usr/share/texlive/texmf-dist/tex/latex/amsmath/amstext.sty
(/usr/share/texlive/texmf-dist/tex/latex/amsmath/amsgen.sty))
(/usr/share/texlive/texmf-dist/tex/latex/amsmath/amsbsy.sty)
(/usr/share/texlive/texmf-dist/tex/latex/amsmath/amsopn.sty))
(/usr/share/texlive/texmf-dist/tex/latex/ctex/ctex.sty
(/usr/share/texlive/texmf-dist/tex/latex/l3kernel/expl3.sty
(/usr/share/texlive/texmf-dist/tex/latex/l3kernel/expl3-code.tex)
(/usr/share/texlive/texmf-dist/tex/latex/l3kernel/l3xdvipdfmx.def))
(/usr/share/texlive/texmf-dist/tex/latex/l3packages/xparse/xparse.sty)
(/usr/share/texlive/texmf-dist/tex/latex/l3packages/l3keys2e/l3keys2e.sty)
(/usr/share/texlive/texmf-dist/tex/latex/ctex/ctexhook.sty)
(/usr/share/texlive/texmf-dist/tex/latex/ctex/ctexpatch.sty)
(/usr/share/texlive/texmf-dist/tex/latex/base/fix-cm.sty
(/usr/share/texlive/texmf-dist/tex/latex/base/ts1enc.def))
(/usr/share/texlive/texmf-dist/tex/latex/ms/everysel.sty)
(/usr/share/texlive/texmf-dist/tex/latex/ctex/config/ctexopts.cfg)
(/usr/share/texlive/texmf-dist/tex/latex/ctex/engine/ctex-engine-xetex.def
(/usr/share/texlive/texmf-dist/tex/xelatex/xecjk/xeCJK.sty
(/usr/share/texlive/texmf-dist/tex/latex/l3packages/xtemplate/xtemplate.sty)
(/usr/share/texlive/texmf-dist/tex/latex/fontspec/fontspec.sty
(/usr/share/texlive/texmf-dist/tex/latex/fontspec/fontspec-xetex.sty
(/usr/share/texlive/texmf-dist/tex/latex/base/fontenc.sty
(/usr/share/texlive/texmf-dist/tex/latex/euenc/eu1enc.def)
(/usr/share/texlive/texmf-dist/tex/latex/euenc/eu1lmr.fd))
(/usr/share/texlive/texmf-dist/tex/xelatex/xunicode/xunicode.sty
(/usr/share/texmf/tex/latex/tipa/t3enc.def
(/usr/share/texlive/texmf-dist/tex/latex/euenc/eu1lmss.fd))
(/usr/share/texlive/texmf-dist/tex/latex/graphics/graphicx.sty
(/usr/share/texlive/texmf-dist/tex/latex/graphics/keyval.sty)
(/usr/share/texlive/texmf-dist/tex/latex/graphics/graphics.sty
(/usr/share/texlive/texmf-dist/tex/latex/graphics/trig.sty)
(/usr/share/texlive/texmf-dist/tex/latex/latexconfig/graphics.cfg)
(/usr/share/texlive/texmf-dist/tex/xelatex/xetex-def/xetex.def
(/usr/share/texlive/texmf-dist/tex/generic/oberdiek/infwarerr.sty)
(/usr/share/texlive/texmf-dist/tex/generic/oberdiek/ltxcmds.sty)))))
(/usr/share/texlive/texmf-dist/tex/latex/fontspec/fontspec.cfg)))
(/usr/share/texlive/texmf-dist/tex/xelatex/xecjk/xunicode-addon.sty)
(/usr/share/texlive/texmf-dist/tex/xelatex/xunicode/xunicode.sty
*** Reloading Xunicode for encoding 'EU1' ***
) (/usr/share/texlive/texmf-dist/tex/xelatex/xecjk/xunicode-extra.def)
(/usr/share/texlive/texmf-dist/tex/xelatex/xecjk/xeCJK.cfg))
(/usr/share/texlive/texmf-dist/tex/xelatex/xecjk/xeCJKfntef.sty
(/usr/share/texlive/texmf-dist/tex/generic/ulem/ulem.sty)
(/usr/share/texlive/texmf-dist/tex/latex/environ/environ.sty
(/usr/share/texlive/texmf-dist/tex/latex/trimspaces/trimspaces.sty))
(/usr/share/texmf/tex/latex/CJK/CJKfntef.sty)))
(/usr/share/texlive/texmf-dist/tex/latex/zhnumber/zhnumber.sty
(/usr/share/texlive/texmf-dist/tex/latex/zhnumber/zhnumber-utf8.cfg))
(/usr/share/texlive/texmf-dist/tex/latex/ctex/scheme/ctex-scheme-chinese.def
(/usr/share/texlive/texmf-dist/tex/latex/ctex/config/ctex-name-utf8.cfg))
(/usr/share/texlive/texmf-dist/tex/latex/tools/indentfirst.sty)
(/usr/share/texlive/texmf-dist/tex/latex/ctex/ctex-c5size.clo)
(/usr/share/texlive/texmf-dist/tex/latex/ctex/fontset/ctex-fontset-fandol.def
*************************************************
* fontspec warning: "script-not-exist"
*
* Font 'FandolSong-Regular' does not contain script 'CJK'.
*************************************************
)) (/usr/share/texlive/texmf-dist/tex/latex/ctex/config/ctex.cfg)
No file test.aux.
(/usr/share/texmf/tex/latex/tipa/t3cmr.fd)
ABD: EverySelectfont initializing macros

LaTeX Font Warning: Font shape `OMX/cmex/m/n' in size <10.53937&> not available
(Font)              size <10.95&> substituted on input line 6.

[1] (./test.aux)

LaTeX Font Warning: Size substitutions with differences
(Font)              up to 0.41063pt have occurred.

 )
Output written on test.pdf (1 page).
Transcript written on test.log.
jiangjuan@jiangjuan-machine:~/test$
jiangjuan@jiangjuan-machine:~/test$ ls
test.aux  test.log  test.pdf  test.tex  WhoLogIn.sh
jiangjuan@jiangjuan-machine:~/test$
