[Solved] Flutter – AAPT: error: resource android:attr/dialogCornerRadiu…

Launching lib\main.dart on Nokia X6 in debug mode...

FAILURE: Build failed with an exception.

* What went wrong:
Execution failed for task ':app:processDebugResources'.
> Android resource linking failed
  Output:  E:\Flutter Projects\intro_to_flutter\build\app\intermediates\incremental\mergeDebugResources\merged.dir\values-v28\values-v28.xml:7: error: resource android:attr/dialogCornerRadius not found.
  E:\Flutter Projects\intro_to_flutter\build\app\intermediates\incremental\mergeDebugResources\merged.dir\values-v28\values-v28.xml:11: error: resource android:attr/dialogCornerRadius not found.
  E:\Flutter Projects\intro_to_flutter\build\app\intermediates\incremental\mergeDebugResources\merged.dir\values\values.xml:959: error: resource android:attr/fontVariationSettings not found.
  E:\Flutter Projects\intro_to_flutter\build\app\intermediates\incremental\mergeDebugResources\merged.dir\values\values.xml:960: error: resource android:attr/ttcIndex not found.
  error: failed linking references.

  Command: C:\Users\hupo3\.gradle\caches\transforms-1\files-1.1\aapt2-3.2.1-4818971-windows.jar\c1441429ce2aae0e0bed3ad48db2b49e\aapt2-3.2.1-4818971-windows\aapt2.exe link -I\
          C:\Users\hupo3\AppData\Local\Android\sdk\platforms\android-27\android.jar\
          --manifest\
          E:\Flutter Projects\intro_to_flutter\build\app\intermediates\merged_manifests\debug\processDebugManifest\merged\AndroidManifest.xml\
          -o\
          E:\Flutter Projects\intro_to_flutter\build\app\intermediates\processed_res\debug\processDebugResources\out\resources-debug.ap_\
          -R\
          @E:\Flutter Projects\intro_to_flutter\build\app\intermediates\incremental\processDebugResources\resources-list-for-resources-debug.ap_.txt\
          --auto-add-overlay\
          --java\
          E:\Flutter Projects\intro_to_flutter\build\app\generated\not_namespaced_r_class_sources\debug\processDebugResources\r\
          --custom-package\
          com.xiaobing.introtoflutter\
          -0\
          apk\
          --output-text-symbols\
          E:\Flutter Projects\intro_to_flutter\build\app\intermediates\symbols\debug\R.txt\
          --no-version-vectors
  Daemon:  AAPT2 aapt2-3.2.1-4818971-windows Daemon #0
  Output:  C:\Users\hupo3\.gradle\caches\transforms-1\files-1.1\appcompat-v7-28.0.0.aar\12aaee80bab0fcaef8511d3958ba785b\res\values-v28\values-v28.xml:9:5-12:13: AAPT: error: resource android:attr/dialogCornerRadius not found.

  E:\Flutter Projects\intro_to_flutter\build\app\intermediates\incremental\mergeDebugResources\merged.dir\values-v28\values-v28.xml:11: AAPT: error: resource android:attr/dialogCornerRadius not found.

  C:\Users\hupo3\.gradle\caches\transforms-1\files-1.1\support-compat-28.0.0.aar\b1fc0e0ff1348f4d278539eb80ede9d3\res\values\values.xml:89:5-125:25: AAPT: error: resource android:attr/fontVariationSettings not found.

  C:\Users\hupo3\.gradle\caches\transforms-1\files-1.1\support-compat-28.0.0.aar\b1fc0e0ff1348f4d278539eb80ede9d3\res\values\values.xml:89:5-125:25: AAPT: error: resource android:attr/ttcIndex not found.

  error: failed linking references.
  Command: C:\Users\hupo3\.gradle\caches\transforms-1\files-1.1\aapt2-3.2.1-4818971-windows.jar\c1441429ce2aae0e0bed3ad48db2b49e\aapt2-3.2.1-4818971-windows\aapt2.exe link -I\
          C:\Users\hupo3\AppData\Local\Android\sdk\platforms\android-27\android.jar\
          --manifest\
          E:\Flutter Projects\intro_to_flutter\build\app\intermediates\merged_manifests\debug\processDebugManifest\merged\AndroidManifest.xml\
          -o\
          E:\Flutter Projects\intro_to_flutter\build\app\intermediates\processed_res\debug\processDebugResources\out\resources-debug.ap_\
          -R\
          @E:\Flutter Projects\intro_to_flutter\build\app\intermediates\incremental\processDebugResources\resources-list-for-resources-debug.ap_.txt\
          --auto-add-overlay\
          --java\
          E:\Flutter Projects\intro_to_flutter\build\app\generated\not_namespaced_r_class_sources\debug\processDebugResources\r\
          --custom-package\
          com.xiaobing.introtoflutter\
          -0\
          apk\
          --output-text-symbols\
          E:\Flutter Projects\intro_to_flutter\build\app\intermediates\symbols\debug\R.txt\
          --no-version-vectors
  Daemon:  AAPT2 aapt2-3.2.1-4818971-windows Daemon #0

* Try:
Run with --stacktrace option to get the stack trace. Run with --info or --debug option to get more log output. Run with --scan to get full insights.

* Get more help at https://help.gradle.org

BUILD FAILED in 18s
Gradle task assembleDebug failed with exit code 1
Exited (sigterm)


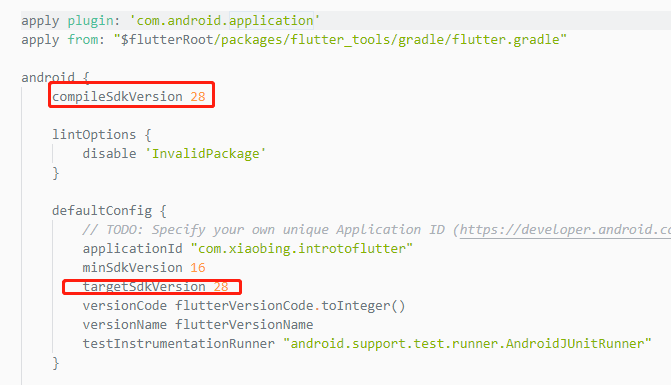
Solution:

Open android\app\build.gradle file

Modify compileSdkVersion 和 targetSdkVersion


[Solved] NPM Error: gyp: No Xcode or CLT version detected!

question

Recently, when using npm to install modules in macOS Catalina, the following errors often occur:


> node-gyp rebuild

No receipt for 'com.apple.pkg.CLTools_Executables' found at '/'.

No receipt for 'com.apple.pkg.DeveloperToolsCLILeo' found at '/'.

No receipt for 'com.apple.pkg.DeveloperToolsCLI' found at '/'.

gyp: No Xcode or CLT version detected!
gyp ERR! configure error 
gyp ERR! stack Error: `gyp` failed with exit code: 1
gyp ERR! stack     at ChildProcess.onCpExit (/usr/local/lib/node_modules/npm/node_modules/node-gyp/lib/configure.js:351:16)
gyp ERR! stack     at ChildProcess.emit (events.js:210:5)
gyp ERR! stack     at Process.ChildProcess._handle.onexit (internal/child_process.js:272:12)
gyp ERR! System Darwin 19.3.0
gyp ERR! command "/usr/local/bin/node" "/usr/local/lib/node_modules/npm/node_modules/node-gyp/bin/node-gyp.js" "rebuild"
gyp ERR! cwd /Users/yangjian/Documents/temp/test001/node_modules/fsevents
gyp ERR! node -v v12.13.0
gyp ERR! node-gyp -v v5.0.5
gyp ERR! not ok 
  • Screenshot below

1

solution

1. Try to fix it with the following command

$ xcode-select --install

The system prompts the following information:

xcode-select: error: command line tools are already installed, use "Software Update" to install updates

In fact, there is no so-called “Software Update” to update

2. Correct posture

At a loss, I found the following solutions:

$ sudo rm -rf $(xcode-select -print-path)
$ xcode-select --install

[Solved] Backend Internal error: Exception during IR lowering

// Define two datas in viewmodel
class LoginViewModel @Inject constructor() : BaseViewModel<LoginIntent>() {
    val height = MutableStateFlow(-1f)
    val weight = MutableStateFlow(-1f)
}

// The data is used in the UI to make the determination.
BaseLoginScreen(
	canNextClick = vm.weight.collectAsState().value!=-1f && vm.weight.collectAsState().value!=-1f,
) { 。。。 }
// it will report error: Backend Internal error: Exception during IR lowering, and Runtime JAR files in the classpath should have the same version.

// Solution:
val height = vm.weight.collectAsState().value
val weight = vm.weight.collectAsState().value
BaseLoginScreen(
	canNextClick = height!=-1f && weight!=-1f,
) { ... }

IE11 Windows7 F12 DOC Resource Manager Error: Exception in window.onload: Error: An error has ocurredJSPlugin.3005

——————

Diagnostic:

Exception in window.onload: Error: An error has ocurredJSPlugin.3005

Stack Trace:

Error: An error has ocurredJSPlugin.3005 at getString (res://C:\Program Files\Internet Explorer\F12Resources.dll/23/pluginhost/plugin.f12.js:5021:27) at ToolWindowHelpers.loadString (res://C:\Program Files\Internet Explorer\F12Resources.dll/23/Common/CommonMerged.js:5803:13) at TabPanes…

——————-


Solution: Install Windows7 patch KB3008923;

download link:

http://www.microsoft.com/en-us/download/details.aspx?id=45134   (32-bit)

http://www.microsoft.com/en-US/download/details.aspx?id=45154  (64-bit)

CheckPoint Remote Access client on macOS fails to connect with “Connectivity with the VPN service is lost” error message

Symptoms

  1. Remote Access client on macOS fails to connect with “Connectivity with the VPN service is lost” error message.
  2. TrGui debug shows:
    [26 Apr 12:34:34][TR_API] TR_API::TrAPI::TrAPIInitThread: Critical error. breaking.
    [ 14717 0x700007cba000][26 Apr 12:34:34][TR_API] TR_API::TrAPI::TrAPIInitThread: API Inited FAIL
    [ 14717 0x700007cba000][26 Apr 12:34:34][TR_API] TR_API::TrAPI::TrAPIInitThread: TrAPIInitThread finished
    [ 14717 0x10ce41e00][26 Apr 12:34:34][TR_API] TR_API::TrAPI::TrAPIInit: connection to the service couldn’t be established
    [ 14717 0x10ce41e00][26 Apr 12:34:34][TR_API] TR_API::TrAPI::TrAPIInit: TrAPIInit failed
    [ 14717 0x10ce41e00][26 Apr 12:34:34][TR_API] TR_API::TrAPIDestroy: Entering…
    [ 14717 0x10ce41e00][26 Apr 12:34:34][TR_API] TR_API::TrAPIDestroy: Called not from the message loop thread, raising trigger
    [ 14717 0x10ce41e00][26 Apr 12:34:34][TR_API] TR_API::TrAPIDestroy: Failed to rais trigger
    [ 14717 0x10ce41e00][26 Apr 12:34:34][TR_API] TR_API::TrAPIDestroy: Done
    [ 14717 0x10ce41e00][26 Apr 12:34:34][TR_APIWRAPPER] TrAPIWrapper::InitAPI: failed to init API.
    [ 14717 0x10ce41e00][26 Apr 12:34:34][TrGUI] TrApplication::InitAPI: failed to init API
    [ 14717 0x10ce41e00][26 Apr 12:34:34][TrGUI] new connection status: Terminated
    [….] [TrGUI] TrMainWindow::ShowBalloon: Showing text Connectivity with the VPN service is lost
    [ 14717 0x10ce41e00][26 Apr 12:34:34][TrGUI] TrApplication::GetResourceFullPath: Returning /Applications/Endpoint Security VPN.app/Contents/Resources/errorNotification.png
    [ 14717 0x10ce41e00][26 Apr 12:34:36][TrGUI] WatchDogThread::queryServiceSlot: Trying to init api
    [ 14717 0x10ce41e00][26 Apr 12:34:36][TR_API] TR_API::TrAPI::TrAPIInit: enter …
    [ 14717 0x700008155000][26 Apr 12:34:36][TR_API] TR_API::TrAPI::TrAPIInitThread: Initializing…
    [ 14717 0x700008155000][26 Apr 12:34:36][MessageLoop] MessageLoop::MessageLoop::PeriodicSchedCB: entering.
    [ 14717 0x700008155000][26 Apr 12:34:36][messaging] messaging::setup: created a new

Cause

  • The process com.checkpoint.epc.service.plist is disabled.

Solution

  • Enable the process with the command:
# sudo launchctl load -w /Library/LaunchDaemons/com.checkpoint.epc.service.plist

This will remove the service’s Daemon from the list of disabled services, and then run it. From that point on, the system will run its daemon automatically.
This change will survive reboot.

  • The user can check if the service is running with
    # sudo launchctl list | grep com.che.

[Solved] aarch64-none-elf-gcc: fatal error: cannot execute ‘cc1’: execvp: No such file or directory

root@ubuntu:~/arm/raspberry-pi-os/exercises/lesson05/3/bl4ckout31# make
mkdir -p build
aarch64-none-elf-gcc -Wall -nostdlib -nostartfiles -ffreestanding -Iinclude -mgeneral-regs-only -g -MMD -c src/kernel.c -o build/kernel_c.o
make: aarch64-none-elf-gcc: Command not found
Makefile:16: recipe for target 'build/kernel_c.o' failed
make: *** [build/kernel_c.o] Error 127
root@ubuntu:~/arm/raspberry-pi-os/exercises/lesson05/3/bl4ckout31# export PATH="$PATH:~/arm/gcc-arm-10.3-2021.07-aarch64-aarch64-none-elf/bin/"
root@ubuntu:~/arm/raspberry-pi-os/exercises/lesson05/3/bl4ckout31# aarch64-none-elf-gcc --version
aarch64-none-elf-gcc (GNU Toolchain for the A-profile Architecture 10.3-2021.07 (arm-10.29)) 10.3.1 20210621
Copyright (C) 2020 Free Software Foundation, Inc.
This is free software; see the source for copying conditions.  There is NO
warranty; not even for MERCHANTABILITY or FITNESS FOR A PARTICULAR PURPOSE.

Still report error
root@ubuntu:~/arm/raspberry-pi-os/exercises/lesson05/3/bl4ckout31# make
mkdir -p build
aarch64-none-elf-gcc -Wall -nostdlib -nostartfiles -ffreestanding -Iinclude -mgeneral-regs-only -g -MMD -c src/kernel.c -o build/kernel_c.o
make: aarch64-none-elf-gcc: Command not found
Makefile:16: recipe for target 'build/kernel_c.o' failed
make: *** [build/kernel_c.o] Error 127
root@ubuntu:~/arm/raspberry-pi-os/exercises/lesson05/3/bl4ckout31# aarch64-none-elf-gcc -Wall -nostdlib -nostartfiles -ffreestanding -Iinclude -mgeneral-regs-only -g -MMD -c src/kernel.c -o build/kernel_c.o
aarch64-none-elf-gcc: fatal error: cannot execute 'cc1': execvp: No such file or directory
compilation terminated.
root@ubuntu:~/arm/raspberry-pi-os/exercises/lesson05/3/bl4ckout31#


root@ubuntu:~/arm/gcc-arm-10.3-2021.07-aarch64-aarch64-none-elf# find ./ -name cc1
./libexec/gcc/aarch64-none-elf/10.3.1/cc1
root@ubuntu:~/arm/gcc-arm-10.3-2021.07-aarch64-aarch64-none-elf#


root@ubuntu:~/arm/gcc-arm-10.3-2021.07-aarch64-aarch64-none-elf# ls /root/arm/gcc-arm-10.3-2021.07-aarch64-aarch64-none-elf/libexec/gcc/aarch64-none-elf/10.3.1/cc1 
/root/arm/gcc-arm-10.3-2021.07-aarch64-aarch64-none-elf/libexec/gcc/aarch64-none-elf/10.3.1/cc1


root@ubuntu:~/arm/gcc-arm-10.3-2021.07-aarch64-aarch64-none-elf# ln -s /root/arm/gcc-arm-10.3-2021.07-aarch64-aarch64-none-elf/libexec/gcc/aarch64-none-elf/10.3.1/cc1  /root/arm/gcc-arm-10.3-2021.07-aarch64-aarch64-none-elf/bin/cc1
root@ubuntu:~/arm/gcc-arm-10.3-2021.07-aarch64-aarch64-none-elf# make
make: *** No targets specified and no makefile found.  Stop.
root@ubuntu:~/arm/gcc-arm-10.3-2021.07-aarch64-aarch64-none-elf# cd -
/root/arm/raspberry-pi-os/exercises/lesson05/3/bl4ckout31
root@ubuntu:~/arm/raspberry-pi-os/exercises/lesson05/3/bl4ckout31# make
mkdir -p build
aarch64-none-elf-gcc -Wall -nostdlib -nostartfiles -ffreestanding -Iinclude -mgeneral-regs-only -g -MMD -c src/kernel.c -o build/kernel_c.o
make: aarch64-none-elf-gcc: Command not found
Makefile:16: recipe for target 'build/kernel_c.o' failed
make: *** [build/kernel_c.o] Error 127
root@ubuntu:~/arm/raspberry-pi-os/exercises/lesson05/3/bl4ckout31# aarch64-none-elf-gcc -Wall -nostdlib -nostartfiles -ffreestanding -Iinclude -mgeneral-regs-only -g -MMD -c src/kernel.c -o build/kernel_c.o
aarch64-none-elf-gcc: fatal error: cannot execute 'cc1': execvp: No such file or directory
compilation terminated.
root@ubuntu:~/arm/raspberry-pi-os/exercises/lesson05/3/bl4ckout31# ls /root/arm/gcc-arm-10.3-2021.07-aarch64-aarch64-none-elf/bin
aarch64-none-elf-addr2line   aarch64-none-elf-gcc-nm         aarch64-none-elf-lto-dump
aarch64-none-elf-ar          aarch64-none-elf-gcc-ranlib     aarch64-none-elf-nm
aarch64-none-elf-as          aarch64-none-elf-gcov           aarch64-none-elf-objcopy
aarch64-none-elf-c++         aarch64-none-elf-gcov-dump      aarch64-none-elf-objdump
aarch64-none-elf-c++filt     aarch64-none-elf-gcov-tool      aarch64-none-elf-ranlib
aarch64-none-elf-cpp         aarch64-none-elf-gdb            aarch64-none-elf-readelf
aarch64-none-elf-elfedit     aarch64-none-elf-gdb-add-index  aarch64-none-elf-size
aarch64-none-elf-g++         aarch64-none-elf-gfortran       aarch64-none-elf-strings
aarch64-none-elf-gcc         aarch64-none-elf-gprof          aarch64-none-elf-strip
aarch64-none-elf-gcc-10.3.1  aarch64-none-elf-ld             cc1
aarch64-none-elf-gcc-ar      aarch64-none-elf-ld.bfd
root@ubuntu:~/arm/raspberry-pi-os/exercises/lesson05/3/bl4ckout31# ls /root/arm/gcc-arm-10.3-2021.07-aarch64-aarch64-none-elf/bin -al
total 161476
drwxr-xr-x 2  802  802     4096 Mar 16 23:09 .
drwxr-xr-x 8  802  802     4096 Jul 13  2021 ..
-rwxr-xr-x 1  802  802  1222520 Jul  2  2021 aarch64-none-elf-addr2line
-rwxr-xr-x 2  802  802  1252664 Jul  2  2021 aarch64-none-elf-ar
-rwxr-xr-x 2  802  802  2331488 Jul  2  2021 aarch64-none-elf-as
-rwxr-xr-x 2  802  802  1345616 Jul  2  2021 aarch64-none-elf-c++
-rwxr-xr-x 1  802  802  1217312 Jul  2  2021 aarch64-none-elf-c++filt
-rwxr-xr-x 1  802  802  1353952 Jul  2  2021 aarch64-none-elf-cpp
-rwxr-xr-x 1  802  802    43704 Jul  2  2021 aarch64-none-elf-elfedit
-rwxr-xr-x 2  802  802  1345616 Jul  2  2021 aarch64-none-elf-g++
-rwxr-xr-x 2  802  802  1345576 Jul  2  2021 aarch64-none-elf-gcc
-rwxr-xr-x 2  802  802  1345576 Jul  2  2021 aarch64-none-elf-gcc-10.3.1
-rwxr-xr-x 1  802  802    36808 Jul  2  2021 aarch64-none-elf-gcc-ar
-rwxr-xr-x 1  802  802    36808 Jul  2  2021 aarch64-none-elf-gcc-nm
-rwxr-xr-x 1  802  802    36816 Jul  2  2021 aarch64-none-elf-gcc-ranlib
-rwxr-xr-x 1  802  802   878096 Jul  2  2021 aarch64-none-elf-gcov
-rwxr-xr-x 1  802  802   600296 Jul  2  2021 aarch64-none-elf-gcov-dump
-rwxr-xr-x 1  802  802   622296 Jul  2  2021 aarch64-none-elf-gcov-tool
-rwxr-xr-x 1  802  802 99760976 Jul  2  2021 aarch64-none-elf-gdb
-rwxr-xr-x 1  802  802     4045 Jul  2  2021 aarch64-none-elf-gdb-add-index
-rwxr-xr-x 1  802  802  1345960 Jul  2  2021 aarch64-none-elf-gfortran
-rwxr-xr-x 1  802  802  1291344 Jul  2  2021 aarch64-none-elf-gprof
-rwxr-xr-x 4  802  802  3341640 Jul  2  2021 aarch64-none-elf-ld
-rwxr-xr-x 4  802  802  3341640 Jul  2  2021 aarch64-none-elf-ld.bfd
-rwxr-xr-x 1  802  802 29902472 Jul  2  2021 aarch64-none-elf-lto-dump
-rwxr-xr-x 2  802  802  1233792 Jul  2  2021 aarch64-none-elf-nm
-rwxr-xr-x 2  802  802  1358320 Jul  2  2021 aarch64-none-elf-objcopy
-rwxr-xr-x 2  802  802  2681488 Jul  2  2021 aarch64-none-elf-objdump
-rwxr-xr-x 2  802  802  1252672 Jul  2  2021 aarch64-none-elf-ranlib
-rwxr-xr-x 2  802  802   951736 Jul  2  2021 aarch64-none-elf-readelf
-rwxr-xr-x 1  802  802  1226864 Jul  2  2021 aarch64-none-elf-size
-rwxr-xr-x 1  802  802  1222328 Jul  2  2021 aarch64-none-elf-strings
-rwxr-xr-x 2  802  802  1358320 Jul  2  2021 aarch64-none-elf-strip
lrwxrwxrwx 1 root root       95 Mar 16 23:09 cc1 -> /root/arm/gcc-arm-10.3-2021.07-aarch64-aarch64-none-elf/libexec/gcc/aarch64-none-elf/10.3.1/cc1
root@ubuntu:~/arm/raspberry-pi-os/exercises/lesson05/3/bl4ckout31# ls /root/arm/gcc-arm-10.3-2021.07-aarch64-aarch64-none-elf/libexec/gcc/aarch64-none-elf/10.3.1/cc1
/root/arm/gcc-arm-10.3-2021.07-aarch64-aarch64-none-elf/libexec/gcc/aarch64-none-elf/10.3.1/cc1
root@ubuntu:~/arm/raspberry-pi-os/exercises/lesson05/3/bl4ckout31# ls /root/arm/gcc-arm-10.3-2021.07-aarch64-aarch64-none-elf/libexec/gcc/aarch64-none-elf/10.3.1/cc1 -al
-rwxr-xr-x 1 802 802 31068504 Jul  2  2021 /root/arm/gcc-arm-10.3-2021.07-aarch64-aarch64-none-elf/libexec/gcc/aarch64-none-elf/10.3.1/cc1


Solution: add /usr/bin/cc1 as below.

root@ubuntu:~/arm/raspberry-pi-os/exercises/lesson05/3/bl4ckout31# ln -s /root/arm/gcc-arm-10.3-2021.07-aarch64-aarch64-none-elf/libexec/gcc/aarch64-none-elf/10.3.1/cc1  /usr/bin/cc1
root@ubuntu:~/arm/raspberry-pi-os/exercises/lesson05/3/bl4ckout31# make
mkdir -p build
aarch64-none-elf-gcc -Wall -nostdlib -nostartfiles -ffreestanding -Iinclude -mgeneral-regs-only -g -MMD -c src/kernel.c -o build/kernel_c.o
make: aarch64-none-elf-gcc: Command not found
Makefile:16: recipe for target 'build/kernel_c.o' failed
make: *** [build/kernel_c.o] Error 127
root@ubuntu:~/arm/raspberry-pi-os/exercises/lesson05/3/bl4ckout31# aarch64-none-elf-gcc -Wall -nostdlib -nostartfiles -ffreestanding -Iinclude -mgeneral-regs-only -g -MMD -c src/kernel.c -o build/kernel_c.o
In file included from src/kernel.c:1:
include/printf.h:94:10: fatal error: stdarg.h: No such file or directory
   94 | #include <stdarg.h>
      |          ^~~~~~~~~~
compilation terminated.
root@ubuntu:~/arm/raspberry-pi-os/exercises/lesson05/3/bl4ckout31#

[Solved] mujoco_py Run example Error: ERROR: GLEW initalization error: Missing GL version

After the successful installation of mujoco_py, run the example in the built-in example and find an error:  ERROR: GLEW initalization error: Missing GL version


Modify the configuration in .vimrc and add the following:

export LD_PRELOAD=/usr/lib/x86_64-linux-gnu/libGLEW.so


=================================================


All examples of mujoco_py below:


requires attention:


Run the example that comes with mujoco-py:

body_interaction.py disco_fetch.py ​​markers_demo.py render_callback.py setting_state.py tosser.py

Environment variables need to be set:

export LD_PRELOAD=/usr/lib/x86_64-linux-gnu/libGLEW.so

Otherwise, an error will be reported:

ERROR: GLEW initalization error: Missing GL version


Run the built-in example:

internal_functions.py multigpu_rendering.py

Environment variables need to be set:

export LD_PRELOAD=”

Otherwise, an error will be reported.


For a personal analysis of the environment variable export LD_PRELOAD=/usr/lib/x86_64-linux-gnu/libGLEW.so setting:

The mujuco211 version itself comes with the glew library, so when running mujuco-py to run the simulation, set export LD_PRELOAD=”

But when running the visual drawing, you need to call the glew library of the system. At this time, set export LD_PRELOAD=/usr/lib/x86_64-linux-gnu/libGLEW.so

If the glew library of the system is not called when drawing, a version error will be reported, and if the glew library of mujoco itself is not called when running the simulation, an error will also be reported.


The serialize_model.py substep_callback.py in the example does not need to set environment variables.


mjvive.py needs the support of VR SDK, etc., which is not considered here. (This should be run after you install HTC’s VR device client on your linux computer)

MyBatis Error: Error building SqlSession [How to Solve]

MyBatis Error building SqlSession.

The error may exist in SQL Mapper Configuration

Cause: org.apache.ibatis.builder.BuilderException: Error parsing SQL Mapper Configuration. Cause: java.lang.ClassNotFoundException

In the configuration file:

<mappers>
    <mapper class="com/base/dao/UserMapper.xml"/>
</mappers>

written as:

<mappers>
    <mapper resource="com/base/dao/UserMapper.xml"/>
</mappers>

If you still can’t find it, you can configure pom.xml

<build>
    <resources>
        <resource>
            <directory>src/main/resources</directory>
            <includes>
                <include>**/*.properties</include>
                <include>**/*.xml</include>
            </includes>
        </resource>
        <resource>
            <directory>src/main/java</directory>
            <includes>
                <include>**/*.properties</include>
                <include>**/*.xml</include>
            </includes>
        </resource>
    </resources>
</build>

[Solved] Module build failed: Error: Node Sass version 6.0.0 is incompatible with ^4.0.0.

Module build failed: Error: Node Sass version 6.0.0 is incompatible with ^4.0.0.
npm run dev prompts the following error

Module build failed: Error: Node Sass version 6.0.0 is incompatible with ^4.0.0.

Reason: node-sass version is too high, uninstall and reinstall the lower version

1. Uninstall: npm uninstall node-sass

2. Installation: npm install [email protected]

3. Run: npm run dev

[Solved] Json.Net – Error getting value from ‘ScopeId’ on ‘System.Net.IPAddress’

The IPAddress class is not very friendly to serialization, as you’ve seen. Not only will it throw a SocketException if you try to access the ScopeID field for an IPv4 address, but it will also throw if you try to access the Address field directly for an IPv6 address.

To get around the exceptions, you will need a custom JsonConverter. A converter allows you to tell Json.Net exactly how you’d like it to serialize and/or deserialize a particular type of object. For an IPAddress, it seems the easiest way to get the data that satisfies everyone is simply to convert it to its string representation and back. We can do that in the converter. Here is how I would write it:

class IPAddressConverter : JsonConverter
{
    public override bool CanConvert(Type objectType)
    {
        return (objectType == typeof(IPAddress));
    }

    public override void WriteJson(JsonWriter writer, object value, JsonSerializer serializer)
    {
        writer.WriteValue(value.ToString());
    }

    public override object ReadJson(JsonReader reader, Type objectType, object existingValue, JsonSerializer serializer)
    {
        return IPAddress.Parse((string)reader.Value);
    }
}

Pretty straightforward, as these things go. But, this is not the end of the story. If you need to go round-trip with your IPEndPoint, then you will need a converter for it as well. Why? Because IPEndPoint does not contain a default constructor, so Json.Net will not know how to instantiate it. Fortunately, this converter is not difficult to write either:

class IPEndPointConverter : JsonConverter
{
    public override bool CanConvert(Type objectType)
    {
        return (objectType == typeof(IPEndPoint));
    }

    public override void WriteJson(JsonWriter writer, object value, JsonSerializer serializer)
    {
        IPEndPoint ep = (IPEndPoint)value;
        JObject jo = new JObject();
        jo.Add("Address", JToken.FromObject(ep.Address, serializer));
        jo.Add("Port", ep.Port);
        jo.WriteTo(writer);
    }

    public override object ReadJson(JsonReader reader, Type objectType, object existingValue, JsonSerializer serializer)
    {
        JObject jo = JObject.Load(reader);
        IPAddress address = jo["Address"].ToObject<IPAddress>(serializer);
        int port = (int)jo["Port"];
        return new IPEndPoint(address, port);
    }
}

So, now that we have the converters, how do we use them? Here is a simple example program that demonstrates. It first creates a couple of endpoints, serializes them to JSON using the custom converters, then immediately deserializes the JSON back into endpoints again using the same converters.

public class Program
{
    static void Main(string[] args)
    {
        var endpoints = new IPEndPoint[]
        {
            new IPEndPoint(IPAddress.Parse("8.8.4.4"), 53),
            new IPEndPoint(IPAddress.Parse("2001:db8::ff00:42:8329"), 81)
        };

        var settings = new JsonSerializerSettings();
        settings.Converters.Add(new IPAddressConverter());
        settings.Converters.Add(new IPEndPointConverter());
        settings.Formatting = Formatting.Indented;

        string json = JsonConvert.SerializeObject(endpoints, settings);
        Console.WriteLine(json);

        var endpoints2 = JsonConvert.DeserializeObject<IPEndPoint[]>(json, settings);

        foreach (IPEndPoint ep in endpoints2)
        {
            Console.WriteLine();
            Console.WriteLine("AddressFamily: " + ep.AddressFamily);
            Console.WriteLine("Address: " + ep.Address);
            Console.WriteLine("Port: " + ep.Port);
        }
    }
}

Here is the output:

[
  {
    "Address": "8.8.4.4",
    "Port": 53
  },
  {
    "Address": "2001:db8::ff00:42:8329",
    "Port": 81
  }
]

AddressFamily: InterNetwork
Address: 8.8.4.4
Port: 53

AddressFamily: InterNetworkV6
Address: 2001:db8::ff00:42:8329
Port: 81

Fiddle: https://dotnetfiddle.net/tK7NKY

  • Code of WriteJson can be simplified using JObject too. 
  • Performance impact of WriteJson and ReadJson can be improved by using the writer and reader objects, avoiding JObject allocation. I have submitted an edit to this very useful answer.