import android.annotation.SuppressLint;
import android.support.annotation.NonNull;
import android.support.annotation.Nullable;
import android.text.TextUtils;
import android.webkit.WebView;
import android.webkit.WebViewClient;

/**
 * Created by  on 2019/2/22.
 * desc:Make the webview support window.history.go()
 * Replace the history.go() method in js with webview.goBack
 */
public class WebViewGoBackSupport {

    /**
     * Custom, links loaded when history.go is called by js to listen for history.go method calls
     */
    private final static String CONSTANTS_GO_BACK = "/CONSTANTS_GO_BACK#";
    /**
     * Methods to call back when the webview fails to return
     */
    @Nullable
    private Runnable whenCannotGoBackRunnable;
    @NonNull
    private WebView webview;

    /**
     * @param whenCannotGoBackRunnable Methods to call back when there is no previous page and history.go is called by js
     */
    @SuppressLint("SetJavaScriptEnabled")
    public WebViewGoBackSupport(@NonNull WebView webview, @Nullable Runnable whenCannotGoBackRunnable) {
        this.webview = webview;
        this.whenCannotGoBackRunnable = whenCannotGoBackRunnable;
        this.webview.getSettings().setJavaScriptEnabled(true);
    }

    /**
     * @param whenCannotGoBackRunnable Method to call back when there is no previous page and js calls history.go
     * @param defaultClient when true, no need to call it manually onPageFinished、shouldOverrideUrlLoading
     */
    public WebViewGoBackSupport(@NonNull WebView webview, @Nullable Runnable whenCannotGoBackRunnable, boolean defaultClient) {
        this(webview, whenCannotGoBackRunnable);
        if (defaultClient) {
            webview.setWebViewClient(new WebViewClient() {
                @Override
                public void onPageFinished(WebView view, String url) {
                    WebViewGoBackSupport.this.onPageFinished(url);
                    super.onPageFinished(view, url);
                }

                @Override
                public boolean shouldOverrideUrlLoading(WebView view, String url) {
                    WebViewGoBackSupport.this.shouldOverrideUrlLoading(url);
                    return super.shouldOverrideUrlLoading(view, url);
                }
            });
        }
    }

    /**
     * Called in the corresponding method of WebViewClient
     * Note: This method needs to be called manually, or use defaultClient == true
     */
    public void onPageFinished(String url) {
        //Rewrite js page window.history.go method
        String script = "javascript:(function(){window.history.go = function(index){" +
                "window.location.href='" + CONSTANTS_GO_BACK + "'+index;" +
                "}})()";
        webview.loadUrl(script);
    }

    /**
     * Called in the corresponding method of WebViewClient
     * Note: This method needs to be called manually, or use defaultClient == true
     */
    public void shouldOverrideUrlLoading(String url) {
        if (!TextUtils.isEmpty(url) && url.contains(CONSTANTS_GO_BACK)) {
            int step = -1;
            try {
                //Parsing the parameters passed in when js calls history.go
                step = Integer.parseInt(url.split("#")[1]);
            } catch (Exception e) {
                e.printStackTrace();
            }
            if (webview.canGoBackOrForward(step)) {
                webview.goBackOrForward(step);
            } else if (whenCannotGoBackRunnable != null) {
                //Callback method when there is no previous page and history.go is called by js
                whenCannotGoBackRunnable.run();
            }
        }
    }
}
Tag Archives: android
Eact Native Generate APP: You have not accepted the license agreements of the following SDK components:
1、 Error information
* What went wrong:
A problem occurred configuring project ':app'.
&> You have not accepted the license agreements of the following SDK components:
  [Android SDK Build-Tools 26.0.3, Android SDK Platform 26].
  Before building your project, you need to accept the license agreements and complete the installation of the missing components using the Android Studio SDK Manager.
  Alternatively, to learn how to transfer the license agreements from one workstation to another, go to http://d.android.com/r/studio-ui/export-licenses.html

* Try:
Run with --stacktrace option to get the stack trace. Run with --info or --debug option to get more log output.
2、 Cause of error
Starting from Android gradle plugin 2.2.0, gradle will automatically load the required SDK and build tools. However, because it does not accept the license, the loading dependency is terminated.
3、 Solutions
(1) Find your own Android SDK location and enter the tools/bin directory
(2) Open CMD (do not use any other one) and enter the above directory
(3) Enter the following command
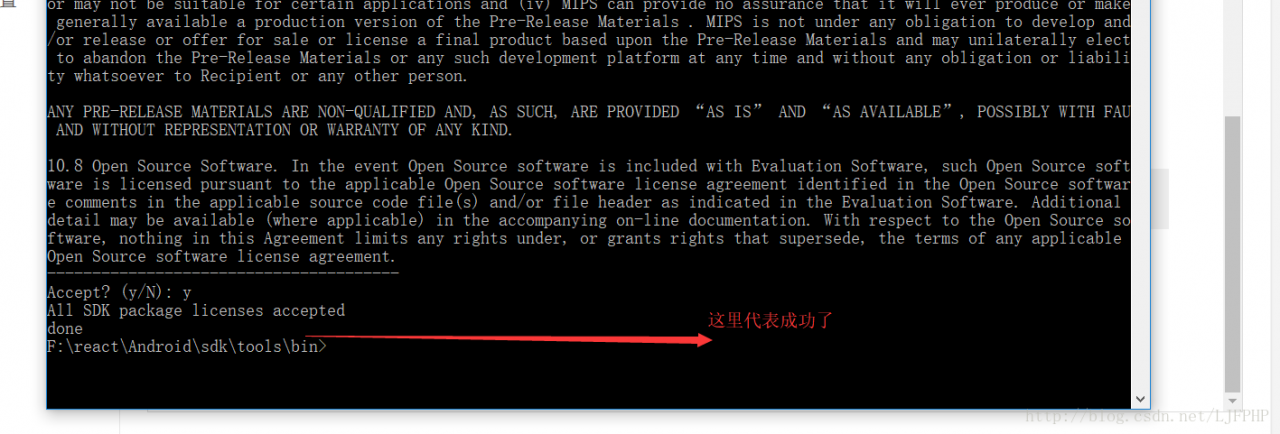
sdkmanager.bat --licenses(4) After input, a lot of things will pop up. We just need to write y in all of them
(5) Success tips

Flutter: Android dependency ‘com.android.support:support-v4’ has different version …
Launching lib\main.dart on Nokia X6 in debug mode...
Initializing gradle...
Resolving dependencies...
Gradle task 'assembleDebug'...

FAILURE: Build failed with an exception.

* What went wrong:
Execution failed for task ':app:preDebugBuild'.
&> Android dependency 'com.android.support:support-v4' has different version for the compile (26.1.0) and runtime (27.1.1) classpath. You should manually set the same version via DependencyResolution

* Try:
Run with --stacktrace option to get the stack trace. Run with --info or --debug option to get more log output. Run with --scan to get full insights.

* Get more help at https://help.gradle.org

BUILD FAILED in 14s
Finished with error: Gradle task assembleDebug failed with exit code 1
How to Solve:
Add a new line in android/app/build.gradle,dependencies
dependencies {
    //PART TO ADD

    implementation "com.android.support:support-v4:27.1.1"
}
There is another way online:
subprojects {

    project.evaluationDependsOn(':app')
    //[PART TO ADD START]
    project.configurations.all {

        resolutionStrategy.eachDependency { details -&>

            if (details.requested.group == 'com.android.support'
                    && !details.requested.name.contains('multidex') ) {
                details.useVersion "27.1.0"
            }
        }
    }
    //[PART TO ADD END]
}android unity Error: your hardware does not support this application,sorry!
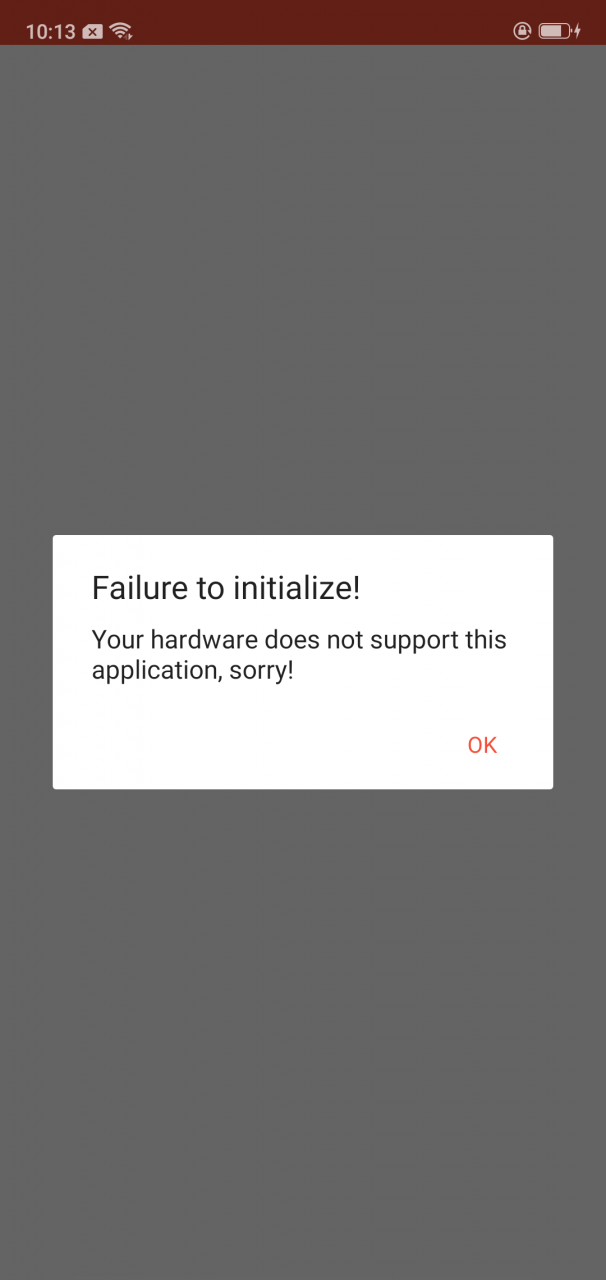
recently, I met a problem about this, which occurred when I connected to unity3d on Android
the problem is to open the app and pop up the pop-up box below. Click OK to exit

This problem is caused by a problem with the so file in the LIBS folder
Solution one
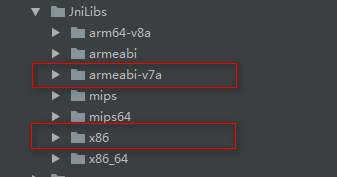
Delete other so files, only v7a and x86
then clean it and run it
Next, I’ll post out the LIBS folder in the project: (just two red boxes are needed)

Solution two
Edit the build.gradle File, add the following code to it:
sourceSets {
        main {
            jniLibs.srcDirs = ['libs']
        }
    }
Code after adding:
apply plugin: 'com.android.application'

android {
    compileSdkVersion 28
    buildToolsVersion "28.0.0"

    defaultConfig {
        minSdkVersion 21
        targetSdkVersion 28
        versionCode 1
        versionName "1.0"
    }
    buildTypes {
        release {
            runProguard false
            proguardFiles getDefaultProguardFile('proguard-android.txt'), 'proguard-rules.pro'
        }
    }
    sourceSets {
        main {
            jniLibs.srcDirs = ['libs']
        }
    }
Android Your content must have a ListView whose…
Android Your content must have a ListView whose id attribute is ‘android.R. id.list ‘solutions to errors
Listview plays an important role in Android development, and it is used in many occasions
Error prompt: your content must have a listview which ID attribute is’ Android. R id.list ‘
For the above error, it may be that we inherit liseactivity to monitor setonitemclick events in listview, but there is no listview tag. It has been said on the Internet that we only need to add the following code to the layout file:
<ListView
a<ListView android:id= “@ Android: ID/list” or android:id= “@id/ android:list ” android:layout_ width=”fill_ parent” android:layout_ height=”wrap_ content”&> </ListView&>
ndroid:id= “@ Android: ID/list” or android:id= “@id/ android:list ”
android:layout_ width=”fill_ parent”
android:layout_ height=”wrap_ content”&>
</ListView&>
However, if we want to implement a custom listview, that is, we will monitor the space in the listview through the baseadapter, then we just need to inherit the activity. But note that we use listview instead of inheriting listactivity. Therefore, we must remember to declare a listview object in the project and instantiate it, so that we can get the listview we want
Don’t worry. Don’t forget that we have our own instantiated listview. With this, we can call the setonitemclicklistener method. The details are as follows:
listView.setOnItemClickListener (new OnItemClickListener() {
@Override
public void onItemClick(AdapterView<?&> arg0, View arg1, int arg2,
long arg3) {
// TODO Auto-generated method stub
Log.i(“TAG”,”The Item has been clicked”);
}
});
listView.setOnItemClickListener (new OnItemClickListener() { @Override public void onItemClick(AdapterView<?&> arg0, View arg1, int arg2, long arg3) { // TODO Auto-generated method stub Log.i(“TAG”,”The Item has been clicked”); } });
At this time, we can still use the same construction method as the simpleadapter provided by the system to call our own customized baseadapter, as described before