Tag Archives: ubuntu

Ubuntu failed to install libssl dev (depending on aptitude to manage degraded software) and recorded the list of installed software in dpkg

Direct installation of libssl dev failed in Ubuntu 12.04 LTS

Prompt error:

$ sudo apt-get install libssl-dev
Reading package lists... Done
Building dependency tree      
Reading state information... Done
Some packages could not be installed. This may mean that you have
requested an impossible situation or if you are using the unstable
distribution that some required packages have not yet been created
or been moved out of Incoming.
The following information may help to resolve the situation:
The following packages have unmet dependencies:
 libssl-dev : Depends: libssl1.0.0 (= 1.0.1-4ubuntu5) but 1.0.1-4ubuntu5.3 is to be installed
              Recommends: libssl-doc but it is not going to be installed
E: Unable to correct problems, you have held broken packages.

Reason:

The installed version of libssl 1.0.0 is too high to support

$dpkg -l *libssl*
Desired=Unknown/Install/Remove/Purge/Hold
| Status=Not/Inst/Conf-files/Unpacked/halF-conf/Half-inst/trig-aWait/Trig-pend
|/ Err?=(none)/Reinst-required (Status,Err: uppercase=bad)
||/ Name               Version            Description
+++-==================-==================-====================================================
un  libssl-dev         <none>             (no description available)
un  libssl-doc         <none>             (no description available)
ii  libssl1.0.0        1.0.1-4ubuntu5.3   SSL shared libraries

Solution:

Using aptitude package manager

1. Install aptitude

$sudo apt-get install aptitude

2. Use aptitude to install libssl dev package and adopt the recommended solution (demote libssl version 1.0.0)

$sudo aptitude install libssl-dev
The following NEW packages will be installed:
  libssl-dev{b}
The following packages are RECOMMENDED but will NOT be installed:
  libssl-doc
0 packages upgraded, 1 newly installed, 0 to remove and 0 not upgraded.
Need to get 1,528 kB of archives. After unpacking 6,179 kB will be used.
The following packages have unmet dependencies:
 libssl-dev : Depends: libssl1.0.0 (= 1.0.1-4ubuntu5) but 1.0.1-4ubuntu5.3 is installed.
              Depends: zlib1g-dev but it is not going to be installed.
The following actions will resolve these dependencies:
     Keep the following packages at their current version:
1)     libssl-dev [Not Installed]                        
Accept this solution?[Y/n/q/?] n
The following actions will resolve these dependencies:
     Install the following packages:                                          
1)     zlib1g-dev [1:1.2.3.4.dfsg-3ubuntu4 (precise)]                         
     Downgrade the following packages:                                        
2)     libssl1.0.0 [1.0.1-4ubuntu5.3 (now) -> 1.0.1-4ubuntu5 (precise-updates)]
Accept this solution?[Y/n/q/?] y
The following packages will be DOWNGRADED:
  libssl1.0.0
The following NEW packages will be installed:
  libssl-dev zlib1g-dev{a}
The following packages are RECOMMENDED but will NOT be installed:
  libssl-doc
0 packages upgraded, 2 newly installed, 1 downgraded, 0 to remove and 0 not upgraded.
Need to get 2,707 kB of archives. After unpacking 6,575 kB will be used.
Do you want to continue?[Y/n/?] y
Get: 1 http://mirror.lupaworld.com/ubuntu/ precise-updates/main libssl1.0.0 amd64 1.0.1-4ubuntu5 [1,013 kB]
Get: 2 http://mirror.lupaworld.com/ubuntu/ precise/main zlib1g-dev amd64 1:1.2.3.4.dfsg-3ubuntu4 [165 kB]
Get: 3 http://mirror.lupaworld.com/ubuntu/ precise-updates/main libssl-dev amd64 1.0.1-4ubuntu5 [1,528 kB]
Fetched 2,707 kB in 5s (503 kB/s)      
Preconfiguring packages ...
dpkg: warning: downgrading libssl1.0.0 from 1.0.1-4ubuntu5.3 to 1.0.1-4ubuntu5.
(Reading database ... 150648 files and directories currently installed.)
Preparing to replace libssl1.0.0 1.0.1-4ubuntu5.3 (using .../libssl1.0.0_1.0.1-4ubuntu5_amd64.deb) ...
Unpacking replacement libssl1.0.0 ...
Setting up libssl1.0.0 (1.0.1-4ubuntu5) ...
Processing triggers for libc-bin ...
ldconfig deferred processing now taking place
Selecting previously unselected package zlib1g-dev.
(Reading database ... 150648 files and directories currently installed.)
Unpacking zlib1g-dev (from .../zlib1g-dev_1%3a1.2.3.4.dfsg-3ubuntu4_amd64.deb) ...
Selecting previously unselected package libssl-dev.
Unpacking libssl-dev (from .../libssl-dev_1.0.1-4ubuntu5_amd64.deb) ...
Processing triggers for man-db ...
Setting up zlib1g-dev (1:1.2.3.4.dfsg-3ubuntu4) ...
Setting up libssl-dev (1.0.1-4ubuntu5) ...

To verify the installation of libssl dev package:

$dpkg -l *libssl*
Desired=Unknown/Install/Remove/Purge/Hold
| Status=Not/Inst/Conf-files/Unpacked/halF-conf/Half-inst/trig-aWait/Trig-pend
|/ Err?=(none)/Reinst-required (Status,Err: uppercase=bad)
||/ Name               Version            Description
+++-==================-==================-====================================================
ii  libssl-dev         1.0.1-4ubuntu5     SSL development libraries, header files and document
un  libssl-doc         <none>             (no description available)
ii  libssl1.0.0        1.0.1-4ubuntu5     SSL shared libraries
Causes and solutions of system program problem detected in Ubuntu startup display

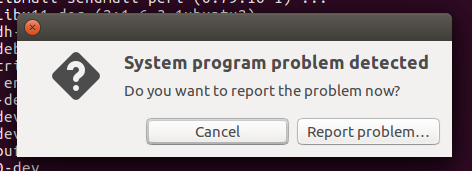
When using Ubuntu, you often encounter such an error prompt: “system program problem detected”

As shown in the figure:

Reason:

There is a built-in utility called app in Ubuntu, which can notify when a program crashes. This program, called import, notifies you of errors whenever you log into your Ubuntu system. It’s normal that you don’t have to panic or be afraid of such a mistake

Solution:

1. Inform system developers to do this. It’s recommended, and it won’t take you long. Click the “report prolem” button in the error prompt dialog box. You will be prompted to enter your administrator account password. Then, click “continue” to send the error prompt to developers, so that they can help solve the problem

First, make sure you are connected to the Internet properly. Once you submit the error report, developers will study the report carefully and try to solve the error in the next release

After submitting the error prompt, you can delete the file with the crash error prompt from your local system. If you want to see these error prompt files, you can enter the following command in the terminal: LS/var/crash/

Output (everyone is different)

libglib2.0-dev.0.crash_ usr_ bin_ appstreamcli.0.uploaded _ usr_ bin_ appstreamcli.0.crash _ usr_ bin_ pycompile.0.crash _ usr_ bin_ Appstreamcli. 0. Upload
delete all through the following command: sudorm – FR/var/crash/*

2. Disable the function of import. This is not recommended

Edit the app file/etc/default/APP

sudo nano /etc/default/apport

Find the line enabled=1 and change it to 0(zero)

# set this to 0 to disable apport, or to 1 to enable it

# you can temporarily override this with

# sudo service apport start force_start=1

enabled=0

Press crtl+x to exit, press y to save (nono), enter

Note: nano is a small, free and friendly editor. There are nano commands on most Linux

Then, you can stop the app service

Sudo stop apport

The app will not report any errors

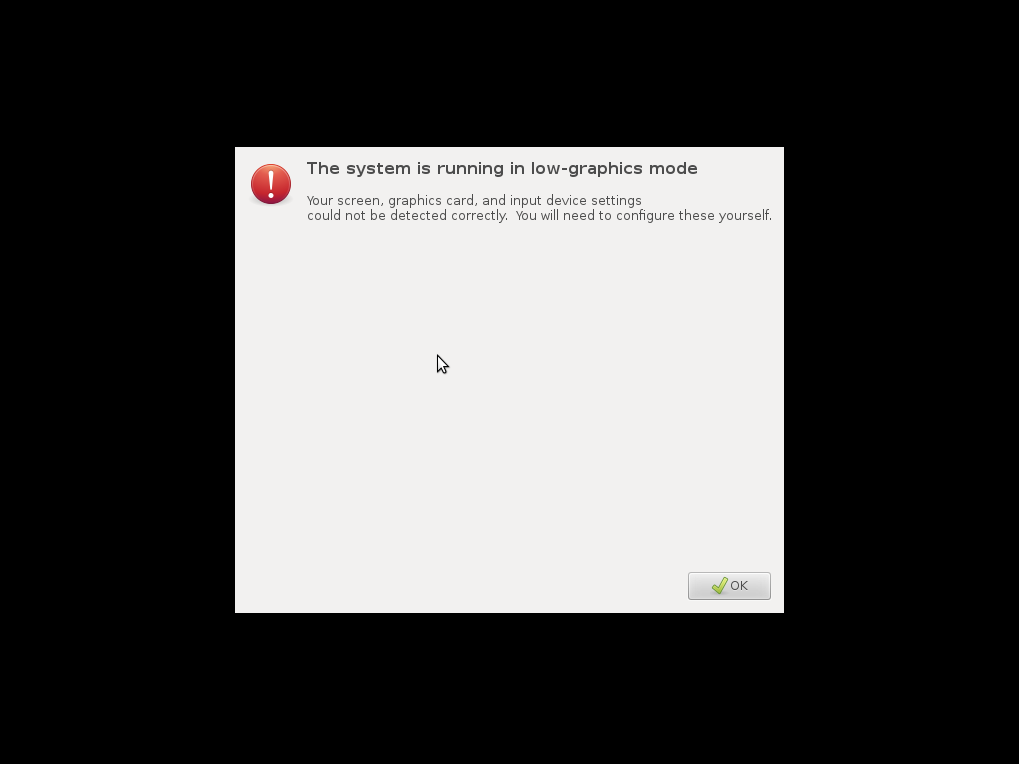
[Solved] Ubuntu Warning: The system is running in low-graphics mode

After checking the Internet for a number of solutions, I finally found one that fits my problem here, cited below.

I have recently received a similar issue with myPangolin Performance laptop. The folks at System 76 told me to do the following:

Click Okay and then select the option to get a terminal. (alternatively you can press ctr+alt+f1 to bring up another tty)

sudo chown lightdm:lightdm -R /var/lib/lightdm
sudo chown avahi-autoipd:avahi-autoipd -R /var/lib/avahi-autoipd
sudo chown colord:colord -R /var/lib/colord
sudo reboot

—————————————————————————-

Attachment: there is another way to install network card driver on the Internet

# For the latest Nvidia binary drivers.

sudo add-apt-repository ppa:ubuntu-x-swat/x-updates
sudo apt-get update
sudo apt-get install nvidia-current nvidia-current-modaliases nvidia-settings

# For the latest ATI/AMD binary drivers.

sudo add-apt-repository ppa:ubuntu-x-swat/x-updates
sudo apt-get update
sudo apt-get install fglrx 

I installed the NVIDIA driver. After restarting, I entered the login interface. After entering the user name and password, I still couldn’t enter the desktop. I kept circulating in the login interface. The solution is as follows:

alternatively you can press ctr+alt+f1 to bring up another tty

To uninstall NVIDIA driver:

sudo apt-get remove --purge nvidia-*
sudo apt-get install ubuntu-desktop
sudo rm /etc/X11/xorg.conf
echo 'nouveau' | sudo tee -a /etc/modules
#restart
sudo reboot

After restart

Reason search:

When there is a circular login problem, you can enter the shell according to the above method and find the. Xsession errors file in the home directory

# cd home check.xsession-errors
cd ~
ls -a
vi .xsession-errors

Then you can see the information in the log, according to the information in the log to Baidu, maybe you can solve the problem of driver installation

[Linux error highlights] IBus input method of Ubuntu system cannot be switched to Pinyin

System information:

Operating system: Ubuntu 14.04 lts
OS

Desktop environment: Gnome

System default language: English

Problem Description:

After sudo apt get install IBus Pinyin, pressing the shortcut key Ctrl + space cannot switch between Chinese and English. Even if Chinese pinyin is activated in input method settings, it still has no effect

Solution:

First, other input methods can be used

Second, open the terminal, input IBus list engine, press enter, and print out all the input engine information of IBus. Check whether there is a language: Chinese Pinyin – Pinyin engine. If there is, enter IBus engine pinyin to switch to Chinese Pinyin input. However, the input method icon is not displayed in the notification bar. Enter IBus engine xkb:us : eng can switch to English input again. Every time you log in to the system or restart IBus, the default is xkb:us ::eng。

Solutions to the phenomena of / dev / sda2 clean and / dev / sda2 recovering journal when starting Ubuntu

Recently, after installing NVIDIA graphics card on Ubuntu 18.4, it seems that the graphics card is not fully compatible

The first time there was a problem, it was found that the system adopted the default graphics card driver after logging in the account, but the installed graphics card driver was damaged and could not be used

The second time there was a problem, the words/dev/sda2 clean and/dev/sda2 recovering journal appeared on the interface after boot, and they were stuck

For the second problem, the solutions are as follows:

1. In the stuck interface, we need to switch to the command line mode, Ctrl + Alt + F3 (related to the machine, probably between F1 and F6)

2. Check whether the driver of the graphics card has been damaged. Cat/Pro/driver/NVIDIA/version, if not, it means there is a problem

3. Uninstall the installed graphics driver:

sudo apt purge nvidia-*

 sudo apt autoremove

4. Download the corresponding graphics card driver on the official website at: https://www.nvidia.com/Download/index.aspx After selecting the corresponding graphics driver, the downloaded file name is nvidia-linux-x86_ 64-390.77.run

5. Install graphics driver: sudo bashnvidia-linux-x86_ 64-390.77.run

6. Some inquiry information:

1)Accept License

2)The distribution-provided pre-install script failed! Are you sure you want to continue?-> CONTINUE INSTALLATION

3)Install NVIDIA’s 32-bit compatibility libraries?-> YES

4) An incomplete installation of libglvnd was found. Do you want to install a full copy of libglvnd? This will overwrite any existing libglvnd libraries.-> Install and overwrite existin

4) Would you like to run the nvidia-xconfig utility?-> YES

7. Installation completed

Solutions to Ubuntu forgetting password and root password

The root of Ubuntu is forbidden by default, and the password of root is not required to be set during installation. To use it, just set the password for root, sudo passwd root. If you just forget the password of ordinary users, you can change it with root. If you forget the root password, enter single user mode

Enter single user mode:

1. When booting to grub loading, please wait…, press ESC to enter the Startup menu, select the recovery mode of the corresponding kernel version, and press e to enter the editing state

2. Move the cursor, change “recovery nomodeset” to “rwsingleinit =/bin/bash”, and then press Ctrl + x to enter single user mode

Then we can use the command passwd to change the password

See: root @ (none):/# enter “passwd” immediately

See: enternewunix password: enter “123” immediately

See: retypenewunix password: enter “123” immediately

The new password is 123

4. Enter “reboot” enter! Can also ctraltdel. In short, restart it

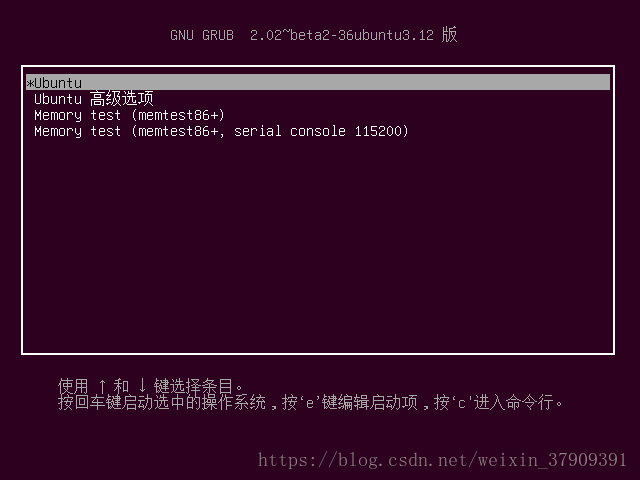
1. Start the system. During startup, press ESC or shift key repeatedly until the following interface appears:

Move up and down, select advanced options for Ubuntu (or some versions show advanced options for Ubuntu), and then press’ Enter ‘to enter the following interface

Select Ubuntu, with Linux 4.13.0-38-generic (recovery mode), as follows:

Press the ‘e’ key to enter the interface as follows

Move the cursor through the up and down left and right keys to find the line of Linux/boot /… Ro recovery nomodeset, as shown below

Change ro recovery nomodeset in the figure to quiet splash RW init =/bin/bash, and the result is as follows

Press’ Ctrl + x ‘for a few seconds to enter the interface as follows:

Enter the command passwd as follows

Press “enter”, the interface is as follows:

After entering the password once, press “enter” and press enter to enter the password again. The interface is as follows

After entering the password twice, press the “enter” key, and the interface is as follows:

The password is entered successfully

Restart the computer (if it is a virtual machine, restart the virtual machine), enter the terminal, enter the command Su – the interface is as follows

Enter the password you just set. The interface is as follows

Filesystem.squashfs error in installing Ubuntu – solution (for reference)

SquashfsErrors:

unable to boot from the Ubuntu LiveCD, due to SquashFS errors like this:

SQUASHFS error: sb_bread failed reading block 0x9d7f3
SQUASHFS error: Unable to read fragment cache block [275faa28]
SQUASHFS error: Unable to read page, block 275faa28, size 23a7

method1:adding the ide=nodma or acpi=off allowed them to work around this issuemethod2:

You can add those lines to the grub entry, either in the grub.conf file or either entering letter ‘e’ on the grub menu and after editing Control+x to boot:

Add to the grub line:

all_generic_ide pci=nommconf

Add to the kernel line:

ide=nodma acpi=off

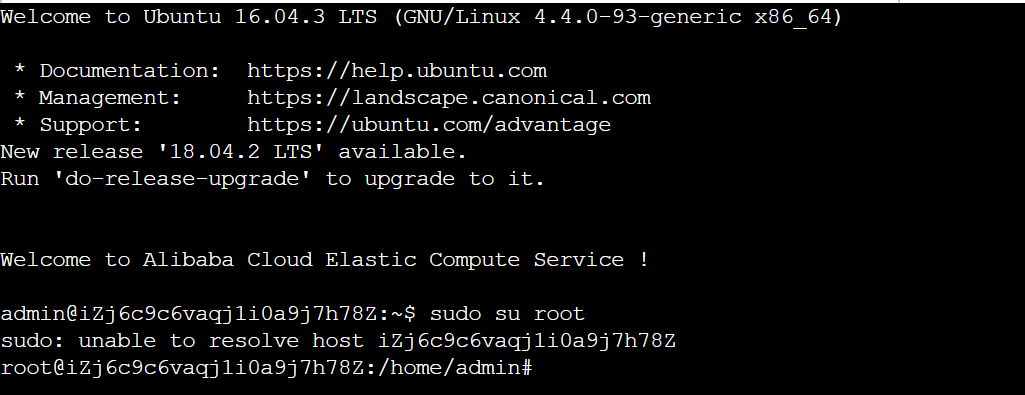
Ubuntu sudo: unable to resolve host

When you use SSH to connect to the lightweight application server Ubuntu instance of alicloud and execute the command sudo Su root, you will be prompted:

The basic use of sudo at the beginning of the command will prompt this information, looking more uncomfortable

Although sudo can still run normally, the warning message comes out every time. This is just a problem in the reverse solution of the machine, so you can set it directly from/etc/hosts, so that ABC (host name) can solve the IP of 127.0.0.1

Solutions

You need to modify the/etc/hosts file:

sudo vi /etc/hosts

In

127.0.0.1       localhost

Next add a record:

127.0.0.1         iZj6c9c6vaqj1i0a9j7h78Z

Or add to the following:

127.0.0.1        localhost     iZj6c9c6vaqj1i0a9j7h78Z

Type izj6c9c6vaqj1i0a9j7h78z

References

1. https://yq.aliyun.com/articles/495245

2. https://blog.csdn.net/skh2015java/article/details/80152730

Nginx Error when installing the startup service failed to start a high performance web server and a reverse proxy serve

Nginx Error when installing the startup service failed to start a high performance web server and a reverse proxy serve
ubuntu16.04
apt update
apt install -y nginx
service nginx start
Error:

root@zabbix:/home/appliance# systemctl status nginx.service

nginx.service - A high performance web server and a reverse proxy server
   Loaded: loaded (/lib/systemd/system/nginx.service; enabled; vendor preset: enabled)
   Active: failed (Result: exit-code) since Wed 2018-07-25 18:33:26 UTC; 1min 27s ago
  Process: 30040 ExecStart=/usr/sbin/nginx -g daemon on; master_process on; (code=exited, status=1/FAILURE)
  Process: 30037 ExecStartPre=/usr/sbin/nginx -t -q -g daemon on; master_process on; (code=exited, status=0/SUCCESS)

Jul 25 18:33:25 zabbix nginx[30040]: nginx: [emerg] listen() to [::]:80, backlog 511 failed (98: Address already in use)
Jul 25 18:33:25 zabbix nginx[30040]: nginx: [emerg] listen() to 0.0.0.0:80, backlog 511 failed (98: Address already in use)
Jul 25 18:33:25 zabbix nginx[30040]: nginx: [emerg] listen() to [::]:80, backlog 511 failed (98: Address already in use)
Jul 25 18:33:26 zabbix nginx[30040]: nginx: [emerg] listen() to 0.0.0.0:80, backlog 511 failed (98: Address already in use)
Jul 25 18:33:26 zabbix nginx[30040]: nginx: [emerg] listen() to [::]:80, backlog 511 failed (98: Address already in use)
Jul 25 18:33:26 zabbix nginx[30040]: nginx: [emerg] still could not bind()
Jul 25 18:33:26 zabbix systemd[1]: nginx.service: Control process exited, code=exited status=1

Jul 25 18:33:26 zabbix systemd[1]: *******Failed to start A high performance web server*** and a reverse proxy server.****

Jul 25 18:33:26 zabbix systemd[1]: nginx.service: Unit entered failed state.
Jul 25 18:33:26 zabbix systemd[1]: nginx.service: Failed with result 'exit-code'.

Error reason: you already have a process bound to HTTP port 80. You can run the command sudo lsof - I: 80 to get the list of processes using this port, and then stop/disable the web server
solution: you can run the command to stop the process using port 80 sudo fuser - K 80/TCP

How to Install and Configure VNC on Ubuntu 14.04

Step One — Install Desktop Environment and VNC Server

$ sudo apt-get update
$ sudo apt-get install xfce4 xfce4-goodies tightvncserver

Step Two — Configure VNC Server

$ sudo mv ~/.vnc/xstartup ~/.vnc/xstartup.bak
$ sudo nano ~/.vnc/xstartup

----------------------------------------
#!/bin/bash
xrdb $HOME/.Xresources
startxfce4 &
----------------------------------------

$ sudo chmod +x ~/.vnc/xstartup

Step Three — Create a VNC Service File

$ sudo nano /etc/init.d/vncserver

------------------------------------------------------------------------
#!/bin/bash
PATH="$PATH:/usr/bin/"
export USER="user"
DISPLAY="1"
DEPTH="16"
GEOMETRY="1024x768"
OPTIONS="-depth ${DEPTH} -geometry ${GEOMETRY} :${DISPLAY}"
. /lib/lsb/init-functions

case "$1" in
start)
log_action_begin_msg "Starting vncserver for user '${USER}' on localhost:${DISPLAY}"
su ${USER} -c "/usr/bin/vncserver ${OPTIONS}"
;;

stop)
log_action_begin_msg "Stopping vncserver for user '${USER}' on localhost:${DISPLAY}"
su ${USER} -c "/usr/bin/vncserver -kill :${DISPLAY}"
;;

restart)
$0 stop
$0 start
;;
esac
exit 0
------------------------------------------------------------------------

$ sudo chmod +x /etc/init.d/vncserver
$ sudo service vncserver start

PS:how-to-install-and-configure-vnc-on-ubuntu-14-04,