Tag Archives: Windows

Solution for docker under windows:This error may also indicate that the docker daemon is not running.

error during connect: Get http://%2F%2F.%2Fpipe%2Fdocker_engine/v1.35/info: open //./pipe/docker_engine: The system cannot find the file specified. In the default daemon configuration on Windows, the docker client must be run elevated to connect. This error may also indicate that the docker daemon is not running.

How to Solve this error:

cd "C:\Program Files\Docker\Docker"
./DockerCli.exe -SwitchDaemon

After the above operation, the problem is solved


Remote connection to Ubuntu 14.04 desktop environment through VNC under Windows

1. Install xrdp

Windows remote desktop uses RDP protocol, so you need to install xrdp on Ubuntu first, and search for xrdp installation in the Ubuntu software center. Installation

xrdp will be automatically installed at the same time

vnc4server

XBASE clients component or terminal command line input installation:

sudo apt-get install xrdp vnc4server xbase-clients

2. Set on

After the installation, open the “desktop sharing” option in the/usr/share/applications directory, and further set the desktop sharing option. The first step is to turn on sharing, including whether other users are allowed to control, whether local confirmation is required when remote connection, and the password of remote connection. If you need to access this Ubuntu computer from the public network, that is, the external network, you need to open the “automatic configuration of UPnP router open and forward port project”. General suggestions are as follows:

If above 13.04 has been set, but Ubuntu 14.04 is unable to connect correctly, the security level will be displayed, and we need to continue to configure.

1. Install dconf editor;

sudo apt-get install dconf-editor

2. You need to adjust through dconf editor, open the terminal (shortcut key: Ctrl + Alt + T), enter the command: dconf editor, and then access the following configuration path: org > gnome > desktop > remote-access;

3. Uncheck the “prompt enabled” and “requlle encryption” attributes.

3. Start connecting

Back to windows, use VNC viewer to input the IP address of Ubuntu, as shown in the figure below:

Click Connect, and then enter the set access password to OK, and the graphical interface will appear

Go to: install C extended compiler environment of Python under windows (solve the problem of “unable to find vcfarsall. Bat”

Individual articles are original or translated unless reprinted

Individual articles are welcome to be reprinted in various forms, but those over 18 years old are requested to indicate the source of the article, respect my labor and your intelligence

Link to this article: http://www.cnblogs.com/fbwfbi/p/4509622.html

N hasn’t started blogging for a long time. I always feel that I need to remember something casually. I’ve lost some things, technologies and tools. I’d better record every bit of them

In windows, PIP is used to install some third-party libraries of Python. Many of them use C to write some extensions and need to use VC + + compiler to compile and install (or use MinGW, generally not recommended). Otherwise, it will appear “ unable to find vcfarsall. Bat “. For example, python 2.7 needs to use VS2008 C + + compiler, while python3 to python3.4 (python3.5 will use vs2015) will use VS2010 to compile. However, anyone who has ever installed vs, a huge and bloated IDE, knows that it comes with a lot of Microsoft plug-ins that you don’t know whether they are useful or not. They occupy a lot of space on C disk and start slowly, although the interface function of IDE is barely passable. If the computer configuration is general, this thing will make n cards, generally do not do related development, there is no need to install the entire vs. For Python 2.7, Microsoft has a conscience. It directly launched Microsoft Visual C + + compiler for Python 2.7, which can be downloaded and installed directly. Then, in the start menu – “all programs”, find the corresponding directory, and according to your platform and python Version (select x86 or x64), click the corresponding command prompt to run. In this CMD window, you can enter the set command to check the environment variables. It is found that the parameters include =, path =, lib =, and libpath = have been set, so you can enter them directly

pip install numpy

You can install and compile the corresponding third-party modules and libraries. Sometimes the compilation process is long and you need to wait patiently

But for Python 3, it’s not so convenient. Because my Python 3.4 is 64 bit, it’s obviously impossible to use VS2010 express directly, because it only has x86 version by default, not 64 bit. Refer to a question and answer in stack overflow

Python PIP has issues with path for MS Visual Studio 2010 Express for 64-bit install on Windows 7

According to the above suggestions, I get the corresponding solution on this machine. First install VS2010 express, then install windows SDK 7.1, and finally install a 64 bit compiler patch

  Microsoft SDK 7.1 (Windows 7)

  VC-Compiler-KB2519277

PS: before installing SDK 7.1, please uninstall VC redistribute 2010 related component packages (including x86 and x64), otherwise an error will be reported

After completing the above steps, the basic MSVC compilation environment (including x64) has been configured. However, if you compile a project in the future, such as building a Qt5 project, the following errors will appear:

c:\program files (x86)\microsoft visual studio 10.0\vc\include\intrin.h(26):fatal error C1083: Cannot open include file: ‘ammintrin.h’: No such file or directory

At this time, you can download the corresponding ammintrin. H from the Internet, and put it in the directory of C:// program files (x86) \ \ Microsoft Visual Studio 10.0 \ \ VC \ \ include \, which can be downloaded from the following Baidu Library:

ammintrin. H header file, which is required after installing kb2519277 patch in Windows SDK 7.1

After installation, in the start menu, find “windows SDK 7.1 command prompt”, click Run, and set the corresponding compilation environment through setenv in the shell, as shown in the following figure:

After setting “setenv/x64”, you can install the corresponding package in the 64 bit compiling environment

At this point, you may need to mention that after setting up the environment, you can install numpy in Python 2.7 and python 3.4 respectively. You find that py2 is OK, but PY3 fails to install and compile link (you have tested it in the virtual machine before, but PY3 installation is OK). Why?Please compare the following two pictures:

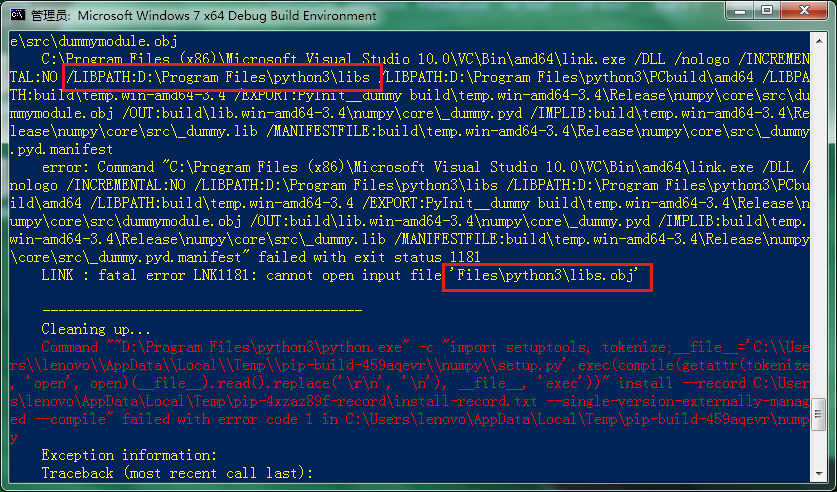
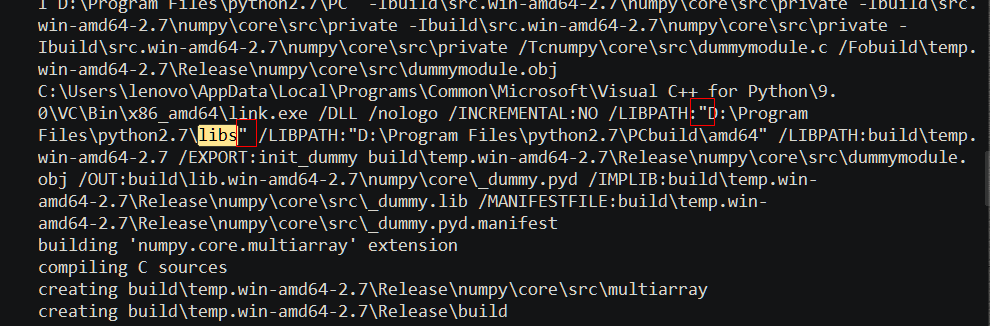
Obviously, when py2 is installed, libpath under the link command line uses “” to cause it. Therefore, the path with spaces will not partition the parameters. PY3 is not so detailed. I don’t know whether it is the fault of PIP and setuptools calling the CMD command or the bug in distutils. Anyway, the installation path of PY3 can’t have spaces. So I adjusted the installation path of python3, that is, there is no space, and the compilation is successful

Of course, this is just a VC + + compilation environment. For a numerical calculation library like SciPy, you need a FORTRAN compiler to install it. Obviously, the compilation and installation under windows is far less convenient than that under Linux (except that the package name is not easy to remember and the package dependence is troublesome). GCC and gfortran are ready-made, and apt get is also ready-made. Therefore, if you develop and test under windows, you can directly use a large number of compiled and packaged windows wheel installation packages provided by the University of California, Irvine (UCI), which contain numpy, SciPy, Matplotlib and other module libraries for numerical analysis and scientific calculation, and all of them are MKL versions. Download the corresponding version and directly use “PIP install XXX. WHL” to complete the installation. The WHL file is just like a zip file. You can also use the compression software to unpack it and put it in the corresponding lib/site packages directory. Of course, you can also use the python customized environment version Anaconda , which has directly integrated the above packages, including the easy-to-use repl tool like IPython and CONDA package management

Windows php Call to undefined function curl_init()

Apache 2.4, php-5.6.30 under win10

Call to undefined function curl_ init()。

1. Confirm extension_ Dir = “PHP extended directory”

2. Confirm extension = PHP_ The comment of curl.dll has been removed, and PHP does exist in the EXT directory_ curl.dll。

If curl still doesn’t work

The reason is that libeay32.dll, ssleay32.dll and libssh2.dll, which curl depends on, cannot be loaded. These three files are in the PHP installation directory

Many people on the Internet say that as long as libeay32.dll and ssleay32.dll are used, I can’t test them. If curl is not turned on, libssh2.dll is still needed

Method 1: copy them to the bin directory of Apache, restart Apache, and start curl of PHP successfully

Method 2: add the PHP installation directory to the environment variable, restart Apache, and succeed

PS: I have tried these two methods

Add in Apache’s configuration file httpd.conf

LoadFile "D:/wamp/php-5.6.30/php5ts.dll"
LoadFile "D:/wamp/php-5.6.30/libeay32.dll"
LoadFile "D:/wamp/php-5.6.30/ssleay32.dll"
LoadFile "D:/wamp/php-5.6.30/libssh2.dll"

, test result: invalid

Wnmp environment configuration (Windows + nginx + MySQL + PHP)

1. Packages to be prepared:
nginx: http://nginx.org Here I download the latest version of 1.11.13
PHP: http://windows.php.net/download (Note: PHP in nginx runs in fastcgi mode, so download PHP package of non ready-made security NTS)
runhiddenconsole: RunHiddenConsole.zip Used to write quick start and stop programs

2. Installation and configuration. Create a new directory D: wnmp
1. Installation and configuration of PHP:
decompress and rename the downloaded PHP package php-5.6.30-nts-win32-vc11-x64 to PHP5 to form the path D: wnmp Go down and find it

;extension=php_mysql.dll
;extension=php_mysqli.dll

Remove the front “;” and add MySQL extension to make PHP support mysql. Later, you can add other extensions as needed, all of which are to remove the semicolon.
Next, configure PHP to work with nginx. Find out; cgi.fix_ Pathinfo = 1, remove the semicolon. This step is very important. This is the CGI setting of PHP.

cgi.fix_pathinfo=1

2. Nginx installation and configuration:
unzip the downloaded nginx-1.11.13 package to the wnmp directory, named nginx. Enter the nginx/conf directory and open the configuration file nginx.conf , find

location/{
  root  html;  #This is the root directory of the site, in nginx/html
  index index.html index.htm;
}

Change to:

location/{
    root  D:/wnmp/www;  #Specify the site root directory as D:/wnmp/www
    index index.php index.html index.htm; # Add index.php, giving priority to parsing php files
}

Further down, find it

#location ~ \.php$ {
#    root           html;
#    fastcgi_pass   127.0.0.1:9000;
#    fastcgi_index  index.php;
#    fastcgi_param  SCRIPT_FILENAME  /scripts$fastcgi_script_name;
#    include        fastcgi_params;
#}

First, remove the previous “#”, then change root HTML; to root D/wnmp/www, and then change/scripts to $document_ Root, here’s “$document_ “Root” is the site path specified by “root” above. The results are as follows

location ~ \.php$ {
    root           D:/wnmp/www;
    fastcgi_pass   127.0.0.1:9000;
    fastcgi_index  index.php;
    fastcgi_param  SCRIPT_FILENAME  $document_root$fastcgi_script_name;
    include        fastcgi_params;
}

Just save the configuration file. In this way, the environment of nginx + PHP is initially configured. You can enter the command to start PHP, and start nginx manually, and create a new one in the directory D:: (wnmp) www phpinfo.php File to test whether it works.

3. Write quick start and stop scripts
to download the RunHiddenConsole.zip The files are decompressed and stored in the directory D/wnmp (or nginx), RunHiddenConsole.exe The function of the script is to automatically close the script after executing the command line script, and the process opened in the script will not be closed. Create a script named“ start.bat “, the content is as follows:

@echo off
REM Windows 
REM set PHP_FCGI_CHILDREN=5

REM Maximum number of requests per process, or set as a Windows environment variable
set PHP_FCGI_MAX_REQUESTS=1000

echo Starting PHP FastCGI...
RunHiddenConsole D:/wnmp/php5/php-cgi.exe -b 127.0.0.1:9000 -c D:/wnmp/php5/php.ini

echo Starting nginx...
RunHiddenConsole D:/wnmp/nginx/nginx.exe -p D:/wnmp/nginx

Create another one called“ stop.bat “To close nginx and PHP:

@echo off

echo Stopping nginx...
taskkill /F /IM nginx.exe > null

echo Stopping PHP FastCGI...
taskkill /F /IM php-cgi.exe > null

exit

After completion, the D/wnmp directory is as follows:

In this way, the service scripts are created. double-click start.bat You can see that there are two in the process manager nginx.exe Process and a PHP- cgi.exe Process.

3、 test: create a new file in the site directory D/wnmp/www phpinfo.php The contents are as follows:

<?php
	phpinfo();	
?>

After saving, the browser accesses“ http://localhost/phpinfo.php ”, see the following information, that windows nginx + PHP development environment has been configured successfully!

Testing MySQL database connection: please see another article about MySQL service. Under D/wnmp/www, create a new index.php The contents are as follows:

<?php 
	if (mysqli_connect("localhost","root","root")) {
		echo "successful!";
	}else{
		echo "error...";
	}
 ?>

Browser anti question“ http://localhost/index.php “, see the following prompt successful! It indicates that all wnmp development rings are configured successfully!

improvement: in step 3 above, when writing quick start script, use% ~ DP0 instead of absolute path D/wnmp .

@echo off
REM Windows
REM set PHP_FCGI_CHILDREN=5

REM Maximum number of requests per process, or set as a Windows environment variable
set PHP_FCGI_MAX_REQUESTS=1000

echo Starting PHP FastCGI...
RunHiddenConsole %~dp0/php5/php-cgi.exe -b 127.0.0.1:9000 -c %~dp0/php5/php.ini

echo Starting nginx...
RunHiddenConsole %~dp0/nginx/nginx.exe -p %~dp0/nginx

% – DP0 refers to the current drive letter plus path, which can only be used in batch file. Bat. works the same as% CD%, but% CD% can be used in batch files or on the command line.

In this way, when the wnmp folder path changes (such as moving from disk d to disk E), there is no need to change the script file.

Use the SC command to manage windows services manually

When you need to manage (add, delete, modify, etc.) system services in Windows system, you can use the SC command provided by Windows system to manage system services.

(take Windows 7 as an example)

Most of the “command parameters” in the SC command need to be “run as an administrator” (that is, start the CMD command line window as an administrator, and then execute the relevant commands in the command line window; note that any command executed in the command line window will be executed with the administrator’s permission. The operation method of starting the CMD command line window as an administrator: click the start menu, input the CMD letter in the “search program and file” input box at the bottom of the start menu, and display the CMD letter in the “program” at the top of the menu cmd.exe Click the right mouse button above, click the “run as administrator (a)” menu item, and click “yes” in the new pop-up “user account control” dialog box to open the “run as administrator” command line window.) Therefore, the following “run as administrator” all the SC command operations.

View SC command help

Execute the SC command without parameters to view the help information; that is, enter SC in the command line window and enter. As a rule, I am used to adding /?To check the help content: SC /

SC command format

sc [server] <command> <ServiceName> [OptionName= “value”] [“option2”]

(according to convention, in the above parameters, the options wrapped by “bracket [XXX]” are expressed as “optional”, and the options wrapped by “angle bracket & lt; XXX &>” are expressed as “required”; the actual command should not include the bracket or angle bracket symbol.)

Server: when managing a remote machine, it can be the machine name or IP address, for example, \ \ \ \ Myserver or \ \ \ 192.168.0.1. You can omit this item when managing this machine.

Command: command parameter. Such as create, description, config, query, start, stop, delete, etc. (Note: you can execute the query command as an ordinary user without trying other command parameters that are not listed).

Servicename: a user-defined non repeatable service name, which is used for subsequent operations (similar to the role of the unique primary key of database records).

Optionname = “value”: “option name” and “option value”, setting related options and values. The option value can be enclosed in double quotation marks. Note that there must be an English space after the equal sign; if the option value in the command needs to be nested in double quotation marks, use the backslash and quotation mark “\” to escape.

Option 2: option value without option name, which can be enclosed in double quotation marks.

Examples

(take managing nginx services as an example)

Add service

sc create Nginx1.12.0 binpath= “D:\GreenSoftwares\nginx-1.12.0\ nginx.exe -P \ “D/greensoftwares/nginx-1.12.0 \” displayName = nginx web server http://nginx.org ” start= delayed-auto

Nginx1.12.0, which is immediately after the create command, is a custom service name (no spaces)

Binpath: the command to be executed when starting the service (note that there must be an English space to the right of the equal sign, the same below)

DisplayName: user defined display name of the service

Start: the start type of the service. For example: boot, system, demand, auto, delayed auto, disabled.

Set the description information for the service

SC description nginx1.12.0 “start or stop nginx server”

Modify service configuration

Use the SC config command to modify one or more configuration information of existing services.

Modify display name: SC config nginx1.12.0 displayName = “nginx server v1.12.0”

Modify start type: SC config nginx1.12.0 start = Auto

View service status

sc query Nginx1.12.0

Start the service

SC start nginx1.12.0, the command will not output startup information (or net start nginx1.12.0, it will output startup information)

Stop service

SC stop nginx1.12.0, the command will not output stop information (or net stop nginx1.12.0, it will output stop information)

Delete service

sc delete Nginx1.12.0

References and notes

I am used to downloading and using the green version (that is, zip compressed version) of MySQL database, so I need to add the MySQL database as a system service

REM fileName: installServiceForMySQL.bat
REM Run as administrator: Save the following contents to a bat file [change the path to the actual path] and right click on the file name and select "Run as administrator (A)".

REM Place this file in the /bin/ directory under the MySQL directory; then change the path of the ini file to the real path with the following parameters
D:/mysql-5.5.16-winx64/bin/mysqld.exe --install-manual MySQL5.5.16 --defaults-file="D:/mysql-5.5.16-winx64/my-medium.ini"

REM Modify MySQL service startup mode: [demand (manual start), auto (auto start), delayed-auto (auto start-delayed start), disabled (disabled start)
sc config MySQL5.5.16 start= auto
REM Add description information to the MySQL service.
sc description MySQL5.5.16 "Start, stop MySQL database services"

Right click the “computer” icon on the windows desktop and select “management (g)” to quickly enter the “computer management” interface. The “services” item is included under “services and Applications”. Press F5 to refresh the list of services.