Author Archives: Robins

[Solved] webview Switch Error: Failed to start Chromedriver session: Failed to get sockets matching: @weblayer_devtools_remote_.*4738

def switch_to_webview_wx(self):
    # context = 'WEBVIEW_com.tencent.mm:tools'
    context = 'WEBVIEW_com.tencent.mm:toolsmp'
    self.__switch_to(context)
    time.sleep(3)
    self.__sel_handle()

When switching webview, throwing exceptions, the context I was using before was: WEBVIEW_com.tencent.mm:tools, then it became WEBVIEW_com.tencent.mm:toolsmp

Only modify the value of context, still the same error is reported, see the log has loaded “androidProcess”: “com.tencent.mm:tools”,


Solution:

Modify desired_caps to “androidProcess”: “com.tencent.mm:toolsmp”, and it works!

"appPackage"      :   "com.tencent.mm",
"appActivity"     :   ".ui.LauncherUI",
"app"             :   "",
"noReset"         :   true,
"fullReset"       :   false,
"noSign"          :   true,
"unicodeKeyboard" :   true,
"resetKeyboard"   :   true,
"skipServerInstallation" : true,
"skipDeviceInitialization" : true,
"chromedriverExecutableDir" : "\\res\\chromedriver\\",
"chromedriverChromeMappingFile" : "\\res\\chromedriver\\chromedriver.json",
"chromeOptions"   :   {
      "androidProcess" : "com.tencent.mm:toolsmp"
}
 1 [Chromedriver] Attempting to use Chromedriver-Chrome mapping from 'D:\jiaolt\A_SVN_AUTO\auto_mwp\auto_mwp\res\chromedriver\chromedriver.json'
 2 [Chromedriver] No file found at 'D:\jiaolt\A_SVN_AUTO\auto_mwp\auto_mwp\res\chromedriver\chromedriver.json'. Using default mapping
 3 [Chromedriver] Found 4 executables in 'D:\jiaolt\A_SVN_AUTO\auto_mwp\auto_mwp\res\chromedriver\'
 4 [Chromedriver] Cannot retrieve version number from 'readme.md' Chromedriver binary. Make sure it returns a valid version string in response to '--version' command line argument. spawn UNKNOWN
 5 [Chromedriver] The following Chromedriver executables were found:
 6 [Chromedriver]     'D:/jiaolt/A_SVN_AUTO/auto_mwp/auto_mwp/res/chromedriver/chromedriver89.exe' (version '89.0.4389.23', minimum Chrome version 'Unknown')
 7 [Chromedriver]     'D:/jiaolt/A_SVN_AUTO/auto_mwp/auto_mwp/res/chromedriver/chromedriver_77_0_3865_40.exe' (version '77.0.3865.40', minimum Chrome version 'Unknown')
 8 [Chromedriver]     'D:/jiaolt/A_SVN_AUTO/auto_mwp/auto_mwp/res/chromedriver/chromedriver_74_0_3729_6_AN9_P30 .exe' (version '74.0.3729.6', minimum Chrome version '74.0.3729')
 9 [ADB] Getting package info for 'com.android.chrome'
10 [ADB] Running 'D:\tools\Android\android_sdk\platform-tools\adb.exe -P 5037 -s 3fc24606 shell dumpsys package com.android.chrome'
11 [Chromedriver] Unable to discover Chrome version. Using Chromedriver 89.0.4389.23 at 'D:/jiaolt/A_SVN_AUTO/auto_mwp/auto_mwp/res/chromedriver/chromedriver89.exe'
12 [Chromedriver] Set chromedriver binary as: D:/jiaolt/A_SVN_AUTO/auto_mwp/auto_mwp/res/chromedriver/chromedriver89.exe
13 [Chromedriver] Killing any old chromedrivers, running: wmic process where "commandline like '%chromedriver.exe%--port=8000%'" delete
14 [Chromedriver] Successfully cleaned up old chromedrivers
15 [Chromedriver] Cleaning any old adb forwarded port socket connections
16 [ADB] List forwarding ports
17 [ADB] Running 'D:\tools\Android\android_sdk\platform-tools\adb.exe -P 5037 -s 3fc24606 forward --list'
18 [Chromedriver] Spawning chromedriver with: D:/jiaolt/A_SVN_AUTO/auto_mwp/auto_mwp/res/chromedriver/chromedriver89.exe --url-base=wd/hub --port=8000 --adb-port=5037 --verbose
19 [Chromedriver] Chromedriver version: '89.0.4389.23'
20 [WD Proxy] Matched '/status' to command name 'getStatus'
21 [WD Proxy] Proxying [GET /status] to [GET http://127.0.0.1:8000/wd/hub/status] with no body
22 [WD Proxy] Got response with status 200: {"value":{"build":{"version":"89.0.4389.23 (61b08ee2c50024bab004e48d2b1b083cdbdac579-refs/branch-heads/4389@{#294})"},"message":"ChromeDriver ready for new sessions.","os":{"arch":"x86_64","name":"Windows NT","version":"6.1.7601 SP1"},"ready":true}}
23 [Chromedriver] Starting W3C Chromedriver session with capabilities: {
24 [Chromedriver]   "capabilities": {
25 [Chromedriver]     "alwaysMatch": {
26 [Chromedriver]       "goog:chromeOptions": {
27 [Chromedriver]         "androidPackage": "com.tencent.mm",
28 [Chromedriver]         "androidUseRunningApp": true,
29 [Chromedriver]         "androidProcess": "com.tencent.mm:tools",
30 [Chromedriver]         "androidDeviceSerial": "3fc24606"
31 [Chromedriver]       },
32 [Chromedriver]       "goog:loggingPrefs": {
33 [Chromedriver]         "browser": "ALL"
34 [Chromedriver]       }
35 [Chromedriver]     }
36 [Chromedriver]   }
37 [Chromedriver] }
38 [WD Proxy] Matched '/session' to command name 'createSession'
39 [WD Proxy] Proxying [POST /session] to [POST http://127.0.0.1:8000/wd/hub/session] with body: {"capabilities":{"alwaysMatch":{"goog:chromeOptions":{"androidPackage":"com.tencent.mm","androidUseRunningApp":true,"androidProcess":"com.tencent.mm:tools","androidDeviceSerial":"3fc24606"},"goog:loggingPrefs":{"browser":"ALL"}}}}
40 [WD Proxy] Got an unexpected response with status 500: {"value":{"error":"unknown error","message":"unknown error: Failed to get sockets matching: @weblayer_devtools_remote_.*4738\n  (make sure the app has its WebView/WebLayer configured for debugging)","stacktrace":"Backtrace:\n\tOrdinal0 [0x0018E7D3+124883]\n\tOrdinal0 [0x0018E7B1+124849]\n\tGetHandleVerifier [0x003D8688+193832]\n\tGetHandleVerifier [0x003C1DCE+101486]\n\tGetHandleVerifier [0x003C93BA+131674]\n\tGetHandleVerifier [0x003C8DF4+130196]\n\tGetHandleVerifier [0x003EE860+284416]\n\tGetHandleVerifier [0x003EE035+282325]\n\tGetHandleVerifier [0x00414A90+440624]\n\tGetHandleVerifier [0x004147FC+439964]\n\tGetHandleVerifier [0x0041154B+426987]\n\tGetHandleVerifier [0x003F4FFD+310941]\n\tGetHandleVerifier [0x003F5D8E+314414]\n\tGetHandleVerifier [0x003F5D19+314297]\n\tGetHandleVerifier [0x004B31EC+1089676]\n\tGetHandleVerifier [0x004B17C9+1082985]\n\tGetHandleVerifier [0x004B13A3+1081923]\n\tGetHandleVerifier [0x005AD9FD+2115741]\n\tOrdinal0 [0x002DB82E+1488942]\n\tOrdinal0 [0x00275A7D+1071741]\n\tOrdi...
41 [W3C] Matched W3C error code 'unknown error' to UnknownError
42 [Chromedriver] Failed to start Chromedriver session: An unknown server-side error occurred while processing the command. Original error: unknown error: Failed to get sockets matching: @weblayer_devtools_remote_.*4738
43 [Chromedriver]   (make sure the app has its WebView/WebLayer configured for debugging)
[Solved] nvidia-smi Error: Failed to initialize NVML: Driver/library version mismatch

Record the problems and solutions encountered when configuring CUDA environment, which has been convenient for future verification:

problem

When the terminal inputs NVIDIA-SMI, the following error is reported:

Failed to initialize NVML: Driver/library version mismatch

The reason for this situation is that the NVIDIA kernel driver version and the system driver do not match.

Most of the cases of this error may be the NVIDIA driver is installed in the low version, due to the system update, the kernel version upgrade led to NVIDIA can not be applied in the high kernel version, the new version of the kernel and the graphics driver does not match, the graphics driver version is too low!

In my case, when I configured a low version of cuda, I accidentally lowered the version of the graphics driver, resulting in an error due to its inconsistency with the system kernel version. In order to restore the previous version, here I solved the problem by reinstalling the corresponding version of the graphics card driver.

Installing the graphics card driver

For the method of this step, please refer to method 2 in this blog. Thank you very much!!

Step 1: install the graphics card driver PPA

The website of NVIDIA’s official PPA is: https://launchpad.net/ ~Graphics drivers/+ archive/Ubuntu/PPA, you can view all graphics card drivers.

lspci | grep NVIDIA #Check the PCIE installed graphics card on your computer, theoretically you don't need to check, you should know it on your own computer
sudo add-apt-repository ppa:graphics-drivers/ppa # Add the graphics card installation source

The installation process of NVIDIA graphics card can take any time for NVIDIA graphics card installation. Press enter in the middle to continue. (because the problem has been solved when writing this blog, there is no way to release the screenshot of the process. For details, please refer to the blog in the link)

NVIDIA PPA is installed into the cache of apt package repository Update it later.

sudo apt update

Step 2: find the appropriate graphics card driver

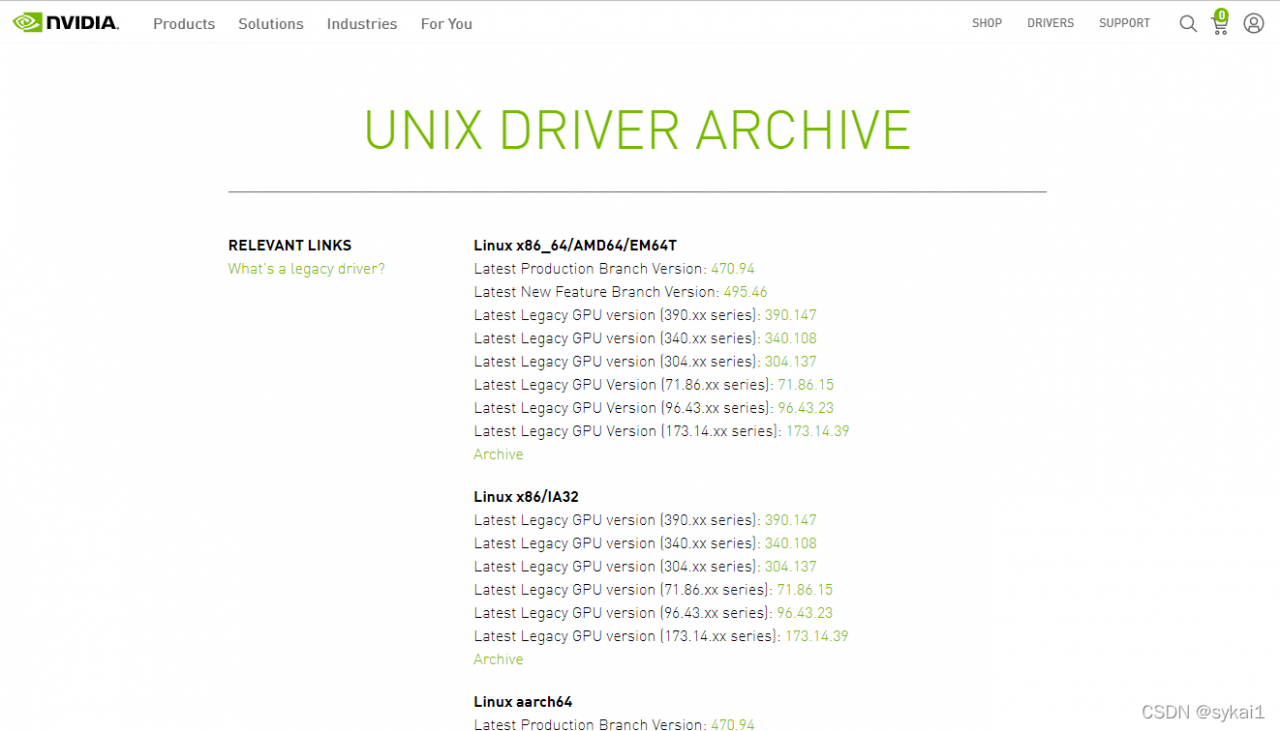
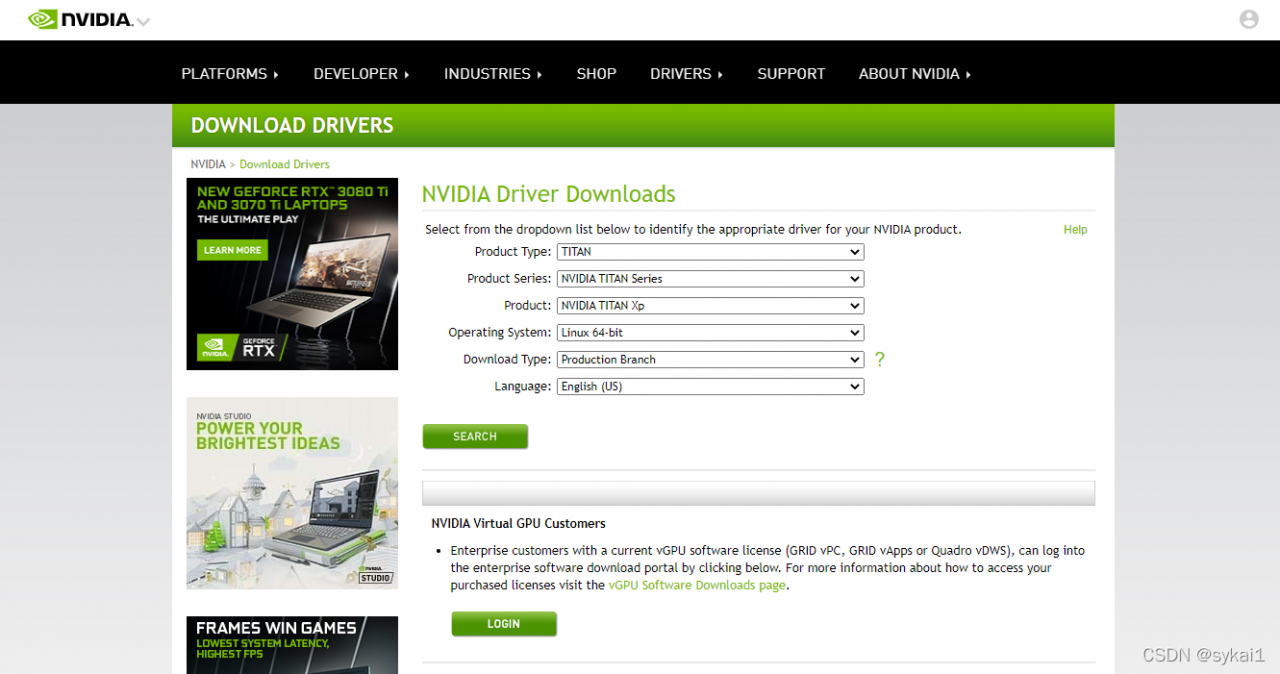
Open the graphics card driver query website:

When my graphics card is Titan XP, find the corresponding option and click search to query

You can see that currently (2022.1.14), the driver version number of my graphics card is 470.94. Verify whether the driver version of the graphics card can be installed initially. You can visit the link and view it according to the system type

Use the following command to search the PPA for the 470 Version (no need to pay attention to the number after the decimal point) of the graphics card driver:

apt search nvidia-470

Good luck, just have; If not found, you can search and use it from high to low according to all available graphics card driver versions in the above web page.

Step 3: remove the previously installed graphics card driver on the system

sudo apt purge nvidia*

This instruction will remove all the graphics card drivers and CUDA used. When the graphics card driver remains unchanged, it will simply upgrade CUDA and delete the previous CUDA version.

Step 4: install the graphics card driver

In this step, use the following commands to install:

sudo apt install nvidia-driver-470

Step 5: restart the computer and verify

sudo reboot
nvidia-smi
lsmod | grep nvidia
nvcc --version


AccessBlank Page: js File Error: failed(ERR_CONTENT_LENGTH_MISMATCH)

problem

Today, when I open my personal homepage http://cdfive.com to find that it is blank, I can display it after F5 refresh several times.
In chrome Ctrl+Shift+N open a new window to visit again, the page shows blank, after many times F5 refresh still blank.
F12 open the console, in Network, I see that the jquery.js that get the home page inside the error, status is FAILED, click FAILED to expand the error message as net::ERR_CONTENT_LENGTH_MISMATCH.
In the Console also see the error, jquery.js failed to get the home page js error.

net::ERR_CONTENT_LENGTH_MISMATCH 200
(index):13 Uncaught ReferenceError: $ is not defined
    at (index):13

Analysis:
Check the Nginx log
cd /usr/local/nginx/
tail -fn 50 error.log

2022/01/15 16:01:29 [crit] 4775#0: *703880 writev() "/usr/local/nginx/proxy_temp/7/24/0000042247" failed (28: No space left on device) while reading upstream, client: x.x.x.x, server: xxx.com, request: "GET /.../jquery.1.10.2.js HTTP/1.1"
, upstream: ...

Through DF - H , it is found that the disk space is 100%

Solution:

Starting from the/root directory, use the command:

du -sh *

du -h --max-depth=1

Find directories that take up more space

It is found that there are too many sentinel log files in the /root/logs/CSP directory

cd /root/logs/csp

ll | wc -l

There are 5351 log files.

rm -rf *.2021*

ll | wc -l

Delete the log files in 2021, and 241 files remain, freeing up 15g of space

Then DF -H, 61% disk space

Visit the home page again, the page display is OK, and the nginx log is normal.

[Solved] docker nginx localhost connection refused connect() failed (111: Connection refused)while connecting to upstream

problem

Visit nginx 502 bad gateway

connect() failed (111: Connection refused)while connecting to upstream

Possible causes 1 docker network problems

The bridge used by docker nginx container (default), and the forwarded service and nginx are on the same machine, but not in the same container, and nginx.conf proxy_pass  is localhost/127.0.0.1

Solution 1:

proxy_pass use intranet (starting with 172/10)/public address IP addr view the address of the machine.

Solution 2:

When starting the nginx container, use --net=host to specify the same network as the host.

docker run --name some-nginx --net=host -v /home/docker/nginx:/etc/nginx -v /home/docker/nginx/logs:/opt/app/logs -d nginx

Possible question 2 is the service started or not?

Make sure the service starts normally docker ps check whether the service exists;

Ensure proxy_ The port of pass is consistent with the service port being forwarded. Use telnet IP port to test

Possible question 3: is the port open

For ECS, if the proxy address is not the local IP address, please open the corresponding port in the corresponding security policy

[Solved] SSZipArchive Decompress Error: failed to open file in zip file

1. Add manually and drag ssziparchive library directly, and an error will be reported

Error Domain=SSZipArchiveErrorDomain Code=-2 “failed to open file in zip file”

2. Solution

Notes for using ssziparchive:

Add the following GCC_ PREPROCESSOR_ DEFINITIONS:

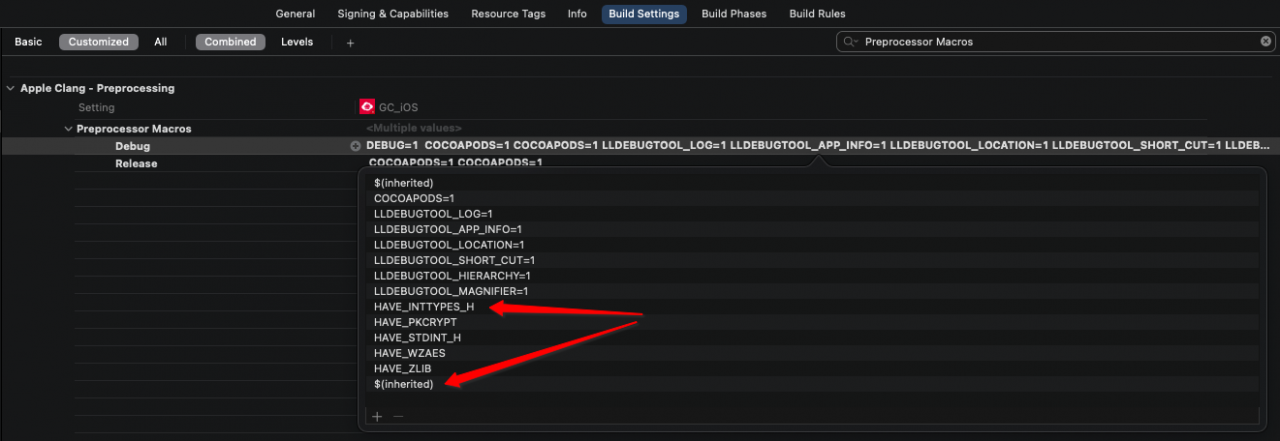
HAVE_ INTTYPES_ H HAVE_ PKCRYPT HAVE_ STDINT_ H HAVE_ WZAES HAVE_ ZLIB $(inherited).

build Setting-Preprocessor Macros–Multiple values (Double-Click), add the following codes:

HAVE_INTTYPES_H HAVE_PKCRYPT HAVE_STDINT_H HAVE_WZAES HAVE_ZLIB $(inherited)

Screenshot:

[Solved] Maven Error: Failed to execute goal org.apache.maven.plugins:maven-clean-plugin:2.5:clean

Maven compile error, whether it is mvn clean or mvn build will appear this error: Failed to execute goal org.apache.maven.plugins:maven-clean-plugin:2.5:clean, and the code does not have any compile error, just can not packaged.
Later found that the prompt cann-t delete target this folder, I manually in the local directory is no way to delete, forced to delete, mvn clean is OK, but still can not packaged, and then checked to find that my code is a startup a note configuration problems, after the note, everything is normal ~ ~

1, manually delete the target folder in the directory.
2, check your code, there is no runtime error, when playing jar packages, may also load the contents of the annotation.

Failed to execute goal org.springframework.boot:spring-boot-maven-plugin:2.3.5. RELEASE:repackage (repackage) on project tristone-boot-module-system: zip file is empty

install package error: Failed to execute goal org.springframework.boot:spring-boot-maven-plugin:2.3.7.RELEASE:repackage (repackage) on project

install package error:
Failed to execute goal org.springframework.boot:spring-boot-maven-plugin:2.3.7.RELEASE:repackage (repackage) on project zbbzfw-common: Execution repackage of goal org.springframework.boot:spring-boot-maven-plugin:2.3.7.RELEASE:repackage failed: Unable to find main class

Solution:

Comment out the following codes in pom.xml file:

<!--    <build>-->
<!--        <plugins>-->
<!--            <plugin>-->
<!--                <groupId>org.springframework.boot</groupId>-->
<!--                <artifactId>spring-boot-maven-plugin</artifactId>-->
<!--            </plugin>-->
<!--        </plugins>-->
<!--    </build>-->

[Solved] APCU Exetend php-fpm Start Error: PHP Startup: apc_mmap: mmap failed: inUnknown on line 0

When the APCU extension is installed and PHP FPM is started, an error is reported: Note: PHP message: PHP fatal error: PHP startup: APC_ mmap: mmap failed: in Unknown on line 0

The reason is shm_size setting is too large.

Solution: Just set shm_size to make the size configuration smaller

As follows:
apc.shm_size=1024M

apc.shm_size=1024M

[Solved] pip Install software Error: Command “python setup.py egg_info” failed with error code 1 in /tmp/pip-build*

pip install software error: Command “python setup.py egg_info” failed with error code 1 in /tmp/pip-build-*(where x is related to the software to be installed)
e.g. pip install pyparsing==1.5.7 install Error: Command “python setup.py egg_info” failed with error code 1 in /tmp/pip-build-WImLdR/pyparsing/
Solution:
sudo python -m pip install –upgrade –force pip
sudo pip install setuptools==40.8.0

BackupDiskFile::CreateMedia: Backup device ‘D:\\backup\\drm_server20220114.bak’ failed to create. Operating system error 5(Access denied.)

BackupDiskFile::CreateMedia: Backup device ‘D:\\backup\\drm_server20220114.bak’ failed to create when the database is automatically backed up. system error 5 (Access denied.) .” Error.

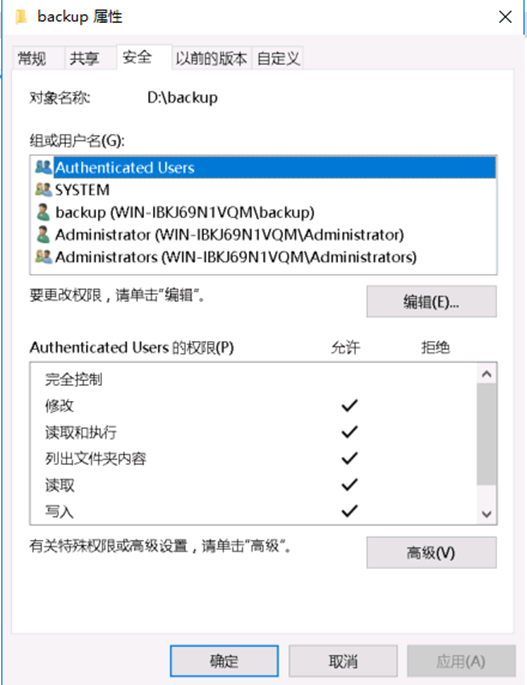
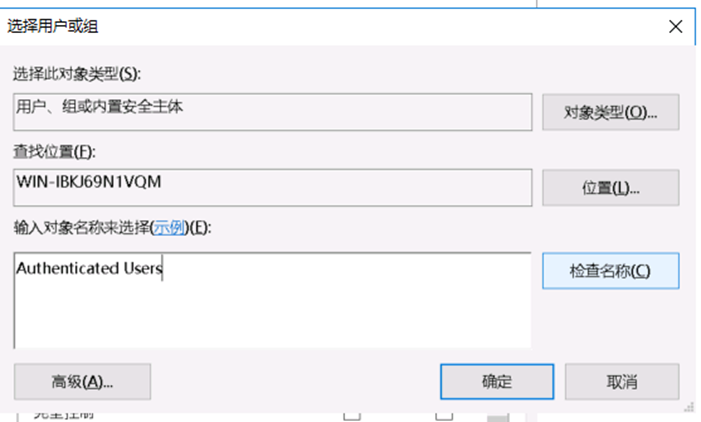
Solution: Right-click the folder à Properties à Security à Group or Username, see if there are Authenticated Users in it, if not, click Edit à Add à Enter Authenticated Users à Check Name à OK à Add Modify Permissions