Category Archives: Python

No module named _tkinter, please install the python-tk package solution summary

0. Preface

In the ipython environment, matlotlib library is needed. When running the .py file, the following error is displayed:

No module named _tkinter, please install the python-tk package.

The configuration environment is ubuntu16.04. The purpose of this article is to solve the above problems.

1.  Tkinter problem description

According to ordinary thinking, the reason for the above error may be that the python environment lacks tk packages from time to time, so enter the command: sudo apt-get install python-tk

But it also prompted an error: tcl8.6.8, tk8.6.8 not found.

Google it, tcl is the abbreviation of “Tool Command Language”, and its object-oriented language is otcl. Tk is an extension of Tcl “graphic toolbox”, which provides various standard GUI interface items to facilitate the rapid development of advanced applications.

2.  Install tcl and tk

Follow the instructions in 1 to download tcl and tk: http://www.tcl.tk/software/tcltk/download.html . The latest version at this time is 8.6.8.

(1) Install tcl, execute the following commands in sequence:

tar -zvxf tar -xzvf tcl8.6.8-src.tar.gz

cd tcl8.6.1/unix

./configure

make

sudo install make

(2) Follow the law and install tk8.6.8:

tar -xzvf tk8.6.8-src.tar.gz

cd tk8.6.8/unix

./configure

make

sudo install make

But an error is prompted when the make command is executed: there is no file or directory for X11/Xlib., see the figure below.

3. Search for the X11/Xlib.h file

According to the prompt in the above figure, the X11/Xlib.h file is missing, so execute the command:

sudo apt-get install libx11-dev

The following prompt appears:


The prompt message is: The package libx11-dev may be missing.

4.  Replace the source (source)

According to the picture, search for libx11-dev and see if there is this libx11-dev package in the system:

apt-cache search Xlib

But the Xlib file cannot be found at all:
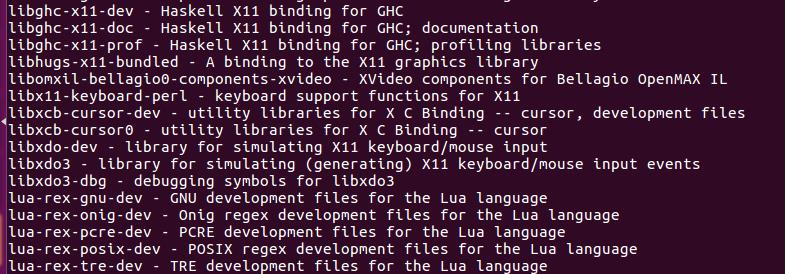
Dramatically discovered that the source of Jack Ma’s house does not have the libx11-dev package at all! ! ! So change the source of Tsinghua University. Please find the specific method of changing the source on the Internet. I will not go into details here.

5.  Find the package of libx11-dev

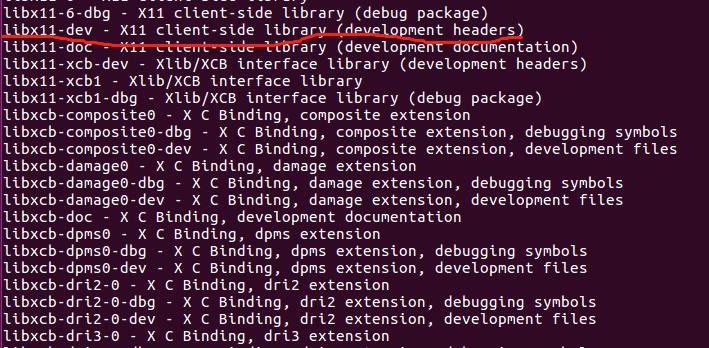
After changing the source, use the command again:  apt-cache search Xlib

Finally found libx11-dev.
6.   Reinstall tk8.6.8

After taking such a big circle, go back to the problem of installing tk8.6.8 in 2 and reinstall tk8.6.8:

tar -xzvf tk8.6.8-src.tar.gz

cd tk8.6.8/unix

./configure

make

sudo install make

7.  Finally install Tkinter

Install the Tkinter package again: sudo apt-get install python-tk

This time there is finally no error prompt.

Run the following .py file in the Ipython environment
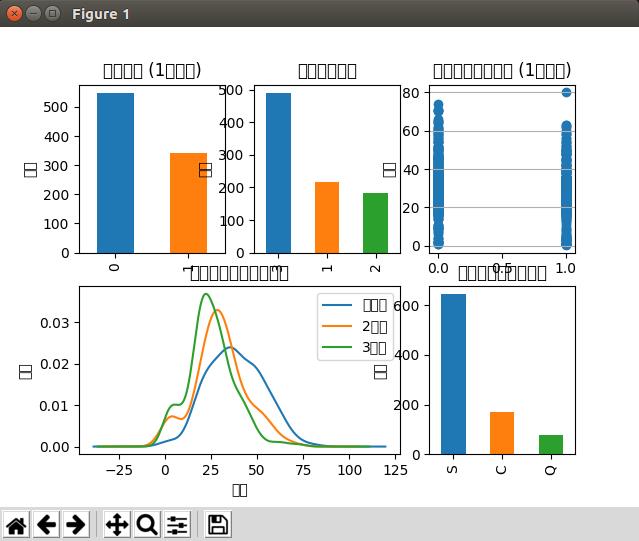
 

Matplotlib and Tkinter were successfully imported.

Okay, the problem is finally solved!


[Solved] ImportError: No module named ‘_tkinter’, please install the python3-tk package

Solution: first run the following command to install the pkin3 version of Tkinter:

sudo apt-get install python3-tk

If you are prompted that the package cannot be found, update it first:

sudo apt-get update
sudo apt-get install python3-tk

I haven’t explained why I can’t find this package after reading it on stack overflow for a long time. In fact, I just need to update it first

How to Solve pip3 ImportError: cannot import name ‘main’

In Ubuntu, after upgrading PIP3, there is an error of importerror: cannot import name ‘main’ when using PIP3. This article describes how to correct this error, pro test effective

Install python3:

sudo apt install python3

Install PIP3:

sudo apt install python3-pip

Upgrade PIP3:

python3 -m pip install –upgrade pip

Then when using PIP3 to install other modules, the error of importerror: cannot import name ‘main’ appears

The fix is to modify the file/usr/bin/PIP3

Here is the original content of this document:

from pip import main  
if __name__ == '__main__':  
    sys.exit(main()) 

Obviously, the main function was modified after PIP3 upgrade

Now modify this file as follows:

from pip import __main__  //must modify
if __name__ == '__main__':  
    sys.exit(__main__._main())//add __main__._

After saving, and then using PIP3, everything is normal

~$ pip3 –version
pip 19.0.3 from /home/xinlin/.local/lib/python3.6/site-packages/pip (python 3.6)

I don’t know why, when installing python3, the version of the built-in PIP3 is so low. If you change it to a higher version, many people won’t face this problem

another method is to reconstruct the symbolic connection of/usr/bin/PIP3

Using python3 – M pip or python3 – M site — user base, you can see where PIP3 is installed and rebuild the symbolic connection (How to create symbolic links)

Upgrade pip Error: ”’SSLError(SSLCertVerificationError(1, ‘[SSL: CERTIFICATE_VERIFY_FAILED]…”

Upgraded pip and encountered the following error reported.

PS C:\temp> python -m pip install –upgrade pip
WARNING: Retrying (Retry(total=4, connect=None, read=None, redirect=None, status=None)) after connection broken by ‘SSLError(SSLCertVerificationError(1, ‘[SSL: CERTIFICATE_VERIFY_FAILED] certificate verify failed: self signed certificate in certificate chain (_ssl.c:1108)’))’: /simple/pip/
WARNING: Retrying (Retry(total=3, connect=None, read=None, redirect=None, status=None)) after connection broken by ‘SSLError(SSLCertVerificationError(1, ‘[SSL: CERTIFICATE_VERIFY_FAILED] certificate verify failed: self signed certificate in certificate chain (_ssl.c:1108)’))’: /simple/pip/
WARNING: Retrying (Retry(total=2, connect=None, read=None, redirect=None, status=None)) after connection broken by ‘SSLError(SSLCertVerificationError(1, ‘[SSL: CERTIFICATE_VERIFY_FAILED] certificate verify failed: self signed certificate in certificate chain (_ssl.c:1108)’))’: /simple/pip/
WARNING: Retrying (Retry(total=1, connect=None, read=None, redirect=None, status=None)) after connection broken by ‘SSLError(SSLCertVerificationError(1, ‘[SSL: CERTIFICATE_VERIFY_FAILED] certificate verify failed: self signed certificate in certificate chain (_ssl.c:1108)’))’: /simple/pip/
ERROR: Operation cancelled by user
Could not fetch URL https://pypi.org/simple/pip/: There was a problem confirming the ssl certificate: HTTPSConnectionPool(host=’pypi.org’, port=443): Max retries exceeded with url: /simple/pip/ (Caused by SSLError(SSLCertVerificationError(1, ‘[SSL: CERTIFICATE_VERIFY_FAILED] certificate verify failed: self signed certificate in certificate chain (_ssl.c:1108)’))) – skipping


The solution is to specify the trusted host, as follows.

PS C:\temp> python -m pip install –upgrade pip –trusted-host pypi.org –trusted-host files.pythonhosted.org
Collecting pip
Downloading https://files.pythonhosted.org/packages/43/84/23ed6a1796480a6f1a2d38f2802901d078266bda38388954d01d3f2e821d/pip-20.1.1-py2.py3-none-any.whl (1.5MB)
|████████████████████████████████| 1.5MB 242kB/s
Installing collected packages: pip
Found existing installation: pip 19.2.3
Uninstalling pip-19.2.3:
Successfully uninstalled pip-19.2.3
Successfully installed pip-20.1.1


[Solved] Python pip install Error: OSError: [Errno 1] Operation not permitted

Solutions

pip install --upgrade pip

sudo pip install numpy --upgrade --ignore-installed

sudo pip install scipy --upgrade --ignore-installed

sudo pip install scikit-learn --upgrade --ignore-installed

If it can’t be solved

1. Restart the computer, press Command + R to enter recovery mode, click menu utility, open terminal, and enter CSR util disable

2. Restart the computer, enter normally, open [terminal] and input csrutil status

This is MacOSX 10.11 EI capital using rootlets, which can be understood as a higher level of kernel protection. The system will lock/system,/SBIN,/usr by default

This protection can be turned off by the above method

If it is not closed, it will appear when some software is installed

Operation not permitted

[How to Solve Pytorch Error] EOFError: Ran out of input

The specific errors encountered in training models with pytorch under windows are as follows.

Traceback (most recent call last):
File “train.py”, line 49, in <module>
data_loader_iter = iter(data_loader)
File “D:\anaconda3\lib\site-packages\torch\utils\data\dataloader.py”, line 501
, in __iter__
return _DataLoaderIter(self)
File “D:\anaconda3\lib\site-packages\torch\utils\data\dataloader.py”, line 289
, in __init__
w.start()
File “D:\anaconda3\lib\multiprocessing\process.py”, line 105, in start
self._popen = self._Popen(self)
File “D:\anaconda3\lib\multiprocessing\context.py”, line 212, in _Popen
return _default_context.get_context().Process._Popen(process_obj)
File “D:\anaconda3\lib\multiprocessing\context.py”, line 313, in _Popen
return Popen(process_obj)
File “D:\anaconda3\lib\multiprocessing\popen_spawn_win32.py”, line 66, in __in
it__
reduction.dump(process_obj, to_child)
File “D:\anaconda3\lib\multiprocessing\reduction.py”, line 59, in dump
ForkingPickler(file, protocol).dump(obj)
_pickle.PicklingError: Can’t pickle <function <lambda> at 0x000000001BD9E048>: a
ttribute lookup <lambda> on __main__ failed
Traceback (most recent call last):
File “<string>”, line 1, in <module>
File “D:\anaconda3\lib\multiprocessing\spawn.py”, line 106, in spawn_main
exitcode = _main(fd)
File “D:\anaconda3\lib\multiprocessing\spawn.py”, line 116, in _main
self = pickle.load(from_parent)
EOFError: Ran out of input

This error is actually a pytorch function torch.utils.data.DataLoader in the windows-specific error, the function has a parameter num_workers to indicate the number of processes, in windows to change to 0 can be.

https://discuss.pytorch.org/t/pytorch-windows-eoferror-ran-out-of-input-when-num-workers-0/25918/2

Jupyter notebook new Python3 Error: Permission denied: Untitled.ipynb,Modify workspace


Click New Python file and a pop-up window will pop up to show permission denied: untitled.ipynb

See permission denied trying to solve the permission problem. All kinds of Baidu results are 777 operations on the file, as follows:

sudo chmod 777 ~/.local/share/jupyter/
cd ~/.local/share/jupyter/
ls
sudo chmod 777 runtime/
cd runtime/

Note that the jupyter directory here is the path under share under. Local, not the share/jupyter under your own installation path. There is no runtime folder under the jupyter directory structure under your own installation path

However, after performing Chmod 777 operation and restarting jupyter notebook, it is found that the creation of python3 file is still unable, and it still indicates that the permission is insufficient

Solution: modify the working path of jupyter

The insufficient permissions of all our prompts should be due to the insufficient permissions of the files in our jupyter workspace, which makes it impossible to create new files in the directory

So we can modify the working path of jupyter and control the permissions

CD enter the bin directory under the anaconda installation directory and execute the command to view the path of the configuration file

[virtual@virtual001 bin]$ ./jupyter notebook --generate-config
Writing default config to: /home/virtual/.jupyter/jupyter_notebook_config.py

Open the configuration file jupyter_ notebook_ config.py

## The directory to use for notebooks and kernels.
#c.NotebookApp.notebook_ Direct = '

change it to
?The directory to use for notebooks and kernels.
c.notebookapp.notebook_ Dir = '~/workspace/jupyter'

where ~/workspace/jupyter is my workspace, you can change it to your own existing file path

(the folder must be created in advance. If it is not created, jupyter notebook will not be able to find the file and will flash back.)

(#c.NotebookApp.notebook_ The ᦇ in front of indicates that the comment must be deleted, and no spaces can be left before it.)

PS. in Linux VI, enter/and then enter the keywords to search for full-text search keywords. For example, you can/notebook here_ Dir to locate where to modify

After modification, save and restart jupyter nootbook

Pytorch: How to Use pack_padded_sequence & pad_packed_sequence

pack_ padded_ Sequence is to record the word of each sentence according to the principle of batch first, and change it into a tensor of indefinite length, which is convenient to calculate the loss function

pad_ packed_ Sequence is to add a pack_ padded_ The structure generated by sequence is transformed into the original structure, which is a constant length tensor

The content of test.txt

As they sat in a nice coffee shop, 
he was too nervous to say anything and she felt uncomfortable. 
Suddenly, he asked the waiter, 
"Could you please give me some salt?I'd like to put it in my coffee."

See the following code for details

import torch
import torch.nn as nn
from torch.autograd import Variable
import numpy as np
import wordfreq

vocab = {}
token_id = 1
lengths = []

#Read files and generate dictionaries
with open('test.txt', 'r') as f:
    lines=f.readlines()
    for line in lines:
        tokens = wordfreq.tokenize(line.strip(), 'en')
        lengths.append(len(tokens))
        #Add each word to the vocab and save the corresponding index at the same time
        for word in tokens:
            if word not in vocab:
                vocab[word] = token_id
                token_id += 1

x = np.zeros((len(lengths), max(lengths)))
l_no = 0
#Converting words to numbers
with open('test.txt', 'r') as f:
    lines = f.readlines()
    for line in lines:
        tokens = wordfreq.tokenize(line.strip(), 'en')
        for i in range(len(tokens)):
            x[l_no, i] = vocab[tokens[i]]
        l_no += 1

x=torch.Tensor(x)
x = Variable(x)
print(x)
'''
tensor([[ 1.,  2.,  3.,  4.,  5.,  6.,  7.,  8.,  0.,  0.,  0.,  0.,  0.,  0.],
        [ 9., 10., 11., 12., 13., 14., 15., 16., 17., 18., 19.,  0.,  0.,  0.],
        [20.,  9., 21., 22., 23.,  0.,  0.,  0.,  0.,  0.,  0.,  0.,  0.,  0.],
        [24., 25., 26., 27., 28., 29., 30., 31., 32., 13., 33., 34.,  4.,  7.]])
'''
lengths = torch.Tensor(lengths)
print(lengths)#tensor([ 8., 11.,  5., 14.])

_, idx_sort = torch.sort(torch.Tensor(lengths), dim=0, descending=True)
print(_) #tensor([14., 11.,  8.,  5.])
print(idx_sort)#tensor([3, 1, 0, 2])

lengths = list(lengths[idx_sort])#Fetch elements by subscript [tensor(14.), tensor(11.), tensor(8.), tensor(5.)]
t = x.index_select(0, idx_sort)#Fetch elements by subscript
print(t)
'''
tensor([[24., 25., 26., 27., 28., 29., 30., 31., 32., 13., 33., 34.,  4.,  7.],
        [ 9., 10., 11., 12., 13., 14., 15., 16., 17., 18., 19.,  0.,  0.,  0.],
        [ 1.,  2.,  3.,  4.,  5.,  6.,  7.,  8.,  0.,  0.,  0.,  0.,  0.,  0.],
        [20.,  9., 21., 22., 23.,  0.,  0.,  0.,  0.,  0.,  0.,  0.,  0.,  0.]])
'''
x_packed = nn.utils.rnn.pack_padded_sequence(input=t, lengths=lengths, batch_first=True)
print(x_packed)
'''
PackedSequence(data=tensor([24.,  9.,  1., 20., 25., 10.,  2.,  9., 26., 11.,  3., 21., 27., 12.,
         4., 22., 28., 13.,  5., 23., 29., 14.,  6., 30., 15.,  7., 31., 16.,
         8., 32., 17., 13., 18., 33., 19., 34.,  4.,  7.]), batch_sizes=tensor([4, 4, 4, 4, 4, 3, 3, 3, 2, 2, 2, 1, 1, 1]))
'''


x_padded = nn.utils.rnn.pad_packed_sequence(x_packed, batch_first=True)#x_padded是tuple
print(x_padded)
'''
(tensor([[24., 25., 26., 27., 28., 29., 30., 31., 32., 13., 33., 34.,  4.,  7.],
        [ 9., 10., 11., 12., 13., 14., 15., 16., 17., 18., 19.,  0.,  0.,  0.],
        [ 1.,  2.,  3.,  4.,  5.,  6.,  7.,  8.,  0.,  0.,  0.,  0.,  0.,  0.],
        [20.,  9., 21., 22., 23.,  0.,  0.,  0.,  0.,  0.,  0.,  0.,  0.,  0.]]), tensor([14, 11,  8,  5]))
'''
_, idx_unsort = torch.sort(idx_sort)
output = x_padded[0].index_select(0, idx_unsort)
print(output)
'''
tensor([[ 1.,  2.,  3.,  4.,  5.,  6.,  7.,  8.,  0.,  0.,  0.,  0.,  0.,  0.],
        [ 9., 10., 11., 12., 13., 14., 15., 16., 17., 18., 19.,  0.,  0.,  0.],
        [20.,  9., 21., 22., 23.,  0.,  0.,  0.,  0.,  0.,  0.,  0.,  0.,  0.],
        [24., 25., 26., 27., 28., 29., 30., 31., 32., 13., 33., 34.,  4.,  7.]])
'''

Solutions to the channel problem of PIL PNG format

Recently, we have studied the cutting and splicing of images, using PIL. When we open the PNG format and save it as JPEG format, we find that an error is reported

 1 import os
 2 from PIL import Image
 3 
 4 
 5 im = Image.open(r'E:\work\testcrop\test\hn1.png')
 6 img_size = im.size
 7 w = img_size[0]/2.0
 8 h = img_size[1]
 9 x = 0
10 y = 0
11 print("The image width and height are {}".format(img_size))
12 region = im.crop((x, y, x + w, y + h))
13 a = "1.jpeg"
14 region.save(a)

Error:

raise IOError(“cannot write mode %s as JPEG” % im.mode)
OSError: cannot write mode RGBA as JPEG

Looking up the data, it is found that PNG has four channels of RGBA, while JPEG has three channels of RGB. Therefore, when PNG is transferred to BMP, the program does not know what to do with channel a, and errors will occur

The solution is to check the number of channels and discard channel a

 1 import os
 2 from PIL import Image
 3 path = r'E:\work\testcrop\test\hn2.png'
 4 if 'png' in path[-4:]:
 5     im = Image.open(path)
 6     r, g, b, a = im.split()
 7     im = Image.merge("RGB", (r, g, b))
 8     os.remove(path)
 9     im.save(path[:-4] + ".jpeg")
10 path = path[:-4] + ".jpeg"
11 im = Image.open(path)
12 img_size = im.size
13 w = img_size[0]/2.0
14 h = img_size[1]
15 x = 0
16 y = 0
17 print("The image width and height are {}".format(img_size))
18 region = im.crop((x, y, x + w, y + h))
19 a = "2.jpeg"
20 region.save(a)

Rabbitmq simple configuration and oserror: [errno 9] bad file descriptor problem

Written in the front, due to the version problem of rabbitmq, the location of the parameters passed in may be different. You can check the source code and pass them in one by one

send.py

# encoding: utf-8
# Date: 2019/11/25 20:43


__author__ = 'ryan.liu'

import pika


def test(hash_value):
    # 1, Connect to RabbitMq server
    rabbit_username = 'admin'
    rabbit_password = 'admin'
    credentials = pika.PlainCredentials(rabbit_username, rabbit_password)
    connection = pika.BlockingConnection(
        pika.ConnectionParameters(host='127.0.0.1', port=5672, credentials=credentials))

    # channel is the channel for reading and writing messages
    channel = connection.channel()

    # 2, create a queue named queue
    channel.queue_declare(queue='queue')

    # 3, configure basic_pulish
    channel.basic_publish(
        '',
        'queue',
        hash_value)

    # 4,close connection
    connection.close()
    # return make_response({})

receive.py

# encoding: utf-8
# Date: 2019/11/25 20:43

__author__ = 'ryan.liu'

import pika

rabbit_username = 'admin'
rabbit_password = 'admin'
credentials = pika.PlainCredentials(rabbit_username, rabbit_password)
connection = pika.BlockingConnection(pika.ConnectionParameters(host='127.0.0.1', port=5672, credentials=credentials))
channel = connection.channel()

# Declare the queue
channel.queue_declare(queue='queue')


# 3, define a callback function that the Pika library calls when a message is obtained to process the message
def callback(ch, method, properties, body):
    print("receive.py: receive message", body)


# 4, receive message from queue
# channel.basic_consume(
#     queue='queue',
#     callback,
#     no_ack=True)

channel.basic_consume(
    "queue",
    callback,
    auto_ack=True
)

# 5,wait for message
channel.start_consuming()

I made a mistake today, which caused MQ to report an error all the time

OSError: [Errno 9] Bad file descriptor

The error code is as follows:

rabbit_username = 'admin'
rabbit_password = 'admin'
credentials = pika.PlainCredentials(rabbit_username, rabbit_password)
connection = pika.BlockingConnection(
  pika.ConnectionParameters(host='127.0.0.1', port=5672, credentials=credentials))

channel = connection.channel()

channel.queue_declare(queue='queue')

def test(hash_value):
    channel.basic_publish(
        '',
        'queue',
        hash_value)

    connection.close()
    # return make_response({})

This is a question of the scope of the python foundation

Rabbitmq error

pika.exceptions.IncompatibleProtocolError: StreamLostError: ('Transport indicated EOF',)

Because I started the rabbitmq service with docker, I mapped the port to port 8181, but in fact, when docker started MQ, port 5672 would be started automatically. Therefore, when configuring, port should be the default instead of 8181