Category Archives: Windows

Uncaught DOMException: Blocked a frame with origin “null” from accessing a cross-origin…

Tool environment: use vs code to debug chrome in layui framework

Problem Description: when Chrome browser calls other pages with iframe page, it will prompt: “uncaught domexception: blocked a frame with origin” null “from accessing a cross origin frame”

But there is no problem with IE and edge

Reason: Chrome thinks it is not secure across domains

Solution: add configuration in launch.json

,”runtimeArgs”: [

” –disable-web-security”

]

The complete configuration file is as follows:

1    "version": "0.2.0",
 2     "configurations": [
 3         {
 4             "name": "Debugging with native Chrome",
 5             "type": "chrome",
 6             "request": "launch",
 7             "file": "${workspaceRoot}/index.html",
 8             //"url": "http://mysite.com/index.html", //When using an external server, please comment out the file, use the url instead, and set useBuildInServer to false "http://mysite.com/index.html
 9 "runtimeExecutable": "C:\\Program Files (x86)\Google\\Chrome\\Application\\chrome.exe", // change it to your Chrome installation path
10             "sourceMaps": false,
11             "webRoot": "${workspaceRoot}",
12         //  "preLaunchTask":"build",
13             "userDataDir":"${tmpdir}",
14             "port":5433
15             ,"runtimeArgs": [  
16                 " --disable-web-security"   //Cross-domain access, insecure, local testing only
17             ]
18         }
19     ]

windows homestead vagrant up: Warning: Authentication failure. Retrying…

In windows, vagrant always prompts warning: authentication failure. Retrying… And there is no shared folder after running. It’s depressing

f:\box>vagrant up
==> default: Attempting graceful shutdown of VM...
    default: Guest communication could not be established! This is
se
    default: SSH is not running, the authentication information was
    default: or some other networking issue. Vagrant will force hal
    default: capable.
==> default: Forcing shutdown of VM...
==> default: Clearing any previously set forwarded ports...
==> default: Fixed port collision for 22 => 2222. Now on port 2200.
==> default: Clearing any previously set network interfaces...
==> default: Preparing network interfaces based on configuration...
    default: Adapter 1: nat
==> default: Forwarding ports...
    default: 22 (guest) => 2200 (host) (adapter 1)
==> default: Booting VM...
==> default: Waiting for machine to boot. This may take a few minut
    default: SSH address: 127.0.0.1:2200
    default: SSH username: vagrant
    default: SSH auth method: private key
    default: Warning: Authentication failure. Retrying...
    default: Warning: Authentication failure. Retrying...
    default: Warning: Authentication failure. Retrying...
    default: Warning: Authentication failure. Retrying...
    default: Warning: Authentication failure. Retrying...
    default: Warning: Authentication failure. Retrying...
    default: Warning: Authentication failure. Retrying...
    default: Warning: Authentication failure. Retrying...
The guest machine entered an invalid state while waiting for it
to boot. Valid states are 'starting, running'. The machine is in th
'paused' state. Please verify everything is configured
properly and try again.

If the provider you're using has a GUI that comes with it,
it is often helpful to open that and watch the machine, since the
GUI often has more helpful error messages than Vagrant can retrieve
For example, if you're using VirtualBox, run `vagrant up` while the
VirtualBox GUI is open.

The primary issue for this error is that the provider you're using
is not properly configured. This is very rarely a Vagrant issue.

solution:

# -*- mode: ruby -*-
# vi: set ft=ruby :

# All Vagrant configuration is done below. The "2" in Vagrant.configure
# configures the configuration version (we support older styles for
# backwards compatibility). Please don't change it unless you know what
# you're doing.

Vagrant.configure("2") do |config|
  # The most common configuration options are documented and commented below.
  # For a complete reference, please see the online documentation at
  # https://docs.vagrantup.com.

  # Every Vagrant development environment requires a box. You can search for
  # boxes at https://atlas.hashicorp.com/search.
  config.vm.box = "centos71"
  
  config.vm.boot_timeout = 360
  config.ssh.username = "vagrant"
  config.ssh.password = "vagrant"

  # Disable automatic box update checking. If you disable this, then
  # boxes will only be checked for updates when the user runs
  # `vagrant box outdated`. This is not recommended.
  # config.vm.box_check_update = false

  # Create a forwarded port mapping which allows access to a specific port
  # within the machine from a port on the host machine. In the example below,
  # accessing "localhost:8080" will access port 80 on the guest machine.
  # config.vm.network "forwarded_port", guest: 80, host: 8080

  # Create a private network, which allows host-only access to the machine
  # using a specific IP.
  # config.vm.network "private_network", ip: "192.168.33.10"

  # Create a public network, which generally matched to bridged network.
  # Bridged networks make the machine appear as another physical device on
  # your network.
  # config.vm.network "public_network"

  # Share an additional folder to the guest VM. The first argument is
  # the path on the host to the actual folder. The second argument is
  # the path on the guest to mount the folder. And the optional third
  # argument is a set of non-required options.
  # config.vm.synced_folder "../data", "/vagrant_data"

  # Provider-specific configuration so you can fine-tune various
  # backing providers for Vagrant. These expose provider-specific options.
  # Example for VirtualBox:
  #
  # config.vm.provider "virtualbox" do |vb|
  #   # Display the VirtualBox GUI when booting the machine
  #   vb.gui = true
  #
  #   # Customize the amount of memory on the VM:
  #   vb.memory = "1024"
  # end
  #
  # View the documentation for the provider you are using for more
  # information on available options.

  # Define a Vagrant Push strategy for pushing to Atlas. Other push strategies
  # such as FTP and Heroku are also available. See the documentation at
  # https://docs.vagrantup.com/v2/push/atlas.html for more information.
  # config.push.define "atlas" do |push|
  #   push.app = "YOUR_ATLAS_USERNAME/YOUR_APPLICATION_NAME"
  # end

  # Enable provisioning with a shell script. Additional provisioners such as
  # Puppet, Chef, Ansible, Salt, and Docker are also available. Please see the
  # documentation for more information about their specific syntax and use.
  # config.vm.provision "shell", inline: <<-SHELL
  #   apt-get update
  #   apt-get install -y apache2
  # SHELL
end

Added two lines of code to the Vagrantfile configuration file, using the plaintext username password

config.ssh.username = “vagrant”
config.ssh.password = “vagrant”

save

vagrant reload

sucess

Windows Azure Developer Guidance Map

Introduction

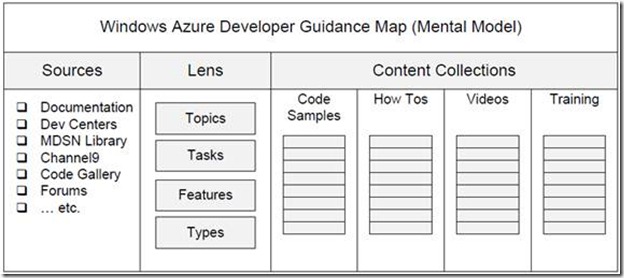
Welcome to the Windows Azure Developer Guidance Map! This map is a consolidated index of Windows Azure content collections for developers. The primary content collections included in this map are: Code Samples, How Tos, Videos, and Training. Within the content collections, the resources are organized by Windows Azure features, common tasks, and common categories for Windows Azure development.

Usage Scenarios

• Use the map to discover the various sources of developer content at Microsoft

• Use the map to find some of the most useful content for helping you solve your problems with Silverlight

• Use the map as an example to help you create your own map of content resources

Mental Model

Sources of Windows Azure Developer Guidance

You can think of this as a “topology map” of some of the main sources of Windows Azure developer guidance from Microsoft. Simply by knowing what types of resources are available (code, forums, documentation, training, etc.), and by knowing where to look, you improve your success at finding the resources you need to get your job done, whether that’s figuring out how to code for a particular scenario, ramping up on the technology, or finding the latest news. Here is a summary of the various channels and some of what they have to offer:

Category Items
Home • Windows Azure – http://www.microsoft.com/windowsazure/windowsazure/
MSDN Hub • MSDN Cloud Hub – http://msdn.microsoft.com/en-us/ff380142.aspx
MSDN Dev Center • Windows Azure Dev Center – http://msdn.microsoft.com/en-us/windowsazure/default.aspx
MSDN Library • Windows Azure Platform – http://msdn.microsoft.com/en-us/library/dd163896.aspx

• Windows Azure API Reference – http://msdn.microsoft.com/en-us/library/ff800682.aspx

Channel 9 • Windows Azure Platform Training Course – http://msdn.microsoft.com/en-us/wazplatformtrainingcourse.aspx

Tags

• AppFabric – http://channel9.msdn.com/Tags/AppFabric

• Azure – http://channel9.msdn.com/Tags/Azure

• AzurePlatform – http://channel9.msdn.com/Tags/azure+platform

• Cloud – http://channel9.msdn.com/Tags/Cloud

• SQL + Azure – http://channel9.msdn.com/Tags/sql+azure

• Windows+Azure – http://channel9.msdn.com/Tags/windows+azure

Code Samples All-in-One Code Framework

• Windows Azure Code Samples – http://1code.codeplex.com/wikipage?title=All-In-One%20Code%20Framework%20Sample%20Catalog&referringTitle=Home

Code Gallery

• Windows Azure Code Samples – http://code.msdn.microsoft.com/windowsazuresamples

Forums • Windows Azure App Platform – http://social.msdn.microsoft.com/Forums/en-US/category/windowsazureplatform

• Windows Azure Marketplace – http://social.msdn.microsoft.com/Forums/en-US/category/azuremarketplace

About window.history.back() backward problem

Under Windows window.history.back() the state of the previous page is returned instead of the previous page. If I modify a page three times, I have to go back three times to go back to the previous page. And the deleted data in the database is still displayed on it, which is very impractical.

Solution: history.back () and then add a reload () so that you can go back to the refreshed page

Namely: history.back (); location.reload (); if there is a frame, just add the name of the frame before it

****************************Notes******************************************

1: history.go (- 1);// return to the previous page. Return without data

2: window.**** ==*****;

3:window.**** ==document.***

4: Use document.location.href After switching, you can return to the original page. And use it document.location.replace After switching, you cannot go back to the original page by “back”.


<inputtype=buttonvalue=Refresh onclick="window.location.reload()">
<inputtype=buttonvalue=Forward onclick="window.history.go(1)">
<inputtype=buttonvalue=Backward onclick="window.history.go(-1)">
<inputtype=buttonvalue=Forward onclick="window.history.forward()">
<inputtype=buttonvalue=Backward onclick="window.history.back()">Backward+Fresh<inputtype=buttonvalue=Backward onclick="window.history.go(-1);window.location.reload()"&>In C# Web application, such as writing back to the previous page code for the page button


window.external Using the complete book

AddFavorite, a script that adds websites to the viewer’s favorites, should be seen often, but do you know some other uses of window.external? Since it is a command for system file manipulation, some scripts may have errors due to security settings.

1.external.AddDesktopComponent Make the site the user’s Active desktop

Syntax:external.AddDesktopComponent(address, type [image/website], left distance, top distance, width, length)

function j_adc(){ //example

window.external.AddDesktopComponent(“http://…”,”website”,0,0,800,600);

}

2.external.AddFavorite Add the site to the user’s favorites

Syntax:external.AddFavorite(url, title);

function j_af(){

window.external.AddFavorite(location.href, document.title);

}

3.external.NavigateAndFind Search for a field in a given site

Syntax:external.NavigateAndFind(file address, keyword_Target)

function j_an(){

window.external.NavigateAndFind(“http://…”,gosearch.value,””);

}

4.external.ShowBrowserUI Calling the language selection window and the favorites management window

Syntax:external.ShowBrowserUI(type[LanguageDialog/OrganizeFavorites], null)

<input type=”button” name=”Button” value=”setting language” onclick=”window.external.ShowBrowserUI(‘LanguageDialog’, null)”&>

<input type=”button” name=”Submit2″ value=”Organize Favorites” onclick=”window.external.ShowBrowserUI(‘OrganizeFavorites’, null)”&>

5.external.ImportExportFavorites Importing and exporting user favorites

Syntax:external.ImportExportFavorites(import/true export/false, file path)

<input type=”button” name=”Button” value=”Import Favorites”

onClick=window.external.ImportExportFavorites(true,”http://…”);&>

<input type=”button” name=”Button3″ value=”export Favorites”

onClick=window.external.ImportExportFavorites(false,”http://…”);&>

6.external.addChanne add to your channel

Syntax:external.addChannel(page path)

7. Here is the list of all methods of the external object

Method Description
AddChannel Obsolete. Presents a dialog box that enables the user to add the specified channel, or to change the channel URL, if it is already installed.
AddDesktopComponent Adds a Web site or image to the Microsoft Active Desktop.
AddFavorite Prompts the user with a dialog box to add the specified URL to the Favorites list.
AddSearchProvider Adds a search provider to the registry.
AddService User initiated action to add a service.
AddToFavoritesBar Adds a URL to the Favorites Bar.
AutoCompleteSaveForm Saves the specified form in the AutoComplete data store.
AutoScan No longer available as of Internet Explorer 7. Attempts to connect to a Web server by passing the specified query through completion templates.
BrandImageUri Not supported. Retrieves the Uniform Resource Identifier (URI) of an alternate product image.
bubbleEvent Propagates an event up its containment hierarchy.
ContentDiscoveryReset Resets the list of feeds, search providers, and Web Slices associated with the page.
CustomizeClearType Not supported. Sets a registry value to turn ClearType on or off.
CustomizeSettings Not supported. Saves the user settings from a “first run” page.
DefaultSearchProvider Not supported. Retrieves the name of the user’s default search provider.
DiagnoseConnection Not supported. Attempts to diagnose problems with the network connection.
ImportExportFavorites Deprecated. Handles the import and export of Internet Explorer favorites.
InPrivateFilteringEnabled Detects whether the user has enabled InPrivate Filtering.
IsSearchMigrated Not supported. Determines whether autosearch settings were migrated from a previous version of Internet Explorer.
IsSearchProviderInstalled Determines if a search provider has been installed for the current user and whether it is set as default.
IsServiceInstalled Check if a service is already installed.
IsSubscribed Obsolete. Retrieves a value indicating whether the client subscribes to the given channel.
NavigateAndFind Navigates to the specified URL and selects the specified text.
PhishingEnabled Not supported. Determines whether Microsoft Phishing Filter is enabled.
raiseEvent Triggers an event, as specified.
RunOnceHasShown Not supported. Determines whether the “first run” page has been shown.
RunOnceRequiredSettingsComplete Not supported. Sets a registry value to indicate whether the “first run” page completed successfully.
RunOnceShown Not supported. Sets a registry value to indicate that the “first run” page has been shown.
SearchGuideUrl Not supported. Retrieves the URL of a page that can be used to install additional search providers.
setContextMenu Constructs a context menu, as specified.
ShowBrowserUI Opens the specified browser dialog box.
SkipRunOnce Not supported. Enables the user to select “first run” settings at a later time.
SkipTabsWelcome Not supported. Disables the welcome screen that appears when opening a new tab in Internet Explorer 7.
SqmEnabled Not supported. Determines whether Software Quality Monitoring (SQM) is enabled.

How to Solve Win32 Disk Imager Error 5: Access is Denied

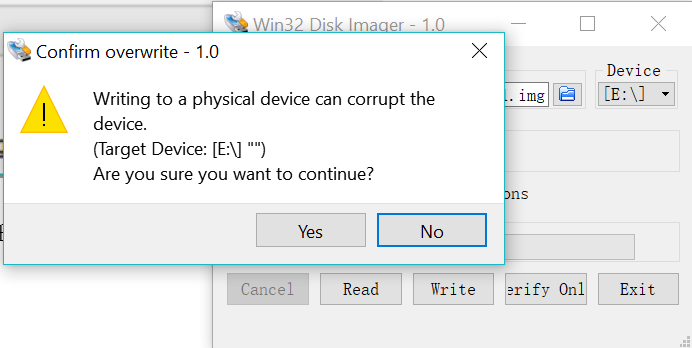
Problem encountered: an error occurred when attempting to write data to handle. Error 5 access is denied

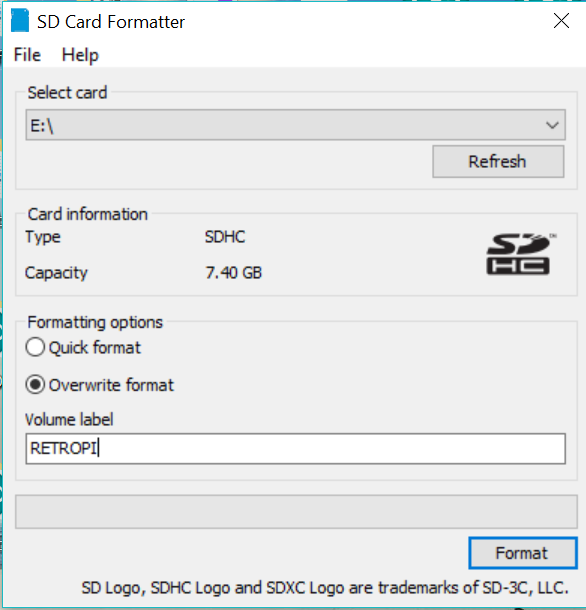
Solution: use SD memory card formatter to format the SD card, and then write the image file to it through the Win32 tool

Specific steps:

1、 Download SD memory card formatter software
official download website: https://www.sdcard.org/downloads/formatter_ 4/
pay attention to choose the software suitable for your operating system

2、 Install the SD memory card formatter software and open the configuration
select the disk where your SD card is located (usually you will take the initiative to select when you plug in the card)
select rewrite format (this is very important!)
Volume label can be named freely

click “format” to start formatting, which usually takes 10 minutes
after formatting, you will find that your disk is completely empty , and there are no files

3、 If you open the Win32 software again and write the image file to the disk where the SD card is located, there will be no error (click Yes to continue writing)

When you install the software, you encounter a bullet box, and the Windows Installer coordinator is stuck in this bullet box all the time


Sometimes when you install software, you got stuck at window which says “Windows InstallerCoordinator”
There is easy fix for this, which involves changing setting of Group Policy.

To disable this group policy you need to perform these steps:
1 ) Log on to the system with a User that has Administrative Privileges
2 ) Open the Windows Control Panel
3 ) Perform a search for Group Policy
4 ) The search results should display a link to the “Local Group Policy Editor”
5 ) Once inside the editor, go to:

Computer Configuration

Administrative Templates

Windows Components

Remote Desktop Services

Remote Desktop Session Host

Application Compatibility

6 ) In the right pane, right click on ‘Turn off Windows Installer RDS Compatibility” and select Edit from the drop down menu
7 ) Select the Radio Button labeled ‘Enable’
8 ) Click OK

Use the SC command to manage windows services manually

When you need to manage (add, delete, modify, etc.) system services in Windows system, you can use the SC command provided by Windows system to manage system services.

(take Windows 7 as an example)

Most of the “command parameters” in the SC command need to be “run as an administrator” (that is, start the CMD command line window as an administrator, and then execute the relevant commands in the command line window; note that any command executed in the command line window will be executed with the administrator’s permission. The operation method of starting the CMD command line window as an administrator: click the start menu, input the CMD letter in the “search program and file” input box at the bottom of the start menu, and display the CMD letter in the “program” at the top of the menu cmd.exe Click the right mouse button above, click the “run as administrator (a)” menu item, and click “yes” in the new pop-up “user account control” dialog box to open the “run as administrator” command line window.) Therefore, the following “run as administrator” all the SC command operations.

View SC command help

Execute the SC command without parameters to view the help information; that is, enter SC in the command line window and enter. As a rule, I am used to adding /?To check the help content: SC /

SC command format

sc [server] <command> <ServiceName> [OptionName= “value”] [“option2”]

(according to convention, in the above parameters, the options wrapped by “bracket [XXX]” are expressed as “optional”, and the options wrapped by “angle bracket & lt; XXX &>” are expressed as “required”; the actual command should not include the bracket or angle bracket symbol.)

Server: when managing a remote machine, it can be the machine name or IP address, for example, \ \ \ \ Myserver or \ \ \ 192.168.0.1. You can omit this item when managing this machine.

Command: command parameter. Such as create, description, config, query, start, stop, delete, etc. (Note: you can execute the query command as an ordinary user without trying other command parameters that are not listed).

Servicename: a user-defined non repeatable service name, which is used for subsequent operations (similar to the role of the unique primary key of database records).

Optionname = “value”: “option name” and “option value”, setting related options and values. The option value can be enclosed in double quotation marks. Note that there must be an English space after the equal sign; if the option value in the command needs to be nested in double quotation marks, use the backslash and quotation mark “\” to escape.

Option 2: option value without option name, which can be enclosed in double quotation marks.

Examples

(take managing nginx services as an example)

Add service

sc create Nginx1.12.0 binpath= “D:\GreenSoftwares\nginx-1.12.0\ nginx.exe -P \ “D/greensoftwares/nginx-1.12.0 \” displayName = nginx web server http://nginx.org ” start= delayed-auto

Nginx1.12.0, which is immediately after the create command, is a custom service name (no spaces)

Binpath: the command to be executed when starting the service (note that there must be an English space to the right of the equal sign, the same below)

DisplayName: user defined display name of the service

Start: the start type of the service. For example: boot, system, demand, auto, delayed auto, disabled.

Set the description information for the service

SC description nginx1.12.0 “start or stop nginx server”

Modify service configuration

Use the SC config command to modify one or more configuration information of existing services.

Modify display name: SC config nginx1.12.0 displayName = “nginx server v1.12.0”

Modify start type: SC config nginx1.12.0 start = Auto

View service status

sc query Nginx1.12.0

Start the service

SC start nginx1.12.0, the command will not output startup information (or net start nginx1.12.0, it will output startup information)

Stop service

SC stop nginx1.12.0, the command will not output stop information (or net stop nginx1.12.0, it will output stop information)

Delete service

sc delete Nginx1.12.0

References and notes

I am used to downloading and using the green version (that is, zip compressed version) of MySQL database, so I need to add the MySQL database as a system service

REM fileName: installServiceForMySQL.bat
REM Run as administrator: Save the following contents to a bat file [change the path to the actual path] and right click on the file name and select "Run as administrator (A)".

REM Place this file in the /bin/ directory under the MySQL directory; then change the path of the ini file to the real path with the following parameters
D:/mysql-5.5.16-winx64/bin/mysqld.exe --install-manual MySQL5.5.16 --defaults-file="D:/mysql-5.5.16-winx64/my-medium.ini"

REM Modify MySQL service startup mode: [demand (manual start), auto (auto start), delayed-auto (auto start-delayed start), disabled (disabled start)
sc config MySQL5.5.16 start= auto
REM Add description information to the MySQL service.
sc description MySQL5.5.16 "Start, stop MySQL database services"

Right click the “computer” icon on the windows desktop and select “management (g)” to quickly enter the “computer management” interface. The “services” item is included under “services and Applications”. Press F5 to refresh the list of services.
 

Fixed: Windows Script Host access is disabled on this machine

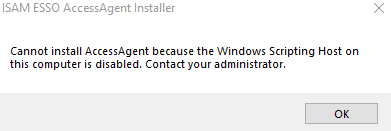
If you receive this Windows Script Host access is disabled on this machine, Contact your administrator for details message box, on your Windows 10/8/7 computer, then this post may interest you. Today we will see how you can enable or disable Windows Script Host.

Windows Script Host access is disabled on this machine

Windows Script Host or WSH, is a Microsoft technology that provides scripting abilities like batch files, but includes many more features. Such Scripts can be run directly from the desktop by double-clicking a script file, or from a command prompt. It can be run from either the protected-mode Windows-based host wscript.exe, or the real-mode command shell-based host cscript.exe.

Several “HTML malware” have been reported to use WSH objects as a result of which, those who do not require this feature, tend to disable it. But disabling WSH, will prevent users from running any scripts, including VBScript and JScript scripts, that rely on this technology – and some software may require this feature to be enabled.

Enable, disable Windows Script Host

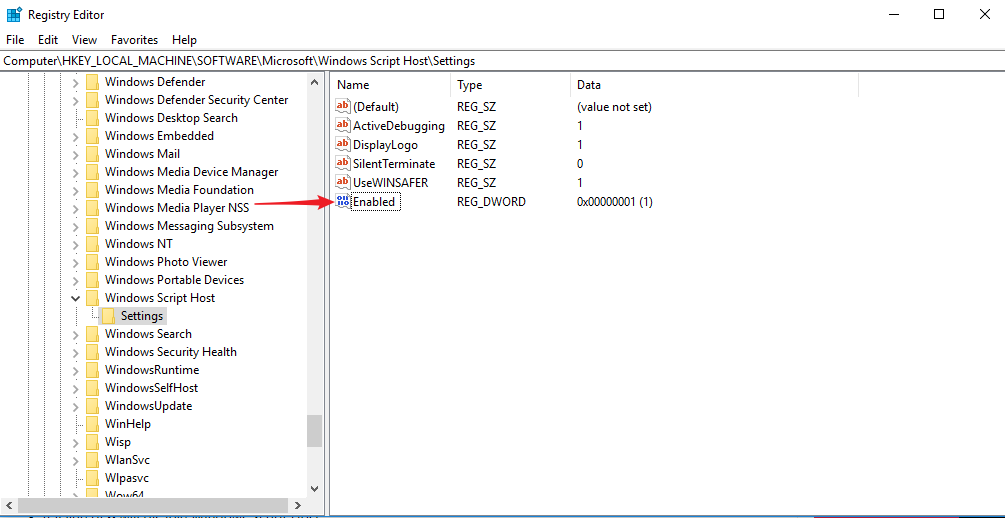
To enable or disable Windows Script Host, type regedit.exe in Run box and hit Enter to open the Registry Editor.

Navigate to the following key:

HKEY_LOCAL_MACHINE\Software\Microsoft\Windows Script Host\Settings


In the right panel, you will see Enabled. If you see the entry 0, it means that the Windows Script Host access is disabled on your Windows machine.

Double Click on it and give it Value Data 1 to enable it.

A value of 1 will enable Windows Script Host

A value of 0 will disable Windows Script Host.

Click on OK and exit the Registry. If you don’t see this entry, then you may need to create it, as it does not exist by default in Windows.

You will now, no longer receive the Windows Script Host access is disabled on this machine. In this way you can enable or disable Windows Script Host.

=========================================

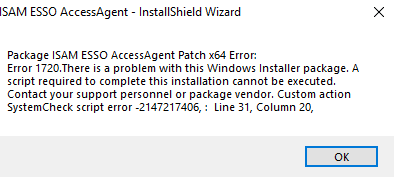
The existing ESSO-AA cannot be uninstalled, and the installation reports the following error.

Solution: Download Microsoft’s repair tool. Uninstall it first, then reinstall it.

https://www.cnblogs.com/rusking/p/10125483.html

How to Solve Word experienced an error trying to open

Not long ago, the system and software were upgraded to Windows Server 2012 Office has been upgraded to office 2013, but a very strange problem is that the doc document I used to write with Office 2010 can’t be opened with office 2013. At first, I thought that the document was broken and took it to my friend’s computer (I installed Office 2007 for him), but his computer can open my document normally. So I wonder if my new system is missing something DLL files and so on, but I use DLL- Files.com The software has checked the DLL file of my computer.

After struggling for a long time, baidu finally found the problem during the day. The problem is still in the setting of office (because it’s office 2013, unsafe files, inaccessible settings, just personal ideas).

solutions :

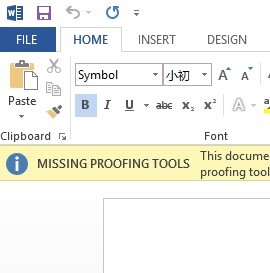
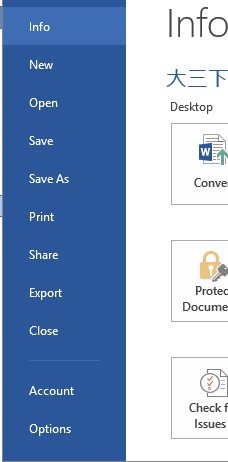
Open any office document and select file

Then select options from the menu

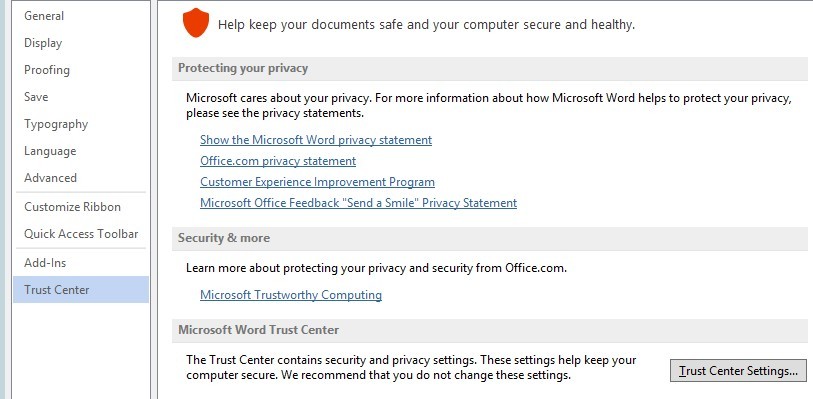
A new setting interface will be displayed. For example, we select the trust center option and click Trust Center settings on the right

Here is a new interface, as follows:

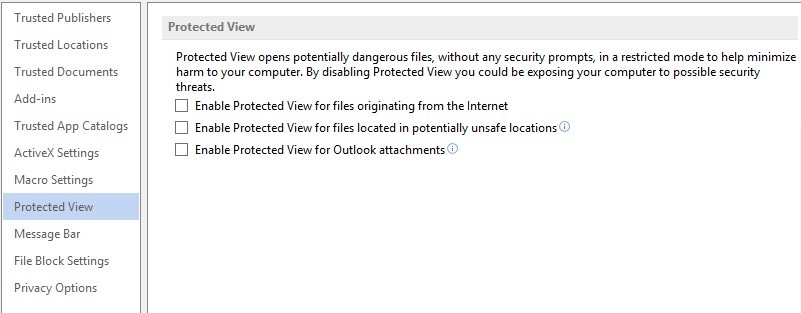
Let’s choose the protected view option, then remove all the previous checks, confirm the application, and then reopen the document we just can’t open. What do you find! Ha ha

Mr. Stallman thinks that the biggest happiness is to let the software developed by himself be used by everyone!