Tag Archives: anaconda

Anaconda establishes a new environment, and condahttpererror: http 000 connection failed for URL… Solution process appears

On March 7, 2020, prepare the scratch, create a new environment with anaconda, execute “CONDA create – n scrapyenv python = 3.6”, and the result is “condahtterror: http 000 connection failed for URL & lt; https://mirrors.tuna.tsinghua.edu.cn/anaconda/pkgs/main/win-64/current_ repodata.json>”。 Here are my solution steps.

1、 Computer environment

Operating system: Windows 10 64 bit

Anaconda version: CONDA   4.8.2

2、 Solution steps

1. Open the power shell and execute the “CONDA config — remove key channels” command to restore Anaconda’s source to the default.

Because I thought there was a problem with the image of Tsinghua University, I wanted to restore the image to the default, and then re execute “CONDA create – n scrapenv python = 3.6”. It was found that the problem still occurred, but the prompt changed to “condahttpererror: http 000 connection failed for URL & lt; https://repo.anaconda.com/pkgs/main/win-64/current_ repodata.json>” Yes. After careful comparison of the previous errors, it is found that the descriptions are the same except that the mirror address is different. Therefore, I don’t think it appears on the mirror address.

2. Restore the anaconda image to the original image. Execute the following command on the power shell:

conda config --add channels - https://mirrors.tuna.tsinghua.edu.cn/anaconda/pkgs/free
conda config --add channels - https://mirrors.tuna.tsinghua.edu.cn/anaconda/pkgs/main

If the command is not executed successfully, execute “CONDA config — remove key channels” in Article 1.

3. After restoring the image to Tsinghua, I executed the command to create the environment again, but it was still unsuccessful. So try to open the address of the image“ https://mirrors.tuna.tsinghua.edu.cn/anaconda/pkgs/main ”After opening, you will see the following interface:
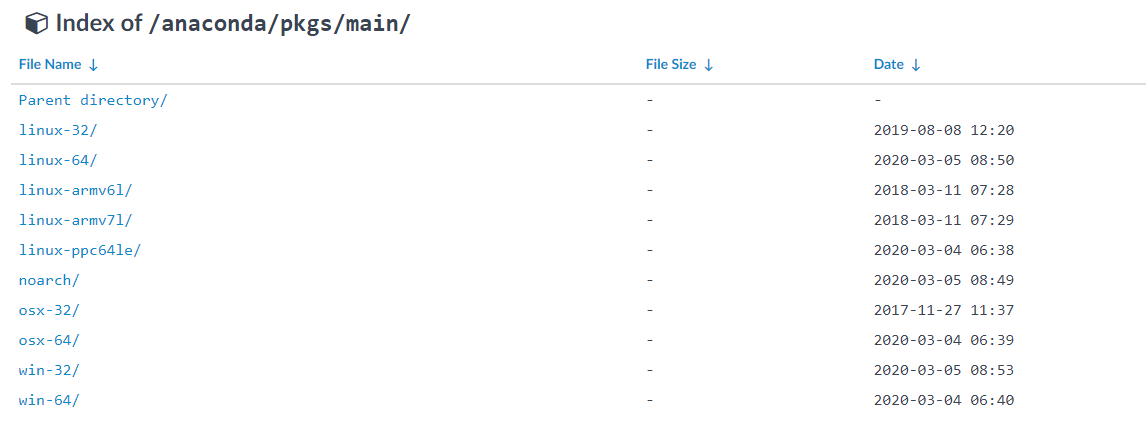
 

  It seems to have found the problem: the image address should be added with “win-64”.

4. Enter “C: \ users \ administrator” and open “. Condarc”. You will see the following code:

ssl_verify: true
show_channel_urls: true

channels:
  - httpn://mirrors.tuna.tsinghua.edu.cn/anaconda/pkgs/main

Change the above code to

ssl_verify: true
show_channel_urls: true

channels:
  - https://mirrors.tuna.tsinghua.edu.cn/anaconda/pkgs/main/win-64

You may also see “- default” in channels: below. Please delete it

5. After modification, execute “CONDA create – n scrapyenv python = 3.6” again. The sound of the waves is still there!

6. Continuing to browse the website, some netizens said, “it must be HTTP, not HTTPS!”, So I tried to modify it,

ssl_verify: true
show_channel_urls: true

channels:
  - http://mirrors.tuna.tsinghua.edu.cn/anaconda/pkgs/free/win-64

Execute “CONDA create – n scrapyenv python = 3.6” again, successfully!!!

7. According to in https://mirror.tuna.tsinghua.edu.cn/help/anaconda/ The final “. Condarc” is

ssl_verify: true
show_channel_urls: true

channels:
  - http://mirrors.tuna.tsinghua.edu.cn/anaconda/pkgs/free/win-64/
  - http://mirrors.tuna.tsinghua.edu.cn/anaconda/pkgs/main/win-64/


Solution to Anaconda installation scene error

Today, I encountered a pit when installing the script with anaconda. Now I’ll send out the solution for your reference:

Problem Description:

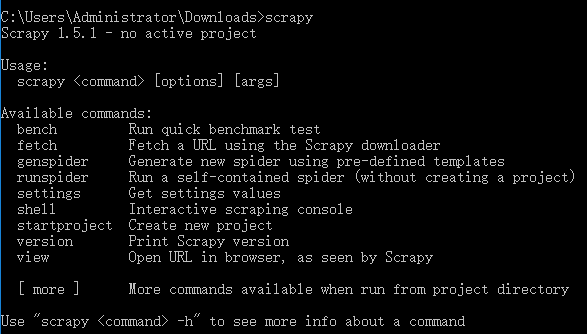
Anaconda installs the sweep and uses the CONDA install sweep command. After the installation is completed, execute the scratch prompt on the command line and report an error, as shown in the figure:

Installation under windows is like this… DLL load failed

Solution:

When you install directly using scratch, you will be prompted that the lxml module is not installed properly. Manual reinstallation is required

1. Find lxml file

Address: https://www.lfd.uci.edu/ ~gohlke/pythonlibs/#lxml

2. Download the corresponding xlml file. I downloaded lxml ‑ 4.2.4 ‑ cp36 ‑ cp36m ‑ win for windows 64 bit_amd64.whl

3. After downloading, open CMD to enter the file directory for execution

    pip install   lxml‑4.2.4‑cp36‑cp36m‑win_amd64.whl


OK, see the prompt that the installation is successful

4. Verify the results and execute the script again:


  ok。 Success

5. Create a crawler project and try the following:


Done


Attached:

Anaconda image source address of Tsinghua University:

   https://mirrors.tuna.tsinghua.edu.cn/help/anaconda/

Download address of lxml and other installation packages:

   https://www.lfd.uci.edu/ ~gohlke/pythonlibs/#lxml


Anaconda makes. Ipynb file into. EXE file

Explain the function of static keyword and final keyword in Java in detail>>>

1. Open Anaconda prompt

# 2. Install pyinstaler (either in the default directory or in other directories)
enter the command:

pip install pyinstaller

note: if the

distributed 1.21.8 requires msgpack, which is not installed.

Msgpack needs to be installed:
the solution command is as follows:

pip install msgpack

If:

You are using pip version 10.0.1, however version 19.1.1 is available.
You should consider upgrading via the 'python -m pip install --upgrade pip' command.

the solution command is as follows:

python -m pip install --upgrade pip

# 3. Open the file ^. Ipynb in jupyter notebook

Download as. Py file and save the file in the directory (default directory or the directory selected above)

4. In the promt window, enter the command: * *

pyinstaller -F ***.py

###############################35

Anaconda “unable to locate program input point OpenSSL_ sk_ new_ Reserve is used in dynamic link library anaconda3 / library / bin / libssl-1_ On 1-x64.dll & qu

Open source software supply chain lighting plan, waiting for you>>>

Anaconda “unable to locate program input point OpenSSL_ sk_ new_ Reserve is used in dynamic link library anaconda3/library/bin/libssl-1_ 1-x64.dll

Refer to: https://stackoverflow.com/a/59884311/625350

Problem description

After loading several packages back and forth on anaconda and installing different Python versions in different environments, an error is reported. Since then, it is very troublesome to install anaconda. Refer to various solutions on CSDN, mainly to add libssl-1 in DLLs_ 1-x64.dll file is copied and pasted into bin, which can completely solve the symptoms but not the root cause. Either Anaconda can not be opened, or it can not be installed. Turn the question into English and go to stackoverflow to find the answer

Solutions

This solution is proposed by titusjan users on stackoverflow, and it is feasible after my personal experiment

As Anaconda maintenance is here( https://github.com/conda/conda/issues/9003#issuecomment -553529174)

It’s not advisable to move libssl DLL like that. Those DLLs are duplicated because there is some confusion in your package. There should not be any OpenSSL DLLs in the DLLs folder. They should be in Library/bin

By looking at the JSON file in the CONDA meta directory, I found DLLs/libssl-1_ 1-x64.dll, the python 3.7.0 software package_ 1-x64.dll is installed and installed by OpenSSL package. After further investigation, I found that Python 3.7.0 does not install OpenSSL as a separate package, but Python 3.7.1 (or higher) does

Generally, upgrading Python works as expected, but if you end up installing both Python 3.7.0 and OpenSSL packages in some way, there will be two libssl-1_ 1-x64.dll, and your Anaconda distribution will be destroyed( You can easily verify this with the CONDA list command.)

I think the best way to solve this problem is:

rename library/bin/libssl-1_ 1-x64.dll is library/bin/libssl-1_ 1-x64.dll.org (you’ll need it later.)

copy DLLs/libssl-1_ 1-x64.dll to library/bin/libssl-1_ 1-x64.dll

use CONDA update Python to update the python version. This will remove DLLs/libssl-1_ 1-x64.dll file

rename library/bin/libssl-1_ 1-x64.dll.org is library/bin/libssl-1_ 1-x64.dll。 This is necessary because otherwise an HTTP error will occur in the next step

use CONDA install OpenSSL — force re install to re install OpenSSL to make sure it is up-to-date

Summary

In fact, libssl-1 in the DLL folder_ The 1-x64.dll file should not exist at all. According to the official statement, adding Anaconda to the system path is not good, so it’s better to reload it( Anaconda (really troublesome)

How to Solve Anaconda Error: PackageNotFoundError: Package not found: ” Package missing in current win-64 channels

1.  Anaconda is a toolkit integrated management tool. It is very convenient to download Python toolkit

conda install package_ name

However, sometimes when a toolkit (such as xmltodict) is installed, if the package cannot be found in the current channels, you will be prompted:

conda install pydot Fetching package metadata ……. Solving package specifications: . PackageNotFoundError: Package not found: ” Package missing in current win-64 channels: – xmltodictYou can search for packages on anaconda.org with anaconda search -t conda xmltodict

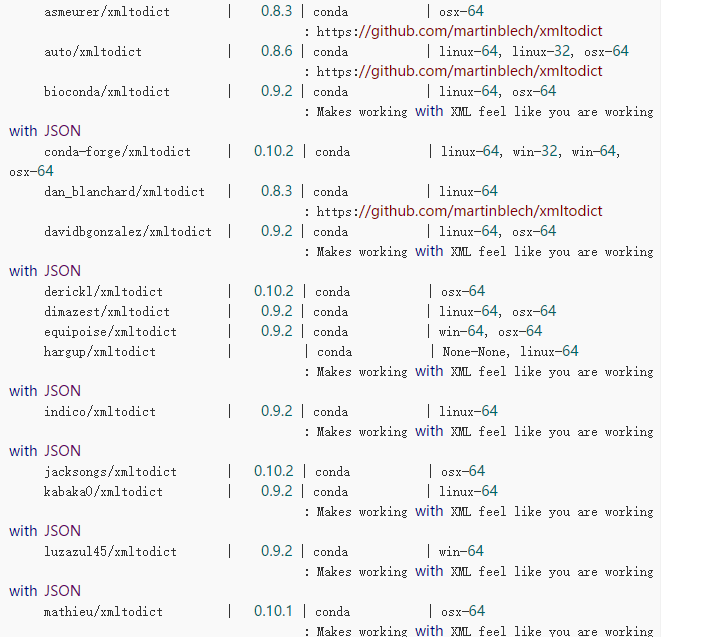
Then enter Anaconda search – t CONDA xmltodict search result according to the prompt:

Now choose an appropriate version to install. For example, I choose this:

conda-forge/xmltodict | 0.10.2 | conda | linux-64, win-32, win-64, osx-64

Then execute the following command to install:

conda install -c https://conda.anaconda.org/conda-forge xmltodict

2.Using PIP install package directly_ Name command and install it in the local tool library

CondaHTTPError: HTTP 000 CONNECTION FAILED for url <https://repo.anaconda.co

First, you need to find the. Condarc file
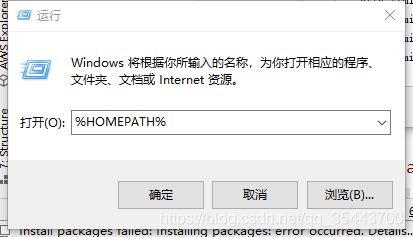
if you don’t know where it is, you can
Win + R
Enter% HomePath%

and then find

to replace the content with the following one

channels:
  - http://mirrors.tuna.tsinghua.edu.cn/anaconda/pkgs/free/
  - http://mirrors.tuna.tsinghua.edu.cn/anaconda/cloud/conda-forge/
  - http://mirrors.tuna.tsinghua.edu.cn/anaconda/cloud/msys2/
  - http://mirrors.tuna.tsinghua.edu.cn/anaconda/cloud/bioconda/
  - http://mirrors.tuna.tsinghua.edu.cn/anaconda/pkgs/main/
show_channel_urls: true
ssl_verify: false

Solving the problem of “solving environment: failed” of CONDA

1. Problem code

Recently, when CONDA installed the software package, the following problems appeared all the time. I found many solutions on the Internet, but they didn’t solve my problem. See link
supplement: the version of CONDA I use is anaconda3-2019.07-windows-x86_ 64。

Collecting package metadata (current_repodata.json): done
Solving environment: failed with current_repodata.json, will retry with next repodata source.
Collecting package metadata (repodata.json): done
Solving environment: failed
Initial quick solve with frozen env failed.  Unfreezing env and trying again.
Solving environment: failed

2. Find out the reason

Later, when looking at the error message, I found that it was to use two commands of CONDA forge that caused this error. The culprit is the second sentence.

conda config --add channels conda-forge
conda config --set channel_priority strict

3. Solutions

conda config --set channel_priority flexible

Solutions to RHEL 7 “there are no enabled repos”

Solutions to RHEL 7 “there are no enabled repos”

[ root@system1 Desktop]# yum install squid
Loaded plugins: langpacks, product-id, subscription-manager
This system is not registered to Red Hat Subscription Management. You can use subscription-manager to register.
There are no enabled repos.
Run “yum repolist all” to see the repos you have.
You can enable repos with yum-config-manager –enable <repo&>

See the above error, is your Yum warehouse problem, I now teach you to build a local Yum warehouse, so you can use it again!!

One of the most obvious ways is to use subscription manager and follow the instructions to register your rhel7 system to enable RHEL buy back. To do this, you need to pay or try a RedHat subscription. However, if you just want to play games and install software without the latest red hat subscription, you can install the downloaded red hat ISO image as the default local repository and install software. To enable your local repository, and thus overcome the second there are no enabled repos

[root@rhel7 ~]# mkdir /media/rhel7-repo-iso
[root@rhel7 ~]# mount /dev/cdrom /media/rhel7-repo-iso/
mount: /dev/sr0 is write-protected, mounting read-only

Now, when you install RHEL 7 ISO, please/media/RHEL 7-repo-iso/create a new Yum repo file, which contains the following contents:

[root@rhel7 ~]# vi /etc/yum.repos.d/RHEL_7_Disc.repo
[root@rhel7 ~]# cat /etc/yum.repos.d/RHEL_7_Disc.repo
[RHEL_7_Disc]
name=RHEL_7_x86_64_Disc
baseurl="file:///media/rhel7-repo-iso/"
gpgcheck=0

Once ready, check the new warehouse to enable it:

# yum repolist
Loaded plugins: product-id, subscription-manager
This system is not registered to Red Hat Subscription Management. You can use subscription-manager to register.
RHEL_7_Disc                                                                                                                                      | 4.1 kB  00:00:00     
(1/2): RHEL_7_Disc/group_gz                                                                                                                      | 134 kB  00:00:00     
(2/2): RHEL_7_Disc/primary_db                                                                                                                    | 3.4 MB  00:00:00     
repo id                                                                      repo name                                                                            status
RHEL_7_Disc                                                                  RHEL_7_x86_64_Disc                                                                   4,305
repolist: 4,305

(Note: there may be problems here. See the following supplement for solutions.)

You will now be able to install new software on unregistered RHEL 7 Linux machines. The disadvantage is that you don’t receive any new updates, which may create a security issue for your system. Also, when using the yum command:

This system is not registered to Red Hat Subscription Management. You can use subscription-manager to register.

Supplement:

Running Yum repolist may still display 0.

Yum puts the information about each warehouse in a separate file (in the directory/etc)/ yum.repos . d), when “there are no enabled repos” and “Yum repolistall” are still displayed as 0, then look at the directory/etc/ yum.repos Does the previously created configuration file exist under. D

RHEL_7_Disc.repo

If this configuration file does not exist, manually create and add it to the directory/etc/ yum.repos . D.

# cat /etc/yum.repos.d/RHEL_7_Disc.repo     Create this new file repo, then save it, and you can install other services again!
[rhel7]
name=rhel7
baseurl=file:///media/cdrom/
enabled=1
gpgcheck=0

Finally do a mount it, boot automatically start, convenient for later use

[ root@system1 ~]# vim /etc/fstab

#
# /etc/fstab
# Created by anaconda on Tue Jul 16 15:51:34 2019
#
# Accessible filesystems, by reference, are maintained under ‘/dev/disk’
# See man pages fstab(5), findfs(8), mount(8) and/or blkid(8) for more info
#
/dev/mapper/rhel-root/xfs defaults 1 1
UUID=9cead03a-2b93-4686-9b23-70cfb9264f3f /boot xfs defaults 1 2
/dev/mapper/RHEL swap swap defaults 0 0
/dev/CDROM/Andy iso9660 defaults 0 0// with this sentence, it’s good
~
~ finally.

Anaconda conda activate Envirnment: Your shell has not been properly configured to use ‘conda activate’.

You shell has not been properly configured to use ‘CONDA activate’ when you open the terminal under vs code

Solution:

1. Activation environment

#activate Envirnment
source activate

2. Exit environment

conda deactivate

3. Activate base

conda activate base

It seems that this method can only solve the problem for a short time, but it will still appear when you open it again. Finally, you can uninstall vs code from the anaconda navigator interface and install it again