Tag Archives: CentOS

Using Win32 disk imager to realize USB disk recording

Recently, the computer needs to install Linux system (CentOS, Kali). Because there is no CD-ROM drive, it needs to write the ISO image of the operating system to the U disk. So find the Win32 disk imager
(download address: https://sourceforge.net/projects/win32diskimager/ )。

After downloading, install in win10 environment. After installation, open the interface (as shown in the figure below).

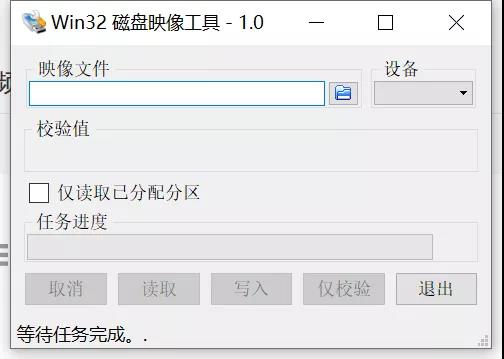
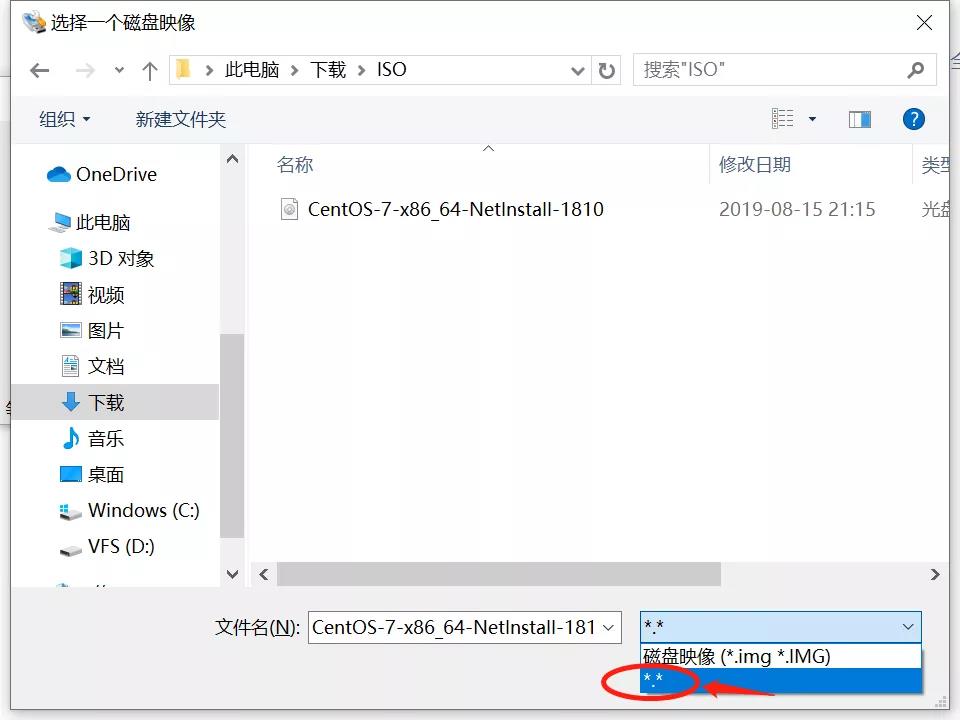
Click “image file” to “select a disk image”. I choose centos7 here. Note: if the file type is not in img format, you need to select *. * to match any format when filtering the file type (as shown in the figure below).

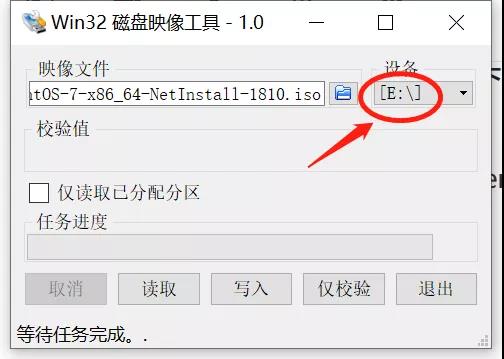
At this time, insert the U disk (Note: the capacity must be greater than the size of the ISO image), the software will automatically detect the new U disk, and the detected drive letter will appear in the “device” position (as shown in the figure below), and the specific drive letter will be different according to the difference of personal environment (for the sake of insurance, it is better to make sure that the identified disk is a U disk before the next operation).

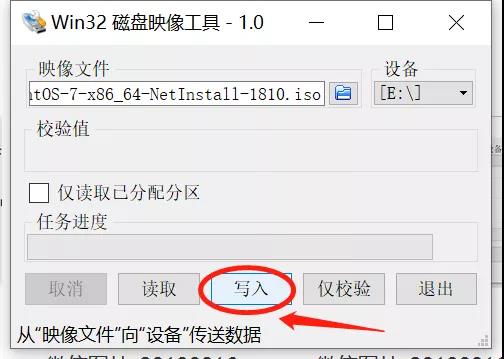
Then click “write” (as shown below) to transfer data from “image file” to “device”.

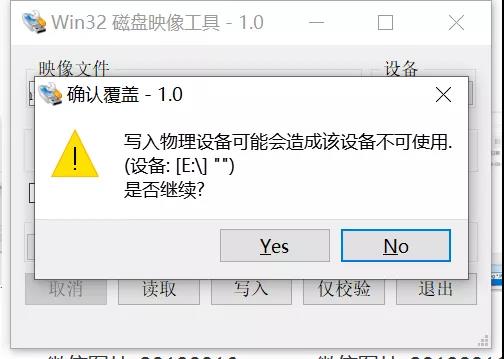
Next, a “confirm Overlay” warning will pop up. If you are ready, click “yes” to start writing data. In the process of writing data, there will be a progress bar (0% ~ 100%), and the waiting time will be different according to the size of ISO image file, the reading and writing speed of U disk and other factors.

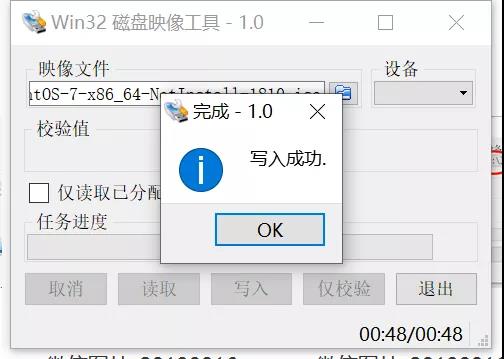
When writing data, please do not sleep or pull out the U disk to avoid all kinds of problems. Please wait patiently until “write successfully” pops up and click “OK”.

So far, it is very simple to use the Win32 disk imager to realize the U disk burning ISO image! In fact, there are many tools for recording ISO on U disk, such as UltraISO. There are some problems in the installation stage of some tools, and some data need to be changed manually. Many beginners encounter various strange problems during installation, and they give up learning Linux because they can’t get the solution…

The author has used a variety of tools to burn before, and will not list all kinds of pits. In Kali’s official tutorial, making ISO image on USB flash disk under Windows environment is indicated to use Win32 disk imager.

When using Win32 disk imager to record Kali and CentOS ISO images, there are no strange problems during system installation. If you have problems with other tools, you can try the method mentioned in this article, and you may get some benefits~

Note: This article is original by Toyo Lau, and can’t be reproduced on any platform without permission. If you need to reprint, you can pay attention to the official account, leave messages in the background, contact with the author, get permission to reprint ~

.

Wechat scan, found more exciting.

You have new mail in / var / spool / mail / root prompt appears in Linux, and the solution to close the email prompt and clean up the content is given

you have new mail in/var/spool/mail/root prompt appears in Linux, and the solution to close the email prompt and clean up the content is

Reference article:

(1) You have new mail in/var/spool/mail/root prompt appears in Linux, and the solution to close the email prompt and clean up the content is given

(2) https://www.cnblogs.com/zdz8207/p/Linux-Centos-mail-root-sendmail.html

Let’s make a note.

Linux: apt get install build essential and Yum groupinstall “development tools”

Ubuntu’s apt install build essential

Function: to configure the Debian system compilation environment is to download and install the dependencies/packages that support the compilation of Debian packages, such as GCC.

Direct execution

#apt install build-essential

You can view log/var/log/apt after execution/ history.log , see the following.

Start-Date: 2019-06-08  07:54:24
Commandline: apt install build-essential
Requested-By: satou (1000)
Install: libmpc3:amd64 (1.1.0-1, automatic), libgcc-7-dev:amd64 (7.4.0-1ubuntu1~18.04, automatic), libmpx2:amd64 (8.3.0-6ubuntu1~18.04, automatic), linux-libc-dev:amd64 (4.15.0-51.55, automatic), libfakeroot:amd64 (1.22-2ubuntu1, automatic), libc6-dev:amd64 (2.27-3ubuntu1, automatic), cpp-7:amd64 (7.4.0-1ubuntu1~18.04, automatic), libalgorithm-diff-perl:amd64 (1.19.03-1, automatic), libalgorithm-merge-perl:amd64 (0.08-3, automatic), binutils:amd64 (2.30-21ubuntu1~18.04.1, automatic), cpp:amd64 (4:7.4.0-1ubuntu2.2, automatic), libitm1:amd64 (8.3.0-6ubuntu1~18.04, automatic), g++:amd64 (4:7.4.0-1ubuntu2.2, automatic), gcc-7-base:amd64 (7.4.0-1ubuntu1~18.04, automatic), gcc:amd64 (4:7.4.0-1ubuntu2.2, automatic), libcilkrts5:amd64 (7.4.0-1ubuntu1~18.04, automatic), libasan4:amd64 (7.4.0-1ubuntu1~18.04, automatic), libquadmath0:amd64 (8.3.0-6ubuntu1~18.04, automatic), libisl19:amd64 (0.19-1, automatic), build-essential:amd64 (12.4ubuntu1), libfile-fcntllock-perl:amd64 (0.22-3build2, automatic), binutils-x86-64-linux-gnu:amd64 (2.30-21ubuntu1~18.04.1, automatic), libstdc++-7-dev:amd64 (7.4.0-1ubuntu1~18.04, automatic), libtsan0:amd64 (8.3.0-6ubuntu1~18.04, automatic), libubsan0:amd64 (7.4.0-1ubuntu1~18.04, automatic), g++-7:amd64 (7.4.0-1ubuntu1~18.04, automatic), make:amd64 (4.1-9.1ubuntu1, automatic), fakeroot:amd64 (1.22-2ubuntu1, automatic), gcc-7:amd64 (7.4.0-1ubuntu1~18.04, automatic), liblsan0:amd64 (8.3.0-6ubuntu1~18.04, automatic), libgomp1:amd64 (8.3.0-6ubuntu1~18.04, automatic), manpages-dev:amd64 (4.15-1, automatic), binutils-common:amd64 (2.30-21ubuntu1~18.04.1, automatic), libc-dev-bin:amd64 (2.27-3ubuntu1, automatic), libbinutils:amd64 (2.30-21ubuntu1~18.04.1, automatic), libatomic1:amd64 (8.3.0-6ubuntu1~18.04, automatic), libcc1-0:amd64 (8.3.0-6ubuntu1~18.04, automatic), libdpkg-perl:amd64 (1.19.0.5ubuntu2.1, automatic), libalgorithm-diff-xs-perl:amd64 (0.04-5, automatic), dpkg-dev:amd64 (1.19.0.5ubuntu2.1, automatic)
Upgrade: gcc-8-base:amd64 (8.2.0-1ubuntu2~18.04, 8.3.0-6ubuntu1~18.04), libgcc1:amd64 (1:8.2.0-1ubuntu2~18.04, 1:8.3.0-6ubuntu1~18.04), libstdc++6:amd64 (8.2.0-1ubuntu2~18.04, 8.3.0-6ubuntu1~18.04)
End-Date: 2019-06-08  07:55:01

Note: (1) execute apt get update or apt update to update the package index before running, otherwise it may fail. (2) It is suggested to use apt instead of apt get

CentOS’s Yum - y groupinstall "development tools"

Function: to configure the compilation environment of CentOS is to download and install the package/dependency that enables CentOS to compile the source code package on the platform

You can use the command Yum grouplist to check which groups there are. Development tools is in available groups.

[root@localhost ~]# yum grouplist
Loaded plugins: fastestmirror, langpacks
There is no installed groups file.
Maybe run: yum groups mark convert (see man yum)
Loading mirror speeds from cached hostfile
 * base: mirrors.tuna.tsinghua.edu.cn
 * extras: mirrors.tuna.tsinghua.edu.cn
 * updates: mirrors.tuna.tsinghua.edu.cn
Available Environment Groups:
   Minimal Install
   Compute Node
   Infrastructure Server
   File and Print Server
   Basic Web Server
   Virtualization Host
   Server with GUI
   GNOME Desktop
   KDE Plasma Workspaces
   Development and Creative Workstation
Available Groups:
   Compatibility Libraries
   Console Internet Tools
   <span style="color: red;"&><Development Tools</span&>
   Graphical Administration Tools
   Legacy UNIX Compatibility
   Scientific Support
   Security Tools
   Smart Card Support
   System Administration Tools
   System Management
Done

Before executing Yum groupinstall "development tools" , execute Yum clean all to clear Yum cache and force Yum to read some configuration files again

[root@localghost ~]# yum clean all
Loaded plugins: fastestmirror, priorities, remove-with-leaves
Cleaning up Everything
Cleaning up list of fastest mirrors
[root@localghost ~]#

List of dependency packages included in the content tools

bison
byacc
cscope
ctags
cvs
diffstat
doxygen
flex
gcc
gcc-c++
gcc-gfortran
gettext
git
indent
intltool
libtool
patch
patchutils
rcs
redhat-rpm-config
rpm-build
subversion
swig
systemtap

Perform the demo

[root@localghost ~]# yum groupinstall "Development tools"


Install      86 Package(s)
Upgrade       0 Package(s)

Total download size: 77 M
Installed size: 234 M
Is this ok [y/N]:

Enter y to confirm the installation and N to cancel. Or Yum - y groupinstall "development tools" confirm in advance.

If you encounter the following error no packages in any requested group available to install or update , you need to configure the data source

cd /etc/yum.repos.d
sudo wget http://public-yum.oracle.com/public-yum-el5.repo
cd /etc/pki/rpm-gpg/
sudo wget https://public-yum.oracle.com/RPM-GPG-KEY-oracle-el5

Reference article

https://support.eapps.com/index.php?/Knowledgebase/Article/View/438/55/user -guide—installing-the-centos-development-tools-gcc-flex-etc

Expand

Lamp one click installation – in fact, with docker container technology, I feel that lamp (Linux + Apache + MySQL/MariaDB/percona + PHP) production environment is unnecessary

Solve the problem of could not retrieve mirrorlist in centos7 yum

Just after installing CentOS 7. X through VMware 12, check the IP address of CentOS LAN using IP addr. It is found that there is no error when using Yum to install some toolkits

Loaded plugins: fastestmirror, refresh-packagekit, security

Loading mirror speeds from cached hostfile

Could not retrieve mirrorlist http://mirrorlist.centos.org/?release=6&arch=i386&repo=os error was

14: PYCURL ERROR 6 – “Couldn’t resolve host ‘ mirrorlist.centos.org ‘”

Error: Cannot find a valid baseurl for repo: base

The image list cannot be retrieved using yum. The solution is as follows.

1. CD/etc/sysconfig/network scripts enter this folder, and then check if there is ifcfg-ens33, sometimes ifcfg-eth0

2. VI ifcfg-ens33 enter the general mode of VI and move the cursor to onboot = No

3. Press “I” to enter the editing mode of VI, and change no to yes

4. After modification, press ESC to enter the general mode again, then press “:” to the bottom of the file, and then enter “WQ” (save to exit) after “:”

5. Restart CentOS and try IP addr and Yum again.

Add: if ifcfg-eth0 file is found in network scripts, change the following two items to the following, and finally restart.

ONBOOT=yes MM_ CONTROLLED=no

has a problem. The official account below is

.

The problem of “no packages” in centos7

“No packages in any requested group available to install or update” in centos7

Using Yum to install X-Windows today, the following error was reported:

sudo  yum groups install "X Window System"

Loading mirror speeds from cached hostfile
 * base: mirrors.shu.edu.cn
 * epel: mirror.dmmlabs.jp
 * extras: mirrors.cn99.com
 * updates: mirrors.cn99.com
Maybe run: yum groups mark install (see man yum)
No packages in any requested group available to install or update

It can’t be installed. It’s invalid. The command is correct. Go to the official website to find out the reason. You can see why Yum groupinstall “package group name” is failing on RHEL 7 with error “there is no installed groups file” on the official website, which exactly describes this problem.

It turns out that after 7, the default options are not installed, so you need to add the default items yourself. The solution is: Yum groupinstall "office suite and productivity" -- setopt = group_ package_ types=mandatory,default,optional

Add — setopt = group after_ package_ Types = mandatory, default, optional

sudo  yum groupinstall "X Window System"  --setopt=group_package_types=mandatory,default,optional

Implementation of commands similar to apt get install build essential in yum

After installing the system in Ubuntu, you can directly use the apt get install build essential command to install the commonly used development and compilation kits. In a system such as CentOS that uses Yum package management, there is a similar implementation method. The solution is to use the following command:

yum groupinstall “Development Tools”

Install CentOS development tools

Mirror source switch


First switch the yum source to the domestic image source
backup the original source image file

# cp /etc/yum.repos.d/CentOS-Base.repo /etc/yum.repos.d/CentOS-Base.repo.backup

Download the new CentOS- Base.repo

#wget -O /etc/yum.repos.d/CentOS-Base.repo http://mirrors.aliyun.com/repo/Centos-7.repo

If WGet is not installed, you can use ?Yum install WGet to execute CentOS after installation- Base.repo Installation of
on /etc/ yum.repos .d/CentOS- Media.repo source file configuration file, changed to invalid

enable=0

Yum cache generation

#yum clean all
#yum makecache
#yum update

CentOS development tools installation

yum groupinstall "Development Libraries"

yum groupinstall "Development Tools"

yum install ncurses-devel zlib-devel texinfo gtk+-devel gtk2-devel qt-devel tcl-devel tk-devel libX11-devel kernel-headers kernel-devel

Solve the problem of “ZABBIX discoverer processes 75% busy” in CentOS

Solve the problem of “ZABBIX discoverer processes 75% busy” in CentOS

Pioneers published in operation and maintenance experience sharing subscription

253

Tencent cloud server annual payment 3 fold

The first purchase of cloud server is at least 3 fold, with super high cost performance

Limited time rush purchase

In the process of using ZABBIX, when the auto discovery protocol is turned on, the alarm message “ZABBIX discoverer processes more than 75% busy” frequently appears, as follows:

Trigger: Zabbix discoverer processes more than 75% busy
Trigger status: PROBLEM
Trigger severity: Average
Trigger IP: 61.172.253.59
Item values:
1. Zabbix busy discoverer processes, in % (192.168.1.222:zabbix[process,discoverer,avg,busy]): 100 %
Original event ID: 4690

After searching on the Internet, there are many main reasons for the alarm: 1. MySQL supporting ZABBIX is stuck; 2. Io of ZABBIX server is stuck; 3. ZABBIX process is not allocated enough memory; 4. The target server is not connected to the network. Therefore, consider increasing the number of initialization processes when ZABBIX server starts, and directly increasing the polling load to avoid this kind of error. Modify/etc/ZABBIX/ZABBIX_ server.conf , find startpollers


### Option: StartPollers

# Number of pre-forked instances of pollers.

#

# Mandatory: no

# Range: 0-1000

# Default:

StartPollers=5

According to the system hardware configuration, it can be set to a higher value. Another solution is to restart ZABBIX server regularly. It can be configured by timing script as follows:


crontab -e

@daily service zabbix-server restart &> /dev/null 2&>&1

For reprint, please note: knowledge base solves the problem of “ZABBIX discoverer processes 75% busy” in CentOS

(adsbygoogle = window.adsbygoogle || []).push({});