Tag Archives: framework

Using CEF as user interface

Learn this, you can use local files to achieve a pure HTML, JavaScript and CSS (bootstrap) based user interface, and use it to operate the system

1、 Create a new folder in the project: HTML resources. Then copy the bootstrap file directory structure and content into it. And set the copy to output directory value of these files to copy always

2、 To display and manipulate index.html In the interface. Add button button to execute with JavaScript. (cefcustomobject is an instance of the operation class later)

<button class="btn btn-info" onclick="cefCustomObject.showDevTools();"&>Open Chrome Dev Tools</button&>
  <button class="btn btn-primary" onclick="cefCustomObject.opencmd();"&>Open cmd.exe</button&>

3. Create a new operation class (user target class) (click the button to perform the operation.) For example, opencmd method: open the CMD process

4、 In the constructor (1 — 4 is the same as using CEF as the browser)::

1. Cefsetting instantiation settings

2. Use CEF to initialize settings

3. Instantiate the chromiumwebbrower object (locally located) index.html (file)

4. Load this object into the control and set it to fill

5. The browser builds objects to register JS events. Binding instantiates the operation class.

6. Some browser properties are set by browersettings. Assigned to the browser.

Git source code address:

https://gitee.com/HuLuMiaoMiao/SecondCefSharp

Reference (some changes are easy to understand and some mistakes are made)

https://ourcodeworld.com/articles/read/173/how-to-use-cefsharp-chromium-embedded-framework-csharp-in-a-winforms-application
Call JIRA API to create issue prompt xsrf check failed

1. Check whether the client sending the request is httpclient or resttemplate in spring. It’s better to use resttemplate (I just want to replace the client). The request header is as follows. The rest is mei’jia

HttpHeaders headers = new HttpHeaders();
headers.add("X-Atlassian-Token", "no-check");
headers.add("Authorization", JIRA_API_AUTHORIZATION);
headers.add("Content-Type", "application/json");

2. Add configuration in the request header( headers.add (x-atlassian-token, no check); this is the advice given in the official document

3. Modify the user agent in the request header

It’s better to deal with the above items. Generally, this problem can be solved. In addition, post several JIRA API documents.

(create issue) https://developer.atlassian.com/cloud/jira/platform/rest/v2/api-group-issues/#api -Rest-api-2-issue-post headers.add (“Authorization”, JIRA_ API_ AUTHORIZATION))

(JIRA official document on security certification related content) https://developer.atlassian.com/server/framework/atlassian-sdk/atlassian-rest-api-design-guidelines-version-1/

(questions from others in JIRA community) https://community.atlassian.com/t5/Jira-questions/Jira-7-rest-api-XSRF-check-failed-for-post-issue-with/qaq-p/488706

Using the Xtreme Toolkit Pro toolbar

Xtreme Toolkit Pro is the most comprehensive interface control package in MFC development. It provides 11 mainstream Visual C + + MFC controls needed for Windows development, including command bars, controls, chart pro, calendar, docking panel, property grid, report control, shortcut bar, syntax edit, skin framework and task panel. If you are interested in the product, please go to Huidu to download the latest trial version of Xtreme Toolkit Pro ! Click to get more free Xtreme Toolkit Pro tutorials, videos and examples

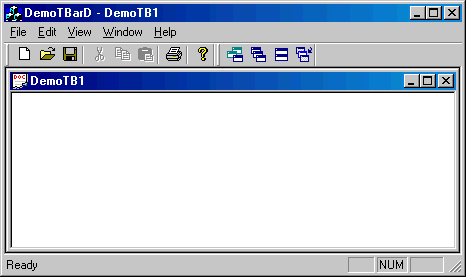
There are many articles about docking toolbars. But I think it’s important to find the same information on Microsoft’s MSDN site. In short

Add the following methods to your CMainFrame class:

void CMainFrame::DockControlBarLeftOf(
                        CToolBar* Bar, CToolBar* LeftOf)
{
    CRect rect;
    DWORD dw;
    UINT n;

    // get MFC to adjust the dimensions of all docked ToolBars
    // so that GetWindowRect will be accurate
    RecalcLayout(TRUE);

    LeftOf-&>GetWindowRect(&rect);
    rect.OffsetRect(1,0);
    dw=LeftOf-&>GetBarStyle();
    n = 0;
    n = (dw&CBRS_ALIGN_TOP) ?AFX_IDW_DOCKBAR_TOP : n;
    n = (dw&CBRS_ALIGN_BOTTOM && n==0) ?
                                AFX_IDW_DOCKBAR_BOTTOM : n;
    n = (dw&CBRS_ALIGN_LEFT && n==0) ?
                                AFX_IDW_DOCKBAR_LEFT : n;
    n = (dw&CBRS_ALIGN_RIGHT && n==0) ?
                                AFX_IDW_DOCKBAR_RIGHT : n;

    // When we take the default parameters on rect, DockControlBar
    // will dock each Toolbar on a seperate line. By calculating a
    // rectangle, we are simulating a Toolbar being dragged to that
    // location and docked.
    DockControlBar(Bar,n,&rect);
}

Now, instead of using dockcontrolbar in your CMainFrame:: oncreate, use dockcontrolbar leftof:

m_wndToolBar1.EnableDocking(CBRS_ALIGN_ANY);
m_wndToolBar2.EnableDocking(CBRS_ALIGN_ANY);
EnableDocking(CBRS_ALIGN_ANY);
DockControlBar(&m_wndToolBar1);
DockControlBarLeftOf(&m_wndToolBar2,&m_wndToolBar1);

This will stop M_ M on the left side of wndtoolbar1_ wndToolBar2。 Click to get the demo corresponding to the article.

That’s all for today, download the latest version of Xtreme Toolkit Pro and share your thoughts on the product in the comments area below. Your feedback can help us find the right direction in the future update!