Tag Archives: visual studio

How to solve Visual Studio error C4996

error C4996: ‘fopen’: This function or variable may be unsafe. Consider using fopen_ s instead. To disable deprecation, use _ CRT_ SECURE_ NO_ WARNINGS. See online help for details.

1> f:\program files (x86)\microsoft visual studio 12.0\vc\include\stdio. H (211): see the statement of “fopen”

Quick solutions are as follows

Right click project file 1 and select 2

2

Then pop up the property page of the file, click 1Processor, and then click 2processor to open the preprocessor, as shown in the figure below

3

Copy “_crt_secure_no_warnings” in the following red box, then click OK and then click apply.

4

Problem solving

Installation tutorial of visual studio 2017 and visual Assist X

statement: all the software provided in this article are from the Internet, only for personal research and learning use, do not use for commercial purposes, please delete within 24 hours after downloading, please support genuine!

I. installation tutorial of visual studio 2017

Visual studio 2017 download address: https://visualstudio.microsoft.com/zh-hans/downloads/

Take the windows system as an example, we can generally choose the community version, which is a free version and can already meet our basic needs, so we can download the community 2017 version corresponding to windows.

The specific installation process is brief.

2. Installation tutorial of VA assistant

Visual Assist X 10.9.2210 download address: https://pan.baidu.com/s/1LcW5eWPtt9NKIQWpihh6EA Extraction code: 472l

1. Download and unzip.

2. Close visual studio 2017 and double-click VA_ X_ Setup2210.exe, select Microsoft Visual Studio 2017, and then click Install.

3. After installation, will download good VA_ 10. DLL to the path as shown in the figure.

C:\Users\Administrator\AppData\Local\Microsoft\VisualStudio\15.0_80ee6e4f\Extensions\gr1pevtd.bko

Finally, open vs again and you can use it normally


How to Solve MSB8020 The build tools for v141 (Platform Toolset = ‘v141‘) cannot be found. To build using the

Problem solving

MSB8020 The build tools for v141 (Platform Toolset = ‘v141’) cannot be found. To build using the v141 build tools, please install v141 build tools. Alternatively, you may upgrade to the current Visual Studio tools by selecting the Project menu or right-click the solution, and then selecting “Retarget solution”. ChineseSimplified C:\Program Files (x86)\MSBuild\ Microsoft.Cpp \v4.0\V140\ Microsoft.Cpp.Platform .targets 57

Solutions

Msb8020 could not find the build tool for v141 (platform toolset =’v141 ‘). To build using the v141 build tool, install the v141 build tool. Alternatively, you can upgrade to the current version of visual studio tools, Microsoft. CPP, v4.0, V140, by selecting the Project menu or right-click solutions and then selecting retargeting solutions\ Microsoft.Cpp . platform objective 57

Solutions

When this problem occurs, you can see that the project you want to build is from vs2017, and its C + + toolset is v141. Of course, we can also choose to install toolset v141 in vs2019. In vs2019, go to tools = &> get tools and functions = &> install the C + + build tools of vs2017.
Note: the vs 2015 platform toolset is V140, the vs 2017 platform toolset is v1141, and the vs 2019 platform toolset is v142.

No build tools were found for & lt; platform &> (platform toolset = “& lt; version &>”. To build using the & lt; version &> build tool, install the & lt; platform &> build tool. Alternatively, you can upgrade to the current visual studio tools by selecting the Project menu or right-click the solution, and then select retarget solution.

WebPack Task Runner

https://marketplace.visualstudio.com/items?itemName=MadsKristensen.WebPackTaskRunner

New to WebPack?

You may want to check out the article How to integrate WebPack into Visual Studio 2015 by Ilya Pirozhenko

Install WebPack

In order to use this extension, you must have WebPack installed globally or locally in your project.

Use npm to install it globally by typing the following in a command line:

npm install webpack -g

To use the server functionality you also need to install webpack-dev-server like so:

npm install webpack-dev-server -g

If you wish to use babel to run WebPack, you must first install it locally in your project:

npm install babel-core --save-dev

Item Template

You can easily add a new webpack.config.js file to your project from the Add New Item dialog.

Just search for “webpack”.

vshost.exe What is the purpose of the document?

When I create and compile the “Hello world” Application in C, in addition to the main exe, I get three files in the debug folder (for example HelloWorld.exe )

HelloWorld.vshost.exe

HelloWorld.pdb

HelloWorld.vshost.exe .manifest

What is the purpose of these documents?


#1st floor

It seems to be a long-running debugging framework process (reducing load time?). I found that when you launch an application from the debugger twice, you usually use the same vshost.exe Process. It just unloads all user loaded DLLs first. This can have strange results if you are using API hooks from managed processes.


#2nd floor

In addition, you can turn off vshost file creation for release version configuration and enable it for debug .
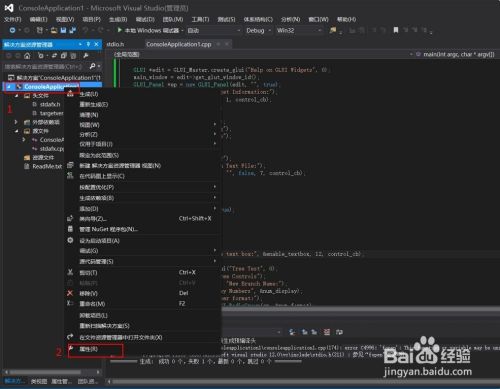
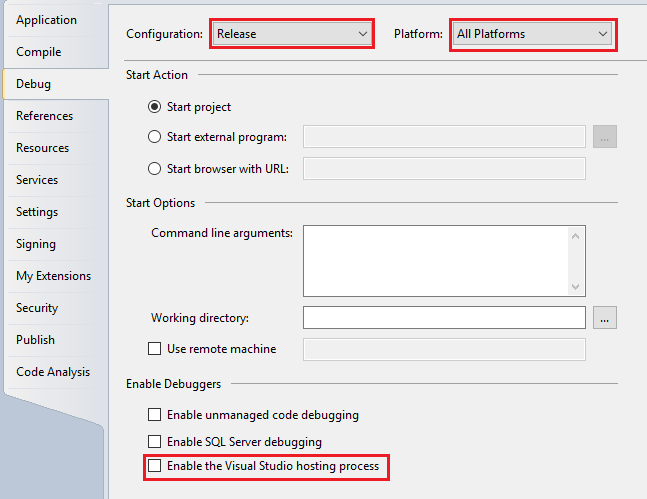
steps

project properties &> debug &> configure (publish) &> Disable Visual Studio host process

project properties &> debug &> configure (debug) &> enable visual studio host process

reference

How MSDN: disable host processes

MSDN host process( vshost.exe )

From MSDN how to: disable host processes

When a host process is enabled, some API calls may be affected. In these cases, the managed procedure must be disabled to return the correct result.

To disable managed procedures

Open the executable project in visual studio. Projects that do not generate executables, such as class libraries or service projects, do not have this option.

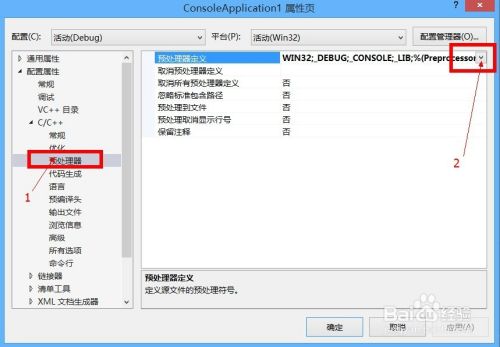
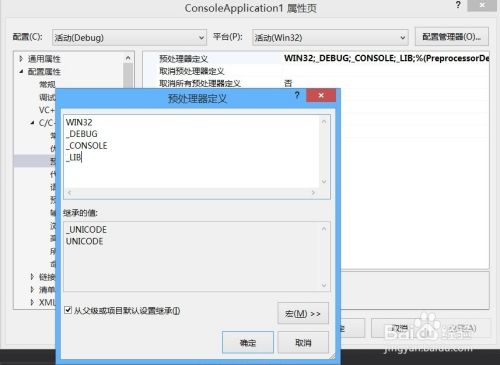
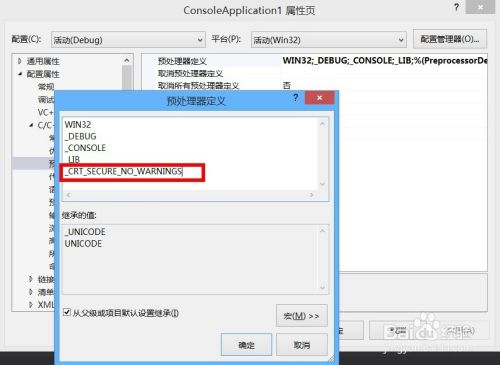
On the item menu, click properties .

Click the debug tab.

Clear the enable visual studio host process check box.

When managed procedures are disabled, several debugging features are unavailable or performance degradation occurs. For more information, see debugging and hosting procedures.

In general, when a managed procedure is disabled:

The time required to start debugging. Net framework applications has increased.

Design time expression evaluation is not available.

Partial trust debugging is not available.


#3rd floor

vshost.exe File is the executable file of Visual Studio (Visual Studio host executable file). This is an executable that links to visual studio and improves debugging.

Don’t use the vshost.exe Or. PDB (debug database) file.


#4th floor

VS2005 introduces vshost.exe Function (to answer your comments).

Its main purpose is to make debugging start faster – basically there’s a framework running, just ready to load your application when you want it.

Please refer to this MSDN article and this blog article for more information.


#5th floor

. Exe – “normal” executable

. vshost.exe -A special version of the executable file to aid debugging; for more information, see MSDN

. PDB – program database with debug symbol

. vshost.exe.manifest -A configuration file that primarily contains library dependencies

Using the Xtreme Toolkit Pro toolbar

Xtreme Toolkit Pro is the most comprehensive interface control package in MFC development. It provides 11 mainstream Visual C + + MFC controls needed for Windows development, including command bars, controls, chart pro, calendar, docking panel, property grid, report control, shortcut bar, syntax edit, skin framework and task panel. If you are interested in the product, please go to Huidu to download the latest trial version of Xtreme Toolkit Pro ! Click to get more free Xtreme Toolkit Pro tutorials, videos and examples

There are many articles about docking toolbars. But I think it’s important to find the same information on Microsoft’s MSDN site. In short

Add the following methods to your CMainFrame class:

void CMainFrame::DockControlBarLeftOf(
                        CToolBar* Bar, CToolBar* LeftOf)
{
    CRect rect;
    DWORD dw;
    UINT n;

    // get MFC to adjust the dimensions of all docked ToolBars
    // so that GetWindowRect will be accurate
    RecalcLayout(TRUE);

    LeftOf-&>GetWindowRect(&rect);
    rect.OffsetRect(1,0);
    dw=LeftOf-&>GetBarStyle();
    n = 0;
    n = (dw&CBRS_ALIGN_TOP) ?AFX_IDW_DOCKBAR_TOP : n;
    n = (dw&CBRS_ALIGN_BOTTOM && n==0) ?
                                AFX_IDW_DOCKBAR_BOTTOM : n;
    n = (dw&CBRS_ALIGN_LEFT && n==0) ?
                                AFX_IDW_DOCKBAR_LEFT : n;
    n = (dw&CBRS_ALIGN_RIGHT && n==0) ?
                                AFX_IDW_DOCKBAR_RIGHT : n;

    // When we take the default parameters on rect, DockControlBar
    // will dock each Toolbar on a seperate line. By calculating a
    // rectangle, we are simulating a Toolbar being dragged to that
    // location and docked.
    DockControlBar(Bar,n,&rect);
}

Now, instead of using dockcontrolbar in your CMainFrame:: oncreate, use dockcontrolbar leftof:

m_wndToolBar1.EnableDocking(CBRS_ALIGN_ANY);
m_wndToolBar2.EnableDocking(CBRS_ALIGN_ANY);
EnableDocking(CBRS_ALIGN_ANY);
DockControlBar(&m_wndToolBar1);
DockControlBarLeftOf(&m_wndToolBar2,&m_wndToolBar1);

This will stop M_ M on the left side of wndtoolbar1_ wndToolBar2。 Click to get the demo corresponding to the article.

That’s all for today, download the latest version of Xtreme Toolkit Pro and share your thoughts on the product in the comments area below. Your feedback can help us find the right direction in the future update!