Resolution of $symbol error when using jQuery Library in typescript
Record a need encountered in today’s work and the solution found by yourself
Requirements:
Add an ID in the original select option box. (I want to add a span element with style. I tried for a long time. I can’t add span in option, let alone with style)
Scheme:
I refer to the original select option box, which added a “√” picture element. The original solution here is to use the jquery.dd.js component.
I looked at the parameter definition of the option element of the next component.
definition:
 1 var parseOption = function(opt) {
 2 var imagePath = '', title ='', description='', value=-1, text='', className='', imagecss = '', index;
 3 if (opt !== undefined) {
 4 var attrTitle = opt.title || "";
 5 //data-title
 6 if (attrTitle!="") {
 7 var reg = /^\{.*\}$/;
 8 var isJson = reg.test(attrTitle);
 9 if (isJson && settings.jsonTitle) {
10 var obj = eval("["+attrTitle+"]");
11 };
12 title = (isJson && settings.jsonTitle) ?obj[0].title : title;
13 description = (isJson && settings.jsonTitle) ?obj[0].description : description;
14 imagePath = (isJson && settings.jsonTitle) ?obj[0].image : attrTitle;
15 imagecss = (isJson && settings.jsonTitle) ?obj[0].imagecss : imagecss;
16 index = opt.index;
17 };
18
19 text = opt.text || '';
20 value = opt.value || '';
21 className = opt.className || "";
22 //ignore title attribute if playing with data tags
23 title = $(opt).prop("data-title") || $(opt).data("title") || (title || "");
24 description = $(opt).prop("data-description") || $(opt).data("description") || (description || "");
25 imagePath = $(opt).prop("data-image") || $(opt).data("image") || (imagePath || "");
26 imagecss = $(opt).prop("data-imagecss") || $(opt).data("imagecss") || (imagecss || "");
27 index = $(opt).index();
28 };
29 var o = {image: imagePath, title: title, description: description, value: value, text: text, className: className, imagecss:imagecss, index:index};
30 return o;
31 };
After reviewing the parameter definitions in this component, I made some changes in combination with the option template used in the original project.
Option template code in the original project:
1 <option value="{{id}}" data-title="{{name}}" {{#if done}} data-image="/images/selected.png"{{else}} data-image="/images/null.png" {{/if}}>
2 {{value}}
3 </option>
To view the original code, add a data image attribute in the option tab, that is, the “√” icon. The effect displayed on the page is that there is a “√” icon in front of each qualified option.
According to this feature, I think about whether I can add another attribute in option to put the content in span I originally wanted to add.
In this way, I selected the description attribute and modified the original code.
As follows:
1 <option value="{{id}}" data-title="{{name}}" {{#if done}} data-image="/images/selected.png"{{else}} data-image="/images/null.png" {{/if}}
{{#if ok}} data-description="正" data-imagecss="fcss" {{/if}}>
2 {{value}}
3 </option>
The part marked with yellow silver light pen is the new part.
Summary:
Where data description = “exactly” is the attribute of description in the above component that I want to add a span element.
Data image = “FCSs” is to modify the CSS style of the original data image attribute.
The above completes the requirement that I want to add an ID in option.
Tails: Part 0000 0011
In these two days, CRM, one of the key development branches of the Department, went online. JQuery is used to call WebService through Ajax. An inexplicable 404 error was reported during the test. After analysis, 404 it is because the error page error.aspx configured by web.config itself does not exist, so this error makes it confusing to find the real reason. In the final analysis, it is lack of experience.
after this error is eliminated, the real cause of the error is that 500 errors are reported, which is correct locally; It is also correct to directly enter the server for testing; Open the browser remote call, and an error will be reported. It’s obvious that Google keyword: jQuery reports errors when calling WebService remotely. There are a lot of solutions, which are simple and effective. Here’s a record:
It turns out that the default post setting in web.config does not allow remote calling of WebService. Just change the configuration.
if you want to call it normally remotely, you need to modify web.config and add the following paragraph under the system.web section
<webServices >
  <protocols >
  <add name="HttpSoap"/>
  <add name="HttpPost"/>
  <add name="HttpGet"/>
  <add name="Documentation"/>
  </protocols>
 </webServices>
cause:
there are many problems after a jQuery version upgrade in the project
Project errors are as follows:
1. Cannot read property ‘MSIE’ of undefined
2. Uncaught type error: $(…). Live is not a function


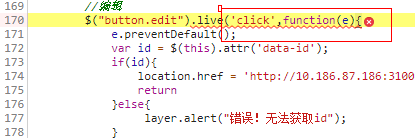
reason:
The latest version of jQuery discards many APIs, including two reported errors
method:
jQuery migrate, a plug-in developed by the jQuery team, automatically recovers APIs that have been abandoned since the latest version, so that the existing JS code can run normally with the latest jQuery library without any change
just refer to the migrate file after the referenced jQuery file
<script src="https://code.jquery.com/jquery-3.4.1.min.js"></script>
<script src="http://code.jquery.com/jquery-migrate-1.2.1.js"></script>The onload event is a standard event in DOM, while the ready event is specific to jQuery.
The purpose of the ready event is that it should occur as soon as the document is loaded, so that code that adds functionality to elements in the page does not have to wait for everything to load.
The ready event occurs after the HTML document is loaded, while the onload event occurs after all content (such as images) is loaded.
From: https://stackoverflow.com/questions/3698200/window-onload-vs-document-ready
$(document). Ready: it is executed after the DOM structure is drawn, and there is no need to wait until the loading is completed. This means that after the DOM tree is loaded, it will be executed without waiting for the pictures or other external files in the page to be loaded. And can write multiple. Ready.
window.onload : all elements of the page are loaded, including pictures and other elements. It can only be executed once. Therefore, the execution time of $(document). Ready is earlier than window.onload . And can write many, look at the code:
//The following code does not execute correctly.
window.onload = function()
{
alert(“text1”);
};
window.onload = function()
{
alert(“text2”);
};
//The result is only the second output Can write more than one at the same time
// The following code is executed correctly.
$(document).ready(function()
{
alert(“Hello World”);
});
$(document).ready(function()
{
alert(“Hello again”);
});
//The results output both times
If you need to get the attribute values of DOM binding elements, it is best to use window.onload , because it is executed after all the elements are loaded. If you use $(document). Ready, the DOM has been loaded, but the element attributes bound to the DOM have not been loaded, so the attributes do not take effect. To solve this problem, you can use the load () method, another page loading method in jQuery. The load () method binds a handler to the onload event of the element. If the processing function is bound to a window object, it will be triggered after all the contents (including windows, frames, objects and images) are loaded. If the processing function is bound to an element, it will be triggered after the contents of the element are loaded.
//Jquery Code:
$(window).load(function ()
{

});
//is equivalent to the following code in JavaScript
Window.onload = function ()
{

}
Conclusion:
1. window.onload=function () {} is to wait for all content to be loaded, such as image, content, JS, CSS, etc.
2. $(function () {}) is to wait for the DOM to be loaded (my understanding is after the label is drawn), and it can be executed even when the picture is not loaded.
3. $(function () {}) is the abbreviation of $(document). Ready (function () {}). The function is the same.
4. $(window). Load (function () {}) is executed after all the contents are loaded.
5. Whether it’s the external chain JS or the JS in the page window.onload Only the last one is executed
6. $(window). Load (function () {}) can have more than one, and all of them are executed in sequence.