Tag Archives: Unity 3D

Getting started with unity 3D lightmapping QuickStart

This an introductory description of lightmapping in Unity. For more advanced topics seein-depth description of lightmapping in Unity

This is a guide to unity lightmap. For more advanced features, see in depth description of lightmapping in unity.

Unity has a built-in lightmapper: it’sBeastby Illuminate Labs. Lightmapping is fully integrated in Unity. This means that Beast will bake lightmaps for your scene based on how your scene is set up within Unity, taking into account meshes, materials, textures and lights. It also means that lightmapping is now an integral part of the rendering engine – once your lightmaps are created you don’t need to do anything else, they will be automatically picked up by the objects.

Unity’s built-in lightmap baking tool is beast of illuminate labs. Baking light mapping process is perfectly integrated into unity. This means that using beast, you can bake your scene according to your mesh objects, material maps and light properties, so as to get a perfect light map. It also means that the lightmap will be part of the rendering engine. As long as you bake the lightmap once, you don’t need to do anything else. The lightmap is automatically assigned to the object

Preparing the scene and baking the lightmaps

SelectingWindow – Lightmappingfrom the menu will open the Lightmapping window:

Select window – lightmapping from the menu bar to open the lightmap tool window

Make sure any mesh you want to be Lightmapped has proper UVs for lightmapping. You can also select the generate lightmap UVs option from the mesh import settings panel to generate a set of UVs for locating the lightmap

In the object pane mark any mesh render or terrain as static – this will tell unity, that those objects won’t move nor change and they can be Lightmapped.
in the object panel, set the objects to be baked as static, so unity will know which objects need to be baked

To control the resolution of the lightmaps, go to theBakepane and adjust theResolutionvalue. (To have a better understanding on how you spend your lightmap texels, Look at the small lightmap display window within the scene view and select show resolution )( In the scene view panel, check the show resolution option in the small window lightmap display to help you view the map resolution settings more intuitively

Press bake
Click bake (baking)

A progress bar appears in unity editor’s status bar, in the bottom right corner

When baking is done, you can see all the baked lightmaps at the bottom of the lightmap editor window

Scene and game views will update – your scene is now lightmapped!

The scene and game windows will be updated. Now you can see the lightmap effect in your scene

Tuning bake settings

Final look of your scene depends a lot on your lighting setup and bake settings. Let’s take a look at an example of some basic settings that can improve lighting quality.

The final rendering of the scene depends on your more settings for lighting and baking options. Let’s look at a small example of improving the quality of light through basic settings

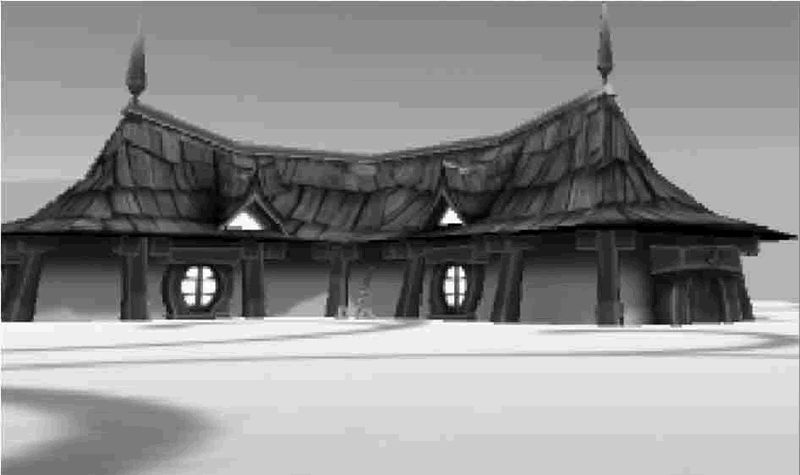
This is a basic scene with a couple of cubes and one point light in the centre. The light is casting hard shadows and the effect is quite dull and artificial.

This is a simple scene with a set of cubes and a point light at the center of the scene. The light produces hard shadows that look rather insipid and unnatural

Selecting the light and opening the Object pane of the Lightmapping window exposes Shadow Radius and Shadow Samples properties. Setting Shadow Radius to 1.2, Shadow Samples to 100 and re-baking produces soft shadows with wide penumbra – our image already looks much better.

Select the light to open the object panel and expand the shadow range and shadow sampling attributes. Setting the shadow range to 1.2, shadow sampling to 100, re baking will produce a soft shadow with a wide penumbra range. Our pictures look really much better

With Unity Pro we can take the scene one step further by enabling Global Illumination and adding a Sky Light. In the Bake pane we set the number of Bounces to 1 and the Sky Light Intensity to 0.5. The result is much softer lighting with subtle diffuse interreflection effects (color bleeding from the green and blue cubes) – much nicer and it’s s till only 3 cubes and a light!

Using the professional version of unity can turn on the global lighting and skylight for baking, and the picture effect can be greatly improved. On the bake panel, set bounce to 1 and sky light intensity to 0.5. It can bake out the soft light source with subtle change of reflection effect( Color spillover from green and blue boxes)

Lightmapping in depth

For more information about the various lightmapping-related settings, please refer to thein-depth description of lightmapping in Unity.

For more information about lightmapping settings, see in depth description of lightmapping in unity

Let’s share my teacher Dashen’s AI course. Zero base! Easy to understand! Funny! And yellow jokes! Hope you can join our AI team! https://blog.csdn.net/jiangjunshow

Unity 3D physics Manager

As an excellent game development platform, unity 3D integrated development environment provides an excellent management mode, namely physics manager

the physical manager manages the parameters of the physical effects in the project, such as the gravity, rebound force, velocity and angular velocity of the object

in unity 3D, execute the command edit → project settings → physics to open the physical manager, as shown in the figure below

you can change the physical effects in the game by adjusting the parameters in the physical manager as needed, as shown in the table below

parameters meaning

function
Gravity Gravity It is applied to all rigid bodies and works only on the y-axis
Default Material Default physical material If a collider does not have a physical material set, the default material is used
Bounce Threshold Rebound threshold If the relative velocity of the two colliders is lower than this value, they will not rebound
Sleep Velocity Dormancy speed Objects below this speed will go into sleep
Sleep Angular Velocity Sleep angular velocity Objects below this angular velocity will go into sleep
Max Angular Velocity Maximum angular velocity It is used to limit the angular velocity of rigid body and avoid numerical instability during rotation
Min Penetration For Penalty Minimum penetration How far can two objects penetrate before the collision detector separates them
Solver Iteration Count Iterations It determines the calculation accuracy of joints and connections
Raycasts Hit Triggers X-ray detection hit trigger If this function is enabled, a hit message will be returned when hit collision occurs during ray detection; If this feature is turned off, no hit message is returned
Layer Collision Matrix Layer collision matrix Define the behavior of layer collision detection system

comprehensive case: maze

case conception

Maze game is a common game type, players in a limited time, looking for treasure box in the maze, so as to achieve the purpose of customs clearance

the purpose of this project is to search for the hidden treasure box in the maze through virtual roaming in the scene, and collect it when close to the treasure box, so as to realize the collision detection function

case design

This case creates a three-dimensional maze scene in unity 3D. There are several treasure boxes scattered in the scene. The game player needs to find the treasure box within the specified time, approach and collect it, and finally pass the customs

project implementation

1) set up maze scene

Step 1): create a new project and name the scene MIG

Step 2): create a game object. Execute the GameObject → 3D object → plane command in the menu bar to create a plane and assign a material to it

execute the GameObject → 3D object → cube command to create several boxes to form a maze scene, as shown in the following figure

Step 3): import model resources. Select the 3D model resource from unity 3D store and load it into the scene, and name it as treasure, as shown in the figure below

Step 4): import the model resources into the hierarchy view, as shown in the following figure

Step 5): execute the commands assets → import package → custom package to add first person resources, as shown in the figure below

Step 6): select the first person resource and click Import to import it, as shown in the figure below

Step 7): search for the first person controller in the project view, add it to the hierarchy view, and place it in an appropriate position on the plane, as shown in the following figure

Step 8): because the first person resource has its own camera, it is necessary to turn off the camera in the scene

2) add trigger

Step 9): select tree, add box Collider to the tree object, and check the is trigger attribute, as shown in the following figure

Step 10): write the script triggers.cs, and the code is as follows

usingUnityEngine;usingSystem.Collections;publicclassTriggers:MonoBehaviour{voidOnTriggerEnter(Colliderother){if(other.tag=="Pickup"){Destroy(other.gameObject);}}}

Step 11): link the triggers script to the first person controller

Step 12): add a label pickup to the tree

3) add counting function

Step 13): modify the script

usingUnityEngine;usingSystem.Collections;publicclassTriggers:MonoBehaviour{publicstaticinttemp_Num=0;voidOnTriggerEnter(Colliderother){if(other.tag=="Pickup"){temp_Num++;Destroy(other.gameObject);}}voidOnGUI(){if(temp_Num==5)if(GUI.Button(newRect(Screen.width/2f,Screen.height/2f,100,50),"playagain")){temp_Num=0;Application.LoadLevel("migong");}}}

Step 14): add the scene to the build settings, as shown in the following figure

4) add timing function

Step 15): complete the code as follows

usingUnityEngine;usingSystem.Collections;publicclassTriggers:MonoBehaviour{publicstaticinttemp_Num=0;publicintparachuteNum;inttimer;inttime_T;boolisWin=false;boolisLose=false;voidStart(){Time.timeScale=1;GameObject[]objs=GameObject.FindGameObjectsWithTag("Pickup");parachuteNum=objs.Length;time_T=(int)Time.time;}voidUpdate(){timer=20-(int)Time.time+time_T;if(temp_Num==parachuteNum&&timer!=0){isWin=true;}if(timer==0&&temp_Num!=parachuteNum){isLose=true;}}voidOnTriggerEnter(Colliderother){if(other.tag=="Pickup"){temp_Num++;Destroy(other.gameObject);}}voidOnGUI(){GUI.Label(newRect(0,0,100,50),timer.ToString());if(isWin==true||isLose==true){Time.timeScale=0;if(GUI.Button(newRect(Screen.width/2f,Screen.height/2f,100,50),"playagain")){isWin=false;isLose=false;temp_Num=0;Application.LoadLevel("migong");}}}}

Step 16): Single Play according to 38062; " Test, results as shown in the following map.