Category Archives: Linux

[Solved] UnboundLocalError: local variable x referenced before assignment

We discussed the relationship between Python scope and legb last time

Next, we will discuss the error reporting we often encounter: referenced before assignment

Simple code:

# coding: utf8
a = 3
def f():
    print a
    a = 4
    print a
f()

print '---------------------loop--------------------'

a = 3
def f():
    a += 4
    print a
f()

No matter the first code or the second code, the following information can be obtained:

UnboundLocalError: local variable 'a' referenced before assignment

Oh ~ no, why did you report an error!! Should be able to get from the global variable ah

In fact, this phenomenon is easy to explain, because although the code execution is sequential, the scope judgment is not. Python uses static scope instead of dynamic scope. In other words, you only need to see from the code body which scope the variable needs to be quoted from

As a result, no matter in the first or second paragraph, python has found the constraint statement for symbol a in the internal scope of the function, so it will not be found from global. However, because the code execution is sequential, the constraint can only be established when the assignment statement is executed. Before that, symbol a can be found in the namespace, but it is undefined

The code a + = 4 seems to be in line with the above, but the reason is that although the code is executed from top to bottom and from left to right, for assignment statements, it is not from left to right, but from right to left

a += 4 ===> A = a + 4 (conversion)

After the above transformation, we can see it more clearly. First, execute a + 4, and then execute the assignment. OK, when executing a + 4, look for a, and find that it can be found in the namespace, but it is not defined, so it will automatically report an error and exit

This problem can be avoided by using global to declare variables in the code, because the global declaration will force Python to search the global namespace, regardless of the legb principle. However, it will also modify the value of global variables. Be careful~
Fixing increasing Load_Cycle_Count on Ubuntu

After digging around on the Internet, I have formulated a solution. Thanks to the Linux Mint forum people as well.

The key was to keep the APM_Level at 254 as this will stop the hard drive from spinning down frequently.

Now I know one can do this:
Code:

sudo hdparm -B 254 /dev/sda

This is not a permanent solution, to make it permanent you need to edit the hdparm.conf file.

I did as follows:

Code:

gksudo gedit /etc/hdparm.conf

Add this line to the very end of the file:

Code:

/dev/sda {
    apm = 254
    apm_battery = 254
}

Reboot the laptop and type the following:

Code:

sudo hdparm -B /dev/sda

The APM_Level will be 254 for when you are plugged in or on battery.

You can verify that the
count
is not increasing at an alarming rate by typing the following in a terminal:

Code:

smartctl -a /dev/sda | grep Load_Cycle_Count

Now I know the battery life will be shortened ever so slightly, but I have not noticed any difference.

I am sure someone else has formulated a similar solution and that this might not be unique.

Hope this helps.

https://wiki.ubuntu.com/DanielHahler/Bug59695

[Solved] Ubuntu Install caffe error: build_release/tools/caffe: error while loading shared libraries: libcudart.so.8….

1. There are three solutions on the Internet:

1) this is GitHub’s solution. Link: https://github.com/tensorflow/tensorflow/issues/5343

It can be seen that this method is still effective

2) execution order:

1 sudo ldconfig /usr/local/cuda/lib64

This feeling is ok too

3) if the above two methods are still unsolved, try the following:

The main reason for this kind of problem is that libcudart. So. 8.0 can’t be found in/usr/local/lib/directory, which can be found in usr/local/cuda-8.0/lib64/directory. Therefore, we copy libcudart. So. 8.0 through the following command. Remember to add sudo permission, otherwise it may not be copied
execute command:

1 sudo cp /usr/local/cuda-8.0/lib64/libcudart.so.8.0 /usr/local/lib/libcudart.so.8.0 && sudo ldconfig

This is where there will also be.

./build/tools/caffe: error while loading shared libraries: libcublas.so.8.0: cannot open shared object file: can not open shared object file: No such file or directory
./build/tools/caffe: error while loading shared libraries: libcurand.so.8.0: cannot open shared object file: can not open shared object file: No such file or directory
./build/tools/caffe: error while loading shared libraries: libcudnn.so.6: cannot open shared object file: can not open shared object file: No such file or directory
The corresponding name marked in yellow in the command can be changed

Execution is complete and there are no more errors!!!

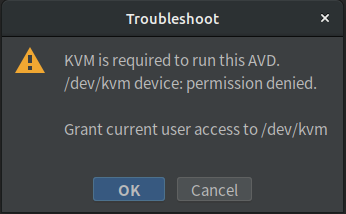
ubuntu18.04 Start Android StudioKVM is required to run this AVD ./dev/kvm device: permission denied.

Install Android studio under Ubuntu 18.04, and report an error after installing the simulator

KVM is required to run this AVD. /dev/kvm device: permission denied.

That is, the current user has no permission to/dev/KVM, so the/dev/KVM file needs to configure the permission group to the current login account. The terminal configures the following commands

sudo chown g -R /dev/kvm

In order to configure the command automatically, we need to follow the way of configuring Java environment variables. Configure it in the. Bashrc file so that it can be started automatically

( the following operations should not be needed. After using the sudo chown command to restart, you do not need to change the permission of this file again, because it has been set)

if you want to know how to add sudo (root permission) command when starting up, please see : start sudo command when Linux starts up

Configuration method:

sudo vim ~/.bashrc

On the last line of the file, add the following code. Add the file/dev/KVM to the permission group of redkey (my account)

sudo chown redkey -R /dev/kvm

In this way, after restarting the computer , the configuration information will be automatically executed

[Solved] SSH is disconnected as soon as it is connected

SSH disconnects as soon as it is connected

Debug message output.

debug1: key_parse_private2: missing begin marker
debug1: read PEM private key done: type RSA
debug1: private host key: #0 type 1 RSA
debug1: key_parse_private2: missing begin marker
debug1: read PEM private key done: type DSA
debug1: private host key: #1 type 2 DSA
debug1: key_parse_private2: missing begin marker
debug1: read PEM private key done: type ECDSA
debug1: private host key: #2 type 3 ECDSA
debug1: rexec_argv[0]=’/usr/sbin/sshd’
debug1: rexec_argv[1]=’-d’
Set /proc/self/oom_score_adj from 0 to -1000
debug1: Bind to port 22 on 0.0.0.0.
Server listening on 0.0.0.0 port 22.
debug1: Bind to port 22 on ::.
Server listening on :: port 22.
debug1: Server will not fork when running in debugging mode.
debug1: rexec start in 5 out 5 newsock 5 pipe -1 sock 8
debug1: inetd sockets after dupping: 3, 3
Connection from 118.11.11.11 port 40989 on 172.11.11.11 port 22
debug1: Client protocol version 2.0; client software version SecureCRT_7.0.0 (x64 build 326) SecureCRT
debug1: no match: SecureCRT_7.0.0 (x64 build 326) SecureCRT
debug1: Enabling compatibility mode for protocol 2.0
debug1: Local version string SSH-2.0-OpenSSH_6.6.1p1 Ubuntu-2ubuntu2
debug1: permanently_set_uid: 110/65534 [preauth]
debug1: list_hostkey_types: ssh-rsa,ssh-dss,ecdsa-sha2-nistp256 [preauth]
debug1: SSH2_MSG_KEXINIT sent [preauth]
debug1: SSH2_MSG_KEXINIT received [preauth]
debug1: kex: client->server aes256-ctr hmac-sha1 none [preauth]
debug1: kex: server->client aes256-ctr hmac-sha1 none [preauth]
debug1: expecting SSH2_MSG_KEXDH_INIT [preauth]
debug1: SSH2_MSG_NEWKEYS sent [preauth]
debug1: expecting SSH2_MSG_NEWKEYS [preauth]
debug1: SSH2_MSG_NEWKEYS received [preauth]
debug1: KEX done [preauth]
debug1: userauth-request for user root service ssh-connection method none [preauth]
debug1: attempt 0 failures 0 [preauth]
debug1: PAM: initializing for “root”
debug1: PAM: setting PAM_RHOST to “118.*****。**。**”
debug1: PAM: setting PAM_TTY to “ssh”


Solution.

Find the following file and comment out this line

Just comment this line in file “/etc/pam.d/sshd”:

sessionrequiredpam_loginuid.so


How to fix the “kernel driver not installed (RC = – 1908)” error of VirtualBox in Ubuntu

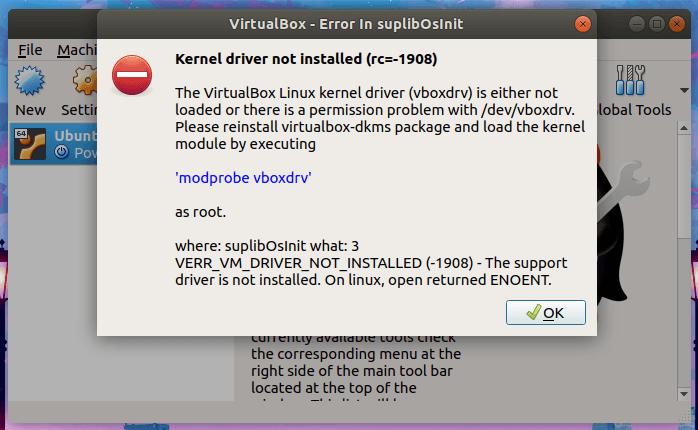
I use Oracle VirtualBox to test various Linux and Unix distributions. So far, I have tested hundreds of virtual machines in VirtualBox. Today, I started the Ubuntu 18.04 Server Edition virtual machine on my Ubuntu 18.04 desktop and I received the following error.

Kernel driver not installed (rc=-1908)
The VirtualBox Linux kernel driver (vboxdrv) is either not loaded or there is a permission problem with /dev/vboxdrv. Please reinstall virtualbox-dkms package and load the kernel module by executing
'modprobe vboxdrv'
as root.
where: suplibOsInit what: 3 VERR_VM_DRIVER_NOT_INSTALLED (-1908) - The support driver is not installed. On linux, open returned ENOENT.

Kernel driver not installed (rc=-1908)” error in Ubuntu

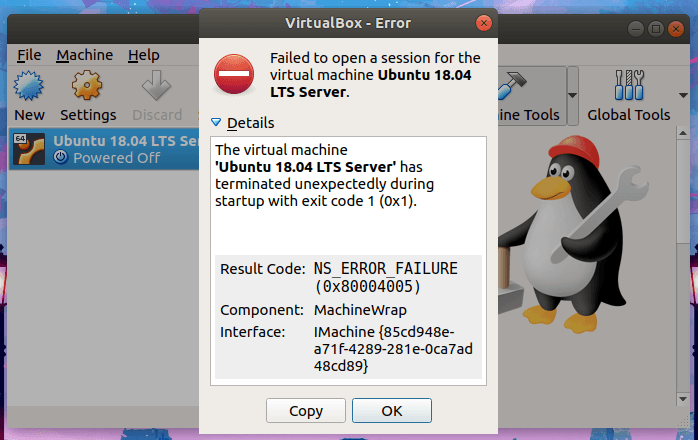
I clicked OK to close the message box, and then I saw another message in the background.

Failed to open a session for the virtual machine Ubuntu 18.04 LTS Server.
The virtual machine 'Ubuntu 18.04 LTS Server' has terminated unexpectedly during startup with exit code 1 (0x1).
Result Code:
NS_ERROR_FAILURE (0x80004005)
Component:
MachineWrap
Interface:
IMachine {85cd948e-a71f-4289-281e-0ca7ad48cd89}

The VM terminates unexpectedly during startup with exit code 1 (0x1)

I don’t know what to do first. I run the following command to check if it works.

$ sudo modprobe vboxdrv

I received this error.

modprobe: FATAL: Module vboxdrv not found in directory /lib/modules/5.0.0-23-generic

After reading these two error messages carefully, I realized that I should update the Virtualbox program.

If you encounter this error in Ubuntu and its derivatives (such as Linux Mint), you can simply reinstall or update the virtualbox-dkms package using the following command.

$ sudo apt install virtualbox-dkms

Or, better yet, update the entire system with.

$ sudo apt upgrade

The error is gone and I can start the virtual machine normally in VirtualBox

Git push error![rejected] master -> master(non-fast-forward) error:failed to push some refs to…


A project is created locally and a warehouse is created on GitHub. To link the local warehouse to the remote warehouse, I use the following method:
git init   initialize the local warehouse
git remote add origin XXX add the remote warehouse address
if you execute
git add – a after that,
Git commit – M ”
git push origin master, then this problem will appear (rejected), so after remote add, don’t worry about git add, be sure to git pull origin master, the reason for this is that you have readme files in the warehouse created by code cloud, but not locally, which causes local and remote out of sync,

Then there are two solutions:
Method 1:
if there is no local readme file, a local readme file will be generated

Git pull — rebase origin master local generation of readme files
git push origin master

Method 2:
then I will force the upload to cover the remote file,
git push – f origin master