Category Archives: Windows

Windows: Socket Server Failed to bind, error 10048 [How to Solve]

Address already in use.

Typically, only one usage of each socket address (protocol/IP address/port) is permitted.

This error occurs if an application attempts to bind a socket to an IP address/port that has already been used for an existing socket, or a socket that wasn’t closed properly, or one that is still in the process of closing.

For server applications that need to bind multiple sockets to the same port number, for example, the case where the client process is taskkilled and started again consider using setsockopt(SO_REUSEADDR).

Client applications usually need not call bind at all—connect chooses an unused port automatically. When bind is called with a wildcard address (involving ADDR_ANY), a WSAEADDRINUSE error could be delayed until the specific address is committed. This could happen with a call to another function later, including connect, listen, WSAConnect, or WSAJoinLeaf.

BOOL bOptVal = TRUE;
        int bOptLen = sizeof(BOOL);
        iResult = setsockopt(ListenSocket, SOL_SOCKET, SO_REUSEADDR, (char *)&bOptVal, bOptLen);
        if (iResult == SOCKET_ERROR)
        {
            char m[500];
            snprintf(m, 500, "%s %d: setsockopt failed, port %d failed with error: %d",
                __func__, __LINE__, port_number, WSAGetLastError());
            printf("%s\n", m);
            freeaddrinfo(result);
            closesocket(ListenSocket);
            WSACleanup();
            return -1;
        }

https://docs.microsoft.com/en-us/windows/desktop/api/winsock/nf-winsock-setsockopt

Chromedriver executable needs to be in path [How to Solve]

Error when executing webdriver. Chrome(): Chrome driver executable needs to be in path

The reason may be that chrome driver is installed, or the chrome driver version does not match the chrome version

Step 1. Download chromedriver

View your own chrome version, and view the corresponding table of chrome driver to download

Download address: https://chromedriver.storage.googleapis.com/index.html

Step 2. Copy chromedriver.exe to the Chrome browser installation directory

After downloading the zip package, we found that there was only one chromedriver.exe file in it. Put the file under the installation directory of Chrome browser. For example, C: program files (x86), Google, chrome and application

(view chrome installation directory: open Chrome browser, open Task Manager, right-click chrome.exe, click properties to view the installation location)

Step 3. Copy chromedriver.exe to the python installation directory

Step 4. Add the browser environment variable to the system path

Turn on the computer – on the computer desktop – right click – my computer – select properties

In my computer properties – left – click – advanced system settings

Click environment variable find path Edit in system variable

OK! Try the python script under execution~

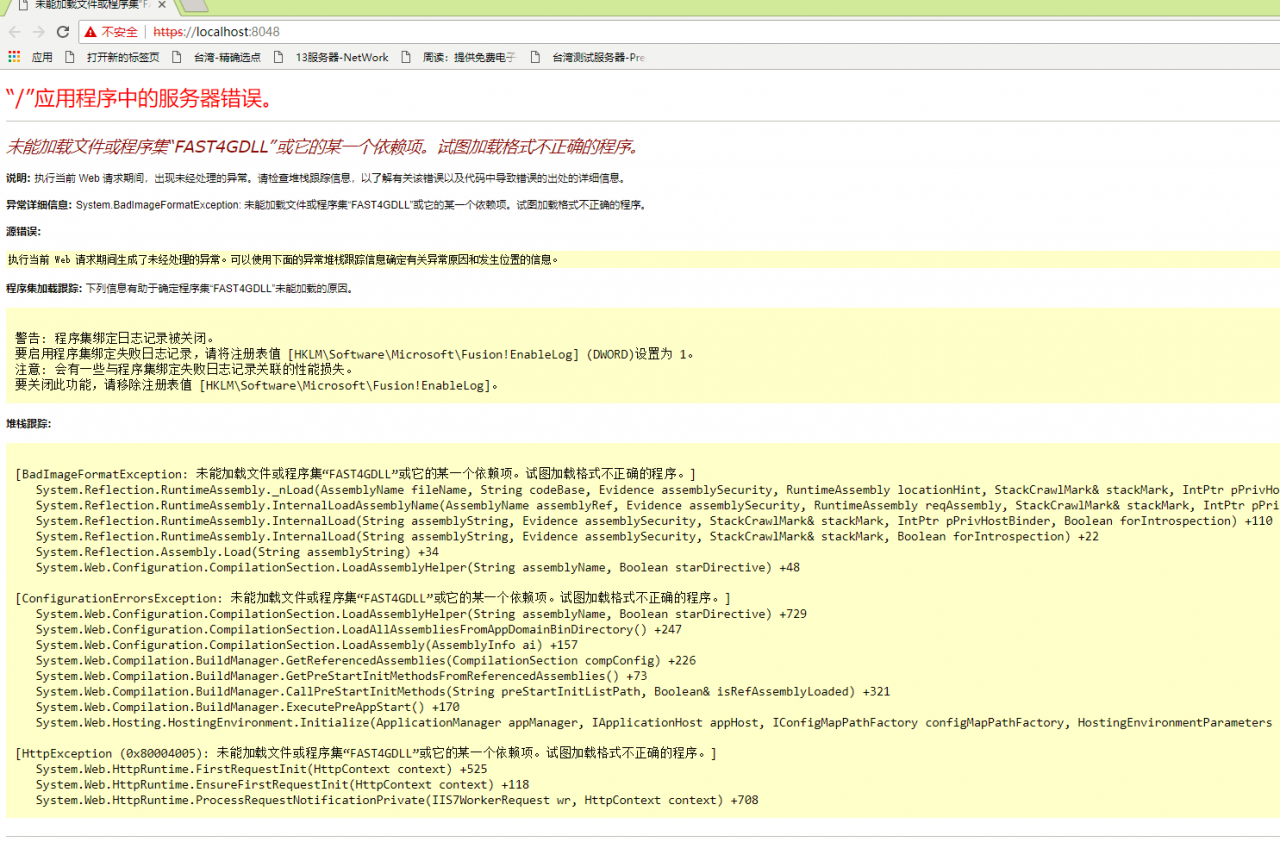
[Solved] Web project adds x86 dll reference, module DLL c:\WINDOWS\system32\inetsrv\aspnetcore.dll failed to load.

Recently I had to add an x86 compiled dll to my project.

First add the reference, compile it, and get an error.

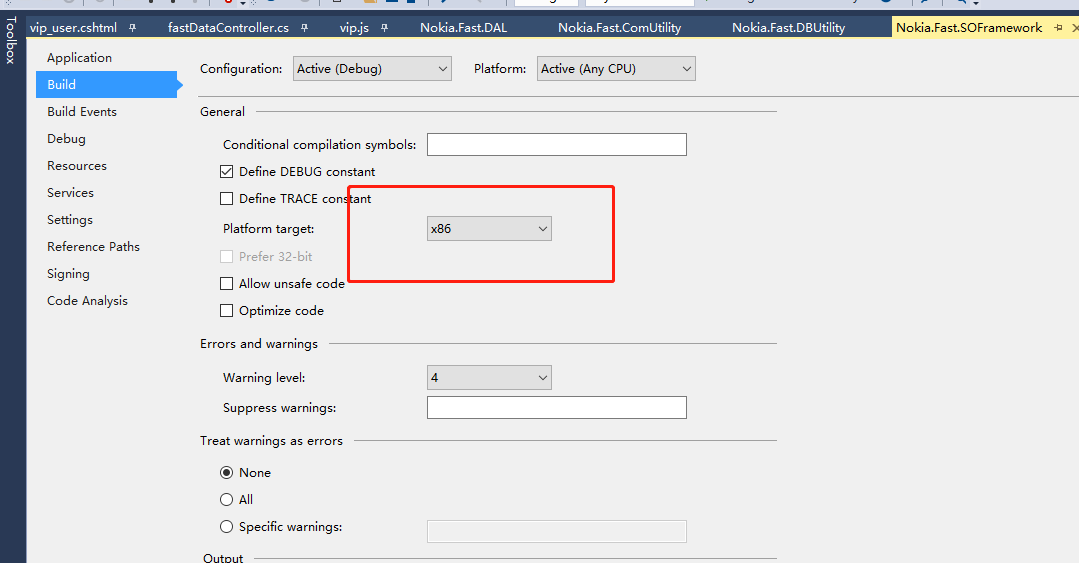
First of all, it was determined that the x86 reference could not be added to the project, so all the projects were compiled in the x86 way, and the corresponding IIS application pool was modified to enable 32 bits.

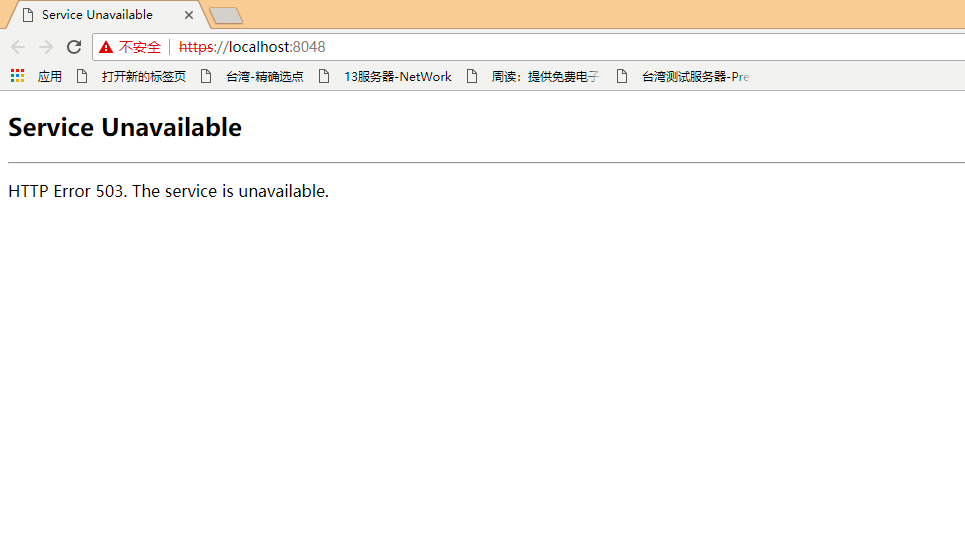
I thought I could display it without any problem, but it reported an error. The error is reported for the local development environment, but the deployment to the server test works fine.

According to the online tips, check the application log in the system log.

Then, based on this error message, I searched the Internet and finally found the solution. 1.

If the error is rewrite.dll, then fix the corresponding IIS URL Rewrite Module 2 in Programs – Applications and Administration. 2.

If the error is aspnetcore.dll, then fix Microsoft .NET Core 1.0.0 – VS 2015 Tooling in Programs – Applications and Administration …

Net Core SDK, but it didn’t work, so I searched for the solution and found

DotNetCore.1.0.1-VS2015Tools.Preview2.0.3.exe, reinstall and repair.

It seems to be necessary to repair once. And that is the windows10 anniversary update caused by the error, so finally understand why the server deployment can be normal.

Installing the recently released Anniversary Update (version 1607) of Windows 10 seems to destabilize IIS by shutting down Application Pools, thus resulting in a 503 error when trying to run an application, which is caused by some DLLs failing to load when the worker process starts. Fortunately, the lovely folks of the interwebz are coming to the rescue!

First, check out the Windows Event Viewer(Win+X, V) to see what you need to fix: Open “Windows Logs”, then “Application” and look for “Error” level entries with the source “IIS-W3SVC-WP” (may be different if the name of your IIS instance is not the default one). In the details, you will see a short message, like this:

The Module DLL <path-to-DLL>failed to load. The data is the error.

Depending on your configuration, there may be different DLLs causing this kind of problem and they will occur one by one, so you will need to keep checking the Event Logs and fix the issues until your application properly starts up. To be sure, before every attempt, stop IIS and close IIS Manager.

Here are two specific issues we’ve experienced so far and how to fix them, but you may bump into completely different ones:

“C:\WINDOWS\system32\inetsrv\rewrite.dll” (reference)

Go to “Programs and Features” (Win+X, F) and repair”IIS URL Rewrite Module 2″.

“C:\WINDOWS\system32\inetsrv\aspnetcore.dll” (reference)

Go to “Programs and Features” (Win+X, F) and repair”Microsoft .NET Core 1.0.0 – VS 2015 Tooling …”.

How to Solve Error during connect when installing docker in Windows 10

The detailed error information is as follows:

C:\Users\zig>docker info
error during connect: Get http://%2F%2F.%2Fpipe%2Fdocker_engine/v1.39/info: open //./pipe/docker_engine: The system cannot find the file specified. In the default daemon configuration on Windows, the docker client must be run elevated to connect. This error may also indicate that the docker daemon is not running.

Modification method:

cd "C:\Program Files\Docker\Docker"
./DockerCli.exe -SwitchDaemon

Reason: Especially on windows machine when you see the above error after a docker update, try the above commands. It appears like the Docker Desktop UI may indicate that you are already using Linux Containers, but the update may have messed up that setting. Running the above commands will set to Linux Containers and there after you can work happily.

Note: The default is Linux Containers, just change it to Windows Containers after using this command.

Solution to the error of cscope – Q option in Windows

In the past, some netizens left a message. When using cscope under windows, the following prompt appeared when using the – Q option:

D:\Temp> cscope -Rbkq
Input file specified two times.

cscope: cannot create inverted index; ignoring -q option
cscope: removed files ncscope.in.out and ncscope.po.out

At that time, easby thought that cscope of Windows version did not support – Q option

However, netizen Liang Feng left a message yesterday

Windows版本的cscope是支持-q选项的,出现以上错误是因为没找到合适的sort命令。所以只要cscope进程的工作目录下有GNU版本的sort就可以了。注意是进程的工作目录,不是可执行程序的目录。具体原因看一下cscope的代码片段。

build.c

#ifdef WIN32
snprintf(sortcommand, sizeof(sortcommand), “set LC_ALL=C && sort -T %s %s”, tmpdir, temp1);
#else
snprintf(sortcommand, sizeof(sortcommand), “env LC_ALL=C sort -T %s %s”, tmpdir, temp1);
#endif

So we did the experiment again. After cygwin is installed, cscope is used in the shell interface of cygwin, and the above error prompt does not appear. However, if you open the command line window of windows, cmd.exe, and execute cscope in it, the above error will appear

After carefully comparing the environment of cygwin with that of cmd.exe, it turns out that sort.exe, which comes with windows, is the ghost

In the shell window of cygwin, the setting of path environment variable will make it find the GNU version of sort.exe first, so the above cscope command can be executed successfully. But in the cmd.exe window, the path environment variable will make it find the sort.exe that comes with windows first instead of GNU sort.exe, so the above error prompt will appear

Knowing the cause of the problem, the solution is very simple. We can write a batch program, reset the path environment variable in this program, and make cscope use GNU version of sort.exe. The sample procedure is as follows:

D:\Temp> type cs.bat
@echo off
set path=c:\cygwin\bin;
cscope -Rbkq

In this batch process, first point the path environment variable to C:// cygwin/bin;, My cscope.exe and GNU version of sort.exe are in this directory. Next, execute the cscope command. Now it uses the GNU version of sort. Exe

Solve the certificate problem of Chrome 70 and above: Failed to load resource: net::ERR_CERT_SYMANTEC_LEGACY

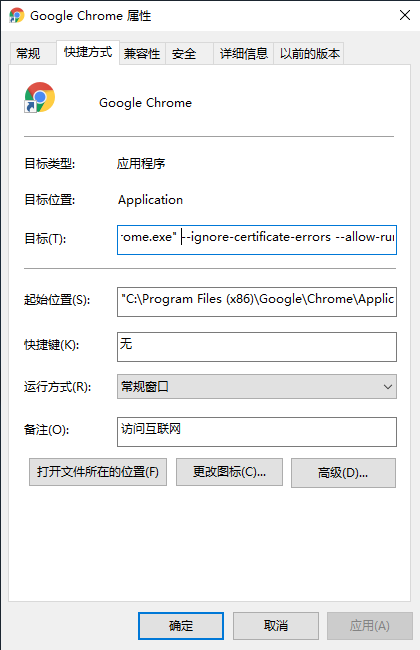
1. The desktop must have a Chrome shortcut

2. Enter shortcut properties

3. Modify the target as: “C:\Program Files (x86)\Google\Chrome\Application\chrome.exe” –ignore-certificate-errors –allow-running-insecure-content    space and add the following paragraph It’s okay

4. It is recommended to use Chrome normally


Windows: SSH-add Error connecting to agent: No such file or directory [Solved]

Use ssh-add under Windows to report Error connecting to agent: No such file or directory

<a name=”mqFEu”></a>

Environmental information

  • Operating system: windows 10
  • Terminal: Windows PowerShell <a name=”pXQ8f”></a>

<a name=”EGV6M”></a>

problem

Error when using ssh-add

PS D:\code> ssh-add -l
Error connecting to agent: No such file or directory

<a name=”kxXYH”></a>

Processing steps

  • Check whether the ssh-agent service started successfully
PS D:\code> get-service ssh*

Status   Name               DisplayName
------   ----               -----------
Stopped  ssh-agent          OpenSSH Authentication Agent
  • Found that the ssh-agent service status is stopped, start the service
PS D:\code> Set-Service -Name ssh-agent -StartupType Manual
PS D:\code> Start-Service ssh-agent
  • Execute the ssh-add command to check whether it is successful
PS D:\code> ssh-add -l
2048 SHA256:Dw8iD5trSzInnsmmDpaXBusdfL2K3wM3b+GMulKNHbAU C:\Users\Administrator\.ssh\xxx-pc (RSA)
2048 SHA256:Mb4qKSueS8bqNALm3423eD98KdTIuEwnLvfVWTNPCusg C:\Users\Administrator\.ssh\yyy (RSA)
2048 SHA256:nyLi89QHTYFMr97sM0cG9I6sBfA82GpR9Os2WF0HlwA C:\Users\Administrator\.ssh\id_rsa (RSA)
  • problem solved

Windows one click restore, shadowcopy error – user affected limit

Windows comes with a restore backup feature that uses shadowcopy technology at the bottom.

This technology uses a copy on write approach, when each time there is a new IO, the old data will be copied out, and then write the new IO

Recently, the interface was called with the error “Event ID 36, User Imposed Limit”, which was found after investigation. When the shadow volume reports the error “User Imposed Limit”, the most likely reason is that the disk where the shadow volume is created is out of space and needs to be expanded.

Reference:

How to Fix VolSnap 36 Error User Imposed Limit – Volume Snapshot VolSnap 36 event ID may show up as error: Volume Snapshot Driver, Diff Area health issues

Event ID 36
Source volsnap

The shadow copies of volume C: were aborted because the shadow copy storage could not grow due to user imposed limit or a related message. Basically VolSnap 36 is an error event that signals an issue with the diff area being used by VSS.

It could be:

a low limit for the diff area, see http://backupchain.com/i/how-to-fix-volsnap-25-error

a disk I/O issue

a bad sector on disk: use chkdsk X: /b to check for bad blocks (may require a reboot)

system load is too high for the diff area to grow fast enough

a corrupt file system issue. Use Chkdsk with /r option, better use /b to also check for bad sectors

The most common cause is #1. Use the solution in the article linked above; however, checking the other potentialities may also be a good idea if the disk hasn’t been checked in a while.

When ffmpeg is used to push streaming, there may be an error: unknown encoder ‘libx264’

When using the following command to push the stream:

ffmpeg -re -i a.mp4 -vcodec libx264 -acodec aac -f flv rtmp://172.31.102.165:1935/myapp 

The following errors may occur:

Unknown encoder 'libx264'

The libx264 library is missing and needs to be installed.

1. gitclonegit://git.videolan.org/x264.git

2. cdx264

3. ./configure –enable-static –enable-share

4. make

5. sudo make install

Need to recompile and install ffmpeg

1. When configuring ffmpeg, add x264, e.g.

./configure –enable-gpl –enable-libx264

2. make clean

3. make

4. make install

At this point, when entering ffmpeg, an error may occur:.

ffmpeg: error while loading shared libraries: libavdevice.so.57: cannot open shared object file: No such file or directory

*****************************************

Modify the ld.so.conf file

1. $ sudo vi /etc/ld.so.conf

2. Modify the following

include ld.so.conf.d/*.conf
/usr/local/ffmpeg/lib ///usr/local/ffmpeg directory is my ffmpeg installation directory, change it according to your installation directory

3. make it work

$ sudo ldconfig

*****************************************

Add environment variables for Ffmpeg
vi /etc/profile
Add:
export PATH=”/usr/local/ffmpeg/bin:$PATH”

Then save and run source /etc/profile

If you are still prompted for missing libx264, you need to go into the compile ffmpeg directory and use the following command to push the stream.

./ffmpeg -re -i a.mp4 -vcodec libx264 -acodec aac -f flv rtmp://172.31.102.165:1935/myapp 

Fix Element Not Found error for Bootrec/Fixboot on Windows 10

The Windows command line is a very useful utility for advanced users. Fixing system files, checking the disk for errors, and many other intensive tasks are made convenient with this. Another task that we carry out with the Command Prompt is to repair the Windows bootup process if it has problems. If when you run thebootrec /fixbootcommand, you receive an error messageElement not foundthen it could be due to a Damaged BCD or MBR, Inactive system partition or No drive being letter assigned to the EFI Partition.
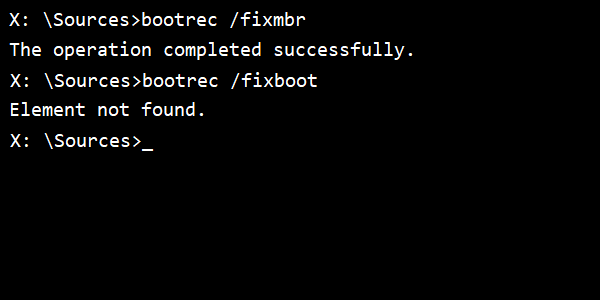
Today, we will be taking a look at how to fix this issue.

Element Not Found error for Bootrec /Fixboot

The following potential fixes will be carried out to fix thisElement Not Founderror-

Assign Drive Letter to EFI Partition.

Set the System Partitionto Active.

Repair BCD.

If you tend to create a System Restore point, you can try to undo any modifications on your computer, byperforming System Restore.

1] Assign Drive Letter to EFI Partition

Start by pressingWINKEY + Xbutton combo or right-click on the Start button and click onCommand Prompt (Admin)or just search forcmdin the Search box, right click on the Command Prompt icon and click onRun as Administrator.

Now, type in the following command-

diskpart

This will start the Diskpart Utility. It is a command line based utility just like the Command Prompt but will get a UAC Prompt once you invoke it. You have to click onYesfor the UAC Prompt.
Then, type in,

list volume

This will list all the partitions created on your computer. This will include both types of partitions that are visible to a normal user in the File Explorer and also the ones created by default by Windows 10 that help it to store the boot files and other important system files.
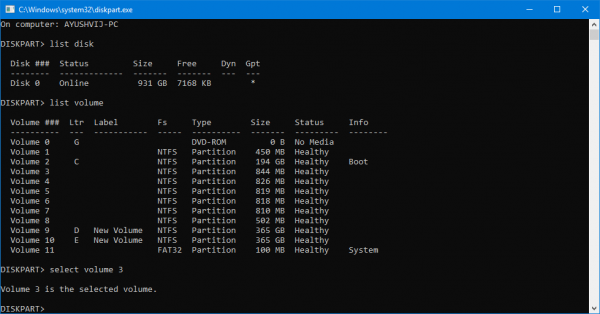
Now you will get a list of the partitions that are made on your computer.

Select the partition that you wish to assign a letter to. You can identify it by the fact its File System (Fs) will be set toFAT32.

Now, type in the followingcommand to select the desired volume-

select volume number

Now, to assign a letter to the volume you just selected, type in the following command-

assign letter=<LETTER>

Replace <LETTER> with the letter that you want to allocate to that partition. This will assign a letter to the volume you just selected.

2] Set the System Partition to Active

You will need tomake a bootable Windows 10 USB driveand then boot your computer using it.

When you come to theWelcome Screento click onNext, and then click onRepair your computeron the bottom left portion of the window. Then click onTroubleshoot > Advanced Options > Command Prompt.

Now, once you have got the Command Prompt window open, execute the following commands one by one in the sequence that they are given-

diskpart

This will start the Diskpart Utility. It is a command line based utility just like the Command Prompt but will get a UAC Prompt once you invoke it. You have to click onYesfor the UAC Prompt. Then, type in-

list disk

Now select your primary disk by typing in-

select disk number

Now, list all the partitions on the selected disk by typing in the following command,

list partition

This will list all the partitions created on your computer. This will include both types of partitions that are visible to a normal user in the File Explorer and also the ones created by default by Windows 10 that help it to store the boot files and other important system files.
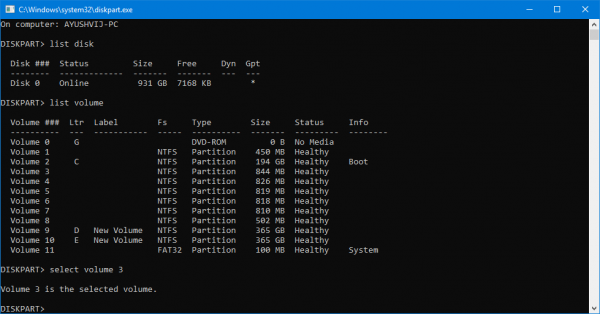
Now you will get a list of the partitions that are made on your computer.

Type in-

select partition number

to select that partition which is usually around 100 MB in size.

Then type-

active

to mark it active.

Finally, typeexitto exit the diskpart utility.

3] Repair BCD

Torepair BCD, you will need tomake a bootable Windows 10 USB driveand then boot your computer using it.

When you come to the Welcome Screen to click onNext, and then click onRepair your computeron the bottom left portion of the window. Then click onTroubleshoot > Advanced Options > Command Prompt.

Now, once you have got the Command Prompt window open, execute the following commands one by one in the sequence that they are given-

bootrec /fixboot

After that enter the following to rename the BCD file-

ren BCD BCD.bak

Finally, type in the following but replaceb:with the letter for your bootable drive that is attached-

bcdboot c:\Windows /l en-us /s b: /f ALL

Wait until the process is done and then restart your computer for the changes to take effect.

This should fix your issues.