Introduction
Some situations (such as BIOS limitations or this grub error) may require to create a separate/boot partition at the beginning of the disk and set up Ubuntu to use it
Here’s how to do it easily:
Procedures
Step 1 – boot on Live CD or live USB
Start the computer:
-Linux secure remixlivivecd or liveusb, then select “Try Ubuntu”, and then go directly to Step 3 below
-Or Ubuntu Live CD or live USB, select “Try Ubuntu” and go to step 2 below
Step 2 – install boot repair in a real-time session
After entering the Ubuntu real-time session, install boot repair in this way:
Connect to the Internet
Open the terminal (Ctrl + Alt + T) and type:
sudo add-apt-repository ppa:yannubuntu/boot-repair && sudo apt-get updatesudo apt-get install -y boot-repairStep 3 – run GParted
Start GParted from any of the following:
-Dash (Ubuntu 11.04 and next): click the Ubuntu logo in the upper left corner of the screen, then type GParted and click the GParted icon that will appear
-Or system – > Management – > GParted menu (Ubuntu 10.04)
-Or type gksudo GParted in the terminal
Step 4 – create a 1GB partition at the beginning of the disk
Through GParted:
-Reduce one of the first partitions of the disk so that creates 1GB (= 1000mib) of free space at the beginning of the disk on which Ubuntu is installed. This free space must be within the first 100GB of the disk (the starting position of the disk at its end must not exceed 100GB). Important: to adjust the size of Windows Vista/7/8 partition, use windows tools instead of GParted

-In this free space, create a 1GB partition with format ext4
-On paper, write down the name of the new 1GB partition. This is usually similar to/dev/ sdxy (x is a letter and Y is a number)
Step 5 – run boot repair
Start boot repair from any of the following:
-Dash (Ubuntu 11.04 and next): click the Ubuntu logo in the upper left corner of the screen, then type boot and click the boot repair icon that will appear
-Or system – > Administration-> Boot repair menu (Ubuntu 10.04)
-Or type boot repair in the terminal
Step 6 – choose the right option
In boot repair:
-Click Advanced Options
-Go to the grub location tab
-Check the “separate/boot partition: sdxy” option (sdxy must be your 1GB partition)

-Click “apply”
-Note the URL that will appear on the paper ( paste. Ubuntu. COM/XXXXXX/)
-Turn off the computer
-Remove Live CD and/or live USB
-Turn on the computer. You should be able to boot to Ubuntu by now
English original
Introduction
Some situations (eg BIOS limitations, orthis GRUB bug) may require tocreate a separate /boot partition at the start of the disk, and setup Ubuntu to use it.
Here is how to do it very easily:
Procedure
Step 1 – Boot on a liveCD or liveUSB
Boot your computer either on:
– aLinux-Secure-RemixliveCD or liveUSB, then choose “Try Ubuntu”, then go directly toStep 3 below.
– or a Ubuntu live-CD or live-USB, choose “Try Ubuntu”, then go toStep 2 below.
Step 2 – Install Boot-Repair in the live-session
Once in the Ubuntu live session, installBoot-Repairthis way:
Connect internet
Open a terminal (Ctrl+Alt+T) and type :
sudo add-apt-repository ppa:yannubuntu/boot-repair && sudo apt-get updatesudo apt-get install -y boot-repairStep 3 – Run gParted
Launch gParted from either:
– the Dash (Ubuntu 11.04 and next): click the Ubuntu logo in the top-left corner of the screen, then typegpartedand click on thegPartedicon that will appear.
– or System->Administration->gParted menu (Ubuntu 10.04)
– or by typinggksudo gpartedin a terminal
Step 4 – Create a 1GB partition at the start of the disk
Via gParted:
– Reduce one of the first partitions of the disk in order tocreate 1GB (=1000MiB) of free space at the start of the diskwhere Ubuntu is installed. This free space must be locatedinside the first 100GB of the disk(its end must not be located at more than 100GB from the start of the disk). Important: to resize Windows Vista/7/8 partitions, don’t use gParted but Windows tools instead.
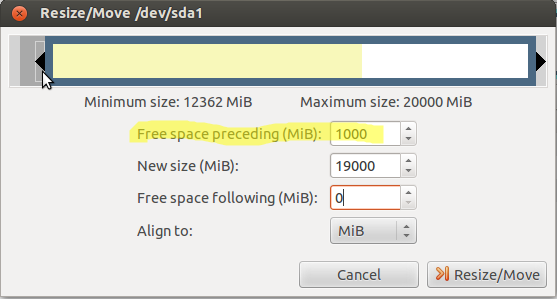
– In this free space, create a1GB partition formatted in EXT4.
– On a paper, note the name of this new 1GB partition. This is generally something like /dev/sdXY(X is a letter, Y is a number).
Step 5 – Run Boot-Repair
Launch Boot-Repair from either:
– the Dash (Ubuntu 11.04 and next): click the Ubuntu logo in the top-left corner of the screen, then typebootand click on theBoot-Repairicon that will appear.
– or System->Administration->Boot-Repair menu (Ubuntu 10.04)
– or by typingboot-repairin a terminal
Step 6 – Choose the right option
In Boot-Repair:
– Click onAdvanced Options
– Go to theGRUB locationtab
– Tick the“Separate /boot partition: sdXY”option (sdXY must be your 1GB partition)

– Click“Apply”
– Note on a paper the URL (paste.ubuntu.com/XXXXXX/) that will appear.
– Shutdown the computer
– Remove the liveCD and/or liveUSB
– Start the computer. You should now be able to boot into Ubuntu.
Similar Posts:
- Ubuntu prompt no such device grub rescue solution
- Grub cannot be started after Linux is installed
- Fix Element Not Found error for Bootrec/Fixboot on Windows 10
- Solution to the problem of no caching mode page found when installing CentOS 7
- Raspberry Pi 4B+Ubuntu20.04 Solve Error sudo: raspi-config: command not found
- The problem of “bad PBR sig” in the installation of Solaris10
- Installing Ubuntu 16.04 on XPS 13
- [Hive on Tez] Input path does not exists error
- Unable to enter the interface after startup of Ubuntu 18.04 [failed command: read DMA]
- Mac OS: How to Copy an operating system image to an SD card