Tag Archives: android studio

Android Studio Emulator: PANIC: Cannot find AVD system path. Please define ANDROID_SDK_ROOT (Solved)

the following error appears after Android studio runs

emulator: process finished with exit code 1
emulator: Panic: cannot find AVD system path. Please define Android_ SDK_ ROOT

Emulator: process end exit code 1
emulator: Panic: AVD system path not found. Please define Android_ SDK_ ROOT

The solution is as follows:

First, delete all the downloaded AVD
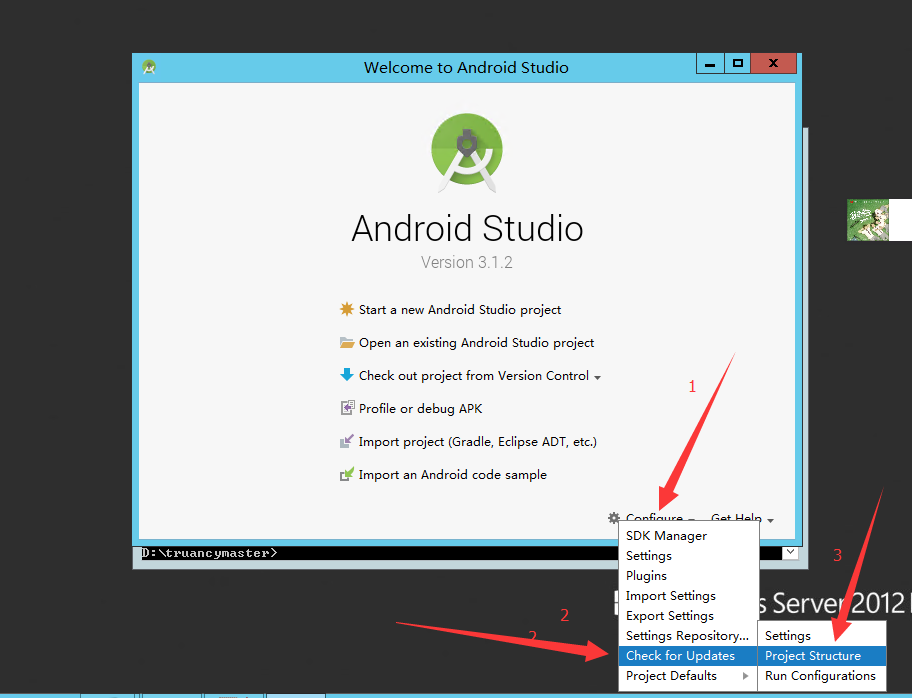
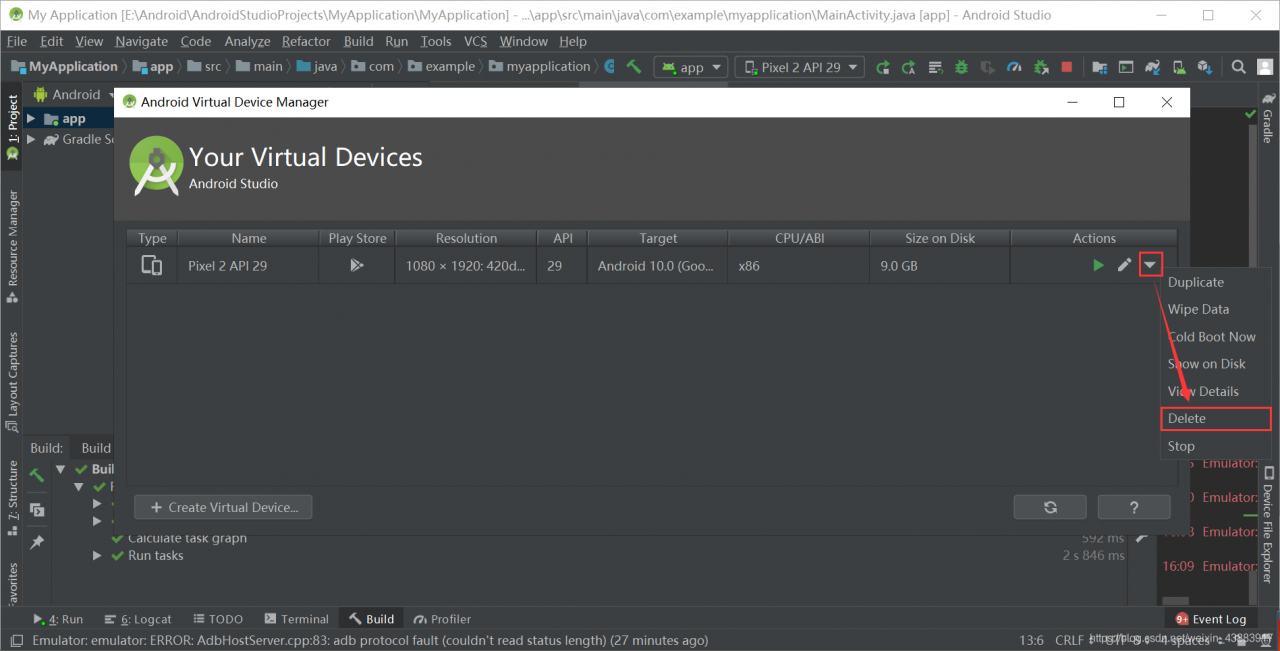
1Open in this way

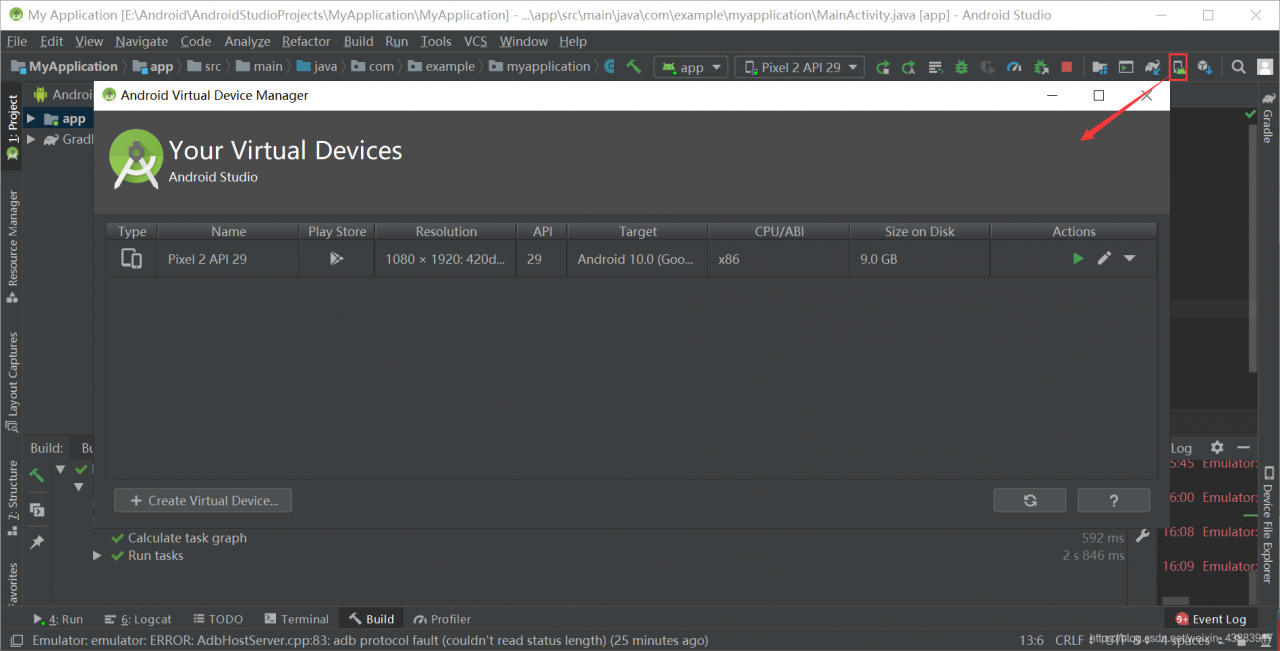
in this way, delete all the items here

2. Configure computer environment variables

2

is more detailed. You can set it and look down directly
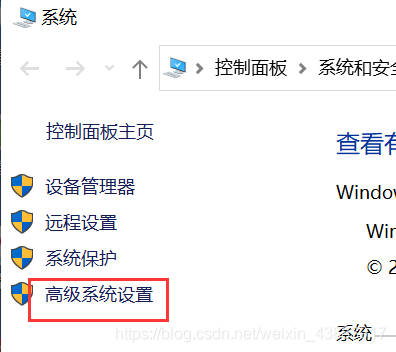
right click the computer and click Properties

Click advanced system settings

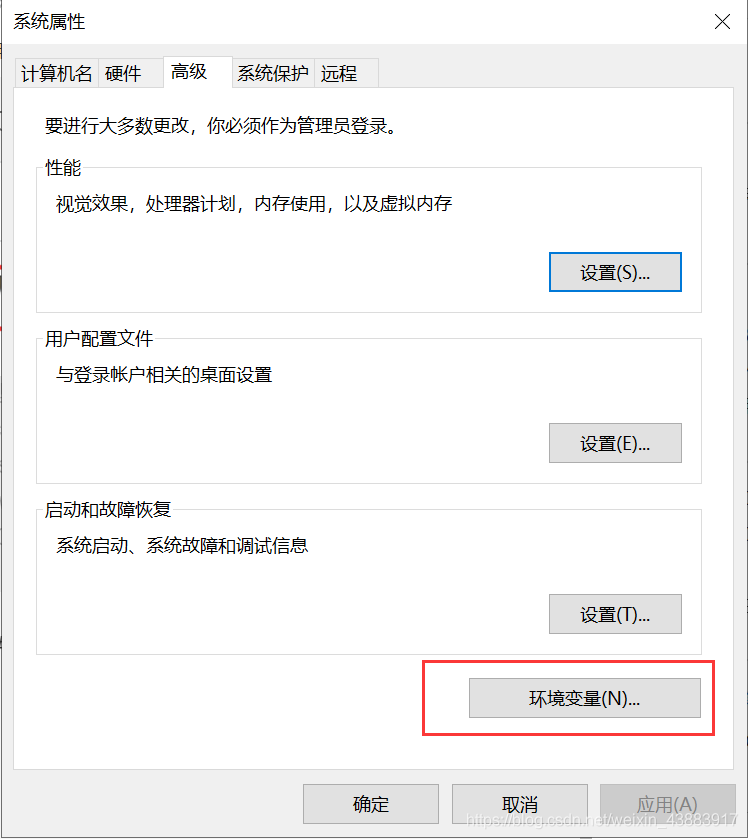
Click environment variables

create two new variables

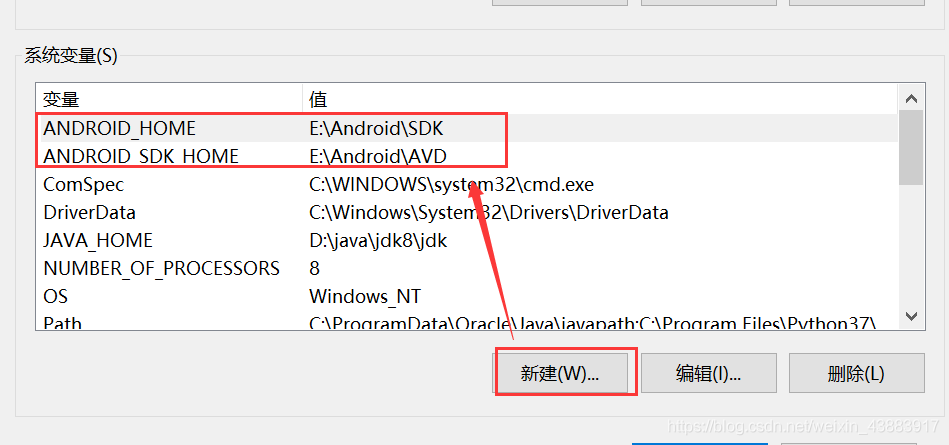
ANDROID_ Home: SDK file path
Android_ SDK_ Home: the file path of AVD. We create an empty folder of AVD. When we download AVD again, we will automatically configure it to the path we have created

and then click OK to exit

all the time

finally, restart Android studio, download and create the image again, and then run it again

If not, try to restart the computer and operate it again

why is the variable value like this?It’s because I set the directory in advance
you can see the detailed steps of Android studio installation and configuration (super detailed). I told you in advance, but your specific situation may be different from mine. You can choose the appropriate folder according to your situation


How to Solve Android Studio Error: SDK tools directory is missing

###Problem Description: because the SDK manager has been installed before, after setting the Android SDK location to the Android SDK installation directory, the SDK Tools Directory is missing error is still reported

The error content is shown in the figure

###Solutions

Online solutions are generally discussed around the proxy setting problem, but I didn’t appear the page of download or download failure in the configuration process, so I ruled out this problem. Problems with the SDK can also be eliminated, because the SDK has been used in other Android projects before, and there is no problem. Finally, after some groping, we finally solved the problem. The problem may be that jjdk is not configured. The solution is as follows:

Open the project structure settings directory

Then configure JDK and SDK

If you forget the JDK installation directory, you can use the command line java - verb to view it in the last line of the result

After the configuration is completed, you can enter the SDK manager again to operate

Android Studio Can not Find “Sync project with Gradle Files”

generally, find “sync project with gradle files” in the file

if not, right-click in the blank space of the toolbar to display the options as shown in the figure below and select “customize menus and toolbars…”

Enter “sync project with gradle files” in the search box, select it, and then click OK

after setting, a small icon like “sync project with gradle files” will appear in the toolbar. At this time, you can click file and find that the selection of “sync project with gradle files” also appears

[note]:

the above icons may not appear immediately after configuration, so wait patiently

I restarted it five or six times

AndroidStudio Error: org.gradle.api.tasks.TaskExecutionException: Execution failed for task ‘:app:proces

Android studio compile error

org.gradle.api.tasks.TaskExecutionException: Execution failed for task
':app:processDebugResources'.

Android resource compilation failed Output:  
D:\company\SuperMarket\app\build\intermediates\incremen

Caused by: org.gradle.tooling.BuildException: 
Failed to process resources, see aapt output above for

Process 'command 'C:\SDK\build-tools\28.0.3\aapt.exe'' 
finished with non-zero exit value 1

Let’s start with an experience. This kind of problem is often the XML file.

How to locate the problem
open the terminal of Android studio and enter the command on the command line: gradlew compiledebugsource -- stacktrace - info or gradlew assembledebug -- info or gradlew assembledebug

Mac Linux system input:./gradlew compiledebugsource — stacktrace – info

Then you can view the specific compilation report information on the command line. There are many compilation contents. If you look down patiently, you will find a very obvious error prompt:

the file and reason of the error are very detailed.

At the bottom of the compilation information is the error information of the build window

...
D:\company\SuperMarket\app\src\main\res\layout\item_c_day_manager_layout.xml:51:46-61: AAPT: No resource found that matches the given name (at 'layout_constraintLeft_toRightOf' with value
 '@id/tv_work_num').
...

* Exception is:
org.gradle.api.tasks.TaskExecutionException: Execution failed for task ':app:processDebugResources'.
        at org.gradle.api.internal.tasks.execution.ExecuteActionsTaskExecuter.executeActions(ExecuteActionsTaskExecuter.java:103)
        at org.gradle.api.internal.tasks.execution.ExecuteActionsTaskExecuter.execute(ExecuteActionsTaskExecuter.java:73)
        at org.gradle.api.internal.tasks.execution.OutputDirectoryCreatingTaskExecuter.execute(OutputDirectoryCreatingTaskExecuter.java:51)
        at org.gradle.api.internal.tasks.execution.SkipUpToDateTaskExecuter.execute(SkipUpToDateTaskExecuter.java:59)
        at org.gradle.api.internal.tasks.execution.ResolveTaskOutputCachingStateExecuter.execute(ResolveTaskOutputCachingStateExecuter.java:54)
        at org.gradle.api.internal.tasks.execution.ValidatingTaskExecuter.execute(ValidatingTaskExecuter.java:59)
        at org.gradle.api.internal.tasks.execution.SkipEmptySourceFilesTaskExecuter.execute(SkipEmptySourceFilesTaskExecuter.java:101)
        at org.gradle.api.internal.tasks.execution.FinalizeInputFilePropertiesTaskExecuter.execute(FinalizeInputFilePropertiesTaskExecuter.java:44)
        at org.gradle.api.internal.tasks.execution.CleanupStaleOutputsExecuter.execute(CleanupStaleOutputsExecuter.java:91)
        at org.gradle.api.internal.tasks.execution.ResolveTaskArtifactStateTaskExecuter.execute(ResolveTaskArtifactStateTaskExecuter.java:62)
        at org.gradle.api.internal.tasks.execution.SkipTaskWithNoActionsExecuter.execute(SkipTaskWithNoActionsExecuter.java:59)
        at org.gradle.api.internal.tasks.execution.SkipOnlyIfTaskExecuter.execute(SkipOnlyIfTaskExecuter.java:54)
        at org.gradle.api.internal.tasks.execution.ExecuteAtMostOnceTaskExecuter.execute(ExecuteAtMostOnceTaskExecuter.java:43)
        at org.gradle.api.internal.tasks.execution.CatchExceptionTaskExecuter.execute(CatchExceptionTaskExecuter.java:34
		...

Android studio import project, error e rror:Unsupported method : BaseConfig.getApplicationIdSuffix().

For the third-party library downloaded from GitHub clone, due to the long time interval, the gradle version is inconsistent with the native version. If it is imported into Android studio, an error will be reported. The error message is as follows:

E rror:Unsupported method : BaseConfig.getApplicationIdSuffix().
The version of Gradle you connect to does not support that method.
To resolve the problem you can change/upgrade the target version of Gradle you connect to.
Alternatively, you can ignore this exception and read other information from the model.

Consult IDE log for more details (Help | Show Log)

Search on stackoverflow and find the solution as follows:

Step 1: modify the build. Gradle file of the project, find dependencies, and modify the classpath

classpath 'com.android.tools.build:gradle:1.0.0'
change to:
classpath 'com.android.tools.build:gradle:2.3.2'

Screenshot:

Step 2: after modifying the version of build.gradle in the previous step, the version of gradle in the gradle wrapper.properties file also needs to be modified. Since the version of gradle in build.gradle has been upgraded to 2.3.2 in the previous step, the gradle in gradle wrapper.properties needs at least 3.3

Modify directly: distributionurl

distributionUrl=https\://services.gradle.org/distributions/gradle-3.3-all.zip

Photo:

Reference 38142142;:

https://stackoverflow.com/questions/44546849/unsupported-method-baseconfig-getapplicationidsuffix

Execution failed for task ‘:app:checkDebugDuplicateClasses‘.

Problem
Android Studio compiles with the following error.
Execution failed for task ':app:checkDebugDuplicateClasses'.


FAILURE: Build failed with an exception.

* What went wrong:
Execution failed for task ':app:checkDebugDuplicateClasses'.
> 1 exception was raised by workers:
  java.lang.RuntimeException: Duplicate class com.tencent.ijk.media.exo.BuildConfig found in modules jetified-LiteAVSDK_Player-7.5.9307-runtime.jar (com.tencent.liteav:LiteAVSDK_Player:7.5.9307) and jetified-LiteAVSDK_Player_7.5.9307-runtime.jar (:LiteAVSDK_Player_7.5.9307:)
  Go to the documentation to learn how to <a href="d.android.com/r/tools/classpath-sync-errors">Fix dependency resolution errors</a>.


* Try:
Run with --stacktrace option to get the stack trace. Run with --info or --debug option to get more log output. Run with --scan to get full insights.

* Get more help at https://help.gradle.org

BUILD FAILED in 1m 34s
155 actionable tasks: 155 executed

reason

Relying on duplicate resource files, for example:

The a.aar file is imported into lib , and then the same a file is relied on in build. Gradle . It depends on two different resource files, but they contain the same content.

Solution

Remove the duplicate resource files.

Failed to install APK, error code: install_ FAILED_ INVALID_ Apk solution

Development environment: Android studio

After copying a project, the package name and application ID are modified. After further development of the program, it is found that it cannot be installed on the mobile phone. The error code is: installation failed with message failed to finalize session:INSTALL_ FAILED_ INVALID_ Apk, as shown in the figure below:

It’s a big headache. There will be no error when copying the project (for copying and modifying the project in Android studio, please refer to: http://blog.csdn.net/Lone1yCode/article/details/79087495 )

Crazy Baidu found a very effective way, as shown in the following figure:

As shown in the figure above, on Android studio, click file, settings, build, execution, deployment, debugger and instant run, cancel the check and try to install again. It’s successful!!

The function of instant run is to speed up the construction and reconstruction. When running the program for the first time, the speed is the same as the normal speed. However, after making many modifications to the program, if you run the program again, Android studio will quickly complete the construction, which is much faster than running the program for the first time. You can learn more about Baidu by yourself.

In addition, I can only copy the project, and the running program will give this error prompt. If the edited project is not copied, it is recommended to start instant run.

Error:Failed to open zip file. Gradle‘s dependency cache may be corrupt (this sometimes occurs after a network connection timeout.)

Perfect solution e rror:Failed to open zip file. Gradle’s dependency cache may be corrupt (this sometimes occurs after a network connection timeout.)

(the picture is found, the same problem)
reason: Download error due to network reasons

Delete the corresponding gradle package, download the gradle version again and reload it

To view the gradle version:

1. Open gradle- wrapper.properties The last line in is gradle version

2. Ctrl + Alt + Shift + s open the project structure

Download website https://services.gradle.org/distributions/

Find the corresponding version to download

My gradle address is C:// users\ lei.gradle \wrapper\dists\gradle-6.1.1-all

After replacing the downloaded gradle with the previous gradle

Restart Android stdio and it’s OK

Build failed for Android studio new project

Build failed for Android studio new project

Error information

org.gradle.initialization.ReportedException: org.gradle.internal.exceptions.LocationAwareException: A problem occurred configuring root project 'Test1'.

Caused by: org.gradle.internal.exceptions.LocationAwareException: A problem occurred configuring root project 'Test1'

Caused by: org.gradle.internal.exceptions.LocationAwareException: A problem occurred configuring root project 'Test1'

##The solution
is to build.gradle The buildscript and allprojects in are changed to the following configuration

this is the original configuration

Change to the following code:

buildscript {

    repositories {
        // maven
        def cn = "http://maven.aliyun.com/nexus/content/groups/public/"
        def abroad = "http://central.maven.org/maven2/"
        // First download the jar from the url if not found, then look in the artifactUrls
        maven {
            url cn
            artifactUrls abroad
        }
        maven { url "http://maven.aliyun.com/nexus/content/repositories/jcenter"}
        google()
    }
    dependencies {
        classpath 'com.android.tools.build:gradle:3.1.4'
        

        // NOTE: Do not place your application dependencies here; they belong
        // in the individual module build.gradle files
    }
}

allprojects {
    repositories {
        // maven
        def cn = "http://maven.aliyun.com/nexus/content/groups/public/"
        def abroad = "http://central.maven.org/maven2/"
        // First download the jar from the url if not found, then look in the artifactUrls
        maven {
            url cn
            artifactUrls abroad
        }
        maven { url "http://maven.aliyun.com/nexus/content/repositories/jcenter"}
        google()
    }
}

Android Studio Error: Failed to delete some children. This might happen because a process has files open

   the error in build APK (s) is as follows:

Unable to delete directory 'F:\AndriodStudioProjects\EDM\app\build\outputs\apk\debug'
  Failed to delete some children. This might happen because a process has files open or has its working directory set in the target directory.
  - F:\AndriodStudioProjects\EDM\app\build\outputs\apk\debug\app-debug.apk

solution: close the folder of \… \ app/build/outputs/APK/debug