Tag Archives: Mac

Conflict between git windows and MAC newline

After chopping hands, the fraud call came before the express delivery was received. How to improve the privacy and security of e-commerce>>>

When I encounter these two errors, I basically ask you to set autocrlf to false. But I don’t think it’s proper

If the line feed character in your source file is LF and autocrlf = true, GIT add will encounter a fatal: LF would be replaced by CRLF error. There are two solutions:

1. Convert LF in your source file to CRLF [recommended]

2. Set autocrlf to false

If your source file contains a new line character, CRLF, and autocrlf = input, GIT add will also encounter a fatal: CRLF would be replaced by lf error. There are two solutions:

1. Convert CRLF in your source file to LF [recommended]

2. Set autocrlf to true or false

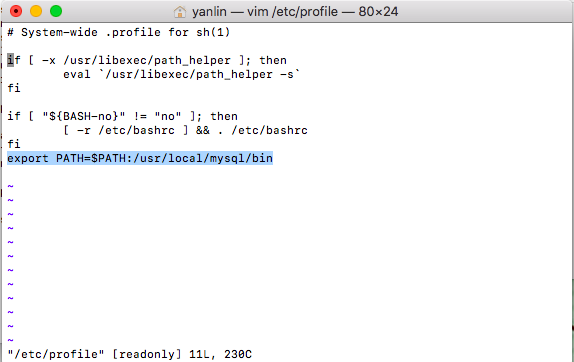
My advice: set autocrlf = input on MAC and set autocrlf = true on windows (the default)

———————————————————————————————————————————-

In this case

Windows:(true)

When submitting, transfer CRLF to LF and submit again

When cutting out, the LF is automatically converted to CRLF

MAC/Linux: (input)

When submitting, transfer CRLF to LF and submit again

When cutting out, keep LF

In this way, it will always be LF in the warehouse, CRLF in Windows workspace and LF in MAC/Linux workspace

The process of installing jupyter notebook on MAC

Don’t panic in case of data tilt, teach you to easily obtain the slope of table tilt>>>

Mac desktop

python:mac Comes with Python 2.7.10

1. Upgrade the PIP installation tool: sudo Python – M PIP install — Upgrade — force pip

2. Install setup tools: sudo PIP install setup tools = = 33.1.1

3. Install Python- dateutil:sudo pip install python-dateutil==2.2

4. Installation six:sudo pip install –ignore-installed six

5. Install jupyter: sudo install jupyter

Start command: input Jupiter notebook directly in the terminal

It took me a long time to do a good job. The above commands are used when there are various problems during installation. Write down the problems and corresponding solutions below

1.ImportError: cannot import name _ Thread report this error solution:

sudo pip uninstall python-dateutil
sudo pip install python-dateutil==2.2

2.File “/Library/Python/2.7/site-packages/dateutil/tz/_ common.py”, line 2, in < module>

from six.moves import _ thread
ImportError: cannot import name _ thread

Solution: install the six command again

After solving the above problem, an error will still be reported when starting. This is a stubborn error

File “/Library/Python/2.7/site-packages/packaging/requirements.py”, line 59, in < module>

MARKER_ EXPR = originalTextFor(MARKER_ EXPR())(“marker”)

TypeError: __ call__() takes exactly 2 arguments (1 given)

Solution: find the file in the path directly according to the error information, open the file and modify the function in line 59

59:#MARKER_ EXPR = originalTextFor(MARKER_ EXPR())(“marker”)
60:MARKER_ EXPR = originalTextFor(MARKER_ EXPR(“marker”))

After modification, directly save the file and run the jupyter notebook command again to start jupyter

As for the problem of sixs, we need to delete the sixs in our default path. Otherwise, even if the update is successful, the latest sixs will not be used

Method: first check the default six path

import six

print six.__ file__

Then delete: sudo RM - RF/system/library/frameworks/python. Framework/versions/2.7/extras/lib/python/six

Finally, use the above command to install and update the six

When installing MySQL database on MAC, the system prompts MySQL: command not found

Geeks, please accept the hero post of 2021 Microsoft x Intel hacking contest>>>

After we install mysql, we enter the MySQL command in the terminal and find that we can’t see the database we installed. This is because you don’t configure the environment variables

Install MySQL database in OS system and save it in/usr/local/MySQL by default

So how do we configure environment variables

1. Open terminal, enter: sudo Su enter to enter the system administrator management directory (of course, you need to enter your user password to enter)

2. Enter the command: VIM/etc/profile, and then enter the VIM editing interface

3. In the VIM editing interface, press I to enter the editing state. Then, you can add the path name and enter the command: export path = $path/usr/local/MySQL/bin

4. Press the ESC key to exit the editing state

5. Enter the command: WQ( Indicates save and force exit)

6. Then I’ll call back to my previous terminal interface

7. Then enter the command: source/etc/profile in this interface to indicate that the settings will take effect immediately. Of course, it’s the same for you to restart after closing

At this time, you can enter: MySQL — version enter to test

What if the system still prompts MySQL: command not found

1. Apple – > System Preferences – > At the bottom, click Mysql to close the MySQL service in the pop-up page

2. Enter the terminal input: CD/usr/local/MySQL/bin

3. After entering, log in the administrator permission sudo Su (enter your computer password)

4. Enter the following command to disable the MySQL verification function./mysqld_ safe –skip-grant-tables & ( Note that mysqld

5. After entering, MySQL will restart automatically (you can see in the preferences that the state of MySQL will change to running)

6. Then enter the command./MySQL

7. After entering, you can see the following effect:

The comfortable MySQL > Prompt

8. Here’s how to change the password

Then enter: flush priorities

After entering, enter: set password for ‘root’ @’localhost ‘= password (‘123’)

9. Re open a terminal and enter: MySQL – uroot – P123 to enter MySQL data:

[Mac Error]-bash: mysql: command not found

First try:

ln -s /usr/local/mysql/bin/mysql /usr/bin/mysql

Prompt: operation not permitted

Again, add sudo to attach administrator permissions, and still prompt: operation not permitted

Then try:

Create and edit the file.
vim ~/.bash_profile
Add.
export PATH=$PATH:/usr/local/mysql/bin
Save, exit

As a result, even MySQL still reported an error

Reexecution:

source ~/.bash_profile

Done

is summarized as follows:

1. create and edit the file: vim ~/.bash_profile.
2. Add export PATH=$PATH:/usr/local/mysql/bin
3. Save and exit wq
4. Execute to take effect           source ~/.bash_profile;

MVN often prompts command not found in MAC

Geeks, please accept the hero post of 2021 Microsoft x Intel hacking contest>>>

~/.bash_ After configuring path in profile, it is found that command not found often occurs in MVN. The reason for the problem lies in the use of Zsh. Switching to bash is normal. If you want to use the command in Zsh normally, you need to configure ~ /. Zshrc, and the configuration content follows ~ /. Bash_ The profile is the same

Note that pyqt5 tools cannot be installed on Mac

Geeks, please accept the hero post of 2021 Microsoft x Intel hacking contest>>>

Recently, I want to study the QT of Python. After searching some materials, I need to install pyqt5 first (this is just a library file, but there is no visual operation on the interface). In addition, pyqt5 tools needs to be installed on the visual interface. Errors are always reported during the installation process, as follows:

Collecting pyqt5-tools

  Could not find a version that satisfies the requirement pyqt5-tools (from versions: )
No matching distribution found for pyqt5-tools

There’s no way. If you want to solve this problem, find the answer on the Internet first! I found the answer in Google

At this point, I understand why the installation failed. The reason is that pyqt5 tools does not have Mac version, but only provides Windows version

Record here

Mac Run MongoDB error: exception in initAndListen: NonExistentPath: Data directory /data/db not found., t…

this is the main error:

Exception in initandlisten: nonexistentpath: data directory /data/DB not found

Catalina, the latest version of the MAC system, has made a surprising change: it does not allow changes to the root directory (which is also discussed in the forum topic)

% sudo mkdir -p /data/db
mkdir: /data/db: Read-only file system

Unfortunately, this is not explicitly stated in Apple’s Catalina release notes, except for the brief mention in Catalina features:

MacOS Catalina runs on a dedicated read-only system volume

Since the directory /data/DB is encoded as mongodb default directory, one solution is to specify a directory where dbpath is not on the root directory. For example:

mongod --dbpath ~/data/db

This will put the mongodb data in your home directory. Just make sure that the path ~/data/DB does exist

alternative method

An alternative method is to use the instructions in installing mongodb Community Edition on MacOS brew :

brew tap mongodb/brew
brew install mongodb-community

By default, this creates some other files:

Configuration file (/ usr/local/etc/mongod. CONF)

Log directory path (/ usr/local/var/log/mongodb)

To run the data directory path (/ usr/local/var/mongodb), mongod you can:

Run the command manually from the command line (you can use an alias for convenience):

mongod --config /usr/local/etc/mongod.conf

Use to run brew services with mongodb as a service. Note that this will run mongodb as a stand-alone node (rather than a replica set), so functionality depending on oplog (such as changestream) will not work unless you modify the mongod configuration file:

brew services start mongodb-community

https://stackoverflow.com/questions/58283257/mongodb-cant-find-data-directory-after-upgrading-to-mac-os-10-15-catalina

After installing node on MAC, enter node – V to prompt node command not found

Download the. PKG file of the node from the official website to install the node. After installation, enter NPM – V and node – V in the MAC terminal to prompt command not found. Refer to the method on the Internet, and finally get the solution

Step 1: create. Bash_ Profile file, ~ means in the ~ directory,. Means hidden file. Open the terminal and enter the following command

touch ~/.bash_profile  

Step 2: open. Bash_ The input command is as follows:

open -t ~/.bash_profile 

Step 3: a blank text edit box will pop up. Edit the first line in the text edit box

export PATH=/usr/local/bin:/usr/bin:/bin:/usr/sbin:/sbin  

Command + s saves the file

Step 4: save. Bash_ Profile file, enter the command:

source .bash_profile  

Step 5: enter NPM – V or node – V again to see the version number~

Please check GDB is coded – see taskgated (8)

Knowledge map advanced must read: read how large-scale map data efficient storage and retrieval>>>

Reprinted from Afan tree’s blog

link address of this article: please check GDB is coded – see taskgated (8))

It’s hard to install GDB with brew. It turns out that it still can’t be debugged and this error is reported>( Please check GDB is coded – see taskgated (8))
for security reasons, Darwin kernel does not allow GDB to debug any program without special authorization, because it can be debugged to control the process. However, if it is root user, there is no such problem, but who is willing to use root to debug the program<
solution:
a common solution is to grant GDB the right to sign code with full trust of the system to other processes

First, you need to create a system code signature trust certificate

Start the “Keychain access” application (/ applications/utilities/Keychain access. APP)
1. Open the menu: Keychain access – Certificate assistant – create Certificate…
2. Enter the name of the certificate, such as GDB cert
3. Select identity type to self signed root
4. Select certificate type to code signing
5. Check: let me override the default signatures
6. Continue all the way. When you choose the time, make it longer, up to 20 years, 7300。
7. Continue all the way until you select the address where the certificate is stored, and select: system
8. After the certificate is created, you need to set the certificate custom trust
9. Right click the GDB cert certificate you just created, and select get info
10. Click trust, The trust options that can be customized will be displayed
11. Select “code signing to always trust” for “code signing”
12 secondly, grant the certificate to GDB and execute the command

1

codesign -s gdb-cert `which gdb`

Well, the above gives GDB a code signature certificate trusted by the system, and GDB can be used normally
to make the newly added certificate effective, you need to restart the taskgated service or restart the system

1

sudo killall taskgated