Abstract:
Starting gzip when packaging can greatly reduce the size of the package, which is very suitable for online deployment. Smaller size for user experience
It means faster loading speed and better user experience.
Vue-cli3.0 project
Installation dependency: compression webpack plugin
npm install compression-webpack-plugin –save-dev
vue.config.js Revision:
const CompressionPlugin = require('compression-webpack-plugin');
constproductionGzipExtensions=/.(js-124css-124json-124txt *)?$/i;
module.exports = {
    publicPath: './',
    productionSourceMap: false,
    configureWebpack: {...},
    chainWebpack: config =&> {
        config.resolve.alias.set('@', resolve('src'));
        if (process.env.NODE_ENV === 'production') {
            config.plugin('compressionPlugin')
            .use(new CompressionPlugin({
                filename: '[path].gz[query]',
                algorithm: 'gzip',
                test: productionGzipExtensions,
                threshold: 10240,
                minRatio: 0.8,
                deleteOriginalAssets: true
            }));
        }
    },
};
Parameter configuration of compression webpack plug in: View on the official website( https://www.webpackjs.com/plugins/compression-webpack-plugin/ )
)
Parameter configuration of compression webpack plug in: View on the official website(
Parameter configuration of compression webpack plug in: View on the official website(
gzip on;
gzip_static on;
gzip_min_length 1k;
gzip_buffers 4 32k;
gzip_http_version 1.1;
gzip_comp_level 2;
gzip_types text/plain application/x-javascript text/css application/xml;
gzip_vary on;
gzip_disable "MSIE [1-6].";
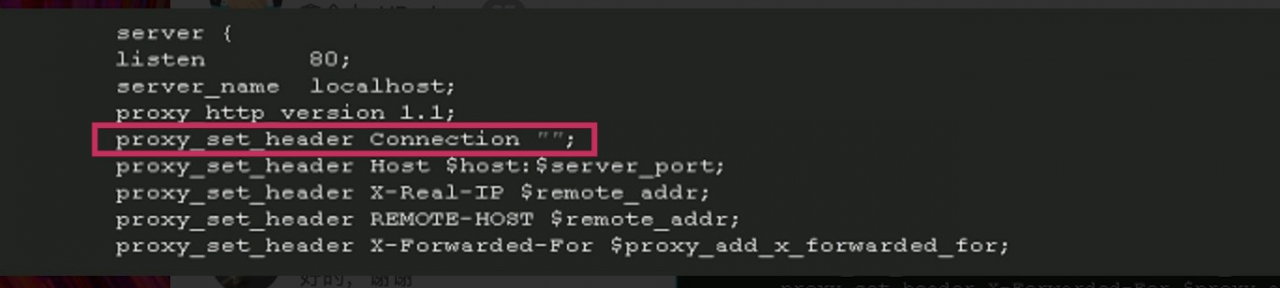
Gzip use environment: http, server, location, if (x), generally defined in nginx.conf Http { Between
gzip on
on is enabled and off is off
gzip_ min_ length 1k
Set the minimum number of bytes of the page that can be compressed. The number of bytes of the page is obtained from the content length in the header. The default value is 0, no matter how many pages are compressed. It is recommended to set the number of bytes larger than 1K. If the number of bytes is less than 1K, it may increase.
gzip_ buffers 4 16k
How much memory is used to cache compression results?”4 16K” means to get the compression results in 16K * 4
gzip_ comp_ level 5
Gzip compression ratio (1 ~ 9), the smaller the compression effect is, the worse the compression effect is, but the larger the processing speed is, the slower the processing speed is, so the intermediate value is generally taken
gzip_ types text/plain application/x-javascript text/css application/xml text/javascript application/x-httpd-php
Takes effect for specific MIME types, where ‘text/HTML’ is forced to be enabled by the system
gzip_ http_ version 1.1
Identify the version of HTTP protocol. Early browsers may not support gzip self decompression, and users will see garbled code
gzip_ vary on
Enable reply header “vary: accept encoding”
gzip_ proxied off
When nginx is used as a reverse proxy, it is enabled, off (compression of all proxy result data is turned off), expired (compression is enabled, if the header contains “expires” header information), and no cache (compression is enabled, if the header contains “cache” header information)- Control:no-cache “), no store (compression enabled, header header contains” cache “- Control:no-store “), private (compression enabled, The header contains “cache”- Control:private “),no_ last_ Modefied (compression enabled, header header does not contain “last modified”), no_ Etag (enable compression, if header does not contain “Etag” header information), auth (enable compression, if header contains “authorization” header information)
gzip_ disable msie6
Ie5.5 and IE6 SP1 use the msie6 parameter to disable gzip compression) to specify which browsers (which will match with user agents) do not need gzip compression, depending on the PCRE library
Server configuration from juan26 = &> https://segmentfault.com/a/1190000012571492?utm_ source=tag-newest
Note: (gzip)_ Static on) the dynamic compression of nginx is to compress each request first and then output it, which causes the virtual machine to waste a lot of CPU. To solve this problem, we can use the nginx module gzip Precompression, this module is used to directly read the compressed file (file name is plus. GZ) for the file that needs to be compressed, instead of dynamic compression. For the request that does not support gzip, read the original file.
1. Files can be compressed using gzip or any other compatible command.
2.gzip_ Static configuration takes precedence over gzip.
3. Open nginx_ After static, we will first find out whether there is a corresponding GZ file for any file.
4.gzip_ Types setting to gzip_ Static is invalid.
5. Gzip static is applicable to HTTP 1.1 by default.
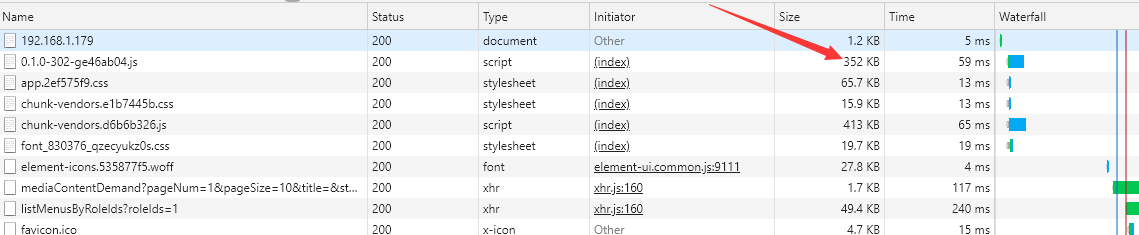
view the size comparison before and after compression:
Unpack
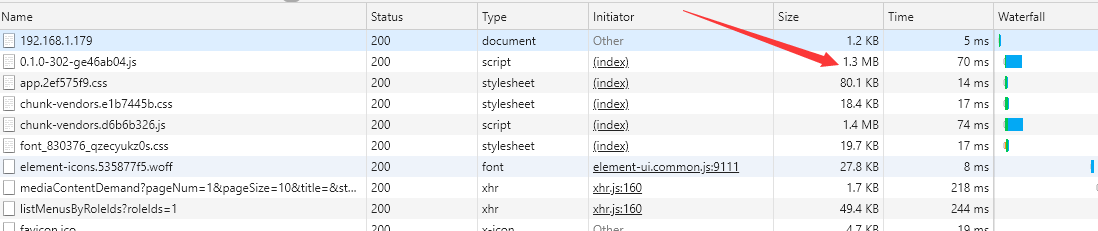 EnPack