Category Archives: Coder

Openeuler: How to Install OpenSSL

OpenSSL installation under openeuler##

Download the latest version of OpenSSL openssl-3.0.0.tar.gz

Unzip the source code

tar xzvf openssl-3.0.0.tar.gz

Enter the source code directory

cd openssl-3.0.0

Compile the installation using the following command

./config
./Configure
sudo make install

Write test code

//test.c
#include <stdio.h>
#include <openssl/evp.h>
int main(){
    OpenSSL_add_all_algorithms();
    return 0;
}

Compiling and executing test code

Compile:
gcc -o to test.c -I openEuler/openssl3.0.0/include -L /openEuler/openssl3.0.0/ssl -ldl -Ipthread -lcrypto

Execute:
./to;echo $?
An error is reported and the OpenSSL development kit needs to be installed.
sudo yum install openssl-devel

    1. Print

Done!

How to Customizate the Style of Option Box by JQuery Component

Record a need encountered in today’s work and the solution found by yourself

Requirements:

Add an ID in the original select option box. (I want to add a span element with style. I tried for a long time. I can’t add span in option, let alone with style)

Scheme:

I refer to the original select option box, which added a “√” picture element. The original solution here is to use the jquery.dd.js component.

I looked at the parameter definition of the option element of the next component.

definition:

 1 var parseOption = function(opt) {
 2 var imagePath = '', title ='', description='', value=-1, text='', className='', imagecss = '', index;
 3 if (opt !== undefined) {
 4 var attrTitle = opt.title || "";
 5 //data-title
 6 if (attrTitle!="") {
 7 var reg = /^\{.*\}$/;
 8 var isJson = reg.test(attrTitle);
 9 if (isJson && settings.jsonTitle) {
10 var obj = eval("["+attrTitle+"]");
11 };
12 title = (isJson && settings.jsonTitle) ?obj[0].title : title;
13 description = (isJson && settings.jsonTitle) ?obj[0].description : description;
14 imagePath = (isJson && settings.jsonTitle) ?obj[0].image : attrTitle;
15 imagecss = (isJson && settings.jsonTitle) ?obj[0].imagecss : imagecss;
16 index = opt.index;
17 };
18 
19 text = opt.text || '';
20 value = opt.value || '';
21 className = opt.className || "";
22 //ignore title attribute if playing with data tags
23 title = $(opt).prop("data-title") || $(opt).data("title") || (title || "");
24 description = $(opt).prop("data-description") || $(opt).data("description") || (description || "");
25 imagePath = $(opt).prop("data-image") || $(opt).data("image") || (imagePath || "");
26 imagecss = $(opt).prop("data-imagecss") || $(opt).data("imagecss") || (imagecss || "");
27 index = $(opt).index();
28 };
29 var o = {image: imagePath, title: title, description: description, value: value, text: text, className: className, imagecss:imagecss, index:index};
30 return o;
31 };

After reviewing the parameter definitions in this component, I made some changes in combination with the option template used in the original project.

Option template code in the original project:

1 <option value="{{id}}" data-title="{{name}}" {{#if done}} data-image="/images/selected.png"{{else}} data-image="/images/null.png" {{/if}}>
2 {{value}}
3 </option>

To view the original code, add a data image attribute in the option tab, that is, the “√” icon. The effect displayed on the page is that there is a “√” icon in front of each qualified option.

According to this feature, I think about whether I can add another attribute in option to put the content in span I originally wanted to add.

In this way, I selected the description attribute and modified the original code.

As follows:

1 <option value="{{id}}" data-title="{{name}}" {{#if done}} data-image="/images/selected.png"{{else}} data-image="/images/null.png" {{/if}}
{{#if ok}} data-description="正" data-imagecss="fcss" {{/if}}>
2 {{value}}
3 </option>

The part marked with yellow silver light pen is the new part.

Summary:

Where data description = “exactly” is the attribute of description in the above component that I want to add a span element.

Data image = “FCSs” is to modify the CSS style of the original data image attribute.

The above completes the requirement that I want to add an ID in option.

Tails: Part 0000 0011

DOM style setting methods in the four components of react

1. Inline style

To add inline styles to the virtual DOM, you need to use expressions to pass in style objects

An inline style needs to be written to a style object, which can be placed in many places

For example, in the render function, on the component prototype, and in the external chain JS file

Note: there are two parentheses here. The first indicates that we want to insert JS in JSX, and the second is the parenthesis of the object

 <p style={{color:'red', fontSize:'14px'}}>Hello world</p>

2. Use class

React recommends that we use inline style, because react thinks that each component is an independent whole

In fact, in most cases, we are still adding a lot of class names to elements, but it should be noted that class needs to be written as classname (because after all, we are writing class JS code, we will receive the current JS rules, and class is a keyword)

import React, { Component } from 'react'
import styles from './style.css'

class ClassStyle extends Component {
  render() {
    let className = cx({
      font: false
    })
    return (
      <>
        <div className={className}>hello</div>
        <p className='setstyle'>style</p>
        <DivContainer>
          world
        </DivContainer>
      <>
    )
  }
}

export default ClassStyle

3. Classnames add different styles for different conditions

Sometimes different styles need to be added according to different conditions, such as completion status, green for completion and red for unfinished. In this case, we recommend using the package class names:

Purpose:

Because react-native dynamically adds multiple class names, an error will be reported

import style from './style.css'
<div className={style.class1 style.class2}</div>

To get the final rendering effect:

<div class='class1 class2'></div>

Download and install

npm i -S classnames

use

import classnames from 'classnames'
<div className=classnames({
    'class1': true,
    'class2': true
    )>
</div>

4.css-in-js

styled components is a CSS in JS framework written for react, which is simply to write CSS in JS. NPM link

The traditional front-end scheme advocates the principle of “separation of concerns”. HTML, CSS and JavaScript should perform their respective duties and be separated.

In the react project, component-based scheme is advocated, which naturally forms a way of centralized writing and management of HTML, CSS and JavaScript.

styled components

should be the most popular library of CSS in JS. Through styled components, you can use the tag template string syntax of ES6 to define a series of CSS properties for the component to be styled. When the JS code of the component is parsed and executed, styled components will dynamically generate a CSS selector, The corresponding CSS style is inserted into the head tag in the form of style tag. The dynamically generated CSS selector will have a small hash value to ensure global uniqueness and avoid style conflicts.

install

npm i -S styled-components

Define style

Style JS file

import styled from 'styled-components'
const Title = styled.div`
    color:red;
    font-size:16px;
    h3{
        color:blue;
        font-size:20px;
    }
`
export {
    Title
}

Display

Use the title just as you would with a regular react component

import React, { Component } from 'react'
import { Title } from './Styles'
class App extends Component {
render() {
    return (
        <div>
            <Title>
            I'm a Title
            <h3>Hello World!</h3>
            </Title>
        </div >
        );
    }
}
export default App

Style inheritance

style

import styled from 'styled-components'
const Button = styled.button`
    font-size: 20px;
    border: 1px solid red;
    border-radius: 3px;
`;

const Button2 = styled(Button)`
    color: blue;
    border-color: yellow;
`;

export {
    Button,
    Button2
}

display

import React, { Component } from 'react'
import {
Button,
Button2
} from './Styles'
class App extends Component {
render() {
    return (
    <div>
        <Button>Button1</Button>
        <Button2>Button2</Button2>
    </div >
    );
}
}
export default App

Attribute transfer

style

import styled from 'styled-components'
const Input = styled.input`
    color: ${props => props.inputColor || "blue"};
    border-radius: 3px;
`;
export {
    Input
}

display

import React, { Component } from 'react'
import { Input } from './Styles'
class App extends Component {
render() {
    return (
    <div>
        <Input defaultValue="Hello" inputColor="red"></Input>
    </div >
    );
}
}
export default App

Vue new page Jump [Three Method to Use]

router link tab jump

<router-link to="/list/one">
    <span>link Jump</span>
</router-link>
// Adding parameters
<router-link :to="{path:'/list/two', query:{id:1,name:'vue'}}">
</router-link>
// Get parameters in subpages
id = this.$route.query.id
// Open in the new Windows
<router-link :to="{path:'/list/three', query:{id:1,name:'vue'}}" target="_blank">
</router-link>

this.$router.push()Jump

toList (e) {
   this.$router.push({path: "/list", query: {id: e}})
 }
 // Adding parameters
 id = this.$route.query.id
 
 toList (e) {
   this.$router.push({name: "/list", params: {id: e}})
 }
 // Note that the address needs to be written after the name
 //parameter acquisition, params and query difference, query parameters are displayed in the address bar, params parameters are not displayed in the address bar
 id = this.$route.params.id

this.$router.replaceJump

//The difference between push and push is that push records a history, while replace does not.
 toList (e) {
   this.$router.replace({name: '/list', params: {id: e}})
 }

Lock failed, MQ already started [How to Solve]

preface

Just contacted rocketmq and used it on the win10 platform. There are too many things that you forget how to use. Now record these things


Check several questions

How to start mqbroker

Direct start

$mqpath> bin\mqbroker.cmd conf\you_special_config.properties

Use the start command

$mqpath> bin\mqbroker.cmd conf\you_special_config.properties

There is no essential difference between the two startup methods, but using the start command will reopen a CMD page for the program, which is more convenient

Use action item or not: - C

$mqpath> bin\mqbroker.cmd -h
usage: mqbroker [-c <arg>] [-h] [-m] [-n <arg>] [-p]
 -c,--configFile <arg>       Broker config properties file
 -h,--help                   Print help
 -m,--printImportantConfig   Print important config item
 -n,--namesrvAddr <arg>      Name server address list, eg: 192.168.0.1:9876;192.168.0.2:9876
 -p,--printConfigItem        Print all config item
"Broker starts OK"

With operation item

With operation items, you can use some custom configurations

Generally, in the cluster, you need to bring operation items and use your own configuration

No action items

Without action items, some configurations of the default configuration are used

In this case, start two brokers , and basically report lock failed and MQ ready started in the second broker

Because the same default configuration is used (starting only one broker is not affected)

Use a different profile

Different configurations meet the most basic requirements

brokername different

brokerid different

listenport different

storepathrootdir different

Same configuration

Similar to the case of without operation item , it will cause lock failed and MQ ready started


Solution:

Use the start command

Use action items - C

Use a different profile

The final start command is:

$mqpath> start bin\mqbroker.cmd -c conf\my-2m2s-sync\broker-b.properties

$mqpath> start bin\mqbroker.cmd -c conf\my-2m2s-sync\broker-a-s.properties


Sample configuration

Host: configuration of two brokers on 192.168.0.123

Broker-a.properties (a node master configuration file)

namesrvAddr=192.168.0.123:9876; 192.168.0.124:9876
brokerClusterName=DefaultCluster
brokerName=broker-a
brokerId=0
deleteWhen=04
fileReservedTime=48
brokerRole=SYNC_MASTER
flushDiskType=ASYNC_FLUSH
listenPort=10911
storePathRootDir=D:/workfile/logs/rocketmqlogs/store-a

broker-b-s.properties (b节点从配置文件)

namesrvAddr=192.168.0.123:9876; 192.168.0.124:9876
brokerClusterName=DefaultCluster
brokerName=broker-b
brokerId=1
deleteWhen=04
fileReservedTime=48
brokerRole=SLAVE
flushDiskType=ASYNC_FLUSH
listenPort=11011
storePathRootDir=D:/workfile/logs/rocketmqlogs/store-b


Host: configuration of two brokers on 192.168.0.124

Broker-b.properties (B node master configuration file)

namesrvAddr=192.168.0.123:9876; 192.168.0.124:9876
brokerClusterName=DefaultCluster
brokerName=broker-b
brokerId=0
deleteWhen=04
fileReservedTime=48
brokerRole=SYNC_MASTER
flushDiskType=ASYNC_FLUSH
listenPort=10911
storePathRootDir=D:/workfile/logs/rocketmqlogs/store-b

broker-a-s.properties (a node from the profile)

namesrvAddr=192.168.0.123:9876; 192.168.0.124:9876
brokerClusterName=DefaultCluster
brokerName=broker-a
brokerId=1
deleteWhen=04
fileReservedTime=48
brokerRole=SLAVE
flushDiskType=ASYNC_FLUSH
listenPort=11011
storePathRootDir=D:/workfile/logs/rocketmqlogs/store-a


JavaWeb HttpServletRequest (How to Get Line, Header and Body)

introduce

HttpServletRequest defines a series of methods to obtain the request line, request header and request body, and can store information as a domain

common method

Request line

String getRemoteAddr()

Parameter: None

Return value: String

Meaning of return value: obtain the client IP address

Function: obtain the client IP address

Request header

String getHead(String name)

Parameters:

String Name: the name of the request header

Return value: String

Meaning of return value: get the value corresponding to the request header

Function: get the value corresponding to the request body

Enumeration getHeaderNames()

Parameter: None

Return value: enumeration < String>

Return value meaning: get the enumeration of all request header names

Function: get the enumeration of all request header names

Request body

String getParameter(String name)

Parameters:

String Name: the name of the request body parameter

Return value: String

Meaning of return value: get the value corresponding to the request body parameter name

Function: get the value corresponding to the request body parameter name

Enumeration< String> getParameterNames()

Parameter: None

Return value: enumeration & lt; String>

Meaning of return value: get the enumeration of all request headers

Function: get the enumeration of all request headers

Request field

void setAttribute(String name ,Object obj)

Parameters:

String Name: the name of the information in the field

Object obj: field value

Return value: None

Return value meaning: None

Scope: store information in the request domain for forwarding

Object geAttribute(String name)

Parameters:

String Name: the name of the information in the field

Return value: object

Meaning of return value: get the object corresponding to the information name in the field

Scope: get the object corresponding to the information name in the domain

Other

void setCharacterEncoding(String name)

Parameters:

String Name: character set

Return value: None

Return value meaning: None

Function: set the character set in the request body

Next (react) framework combined with lib-flexible, postcss-pxtorem do pc-side rem adaptation to solve the font-size is always 54px issue

Install lib-flexible, postcss-pxtorem

1 yarn add lib- flexible
 2 yarn add postcss-pxtorem


Configure postcss-pxtorem

Create a postcss.config.js file in the root directory

1 const pxtorem = require("postcss-pxtorem" );
 2 module.exports = {
 3  plugins: [
 4  pxtorem({
 5 rootValue: 136, // What I configure here is my benchmark value at 1366 resolution, which will be The following explains 
6 unitPrecision: 5 ,
 7 propList: ["*" ],
 8 selectorBlackList: [/^\.nop2r/, /^\.am/,'html' ],
 9  // Exclude antd style, because I give html Min-width is set, so html is also excluded and rem conversion is not performed 
10 replace: true ,
 11 mediaQuery: false ,
 12 minPixelValue: 0
 13  })
14  ]
 15 }


Configure lib-flexible

Under normal circumstances, we can import’lib-flexible’ in app.js, but I started the project after the introduction, and kept reporting window is not defined. After studying for a long time, I found a solution.

1 const setRem = async ()=> {
 2 await require('lib-flexible' )
 3  }
 4 useEffect(()=> {
 5  setRem()
 6 window.addEventListener('resize' ,setRem)
 7 })


Finally no errors were reported!

In this case, it is no problem to adapt to the mobile terminal, but in the case of the PC terminal screen, use the console to view the elements and find that the font-size is always 54px

1 <html data-dpr="1" style="font-size: 54px;">


Solution:
Modify the refreshRem of node_modules\lib-flexible\flexible.js file. It can be seen that the original code does not change with width when width / dpr> 540. We modify this code as follows:

1  function refreshRem(){
 2  var width = docEl.getBoundingClientRect().width;
 3  if (width / dpr> 540 ) {
 4 width = width * dpr;
 5  }
 6  var rem = width / 10 ;
 7 docEl.style. fontSize = rem +'px' ;
 8 flexible.rem = win.rem = rem;
 9 }


at last

According to the design drawing and the resolution under development, modify the rootValue value of the postcss-pxtorem.js file, the normal resolution is width/10

Lower your costs with the new pause and resume actions on Amazon Redshift

Today’s analytics workloads typically require a data warehouse to be available 24 hours a day, 7 days a week. However, there may be times when you need an Amazon Redshift cluster for a short duration of time at frequent (or infrequent) intervals. For example, you may run a periodic ETL job or use a cluster for testing and development and not use it during off-hours or weekends. In these cases, you may want an easy way to keep the data warehouse up and running only part of the time. Previously, you could accomplish this by making a backup, terminating the cluster, and restoring the cluster from the snapshot. The pause and resume actions on Amazon Redshift are a much simpler way to suspend billing and are designed to use if Amazon Redshift is out of operation for hours at a time and on a regularly scheduled basis.

Pausing a cluster suspends compute and retains the underlying data structures and data so you can resume the cluster at a later point with no data loss. You can configure this through the Amazon Redshift console or the use of Amazon Redshift CLIs.

When the cluster is paused, only the cluster’s storage incurs charges. On-demand compute billing is suspended and resumed on a per-second basis. Paused clusters still appear as an entry in the console. You can also automate the pause and resume actions by using a schedule that matches your operational needs.

Using the actions via the Amazon Redshift console

To use the pause and resume actions on the Amazon Redshift console, complete the following steps:

On the Amazon Redshift console, choose Clusters.

Choose your desired cluster.

Choose Actions.

Choose Pause.

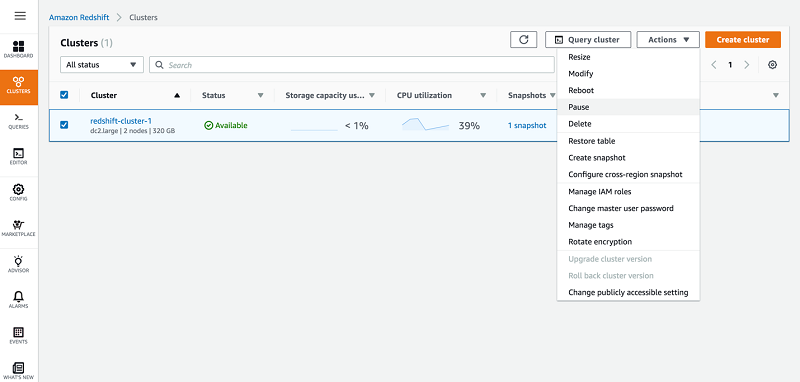
To determine when to pause the cluster, choose from the following three options:

To pause the cluster immediately, select Pause now.

To pause the cluster at a later point, select Pause later.

To pause and resume the cluster according to a set schedule, select Pause and resume on schedule.

For this walkthrough, select Pause now.

Choose Pause now.

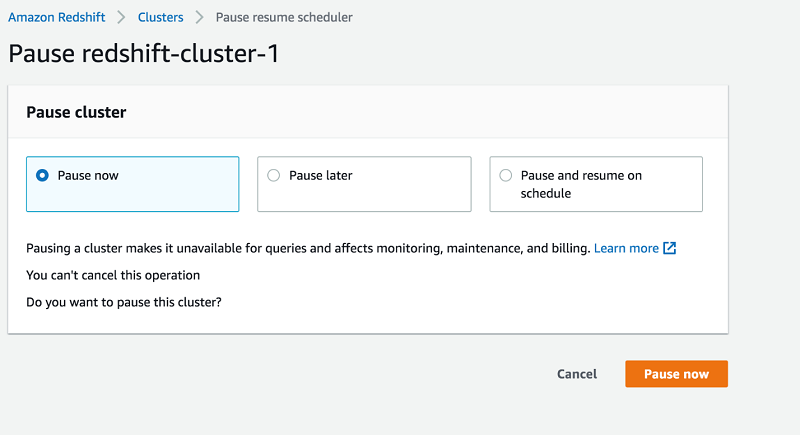
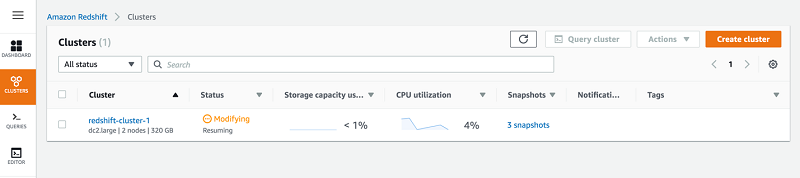
The cluster is now in Modifying status. It can take up to a few minutes for the cluster to change to a Paused state, but the cost accrual for compute resources is suspended immediately.

The following screenshot shows a view of the cluster status.

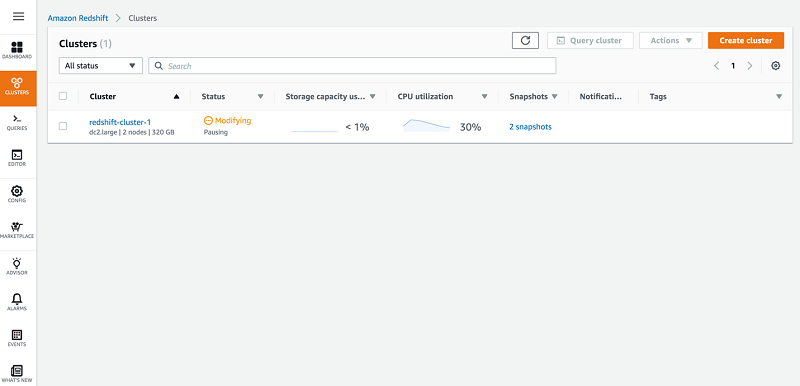
Amazon Redshift processes any outstanding queries before it pauses the cluster. When the cluster is paused, you can still view it on the Amazon Redshift console, and the Resume action is available.

To resume the cluster, complete the following steps:

On the Amazon Redshift console, choose Clusters.

Choose your desired cluster.

Choose Actions.

Choose Resume.

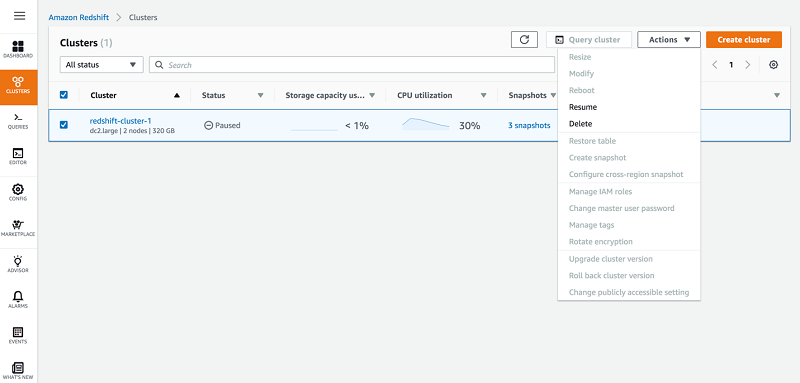
Choose when to resume the cluster. The options are the same as those for the pause action.

For this walkthrough, select Resume now.

Choose Resume now.

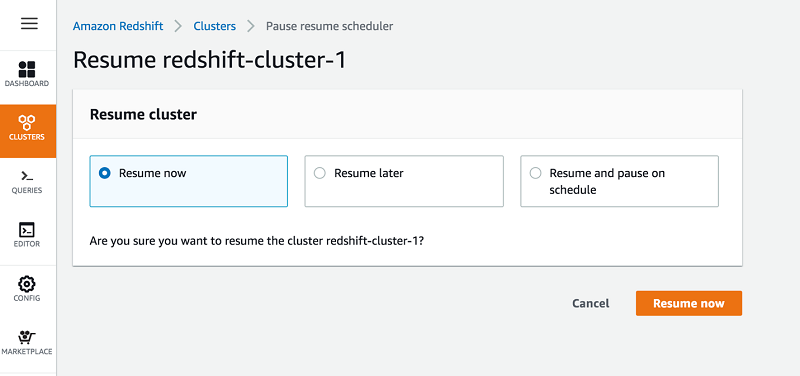
The cluster moves to Modifying status. The time the resume action takes to complete depends on the size of the data and the cluster. It can take 1–30 minutes. Billing only resumes when the cluster is available.

The following screenshot shows the view of the cluster status.

Using the actions via CLI

The following two commands pause and resume the cluster:

Pause-cluster

Resume-cluster

To pause a given cluster, enter the following code:

aws redshift pause-cluster --cluster identifier <insert cluster identifier here>

To resume a paused cluster, enter the following code:

aws redshift resume-cluster --cluster identifier <insert cluster identifier here>

Scheduling pause and resume actions

You can schedule to pause and resume a cluster at specific times of the day and week. For example, this walkthrough pauses a cluster on Friday 8:00 p.m. and resumes it on Monday 7:00 a.m. You can configure this via the Amazon Redshift console or APIs.

Scheduling via the Amazon Redshift console

To schedule to pause and resume a cluster on the Amazon Redshift console, complete the following steps:

On the Amazon Redshift console, choose Clusters.

Choose your desired cluster.

Choose Actions.

Choose Pause.

Select Pause and resume on schedule.

For Schedule name, enter a name for this schedule.

Optionally, for Starts on and Ends on, enter the dates and times to start and end the schedule.

For Pause every and Resume every, choose the time and day to pause and resume.

Choose Schedule recurring pause and resume.

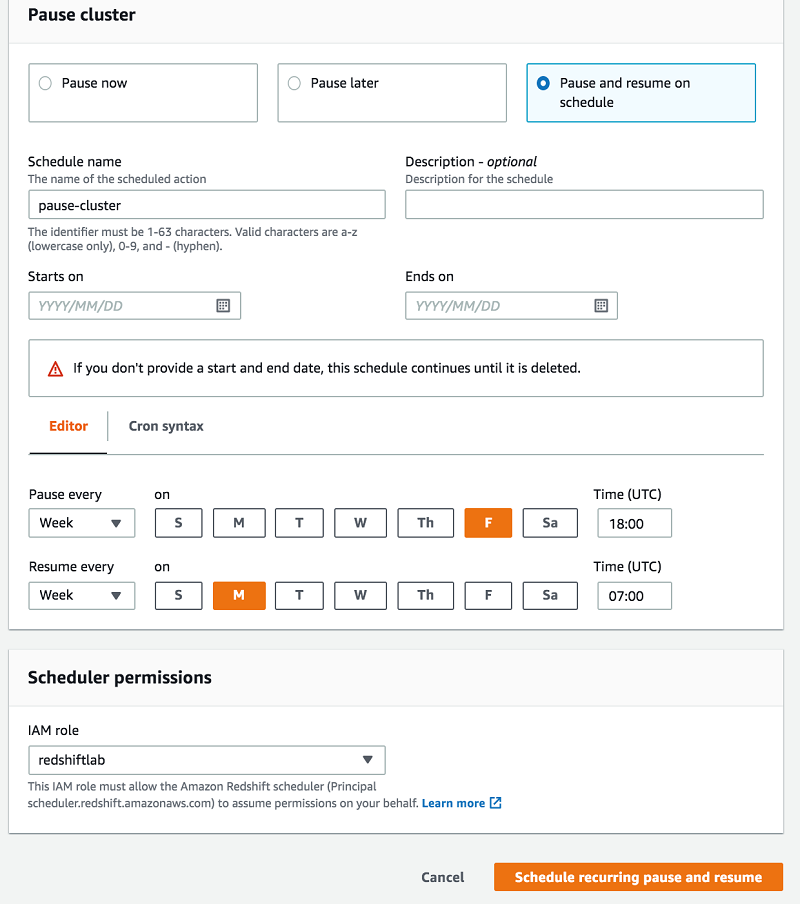
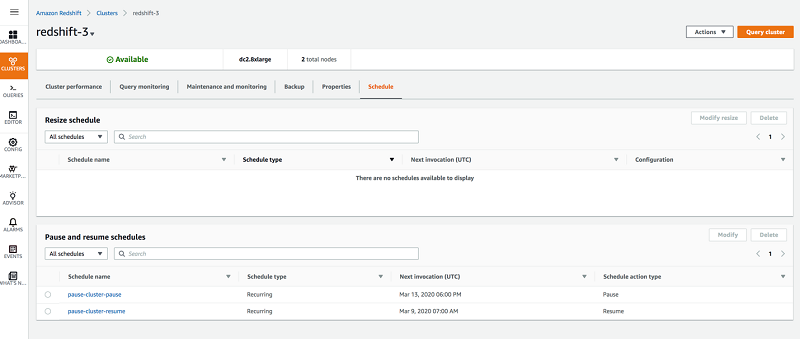
You can review existing pause and resume schedules on the Schedules tab. See the following screenshot.

Scheduling via CLI

The following CLI commands allow you to create, modify, and delete scheduled pause and resume tasks.

To create a scheduled action to occur one time, enter the following code:

aws redshift create-scheduled-action --scheduled-action-name test-resume --schedule "at(2020-02-21T02:00:00)" --target-action "{\"ResumeCluster\":{\"ClusterIdentifier\":\"redshift-cluster-1\"}}" --iam-role arn:aws:iam::<Account ID>:role/<Redshift Role>

To create a recurring scheduled action, enter the following code:

aws redshift create-scheduled-action --scheduled-action-name "scheduled-pause-repetitive" --target-action "{\"PauseCluster\":{\"ClusterIdentifier\":\"redshift-cluster-1\"}}" --schedule "cron(30 20 * * ?*)" --iam-role "arn:aws:iam::<Account ID>:role/<Redshift Role>"

The preceding code example pauses a cluster daily at 10:30 p.m.

To modify an existing scheduled action, enter the following code:

aws redshift modify-scheduled-action --scheduled-action-name "scheduled-pause-repetitive" --schedule "cron(30 * * * ?*)"

The preceding code example modifies the scheduled-pause-repetitive schedule to run every hour at 30 minutes past the hour.

To delete a scheduled action, enter the following code:

aws redshift delete-scheduled-action --scheduled-action-name "scheduled-pause-repetitive"

Summary

The pause and resume actions on Amazon Redshift allow you to easily pause and resume clusters that may not be in operation all the time. Flexible on-demand pricing and per-second billing gives you greater control of costs for clusters. You can run your data warehouse at the lowest cost possible without having to purchase a fixed amount of resources up-front. Amazon Redshift continues to raise the bar for data warehouse users by continually adding more enhancements like pause and resume to empower you to do more with your data at a lower cost.

How to Use Array.prototype.slice.call(arguments)

In the Es5 standard, we often need to convert the arguments object into a real array

1 // You can write it like this
2 var arr = Array.prototype.slice.call(arguments)
3 
4 // You can write it like this
5 var arr = [].slice.call(arguments)
6 
7 // If you are not afraid of trouble, you can also write like this
8 var arr = [].__proto__.slice.call(arguments)

The above three writing methods are equivalent

1 // When you understand the prototype chain, you know
2 Array.prototype === [].__proto__  // true
3  
4 // [].slice calls the slice method in the prototype object of the instance[]
5 [].slice === [].__proto__.slice  // true

Array.prototype.slice.call (arguments) originally called slice by array.prototype, but call (arguments) changed the object calling slice method to arguments. You can imagine that

Array.prototype.slice.call(arguments) ~ arguments.slice()

Array.prototype.slice.call(arguments, [begin[, end]]) ~ arguments.slice([begin [, end]])

We may think that the arguments prototype object is object. Prototype, and there is no slice method. Where does slice method come from

This is because call (arguments) not only changes the direction of this, but also makes the arguments object inherit the slice method in array. Prototype

The following is the source code of array. Prototype. Slice(): 587 lines of GitHub address

function ArraySlice(start, end) {
  CHECK_OBJECT_COERCIBLE(this, "Array.prototype.slice");

  var array = TO_OBJECT(this);
  var len = TO_LENGTH(array.length);
  var start_i = TO_INTEGER(start);
  var end_i = len;

  if (!IS_UNDEFINED(end)) end_i = TO_INTEGER(end);

  if (start_i < 0) {
    start_i += len;
    if (start_i < 0) start_i = 0;
  } else {
    if (start_i > len) start_i = len;
  }

  if (end_i < 0) {
    end_i += len;
    if (end_i < 0) end_i = 0;
  } else {
    if (end_i > len) end_i = len;
  }

  var result = ArraySpeciesCreate(array, MaxSimple(end_i - start_i, 0));

  if (end_i < start_i) return result;

  if (UseSparseVariant(array, len, IS_ARRAY(array), end_i - start_i)) {
    %NormalizeElements(array);
    if (IS_ARRAY(result)) %NormalizeElements(result);
    SparseSlice(array, start_i, end_i - start_i, len, result);
  } else {
    SimpleSlice(array, start_i, end_i - start_i, len, result);
  }

  result.length = end_i - start_i;

  return result;
}

Arguments can be converted to array objects because

We can see that the member properties of the arguments object are similar to arrays and have the length property. Is it so that similar objects can call slice?Let’s have a test

1 var obj = {
2     0: 'foo',
3     1: 'bar',
4     2: 'arg',
5     length: 3
6 }
7 console.log(Array.prototype.slice.call(obj))
8 // ["foo", "bar", "arg"]

This is OK

*PS: ES6 syntax adds array. From (), so the above types of objects can be directly converted into arrays by array. From (obj)