Category Archives: Linux

When Docker installs an Mirror: failed to get default registry endpoint from daemon

1.docker pull ubuntu:18.04

Warning: failed to get default registry endpoint from daemon (Cannot connect to the Docker daemon. Is the docker daemon running on this host?). Using system default:https://index.docker.io/v1/
Cannot connect to the Docker daemon. Is the docker daemon running on this host?

The reason is no sudo, the correct way to write sudo docker pull + software or resources to be installed.

Git Warning: LF will be replaced by CRLF | fatal: CRLF would be replaced by LF

These two errors were encountered because of GIT’s newline check function.

core.safecrlf

Git provides a newline checking function( core.safecrlf ), you can check whether the file is mixed with different styles of newline at the time of submission. The options for this function are as follows:

false - Does not do any checking
warn - check on commit and warn
true - check at commit time and reject commit if a mixup is found

The most stringent true option is recommended.

core.autocrlf
if you are writing programs on windows, or if you are working with other people who are programming on windows and you are on other systems, you may encounter end of line problems. This is because Windows uses carriage return and line feed to end a line, while Mac and Linux only use line feed. Although this is a small problem, it can greatly disrupt cross platform collaboration.

Git can automatically convert line terminator CRLF to LF when you submit, and LF to CRLF when you check out code. use core.autocrlf To turn on this function. If it is on a Windows system, set it to true, so that when checking out the code, lf will be converted to CRLF:

$ git config --global core.autocrlf true

Linux or MAC systems use lf as the line terminator, so you don’t want git to do automatic conversion when checking out a file; when a file with CRLF as the line terminator is accidentally introduced, you definitely want to fix it core.autocrlf Set to input to tell git to convert CRLF to LF when submitting and not when checking out

$ git config --global core.autocrlf input

in this way, CRLF will be retained in check-out files on Windows systems, and LF will be retained on MAC and Linux systems, including warehouses.

If you are a Windows programmer and are developing a project that only runs on windows, you can set false to cancel this function and record the carriage return in the library

$ git config --global core.autocrlf false
How to Solve Git Warning: possible DNS spoofing detected

Today the company updated the git address and after changing the hosts it still reports the following error.

This requires removing the /.ssh/known_hosts file to allow ssh to re-authenticate.

Push failed

@@@@@@@@@@@@@@@@@@@@@@@@@@@@@@@@@@@@@@@@@@@@@@@@@@@@@@@@@@@

@ WARNING: POSSIBLE DNS SPOOFING DETECTED! @

@@@@@@@@@@@@@@@@@@@@@@@@@@@@@@@@@@@@@@@@@@@@@@@@@@@@@@@@@@@

The ECDSA host key for xxx.git.com has changed,

and the key for the corresponding IP address 123.xx.xx.xx is unknown.

This could either mean that DNS SPOOFING is happening or the IP address for the host and its host key have changed at the same time. @@@@@@@@@@@@@@@@@@@@@@@@@@@@@@@@@@@@@@@@@@@@@@@@@@@@@@@@@@@

@ WARNING: REMOTE HOST IDENTIFICATION HAS CHANGED! @

@@@@@@@@@@@@@@@@@@@@@@@@@@@@@@@@@@@@@@@@@@@@@@@@@@@@@@@@@@@

IT IS POSSIBLE THAT SOMEONE IS DOING SOMETHING NASTY!

Someone could be eavesdropping on you right now (man-in-the-middle attack)! It is also possible that a host key has just been changed.

The fingerprint for the ECDSA key sent by the remote host is SHA256:a3kdaf8Axxxxxxxxxxxxxx.

Please contact your system administrator. Add correct host key in /c/Users/xxxxx/.ssh/known_hosts to get rid of this message.

Offending ECDSA key in /c/Users/xxxxx/.ssh/known_hosts:1 ECDSA host key for xxx.git.com has changed and you have requested strict checking.

Host key verification failed. Could not read from remote repository. Please make sure you have the correct access rights and the repository exists.

How to Solve Warning: Permanently added ‘ 192.168.1.230′(RSA) to the list of known hosts.

Premise

When I was running SSH 192.168.1.230 remote on the newly installed red hat linux 5. X system, the following error occurred:

Warning: Permanently added ' 192.168.1.230'(RSA) to the list of known hosts.

Of course, I set the fixed IP first

1. Switch root and use: Su-

2. Delete all the lines in the/etc/hosts file that begin with #

3. Modify ifcfg-eth0 file. Change the bootproto item to bootproto = static

[root@localhost ~]# vi /etc/sysconfig/network-scripts/ifcfg-eth0

Add directly at the end of the file:

IPADDR=192.168.1.230
NETMASK=255.255.255.0
GATEWAY=192.168.1.1
DNS1=192.168.1.1
PREFIX=24

4. Save and restart


Solutions

After the restart of the system is completed, the first remote connection with SSH 192.168.1.230 in the Red Hat Linux 5. X system appears the above error.

Solution:

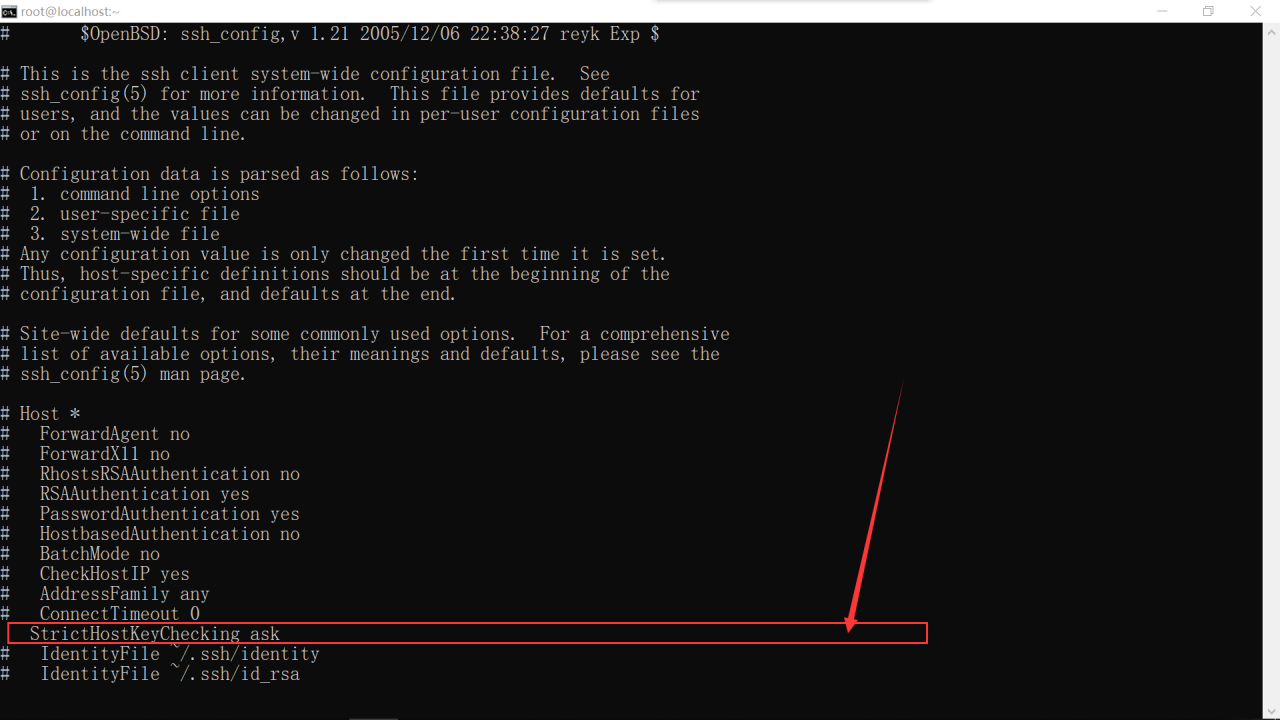
1. Switch to root and use: Su -. It is necessary to switch the root user here, because the/etc/SSH/SSH of ordinary users_ Under config, there may be no # stricthostkeychecking ask item.

2. vim /etc/ssh/ssh_ config。 Find # stricthostkeychecking ask and remove the comment directly. If not, suggest to change the ask to No

Here’s what I changed directly:

3. Save and exit.

How to Solve Linux:No route to host

If a distributed service is configured on the VPS, it can’t run. What should be configured is configured. What the hell. There are many in the log:

No route to host

However, I can ping, in order to exclude the cause of the program itself, I have to use the telnet command to test whether I can connect.

yum update
yum -y install telnet
telnet x.x.x.x 1111

Output results:

Trying x.x.x.x...
telnet: connect to address x.x.x.x: No route to host

Solution:

The following command has been executed and the port has been released. Why?

iptables -A INPUT -m state --state NEW -m tcp -p tcp --dport 1111 -j ACCEPT

Crawling around the Internet, I finally know why.

Wrong:

*filter
:INPUT ACCEPT [0:0]
:FORWARD ACCEPT [0:0]
:OUTPUT ACCEPT [4:512]
-A INPUT -m state --state RELATED,ESTABLISHED -j ACCEPT
-A INPUT -p icmp -j ACCEPT
-A INPUT -i lo -j ACCEPT
-A INPUT -p tcp -m state --state NEW -m tcp --dport 22 -j ACCEPT
-A INPUT -j REJECT --reject-with icmp-host-prohibited
-A INPUT -p tcp -m state --state NEW -m tcp --dport 1111 -j ACCEPT
-A FORWARD -j REJECT --reject-with icmp-host-prohibited
COMMIT

Correct:

*filter
:INPUT ACCEPT [0:0]
:FORWARD ACCEPT [0:0]
:OUTPUT ACCEPT [4:512]
-A INPUT -m state --state RELATED,ESTABLISHED -j ACCEPT
-A INPUT -p icmp -j ACCEPT
-A INPUT -i lo -j ACCEPT
-A INPUT -p tcp -m state --state NEW -m tcp --dport 22 -j ACCEPT
-A INPUT -p tcp -m state --state NEW -m tcp --dport 1111 -j ACCEPT
-A INPUT -j REJECT --reject-with icmp-host-prohibited
-A FORWARD -j REJECT --reject-with icmp-host-prohibited
COMMIT

Conclusion (all dry goods, because I really don’t know iptables)

Port release entry, please put in front of the following entry, and then modify, restart the firewall, everything is OK.

-A INPUT -j REJECT --reject-with icmp-host-prohibited
-A FORWARD -j REJECT --reject-with icmp-host-prohibited

How to Enable EPEL Repository for CentOS 7.x/6.x/5.x

What is EPEL

EPEL(Extra Packages for Enterprise Linux) is open source and free community based repository project from Fedora team which provides 100% high quality add-on software packages for Linux distribution including RHEL (Red Hat Enterprise Linux), CentOS, and Scientific Linux. Epel project is not a part of RHEL/Cent OS but it is designed for major Linux distributions by providing lots of open source packages like networking, sys admin, programming, monitoring and so on. Most of the epel packages are maintained by Fedora repo.

Why we use EPEL repository?

Provides lots of open source packages to install via Yum.

Epel repo is 100% open source and free to use.

It does not provide any core duplicate packages and no compatibility issues.

All epel packages are maintained by Fedora repo.

How To Enable EPEL Repository in RHEL/CentOS 7/6/5?

First, you need to download the file usingWgetand then install it usingRPMon your system to enable the EPEL repository. Use below links based on your Linux OS versions. (Make sure you must berootuser).

RHEL/CentOS 7 64 Bit

##RHEL/CentOS764-Bit###wgethttp://dl.fedoraproject.org/pub/epel/7/x86_64/e/epel-release-7-5.noarch.rpm
#rpm-ivhepel-release-7-5.noarch.rpm

RHEL/CentOS 6 32-64 bit

##RHEL/CentOS632-Bit###wgethttp://download.fedoraproject.org/pub/epel/6/i386/epel-release-6-8.noarch.rpm
#rpm-ivhepel-release-6-8.noarch.rpm##RHEL/CentOS664-Bit###wgethttp://download.fedoraproject.org/pub/epel/6/x86_64/epel-release-6-8.noarch.rpm
#rpm-ivhepel-release-6-8.noarch.rpm

RHEL/CentOS 5 32-64 bit

##RHEL/CentOS532-Bit###wgethttp://download.fedoraproject.org/pub/epel/5/i386/epel-release-5-4.noarch.rpm
#rpm-ivhepel-release-5-4.noarch.rpm##RHEL/CentOS564-Bit###wgethttp://download.fedoraproject.org/pub/epel/5/x86_64/epel-release-5-4.noarch.rpm
#rpm-ivhepel-release-5-4.noarch.rpm

RHEL/CentOS 4 32-64 bit

##RHEL/CentOS432-Bit###wgethttp://download.fedoraproject.org/pub/epel/4/i386/epel-release-4-10.noarch.rpm
#rpm-ivhepel-release-4-10.noarch.rpm##RHEL/CentOS464-Bit###wgethttp://download.fedoraproject.org/pub/epel/4/x86_64/epel-release-4-10.noarch.rpm
#rpm-ivhepel-release-4-10.noarch.rpm

How Do I Verify EPEL Repo?

You need to run the following command to verify that the EPEL repository is enabled. Once you ran the command you will see epel repository.

#yumrepolist

Sample Output

Loadedplugins:downloadonly,fastestmirror,priorities
Loadingmirrorspeedsfromcachedhostfile
*base:centos.aol.in
*epel:ftp.cuhk.edu.hk
*extras:centos.aol.in
*rpmforge:be.mirror.eurid.eu
*updates:centos.aol.in
ReducingCentOS-5Testingtoincludedpackagesonly
Finished
1469packagesexcludedduetorepositorypriorityprotections
repoidreponamestatus
baseCentOS-5-Base2,718+7epelExtraPackagesforEnterpriseLinux5-i3864,320+1,408extrasCentOS-5-Extras229+53
rpmforgeRedHatEnterprise5-RPMforge.net-dag11,251
repolist:19,075

How Do I Use EPEL Repo?

You need to useYUMcommand for searching and installing packages. For example we search forZabbixpackage using epel repo, lets see it is available or not under epel.

#yum--enablerepo=epelinfozabbix

Sample Output

AvailablePackages
Name:zabbix
Arch:i386
Version:1.4.7
Release:1.el5
Size:1.7MRepo:epelSummary:Open-sourcemonitoringsolutionforyourITinfrastructure
URL:http://www.zabbix.com/
License:GPL
Description:ZABBIXissoftwarethatmonitorsnumerousparametersofanetwork.

Let’s installZabbixpackage using epel repo option�enablerepo=epelswitch.

#yum--enablerepo=epelinstallzabbix

Note: The epel configuration file is located under/etc/yum.repos.d/epel.repo.

This way you can install as many as high standard open source packages usingEPELrepo.


Gitlab Access error Whoops, GitLab is taking too much time to respond

Gitlab is taking too much time to respond

gitlab access error whoops, gitlab is taking too much time to respond


problem positioning

problem location port 8080 is occupied:


Solutions

solution 01:

Kill the process occupying port 8080

Or uninstall the software that occupies port 8080

Modify the running port of the program occupying port 8080

Restart gitlab

solution 02:

external_ URL add an unused port

external_url 'http://192.168.45.146

can be changed to unused port:

external_url 'http://192.168.45.146:8899'

open the following three lines of comments
Default comments:

unicorn['port'] = 8088
postgresql['shared_buffers'] = "256MB"
postgresql['max_connections'] = 200


Restart gitlab, Done!

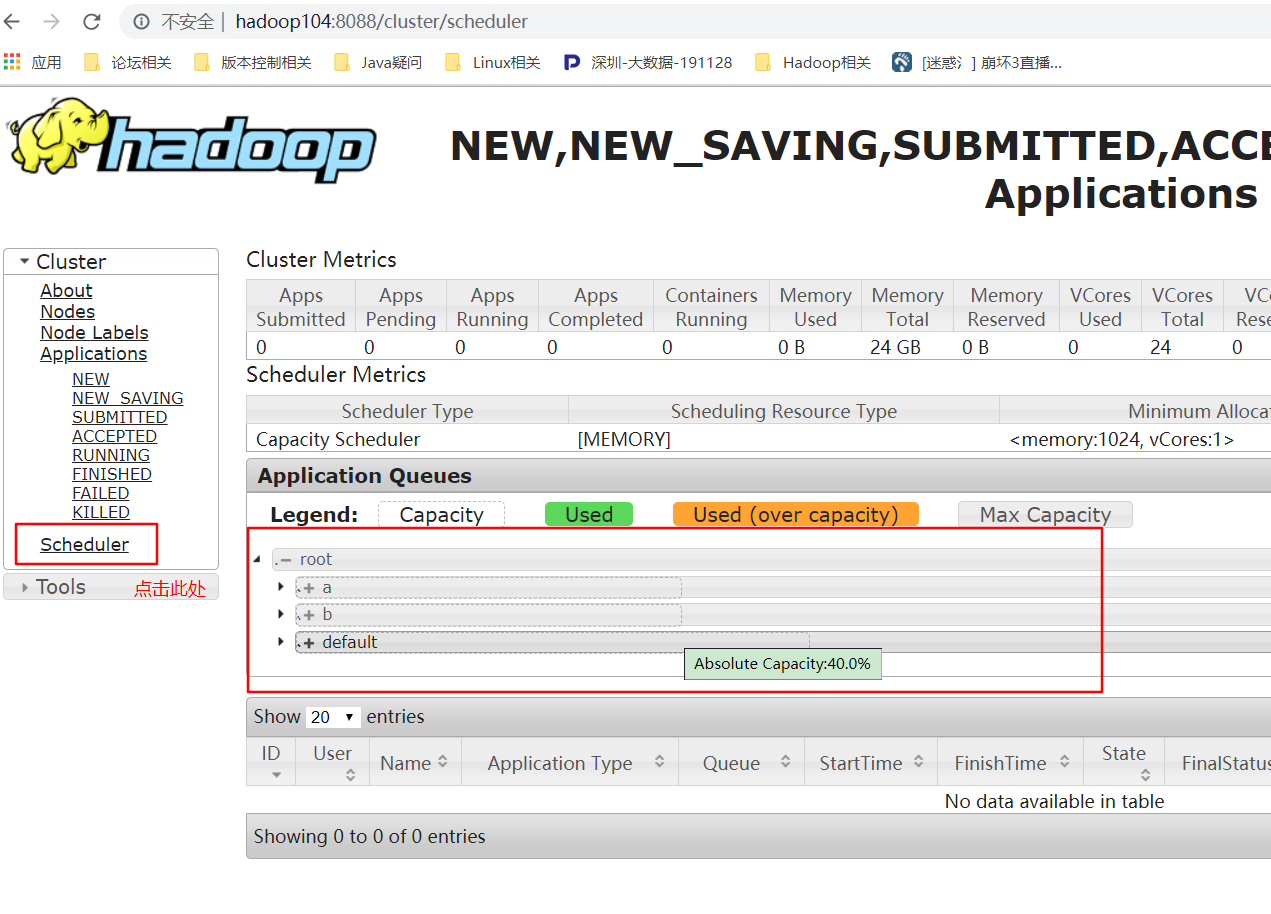
Yarn configures multi queue capacity scheduler

First configure the hadoop/etc/capacity-scheduler.xml file

<!--
  Licensed under the Apache License, Version 2.0 (the "License");
  you may not use this file except in compliance with the License.
  You may obtain a copy of the License at

    http://www.apache.org/licenses/LICENSE-2.0

  Unless required by applicable law or agreed to in writing, software
  distributed under the License is distributed on an "AS IS" BASIS,
  WITHOUT WARRANTIES OR CONDITIONS OF ANY KIND, either express or implied.
  See the License for the specific language governing permissions and
  limitations under the License. See accompanying LICENSE file.
-->
<configuration>

   <!-- The maximum number of jobs the capacity scheduler can hold-->
  <property&>
    <name&>yarn.scheduler.capacity.maximum-applications</name>
    <value&>10000</value>
    <description&>
      Maximum number of applications that can be pending and running.
    </description>
  </property>

  <!-- How much of the total resources of the queue can be occupied by the MRAppMaster process started in the current queue
        This parameter allows you to limit the number of submitted Jobs in the queue
  --&>
  <property&>
    <name&>yarn.scheduler.capacity.maximum-am-resource-percent</name&>
    <value&>0.1</value&>
    <description&>
      Maximum percent of resources in the cluster which can be used to run 
      application masters i.e. controls number of concurrent running
      applications.
    </description&>
  </property&>

  <!-- What strategy is used to calculate when allocating resources to a Job
  --&>
  <property>
    <name&>yarn.scheduler.capacity.resource-calculator</name>
    <value&>org.apache.hadoop.yarn.util.resource.DefaultResourceCalculator</value>
    <description>
      The ResourceCalculator implementation to be used to compare 
      Resources in the scheduler.
      The default i.e. DefaultResourceCalculator only uses Memory while
      DominantResourceCalculator uses dominant-resource to compare 
      multi-dimensional resources such as Memory, CPU etc.
    </description&>
  </property>

   <!-- What sub queues are in the root queue, new a, b queues are added----&>
  <property&>
    <name&>yarn.scheduler.capacity.root.queues</name>
    <value&>default,a,b</value>
    <description>
      The queues at the this level (root is the root queue).
    </description>
  </property>

  <!-- Percentage of capacity occupied by the default queue in the root queue
        The capacity of all subqueues must add up to 100
  --&>
  <property&>
    <name&>yarn.scheduler.capacity.root.default.capacity</name&>
    <value&>40</value&>
    <description&>Default queue target capacity.</description&>
  </property&>
  
  <property&>
    <name&>yarn.scheduler.capacity.root.a.capacity</name&>
    <value&>30</value&>
    <description&>Default queue target capacity.</description&>
  </property>
  
  <property>
    <name&>yarn.scheduler.capacity.root.b.capacity</name>
    <value&>30</value>
    <description&>Default queue target capacity.</description>
  </property>

    <!-- Limit percentage of users in the queue that can use the resources of this queue
  --&>
  <property&>
    <name&>yarn.scheduler.capacity.root.default.user-limit-factor</name&>
    <value&>1</value&>
    <description&>
      Default queue user limit a percentage from 0.0 to 1.0.
    </description&>
  </property&>
  
   <property&>
    <name&>yarn.scheduler.capacity.root.a.user-limit-factor</name&>
    <value&>1</value&>
    <description&>
      Default queue user limit a percentage from 0.0 to 1.0.
    </description&>
  </property&>
  
   <property&>
    <name&>yarn.scheduler.capacity.root.b.user-limit-factor</name&>
    <value&>1</value&>
    <description&>
      Default queue user limit a percentage from 0.0 to 1.0.
    </description&>
  </property&>

  <!-- The maximum value of the percentage of capacity occupied by the default queue in the root queue
  --&>
  <property&>
    <name&>yarn.scheduler.capacity.root.default.maximum-capacity</name&>
    <value&>100</value&>
    <description&>
      The maximum capacity of the default queue. 
    </description&>
  </property&>
  
   <property&>
    <name&>yarn.scheduler.capacity.root.a.maximum-capacity</name&>
    <value&>100</value&>
    <description&>
      The maximum capacity of the default queue. 
    </description&>
  </property&>
  
   <property&>
    <name&>yarn.scheduler.capacity.root.b.maximum-capacity</name&>
    <value&>100</value&>
    <description&>
      The maximum capacity of the default queue. 
    </description&>
  </property&>

    <!-- The state of the default queue in the root queue
  --&>
  <property&>
    <name&>yarn.scheduler.capacity.root.default.state</name&>
    <value&>RUNNING</value&>
    <description&>
      The state of the default queue. State can be one of RUNNING or STOPPED.
    </description&>
  </property&>
  
    <property&>
    <name&>yarn.scheduler.capacity.root.a.state</name&>
    <value&>RUNNING</value&>
    <description>
      The state of the default queue. State can be one of RUNNING or STOPPED.
    </description&>
  </property&>

  
    <property&>
    <name&>yarn.scheduler.capacity.root.b.state</name&>
    <value&>RUNNING</value&>
    <description&>
      The state of the default queue. State can be one of RUNNING or STOPPED.
    </description&>
  </property&>

  <!-- Restrict users who submit to the default queue, i.e. access rights--&>
  <property&>
    <name&>yarn.scheduler.capacity.root.default.acl_submit_applications</name&>
    <value&>*</value&>
    <description&>
      The ACL of who can submit jobs to the default queue.
    </description&>
  </property&>
  
  <property&>
    <name&>yarn.scheduler.capacity.root.a.acl_submit_applications</name&>
    <value&>*</value&>
    <description&>
      The ACL of who can submit jobs to the default queue.
    </description&>
  </property&>
  
  <property&>
    <name&>yarn.scheduler.capacity.root.b.acl_submit_applications</name&>
    <value&>*</value&>
    <description&>
      The ACL of who can submit jobs to the default queue.
    </description&>
  </property&>
<!-- set as admin--&>
  <property&>
    <name&>yarn.scheduler.capacity.root.default.acl_administer_queue</name&>
    <value&>*</value&>
    <description&>
      The ACL of who can administer jobs on the default queue.
    </description&>
  </property&>
  
  <property&>
    <name&>yarn.scheduler.capacity.root.a.acl_administer_queue</name&>
    <value&>*</value&>
    <description&>
      The ACL of who can administer jobs on the default queue.
    </description&>
  </property&>
  
  <property&>
    <name&>yarn.scheduler.capacity.root.b.acl_administer_queue</name&>
    <value&>*</value&>
    <description&>
      The ACL of who can administer jobs on the default queue.
    </description&>
  </property&>

  <property&>
    <name&>yarn.scheduler.capacity.node-locality-delay</name&>
    <value&>40</value&>
    <description&>
      Number of missed scheduling opportunities after which the CapacityScheduler 
      attempts to schedule rack-local containers. 
      Typically this should be set to number of nodes in the cluster, By default is setting 
      approximately number of nodes in one rack which is 40.
    </description&>
  </property&>

  <property&>
    <name&>yarn.scheduler.capacity.queue-mappings</name&>
    <value&></value&>
    <description>
      A list of mappings that will be used to assign jobs to queues
      The syntax for this list is [u|g]:[name]:[queue_name][,next mapping]*
      Typically this list will be used to map users to queues,
      for example, u:%user:%user maps all users to queues with the same name
      as the user.
    </description&>
  </property&>

  <property>
    <name&>yarn.scheduler.capacity.queue-mappings-override.enable</name&>
    <value&>false</value>
    <description>
      If a queue mapping is present, will it override the value specified
      by the user?This can be used by administrators to place jobs in queues
      that are different than the one specified by the user.
      The default is false.
    </description>
  </property>

</configuration>

Use the refresh command after configuration

yarn rmadmin -refreshQueues

Then enter the yarn interface of the cluster, and you can see that the queue becomes three

Then the next step is how to set the job to run in other queues

You know, it’s up to mapred to decide which queue the job runs on- default.xml It’s decided in the document

So you need to change this configuration:

1. If idea is used, it can be used

conf.set (” mapred.job.queue .name”, “a”);

This specifies that the job should be run in the a queue

2. If you run jar package on Linux, you can use

hadoop jar hadoop-mapreduce-examples-2.7.2.jar wordcount -D mapreduce.job.queuename=a/mapjoin/output3

As shown in the figure, the job switches to the a queue

How to Remove the Note: You have new mail in /var/spool/mail/root

The terminal often prompts you have new mail in/var/spool/mail/root after remote login

This prompt is that Linux will check all kinds of Linux status regularly to make a summary. After a period of time, it will send the summary information to root’s mailbox for viewing when necessary.

Generally, the content of the mail is just some normal system information or more important error reports. If you have installed MUTT, you can directly use this command to view the contents of the mail (log in with root first). If not, you can use cat/var/spool/mail/root (log in with root first).

View content:

[root@check1 ~]# cat /var/spool/mail/root

24 May 01:03:01 ntpdate[24397]: the NTP socket is in use, exiting

From [email protected] Thu May 24 01:04:01 2018
Return-Path: <[email protected]&>
X-Original-To: root
Delivered-To: [email protected]
Received: by check1.localdomain (Postfix, from userid 0)
id 5C6D2C0BB7; Thu, 24 May 2018 01:04:01 +0800 (CST)
From: [email protected] (Cron Daemon)
To: [email protected]
Subject: Cron <root@check1&> /usr/sbin/ntpdate 202.112.31.197
Content-Type: text/plain; charset=UTF-8
Auto-Submitted: auto-generated
X-Cron-Env: <LANG=en_US.UTF-8>
X-Cron-Env: <SHELL=/bin/bash>
X-Cron-Env: <PATH=/sbin:/bin:/usr/sbin:/usr/bin&>
X-Cron-Env: <MAILTO=root>
X-Cron-Env: <HOME=/>
X-Cron-Env: <LOGNAME=root&>
X-Cron-Env: <USER=root&>
Message-Id: <[email protected]>
Date: Thu, 24 May 2018 01:04:01 +0800 (CST)

24 May 01:04:01 ntpdate[24552]: the NTP socket is in use, exiting

You can also set to send this information to the administrator mailbox

Log analysis tool logwatch can analyze the log files of Linux, and automatically send mail to the relevant processing personnel, which can be customized. The mail function of logwatch is to send mail with the help of the mail server of the host system. The system needs to install mail server, such as sendmail, postfix, qmail, etc. the specific configuration is not described

Closing prompt:

[root@check1 ~]# echo "unset MAILCHECK">> /etc/profile
[root@check1 ~]# source /etc/profile

View:

[root@check1 ~]# ls -lth /var/spool/mail/
total 49M
-rw------- 1 root mail 49M Jul 4 13:43 root
-rw-rw---- 1 nginx mail 0 May 21 11:46 nginx
-rw-rw---- 1 zabbix mail 0 May 16 15:48 zabbix

Empty:

[root@check1 ~]# cat /dev/null > /var/spool/mail/root