Tag Archives: Linux

linux: How to Remove You have new mail /var/spool/mail/root

Sometimes when you enter the system, you are often prompted to have new mail in/var/spool/mail/root. If you find it annoying, you can solve it like this:

Command line input: echo “unset mail check” > > & etc/profile

It means [append unset mail check to the end of the file/etc/profile], and you will not be prompted after logging in again.

‘xterm’: unknown terminal type.

Question:

Enter the top command on Linux and report an error of ‘xterm’: unknown terminal type

Solution:

1. Copy the good/usr/share/terminfo to your own server

2. The value of terminfo environment variable is not set in the direction of export. Just set the path of terminfo variable to terminfo, such as terminfo =/usr/share/terminfo. You can execute the following command, or write the command to the profile

exportTERMINFO=/usr/share/terminfo

Over

You have new mail in / var / spool / mail / root prompt appears in Linux, and the solution to close the email prompt and clean up the content is given

you have new mail in/var/spool/mail/root prompt appears in Linux, and the solution to close the email prompt and clean up the content is

Reference article:

(1) You have new mail in/var/spool/mail/root prompt appears in Linux, and the solution to close the email prompt and clean up the content is given

(2) https://www.cnblogs.com/zdz8207/p/Linux-Centos-mail-root-sendmail.html

Let’s make a note.

ZABBIX agent active mode monitoring

zabbix_ When there are too many hosts on the server side, because the server side has to go to the client to collect data, ZABBIX will have serious performance problems

1. zabbix server web operation will be very stuck when the controlled side reaches a volume, easy to appear 502.
2. Layer breakage.
3. open too many processes, even if the number of items to reduce the number of machines to join a certain amount of problems later, so you can put the following two directions optimization considerations.
   Add proxy node or node mode to do distributed monitoring.
   Adjust Agentd to active mode.
Since the first option requires adding physical machines, try to use the second method to do the experiment.

1、 ZABBIX at the controlled end_ agentd.conf Profile adjustment

[root@iZ2ze275oaub8pm0zy4g6eZ ~]# egrep -v "^#|^$" /etc/zabbix/zabbix_agentd.conf 
PidFile=/var/run/zabbix/zabbix_agentd.pid
LogFile=/var/log/zabbix/zabbix_agentd.log
LogFileSize=0
 StartAgents=0               #Client agent mode, set to 0 to turn off passive and turn on active mode.
#Server=101.172.288.60 #This directive should be commented out if it is set to pure active mode.
ServerActive=101.172.288.60 ##server ip address to turn on active mode
Hostname=test_host ##important: hostname of the client, not configured to use hostname by default
 RefreshActiveChecks=120 ## The period for the controlled end to get monitoring items from the server, default 120s is enough
 BufferSize=200 #The size of space to store monitoring information on the controlled side
 Timeout=10 #Timeout time
Include=/etc/zabbix/zabbix_agentd.d/

#Note: Since zabbix_agentd on the controlled side does not listen to the local port, you cannot use netstat -lnupt to find out the port.

ZABBIX agent in pure active mode can only support monitoring items of ZABBIX agent (active) type. Next, we will adjust the monitoring items.

2、 Adjust monitoring template

It is recommended to clone a template OS Linux template to modify it

1, clone template

2

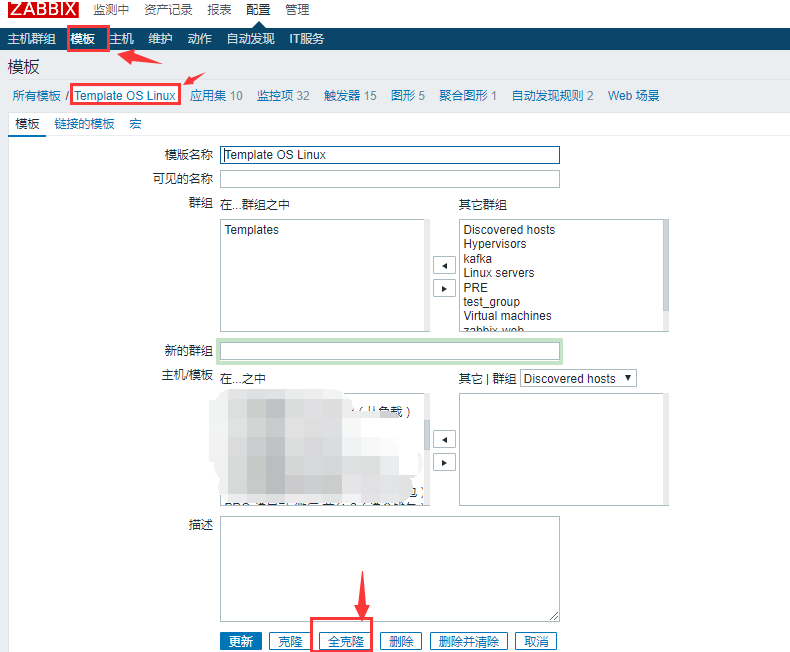
Click the template OS Linux template name, and then click full clone below.

2. Change the template name and add the template

2


3. Add link template


4, batch update monitoring items

4

Enter the template list, find the template you just added, and click the monitoring item.


Then select all monitoring items and find the batch update at the bottom

Then check the first “type” and select “ZABBIX client (active)”; finally, click “update” below.


5. Update monitoring items of auto discovery rule

Follow the above steps to change the automatically discovered monitor type to “active”


3、 Add host

1. Configure host

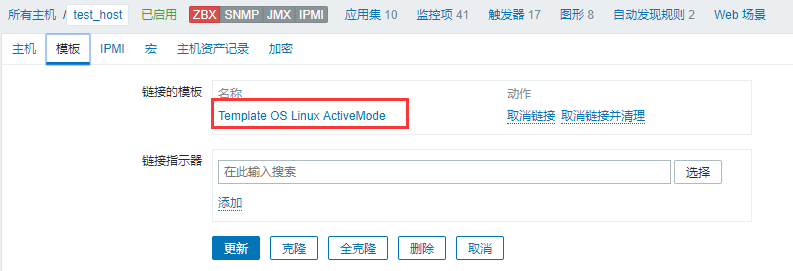
2. Add link template

Add the template you just configured

4、 Test data

Because the server is based on passive mode, if the server cannot directly connect to the passive mode port of the client, the light will not be on.

At that time, we could still get the data, so we couldn’t look at it in a passive way.

Solutions to RHEL 7 “there are no enabled repos”

Solutions to RHEL 7 “there are no enabled repos”

[ root@system1 Desktop]# yum install squid
Loaded plugins: langpacks, product-id, subscription-manager
This system is not registered to Red Hat Subscription Management. You can use subscription-manager to register.
There are no enabled repos.
Run “yum repolist all” to see the repos you have.
You can enable repos with yum-config-manager –enable <repo&>

See the above error, is your Yum warehouse problem, I now teach you to build a local Yum warehouse, so you can use it again!!

One of the most obvious ways is to use subscription manager and follow the instructions to register your rhel7 system to enable RHEL buy back. To do this, you need to pay or try a RedHat subscription. However, if you just want to play games and install software without the latest red hat subscription, you can install the downloaded red hat ISO image as the default local repository and install software. To enable your local repository, and thus overcome the second there are no enabled repos

[root@rhel7 ~]# mkdir /media/rhel7-repo-iso
[root@rhel7 ~]# mount /dev/cdrom /media/rhel7-repo-iso/
mount: /dev/sr0 is write-protected, mounting read-only

Now, when you install RHEL 7 ISO, please/media/RHEL 7-repo-iso/create a new Yum repo file, which contains the following contents:

[root@rhel7 ~]# vi /etc/yum.repos.d/RHEL_7_Disc.repo
[root@rhel7 ~]# cat /etc/yum.repos.d/RHEL_7_Disc.repo
[RHEL_7_Disc]
name=RHEL_7_x86_64_Disc
baseurl="file:///media/rhel7-repo-iso/"
gpgcheck=0

Once ready, check the new warehouse to enable it:

# yum repolist
Loaded plugins: product-id, subscription-manager
This system is not registered to Red Hat Subscription Management. You can use subscription-manager to register.
RHEL_7_Disc                                                                                                                                      | 4.1 kB  00:00:00     
(1/2): RHEL_7_Disc/group_gz                                                                                                                      | 134 kB  00:00:00     
(2/2): RHEL_7_Disc/primary_db                                                                                                                    | 3.4 MB  00:00:00     
repo id                                                                      repo name                                                                            status
RHEL_7_Disc                                                                  RHEL_7_x86_64_Disc                                                                   4,305
repolist: 4,305

(Note: there may be problems here. See the following supplement for solutions.)

You will now be able to install new software on unregistered RHEL 7 Linux machines. The disadvantage is that you don’t receive any new updates, which may create a security issue for your system. Also, when using the yum command:

This system is not registered to Red Hat Subscription Management. You can use subscription-manager to register.

Supplement:

Running Yum repolist may still display 0.

Yum puts the information about each warehouse in a separate file (in the directory/etc)/ yum.repos . d), when “there are no enabled repos” and “Yum repolistall” are still displayed as 0, then look at the directory/etc/ yum.repos Does the previously created configuration file exist under. D

RHEL_7_Disc.repo

If this configuration file does not exist, manually create and add it to the directory/etc/ yum.repos . D.

# cat /etc/yum.repos.d/RHEL_7_Disc.repo     Create this new file repo, then save it, and you can install other services again!
[rhel7]
name=rhel7
baseurl=file:///media/cdrom/
enabled=1
gpgcheck=0

Finally do a mount it, boot automatically start, convenient for later use

[ root@system1 ~]# vim /etc/fstab

#
# /etc/fstab
# Created by anaconda on Tue Jul 16 15:51:34 2019
#
# Accessible filesystems, by reference, are maintained under ‘/dev/disk’
# See man pages fstab(5), findfs(8), mount(8) and/or blkid(8) for more info
#
/dev/mapper/rhel-root/xfs defaults 1 1
UUID=9cead03a-2b93-4686-9b23-70cfb9264f3f /boot xfs defaults 1 2
/dev/mapper/RHEL swap swap defaults 0 0
/dev/CDROM/Andy iso9660 defaults 0 0// with this sentence, it’s good
~
~ finally.

Linux: apt get install build essential and Yum groupinstall “development tools”

Ubuntu’s apt install build essential

Function: to configure the Debian system compilation environment is to download and install the dependencies/packages that support the compilation of Debian packages, such as GCC.

Direct execution

#apt install build-essential

You can view log/var/log/apt after execution/ history.log , see the following.

Start-Date: 2019-06-08  07:54:24
Commandline: apt install build-essential
Requested-By: satou (1000)
Install: libmpc3:amd64 (1.1.0-1, automatic), libgcc-7-dev:amd64 (7.4.0-1ubuntu1~18.04, automatic), libmpx2:amd64 (8.3.0-6ubuntu1~18.04, automatic), linux-libc-dev:amd64 (4.15.0-51.55, automatic), libfakeroot:amd64 (1.22-2ubuntu1, automatic), libc6-dev:amd64 (2.27-3ubuntu1, automatic), cpp-7:amd64 (7.4.0-1ubuntu1~18.04, automatic), libalgorithm-diff-perl:amd64 (1.19.03-1, automatic), libalgorithm-merge-perl:amd64 (0.08-3, automatic), binutils:amd64 (2.30-21ubuntu1~18.04.1, automatic), cpp:amd64 (4:7.4.0-1ubuntu2.2, automatic), libitm1:amd64 (8.3.0-6ubuntu1~18.04, automatic), g++:amd64 (4:7.4.0-1ubuntu2.2, automatic), gcc-7-base:amd64 (7.4.0-1ubuntu1~18.04, automatic), gcc:amd64 (4:7.4.0-1ubuntu2.2, automatic), libcilkrts5:amd64 (7.4.0-1ubuntu1~18.04, automatic), libasan4:amd64 (7.4.0-1ubuntu1~18.04, automatic), libquadmath0:amd64 (8.3.0-6ubuntu1~18.04, automatic), libisl19:amd64 (0.19-1, automatic), build-essential:amd64 (12.4ubuntu1), libfile-fcntllock-perl:amd64 (0.22-3build2, automatic), binutils-x86-64-linux-gnu:amd64 (2.30-21ubuntu1~18.04.1, automatic), libstdc++-7-dev:amd64 (7.4.0-1ubuntu1~18.04, automatic), libtsan0:amd64 (8.3.0-6ubuntu1~18.04, automatic), libubsan0:amd64 (7.4.0-1ubuntu1~18.04, automatic), g++-7:amd64 (7.4.0-1ubuntu1~18.04, automatic), make:amd64 (4.1-9.1ubuntu1, automatic), fakeroot:amd64 (1.22-2ubuntu1, automatic), gcc-7:amd64 (7.4.0-1ubuntu1~18.04, automatic), liblsan0:amd64 (8.3.0-6ubuntu1~18.04, automatic), libgomp1:amd64 (8.3.0-6ubuntu1~18.04, automatic), manpages-dev:amd64 (4.15-1, automatic), binutils-common:amd64 (2.30-21ubuntu1~18.04.1, automatic), libc-dev-bin:amd64 (2.27-3ubuntu1, automatic), libbinutils:amd64 (2.30-21ubuntu1~18.04.1, automatic), libatomic1:amd64 (8.3.0-6ubuntu1~18.04, automatic), libcc1-0:amd64 (8.3.0-6ubuntu1~18.04, automatic), libdpkg-perl:amd64 (1.19.0.5ubuntu2.1, automatic), libalgorithm-diff-xs-perl:amd64 (0.04-5, automatic), dpkg-dev:amd64 (1.19.0.5ubuntu2.1, automatic)
Upgrade: gcc-8-base:amd64 (8.2.0-1ubuntu2~18.04, 8.3.0-6ubuntu1~18.04), libgcc1:amd64 (1:8.2.0-1ubuntu2~18.04, 1:8.3.0-6ubuntu1~18.04), libstdc++6:amd64 (8.2.0-1ubuntu2~18.04, 8.3.0-6ubuntu1~18.04)
End-Date: 2019-06-08  07:55:01

Note: (1) execute apt get update or apt update to update the package index before running, otherwise it may fail. (2) It is suggested to use apt instead of apt get

CentOS’s Yum - y groupinstall "development tools"

Function: to configure the compilation environment of CentOS is to download and install the package/dependency that enables CentOS to compile the source code package on the platform

You can use the command Yum grouplist to check which groups there are. Development tools is in available groups.

[root@localhost ~]# yum grouplist
Loaded plugins: fastestmirror, langpacks
There is no installed groups file.
Maybe run: yum groups mark convert (see man yum)
Loading mirror speeds from cached hostfile
 * base: mirrors.tuna.tsinghua.edu.cn
 * extras: mirrors.tuna.tsinghua.edu.cn
 * updates: mirrors.tuna.tsinghua.edu.cn
Available Environment Groups:
   Minimal Install
   Compute Node
   Infrastructure Server
   File and Print Server
   Basic Web Server
   Virtualization Host
   Server with GUI
   GNOME Desktop
   KDE Plasma Workspaces
   Development and Creative Workstation
Available Groups:
   Compatibility Libraries
   Console Internet Tools
   <span style="color: red;"&><Development Tools</span&>
   Graphical Administration Tools
   Legacy UNIX Compatibility
   Scientific Support
   Security Tools
   Smart Card Support
   System Administration Tools
   System Management
Done

Before executing Yum groupinstall "development tools" , execute Yum clean all to clear Yum cache and force Yum to read some configuration files again

[root@localghost ~]# yum clean all
Loaded plugins: fastestmirror, priorities, remove-with-leaves
Cleaning up Everything
Cleaning up list of fastest mirrors
[root@localghost ~]#

List of dependency packages included in the content tools

bison
byacc
cscope
ctags
cvs
diffstat
doxygen
flex
gcc
gcc-c++
gcc-gfortran
gettext
git
indent
intltool
libtool
patch
patchutils
rcs
redhat-rpm-config
rpm-build
subversion
swig
systemtap

Perform the demo

[root@localghost ~]# yum groupinstall "Development tools"


Install      86 Package(s)
Upgrade       0 Package(s)

Total download size: 77 M
Installed size: 234 M
Is this ok [y/N]:

Enter y to confirm the installation and N to cancel. Or Yum - y groupinstall "development tools" confirm in advance.

If you encounter the following error no packages in any requested group available to install or update , you need to configure the data source

cd /etc/yum.repos.d
sudo wget http://public-yum.oracle.com/public-yum-el5.repo
cd /etc/pki/rpm-gpg/
sudo wget https://public-yum.oracle.com/RPM-GPG-KEY-oracle-el5

Reference article

https://support.eapps.com/index.php?/Knowledgebase/Article/View/438/55/user -guide—installing-the-centos-development-tools-gcc-flex-etc

Expand

Lamp one click installation – in fact, with docker container technology, I feel that lamp (Linux + Apache + MySQL/MariaDB/percona + PHP) production environment is unnecessary
Kali Linux 2.0 U disk installation error, unable to load CD-ROM

2. In the process of installing with USB flash disk, the CD-ROM cannot be mounted. Your installation CD-ROM could’t be mounted.

3. After Google search, we should refer to foreign methods.

4. The solution is obtained and the test is successful. As follows:

In the process of installing kali2.0, the penultimate installation interface (that is, the interface for selecting language, setting user name, password, partition, etc.) will have an execute a shell option.

After selecting execute a shell, there will be a window to execute the shell.

Step 1: DF – M

At this point, you will see the mount information, and the bottom is/dev/XYZ/media

This is the USB device mounted to/media, resulting in the CD-ROM can not be mounted.

Step 2: umount/media

The above foreign solution will continue to mount/dev/XYZ/CD-ROM

However, the local test does not need to be mounted by itself, and the installation program will be mounted by itself. It will cause grub installation failure later.

Step 3: exit

After exiting the command window, continue the installation.

The problem of “no packages” in centos7

“No packages in any requested group available to install or update” in centos7

Using Yum to install X-Windows today, the following error was reported:

sudo  yum groups install "X Window System"

Loading mirror speeds from cached hostfile
 * base: mirrors.shu.edu.cn
 * epel: mirror.dmmlabs.jp
 * extras: mirrors.cn99.com
 * updates: mirrors.cn99.com
Maybe run: yum groups mark install (see man yum)
No packages in any requested group available to install or update

It can’t be installed. It’s invalid. The command is correct. Go to the official website to find out the reason. You can see why Yum groupinstall “package group name” is failing on RHEL 7 with error “there is no installed groups file” on the official website, which exactly describes this problem.

It turns out that after 7, the default options are not installed, so you need to add the default items yourself. The solution is: Yum groupinstall "office suite and productivity" -- setopt = group_ package_ types=mandatory,default,optional

Add — setopt = group after_ package_ Types = mandatory, default, optional

sudo  yum groupinstall "X Window System"  --setopt=group_package_types=mandatory,default,optional

Install CentOS development tools

Mirror source switch


First switch the yum source to the domestic image source
backup the original source image file

# cp /etc/yum.repos.d/CentOS-Base.repo /etc/yum.repos.d/CentOS-Base.repo.backup

Download the new CentOS- Base.repo

#wget -O /etc/yum.repos.d/CentOS-Base.repo http://mirrors.aliyun.com/repo/Centos-7.repo

If WGet is not installed, you can use ?Yum install WGet to execute CentOS after installation- Base.repo Installation of
on /etc/ yum.repos .d/CentOS- Media.repo source file configuration file, changed to invalid

enable=0

Yum cache generation

#yum clean all
#yum makecache
#yum update

CentOS development tools installation

yum groupinstall "Development Libraries"

yum groupinstall "Development Tools"

yum install ncurses-devel zlib-devel texinfo gtk+-devel gtk2-devel qt-devel tcl-devel tk-devel libX11-devel kernel-headers kernel-devel