Tag Archives: Linux

Git Warning: LF will be replaced by CRLF | fatal: CRLF would be replaced by LF

These two errors were encountered because of GIT’s newline check function.

core.safecrlf

Git provides a newline checking function( core.safecrlf ), you can check whether the file is mixed with different styles of newline at the time of submission. The options for this function are as follows:

false - Does not do any checking
warn - check on commit and warn
true - check at commit time and reject commit if a mixup is found

The most stringent true option is recommended.

core.autocrlf
if you are writing programs on windows, or if you are working with other people who are programming on windows and you are on other systems, you may encounter end of line problems. This is because Windows uses carriage return and line feed to end a line, while Mac and Linux only use line feed. Although this is a small problem, it can greatly disrupt cross platform collaboration.

Git can automatically convert line terminator CRLF to LF when you submit, and LF to CRLF when you check out code. use core.autocrlf To turn on this function. If it is on a Windows system, set it to true, so that when checking out the code, lf will be converted to CRLF:

$ git config --global core.autocrlf true

Linux or MAC systems use lf as the line terminator, so you don’t want git to do automatic conversion when checking out a file; when a file with CRLF as the line terminator is accidentally introduced, you definitely want to fix it core.autocrlf Set to input to tell git to convert CRLF to LF when submitting and not when checking out

$ git config --global core.autocrlf input

in this way, CRLF will be retained in check-out files on Windows systems, and LF will be retained on MAC and Linux systems, including warehouses.

If you are a Windows programmer and are developing a project that only runs on windows, you can set false to cancel this function and record the carriage return in the library

$ git config --global core.autocrlf false
How to Solve Warning: Permanently added ‘ 192.168.1.230′(RSA) to the list of known hosts.

Premise

When I was running SSH 192.168.1.230 remote on the newly installed red hat linux 5. X system, the following error occurred:

Warning: Permanently added ' 192.168.1.230'(RSA) to the list of known hosts.

Of course, I set the fixed IP first

1. Switch root and use: Su-

2. Delete all the lines in the/etc/hosts file that begin with #

3. Modify ifcfg-eth0 file. Change the bootproto item to bootproto = static

[root@localhost ~]# vi /etc/sysconfig/network-scripts/ifcfg-eth0

Add directly at the end of the file:

IPADDR=192.168.1.230
NETMASK=255.255.255.0
GATEWAY=192.168.1.1
DNS1=192.168.1.1
PREFIX=24

4. Save and restart


Solutions

After the restart of the system is completed, the first remote connection with SSH 192.168.1.230 in the Red Hat Linux 5. X system appears the above error.

Solution:

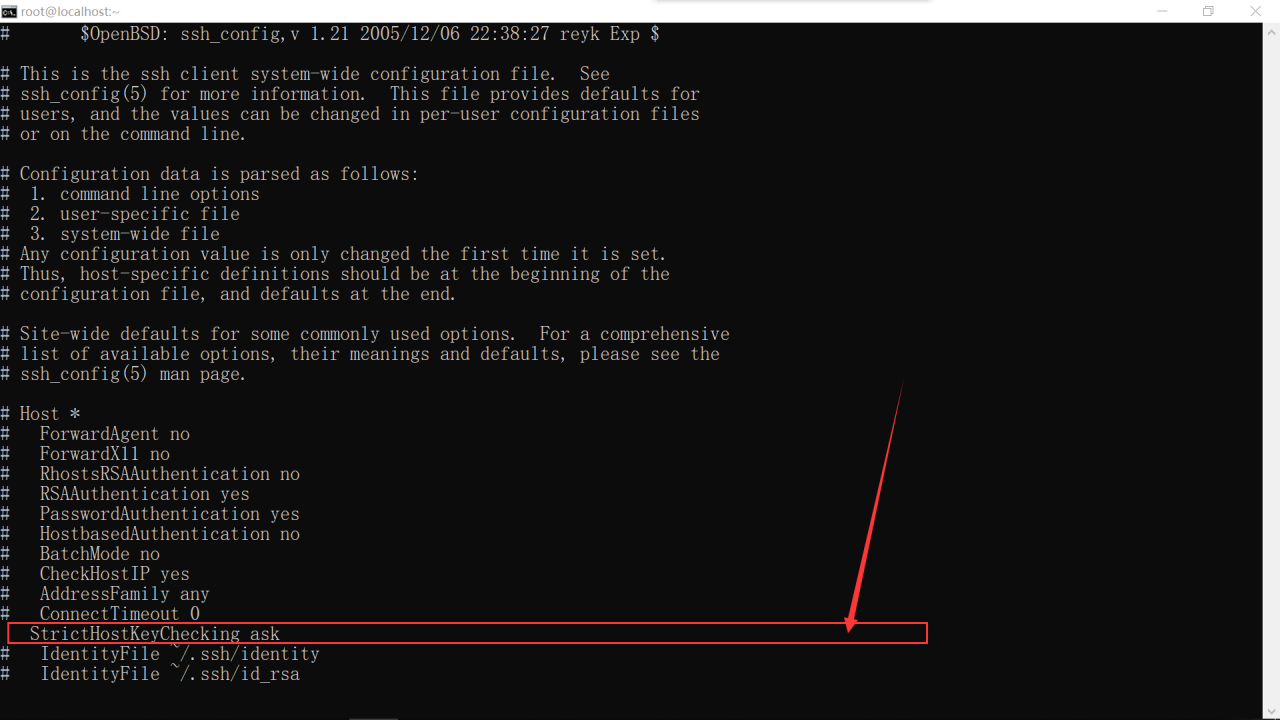
1. Switch to root and use: Su -. It is necessary to switch the root user here, because the/etc/SSH/SSH of ordinary users_ Under config, there may be no # stricthostkeychecking ask item.

2. vim /etc/ssh/ssh_ config。 Find # stricthostkeychecking ask and remove the comment directly. If not, suggest to change the ask to No

Here’s what I changed directly:

3. Save and exit.

Rust’s introduction to Hello world | webassembly

As wechat does not support external links, you can read the original at the end of the article for more resources

In the previous article, we introduced

Learn the frequently asked questions of webassembly

.

Now let’s start with rust.

Rust is the best language to write webassembly applications today.

For the source code repo used in this article, please click:

https://github.com/second-state/wasm-learning/tree/master/rust

Although webassembly supports many programming languages, rust has the best tools so far.

In the past four years, rust has been selected as the most popular programming language by stackoverflow users, and is one of the fastest growing programming languages.

Rust is as versatile and efficient as C, but because of its compiler design, rust is much safer than C.

Like C, rust has a learning curve.

In this tutorial, I’ll help you get started with the rust programming language.

You can use online resources, such as

This book

Learn more about the rust language.

Install rust

In a typical Linux system, run the following instructions, install the rust compiler and the cargo tool to create a management system.


$ sudo apt-get update
$ sudo apt-get -y upgrade

$ curl --proto '=https' --tlsv1.2 -sSf https://sh.rustup.rs | sh
$ source $HOME/.cargo/env

Hello World

The source code of this demo application can be downloaded as follows:

https://github.com/second-state/wasm-learning/blob/master/rust/hello.md

First, let’s use

cargo

Create a new project.


$ cargo new hello
Created binary (application) `hello` package
$ cd hello

stay

src/ main.rs

In

main ()

Function, which is the entry point to execute the rust application.

Src/main. Rs

The contents of the document are as follows.

The code just prints a string “Hello world” to standard output.


fn main() {
println!(“Hello, world!”);
}

Next, create a binary executable for your machine.


$ cargo build --release
Compiling hello v0.1.0 (/home/ubuntu/wasm-learning/rust/hello)
Finished release [optimized] target(s) in 0.22s

You can now run your first rust program and see “Hello world” on the console

You can now run your first rust program and see “Hello world” on the console


$ target/release/hello
Hello, world!

Interaction

The source code for this demo can be found here

https://github.com/second-state/wasm-learning/blob/master/rust/cli.md .

Again, let’s use cargo to create a new project.


$ cargo new cli
Created binary (application) `cli` package
$ cd cli

Src/ main.Rs

The contents of the document are as follows.

env::args()

Will save the string value that we pass from the command line when we execute the program.

Also note here that we first create a rust string and then attach more string references to it.

Why do we have to join string references instead of string values?That’s why rust makes programs safe. click

here

Learn more.


use std::env;

fn main() {
let args: Vec<String&> = env::args().collect();
println!("{}", String::from("Hello ") + &args[1]);
}

Next, create a QR code executable for your machine.


$ cargo build --release

You can run the program and pass in a piece of command line code


$ target/release/cli Rust
Hello Rust

What about webassembly?

Now we’ve learned how to create a local executable program from the rust source code.

Executable programs can only run on the build computer and may not be safe.

In the next tutorial, we will show you:

How to build webassembly bytecode program from rust source code instead of local executable file.

How to interact with webassembly program through web browser instead of tedious command line.

Related reading

String in webassembly

It only takes 5 minutes to teach you how to write and execute a rust + webassembly program

Wechat does not support external links. Click to read the original text to view the article resources

this article is from WeChat official account – WebAssembly Chinese community (webassemblywasm).
In case of infringement, please contact [email protected] Delete.
This article participates in the “OSC source creation program”. You are welcome to join and share.

Unexpected pit of webpack command not found – starting from node

Write a note for yourself:

For a long time

Do the following

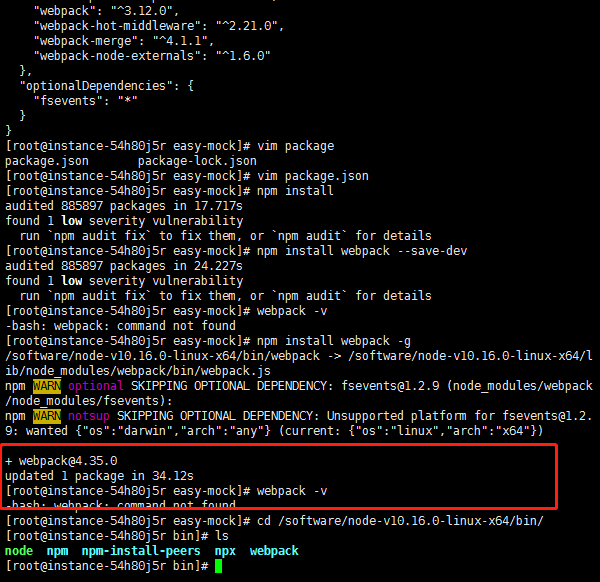
npm install webpack -g

Because Xiaobai doesn’t understand the principle, he executed it many times, and the result is still as the title

I searched the Internet for a long time and tried various methods

Obviously, the installation is successful

A sudden awakening

When installing node, the compiled file is used

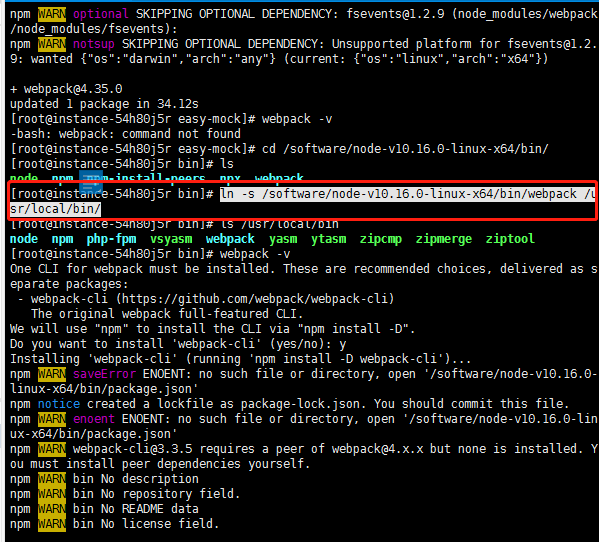
Then use the soft link ln to the system bin to configure the environment

Results when webpack was installed, although the installation was successful, it went to the bin of node instead of the system environment variable

So it failed all the time.

The simplest solution: make a link to the system environment.

In addition: remember that when you configure the node next time, you can directly put it in the location of the system environment variable $path, and there won’t be so many things.

This is also according to the online installation tutorial, operation, do not understand the principle of the pit

ln -s /software/node-v10.16.0-linux-x64/bin/webpack /usr/local/bin/

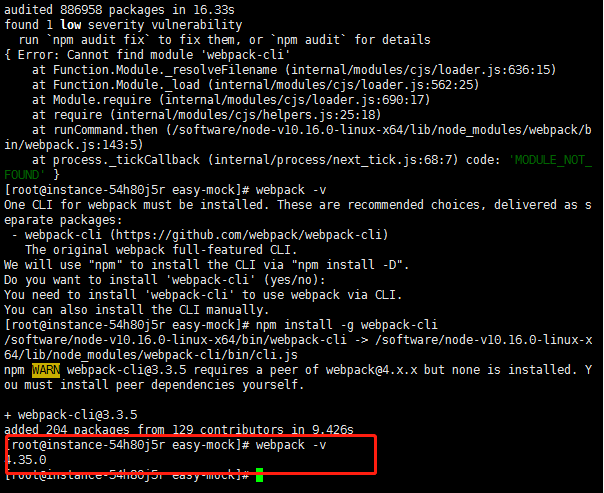
npm install -g webpack-cli

How to Solve Linux:No route to host

If a distributed service is configured on the VPS, it can’t run. What should be configured is configured. What the hell. There are many in the log:

No route to host

However, I can ping, in order to exclude the cause of the program itself, I have to use the telnet command to test whether I can connect.

yum update
yum -y install telnet
telnet x.x.x.x 1111

Output results:

Trying x.x.x.x...
telnet: connect to address x.x.x.x: No route to host

Solution:

The following command has been executed and the port has been released. Why?

iptables -A INPUT -m state --state NEW -m tcp -p tcp --dport 1111 -j ACCEPT

Crawling around the Internet, I finally know why.

Wrong:

*filter
:INPUT ACCEPT [0:0]
:FORWARD ACCEPT [0:0]
:OUTPUT ACCEPT [4:512]
-A INPUT -m state --state RELATED,ESTABLISHED -j ACCEPT
-A INPUT -p icmp -j ACCEPT
-A INPUT -i lo -j ACCEPT
-A INPUT -p tcp -m state --state NEW -m tcp --dport 22 -j ACCEPT
-A INPUT -j REJECT --reject-with icmp-host-prohibited
-A INPUT -p tcp -m state --state NEW -m tcp --dport 1111 -j ACCEPT
-A FORWARD -j REJECT --reject-with icmp-host-prohibited
COMMIT

Correct:

*filter
:INPUT ACCEPT [0:0]
:FORWARD ACCEPT [0:0]
:OUTPUT ACCEPT [4:512]
-A INPUT -m state --state RELATED,ESTABLISHED -j ACCEPT
-A INPUT -p icmp -j ACCEPT
-A INPUT -i lo -j ACCEPT
-A INPUT -p tcp -m state --state NEW -m tcp --dport 22 -j ACCEPT
-A INPUT -p tcp -m state --state NEW -m tcp --dport 1111 -j ACCEPT
-A INPUT -j REJECT --reject-with icmp-host-prohibited
-A FORWARD -j REJECT --reject-with icmp-host-prohibited
COMMIT

Conclusion (all dry goods, because I really don’t know iptables)

Port release entry, please put in front of the following entry, and then modify, restart the firewall, everything is OK.

-A INPUT -j REJECT --reject-with icmp-host-prohibited
-A FORWARD -j REJECT --reject-with icmp-host-prohibited

OS X: equivalent to WGet of Linux

How to execute HTTP get from un * x shell script on OS X system?(installing third-party software is not an option because it has to run on many different systems that I have no control over.).

For example, if I start mercurial server locally to execute Hg service:

... $ hg serve 

Then, from Linux with the WGet command, I do a WGet:

... $  wget http://127.0.0.1:8000
--2010-12-31 22:18:25--  http://127.0.0.1:8000/
Connecting to 127.0.0.1:8000... connected.
HTTP request sent, awaiting response... 200 Script output follows
Length: unspecified [text/html]
Saving to: `index.html

On the terminal where I started the “Hg serve” command, I can see that HTTP get succeeded

127.0.0.1 - - [30/Dec/2010 22:18:17] "GET/HTTP/1.0" 200 -

So on Linux, one way to perform HTTP get from a shell script is to use WGet (if the command is installed of course).

Is there any other way to do the equivalent of a WGet?In particular, I’m looking for something to run on OS X installations.


#1st floor

brew install wget

Homebrew is the package manager of OSX, similar to yum, apt get, choco, emergency, etc. Note that you also need to install Xcode and command line tools. In fact, anyone who uses the command line in OSX will want to install these things.

If you can’t or don’t want to use homemade software, you can also:

Manually install WGet:

curl -# "http://ftp.gnu.org/gnu/wget/wget-1.17.1.tar.xz" -o "wget.tar.xz"
tar xf wget.tar.xz
cd wget-1.17.1
./configure --with-ssl=openssl -with-libssl-prefix=/usr/local/ssl && make -j8 && make install

Alternatively, use the bash alias:

function _wget() { curl "${1}" -o $(basename "${1}") ; };
alias wget='_wget'

#2nd floor

This is the WGet of Mac OS X equivalent to Linux.

For Linux, such as Ubuntu on an AWS instance, use:

wget http://example.com/textfile.txt

For local development on MAC, please use:

curl http://example.com/textfile.txt -o textfile.txt

The – O parameter is required on a Mac to output to a file instead of the screen. Specify a different destination name to rename the downloaded file.

Use uppercase – O and WGet to rename. Lowercase – O specifies the output file of the transfer log.


#3rd floor

1) on your Mac type

nano /usr/bin/wget

2) paste the following

#!/bin/bash
curl -L $1 -o $2

3) close and make it executable

chmod 777 /usr/bin/wget

That’s all.


#4th floor

Curl’s mode is almost equal to the default WGet.

curl -O <url&>

It’s like

wget <url&>

And, if you like, you can add it to. Bashrc:

alias wget='curl -O'

It’s not 100% compatible, but it works with the most common WGet usage (IMO)


#5th floor

You can build WGet on a Mac machine or install it directly using macports.

sudo port install wget 

It can be like glamour, and you can update to the latest version as soon as possible. Ports are more stable than beer, but the recipe and number of ports are much less.

You can choose from https://www.macports.org/install.php to install macports, you can download the . PKG file and install it.

Two solutions to [Linux] WGet: command not found

speed

following:

http://mirrors.163.com/centos/6.8/os/x86 64/packages/wget-1.12-8.el6.x86 64.rpm I don’t know.

implement

rpm -ivh wget-1.12-8.el6.x86_64.rpm

2. Yum install

yum -y install wget